A2 Pulley Manual for Climbers - Injury Information & Rehabilitation
UPDATE: New Version Available Episode 167: Ultimate A2 Pulley Injury Recovery Guide
Hooper’s Beta Ep. 46
Intro
The A2 is one of the most important pulleys in our hands. It’s what allows us to hold onto those tiny edges without the other parts of our finger essentially just coming apart. But how? It’s just a piece of tissue holding another tissue in place. And why is tearing your A2 the most ubiquitous injury in climbing?
In this mega video/manual we’re going to go in-depth into the A2 pulley. We will talk about anatomy, the causes of a tear and how to test yourself for it, the things you can do to treat it as well as ways of preventing it from happening in the first place and in the future, and the thing everyone wants to know: how soon can you get back to climbing.
To fully understand this injury and how we can heal from it we need to get our bearings, anatomically speaking. So to start off we’re going to take a look at our fingers and how they actually work, which in turn will make the testing and treatments sections make a lot more sense.
Let’s dive in.
Anatomy
The flexor digitorum profundus (FDP) runs from the proximal ¾’s of the medial and anterior surfaces of the ulna and interosseous membrane to the base of distal phalanges of the 2nd through 5th digits. On top of this is the flexor digitorum superficialis (FDS) which runs a similar path but stops just short on the proximal portion of the middle phalanx.
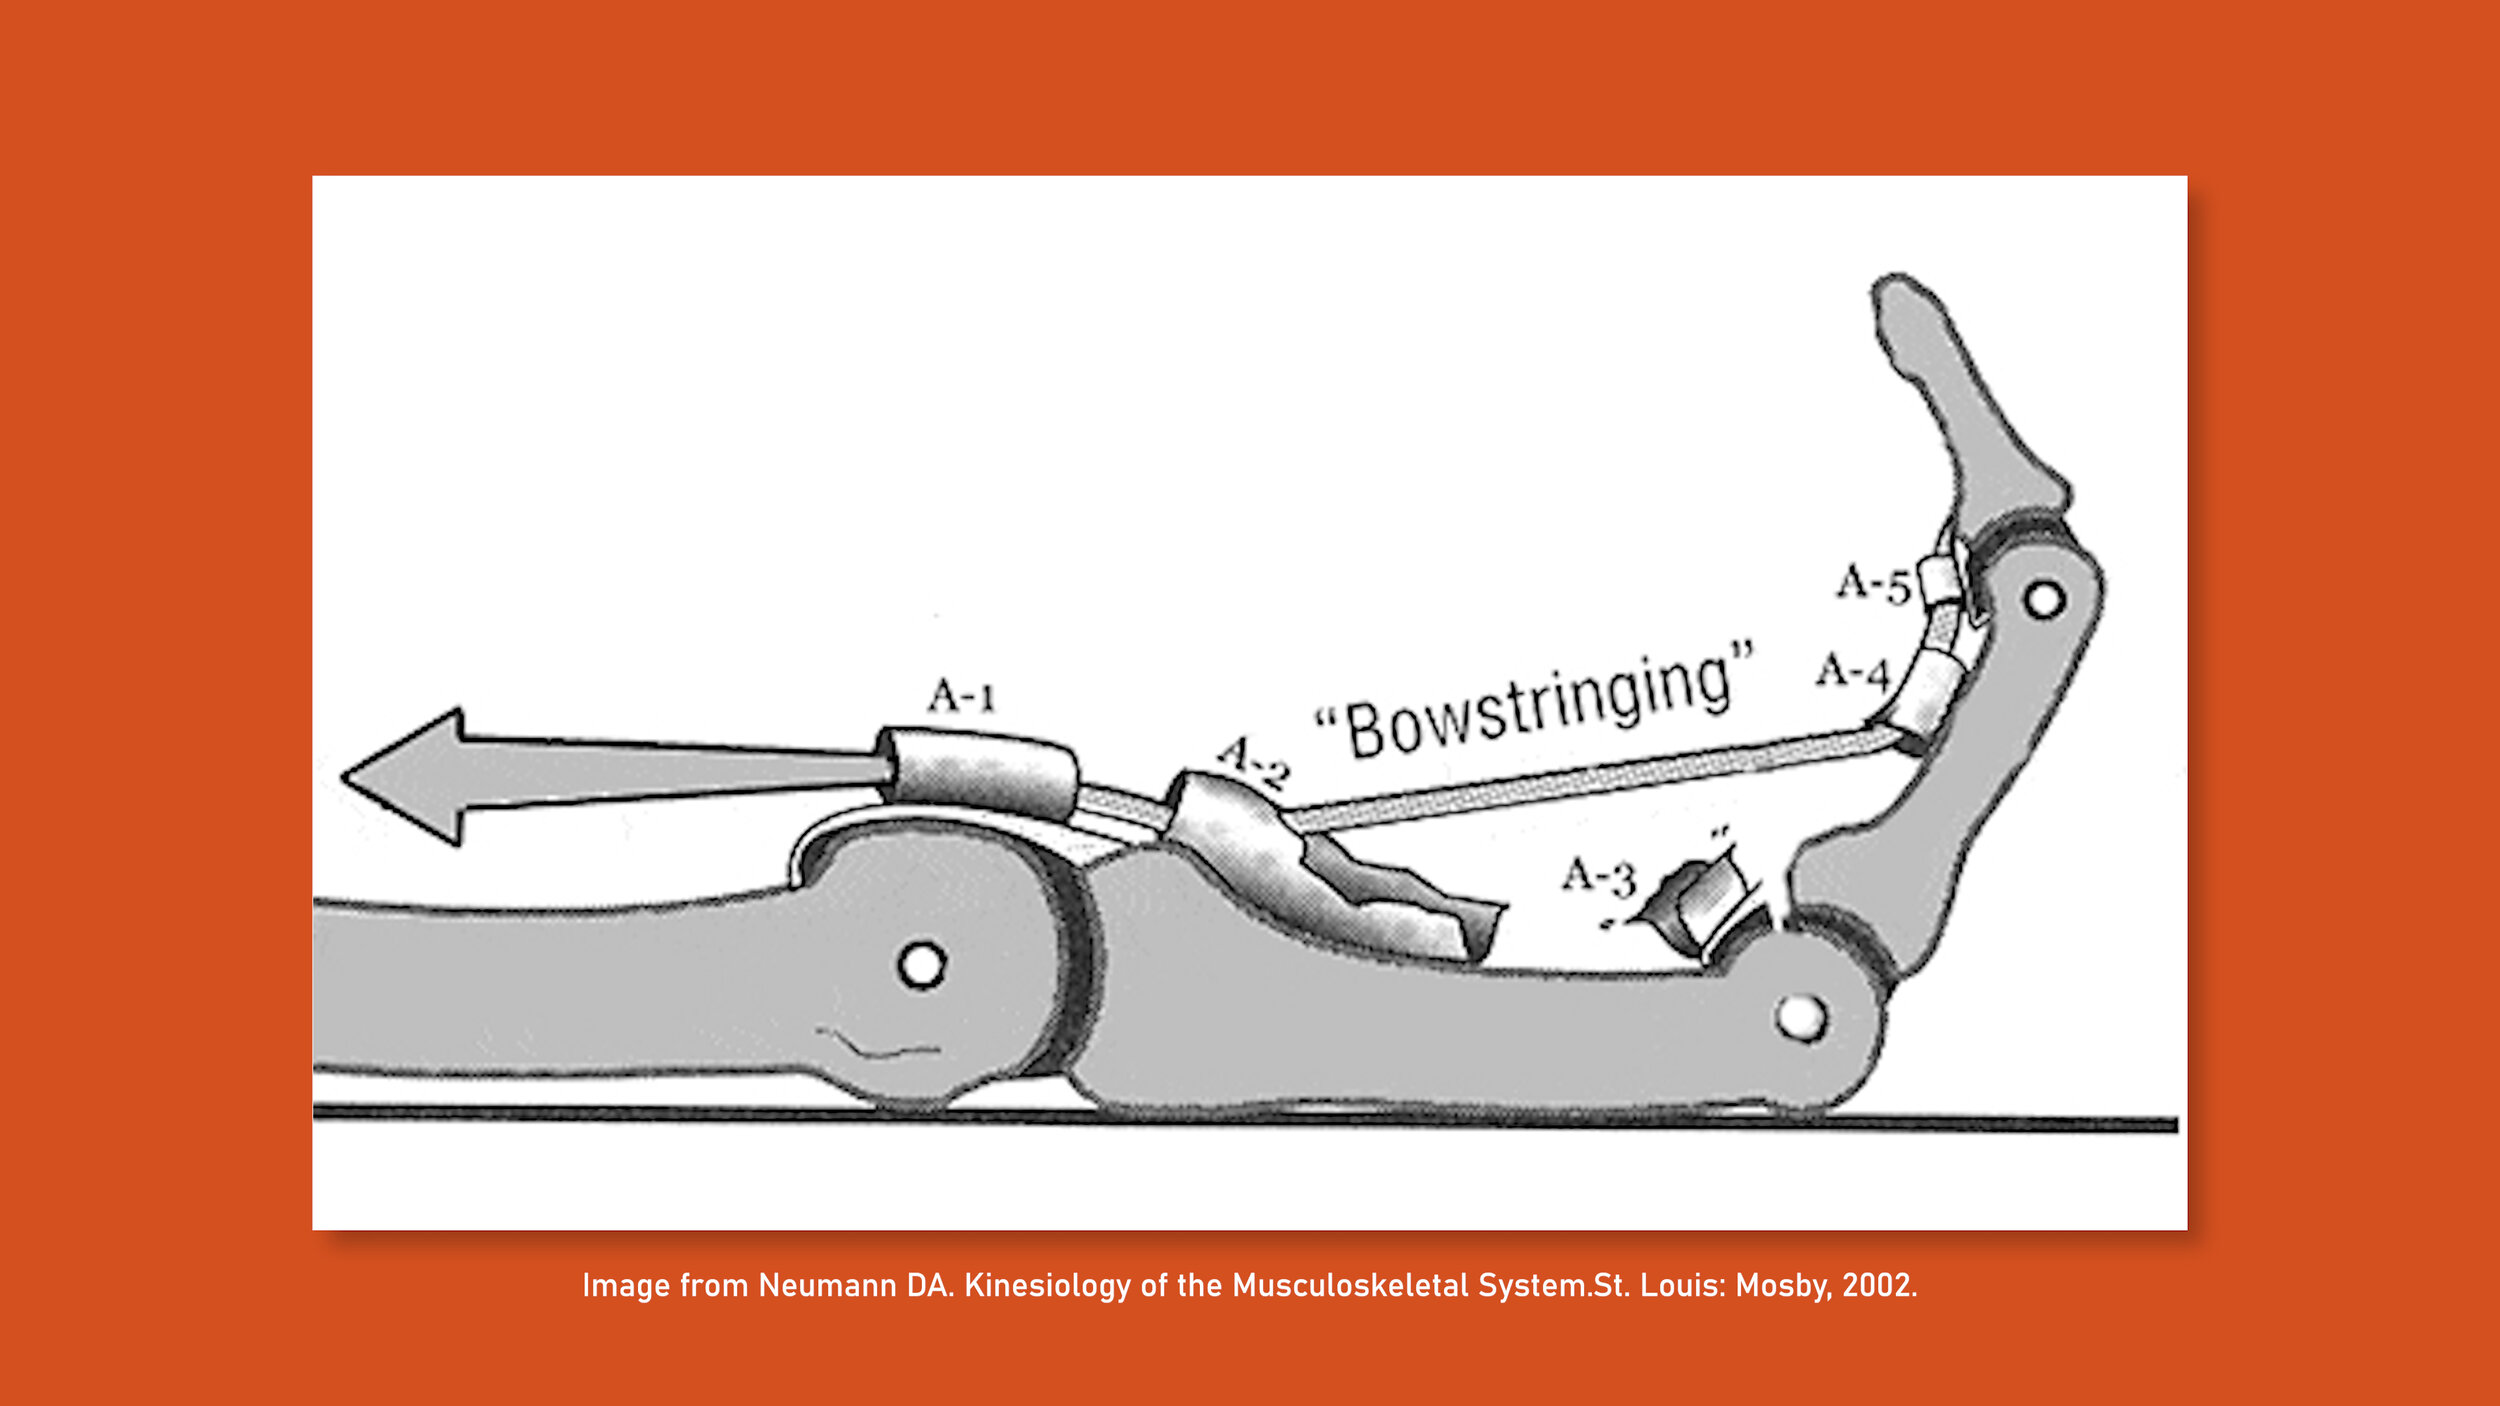
When the FDP and FDS muscles contract, the tendons retract, which causes the finger to flex, just like if there was a string attached to the tip of the finger.
Now, what keeps the string, or tendon in this case, from bowstringing out away from the bones? That’s where your pulleys come into play. The A2 is one of five pulleys in each finger that holds the flexor tendon tight up against the bones. So when you flex your finger, the tendon slides back and forth under the pulley while the pulleys keep it in position.
So what happens when we actually hold something with our fingers, or in other words, apply force to them? I mean I don’t know about you guys but usually when I flex my fingers I’m not just doing it in the air for no reason.
Well the more load you place on your fingers, the more tensile force your flexor tendon has to withstand in order to keep your finger flexed and not allow it to open up.
Now remember that the pulleys are the ones keeping those flexor tendons tight up against the bones so it doesn’t spring out like a bowstring. So as you can imagine, if you continue to increase the force on the flexor tendons (in other words, put more weight on your fingers), you're going to be increasing the force on the pulleys.
Now you might be thinking, “Okay, so if you put too much force on your pulleys, you get injured. Simple!” And you’d be right, but there’s a bit more to it than that. So let’s move onto the next segment and I’ll explain, because what causes an A2 injury is actually really important for understanding how to avoid injuring it again.

Causes
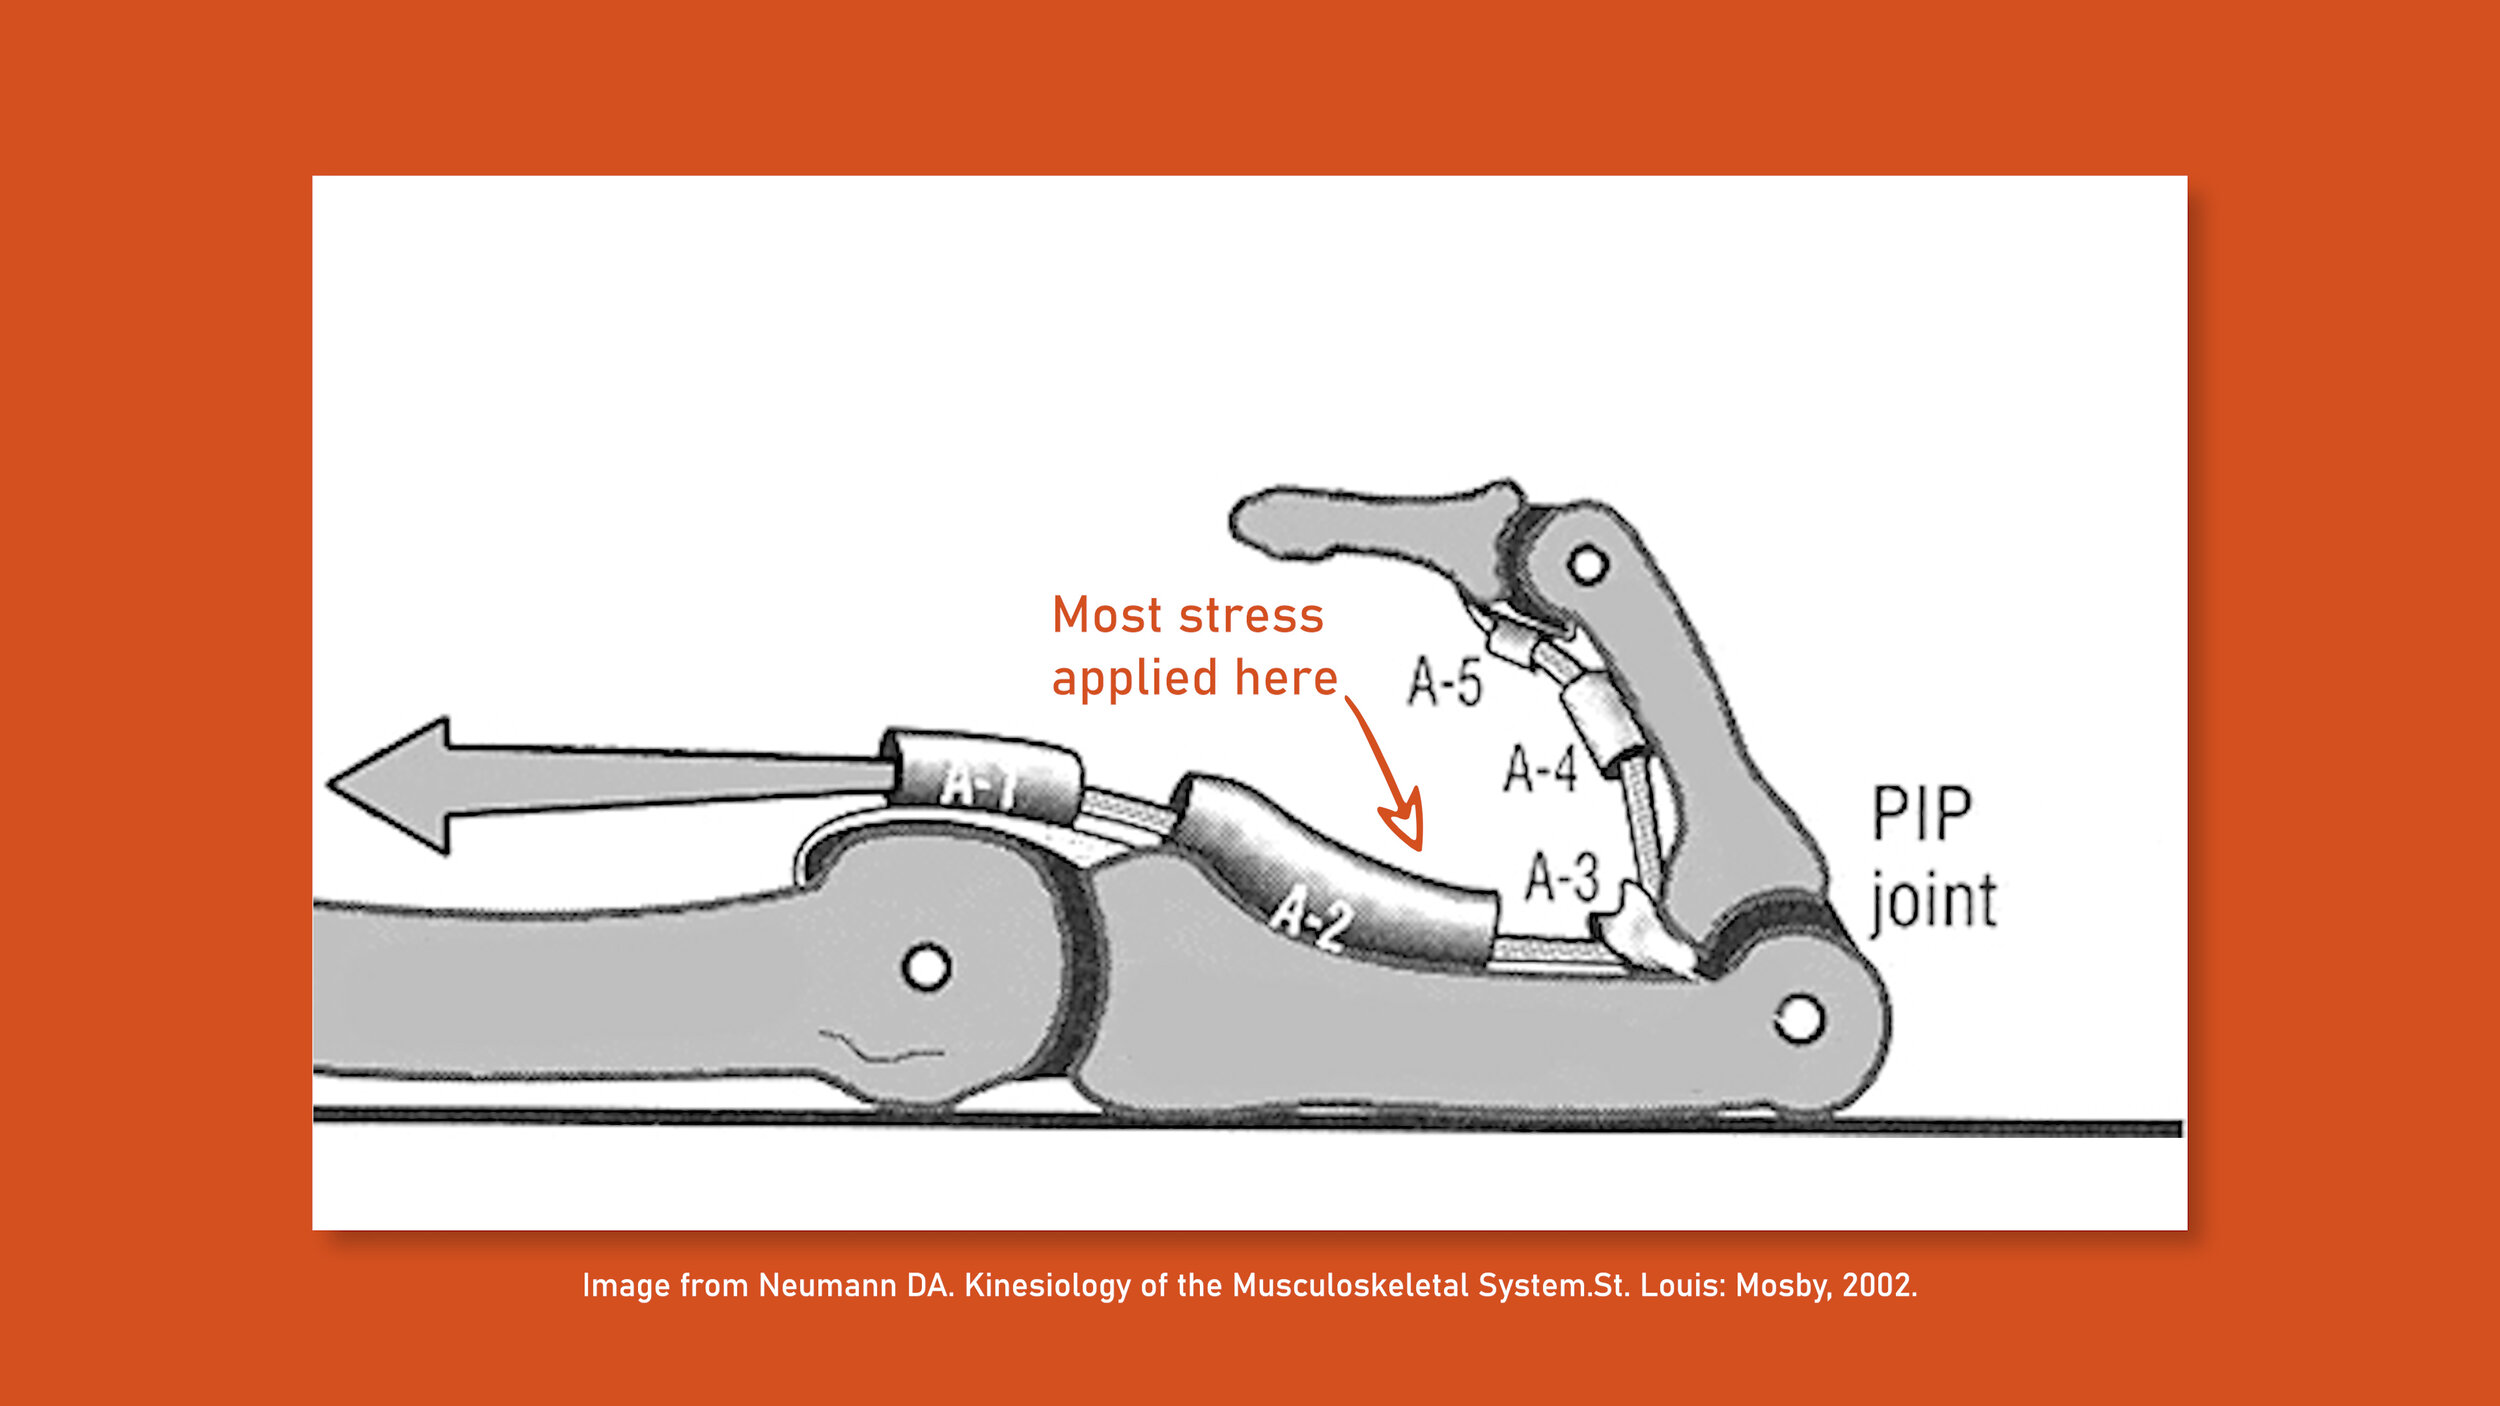
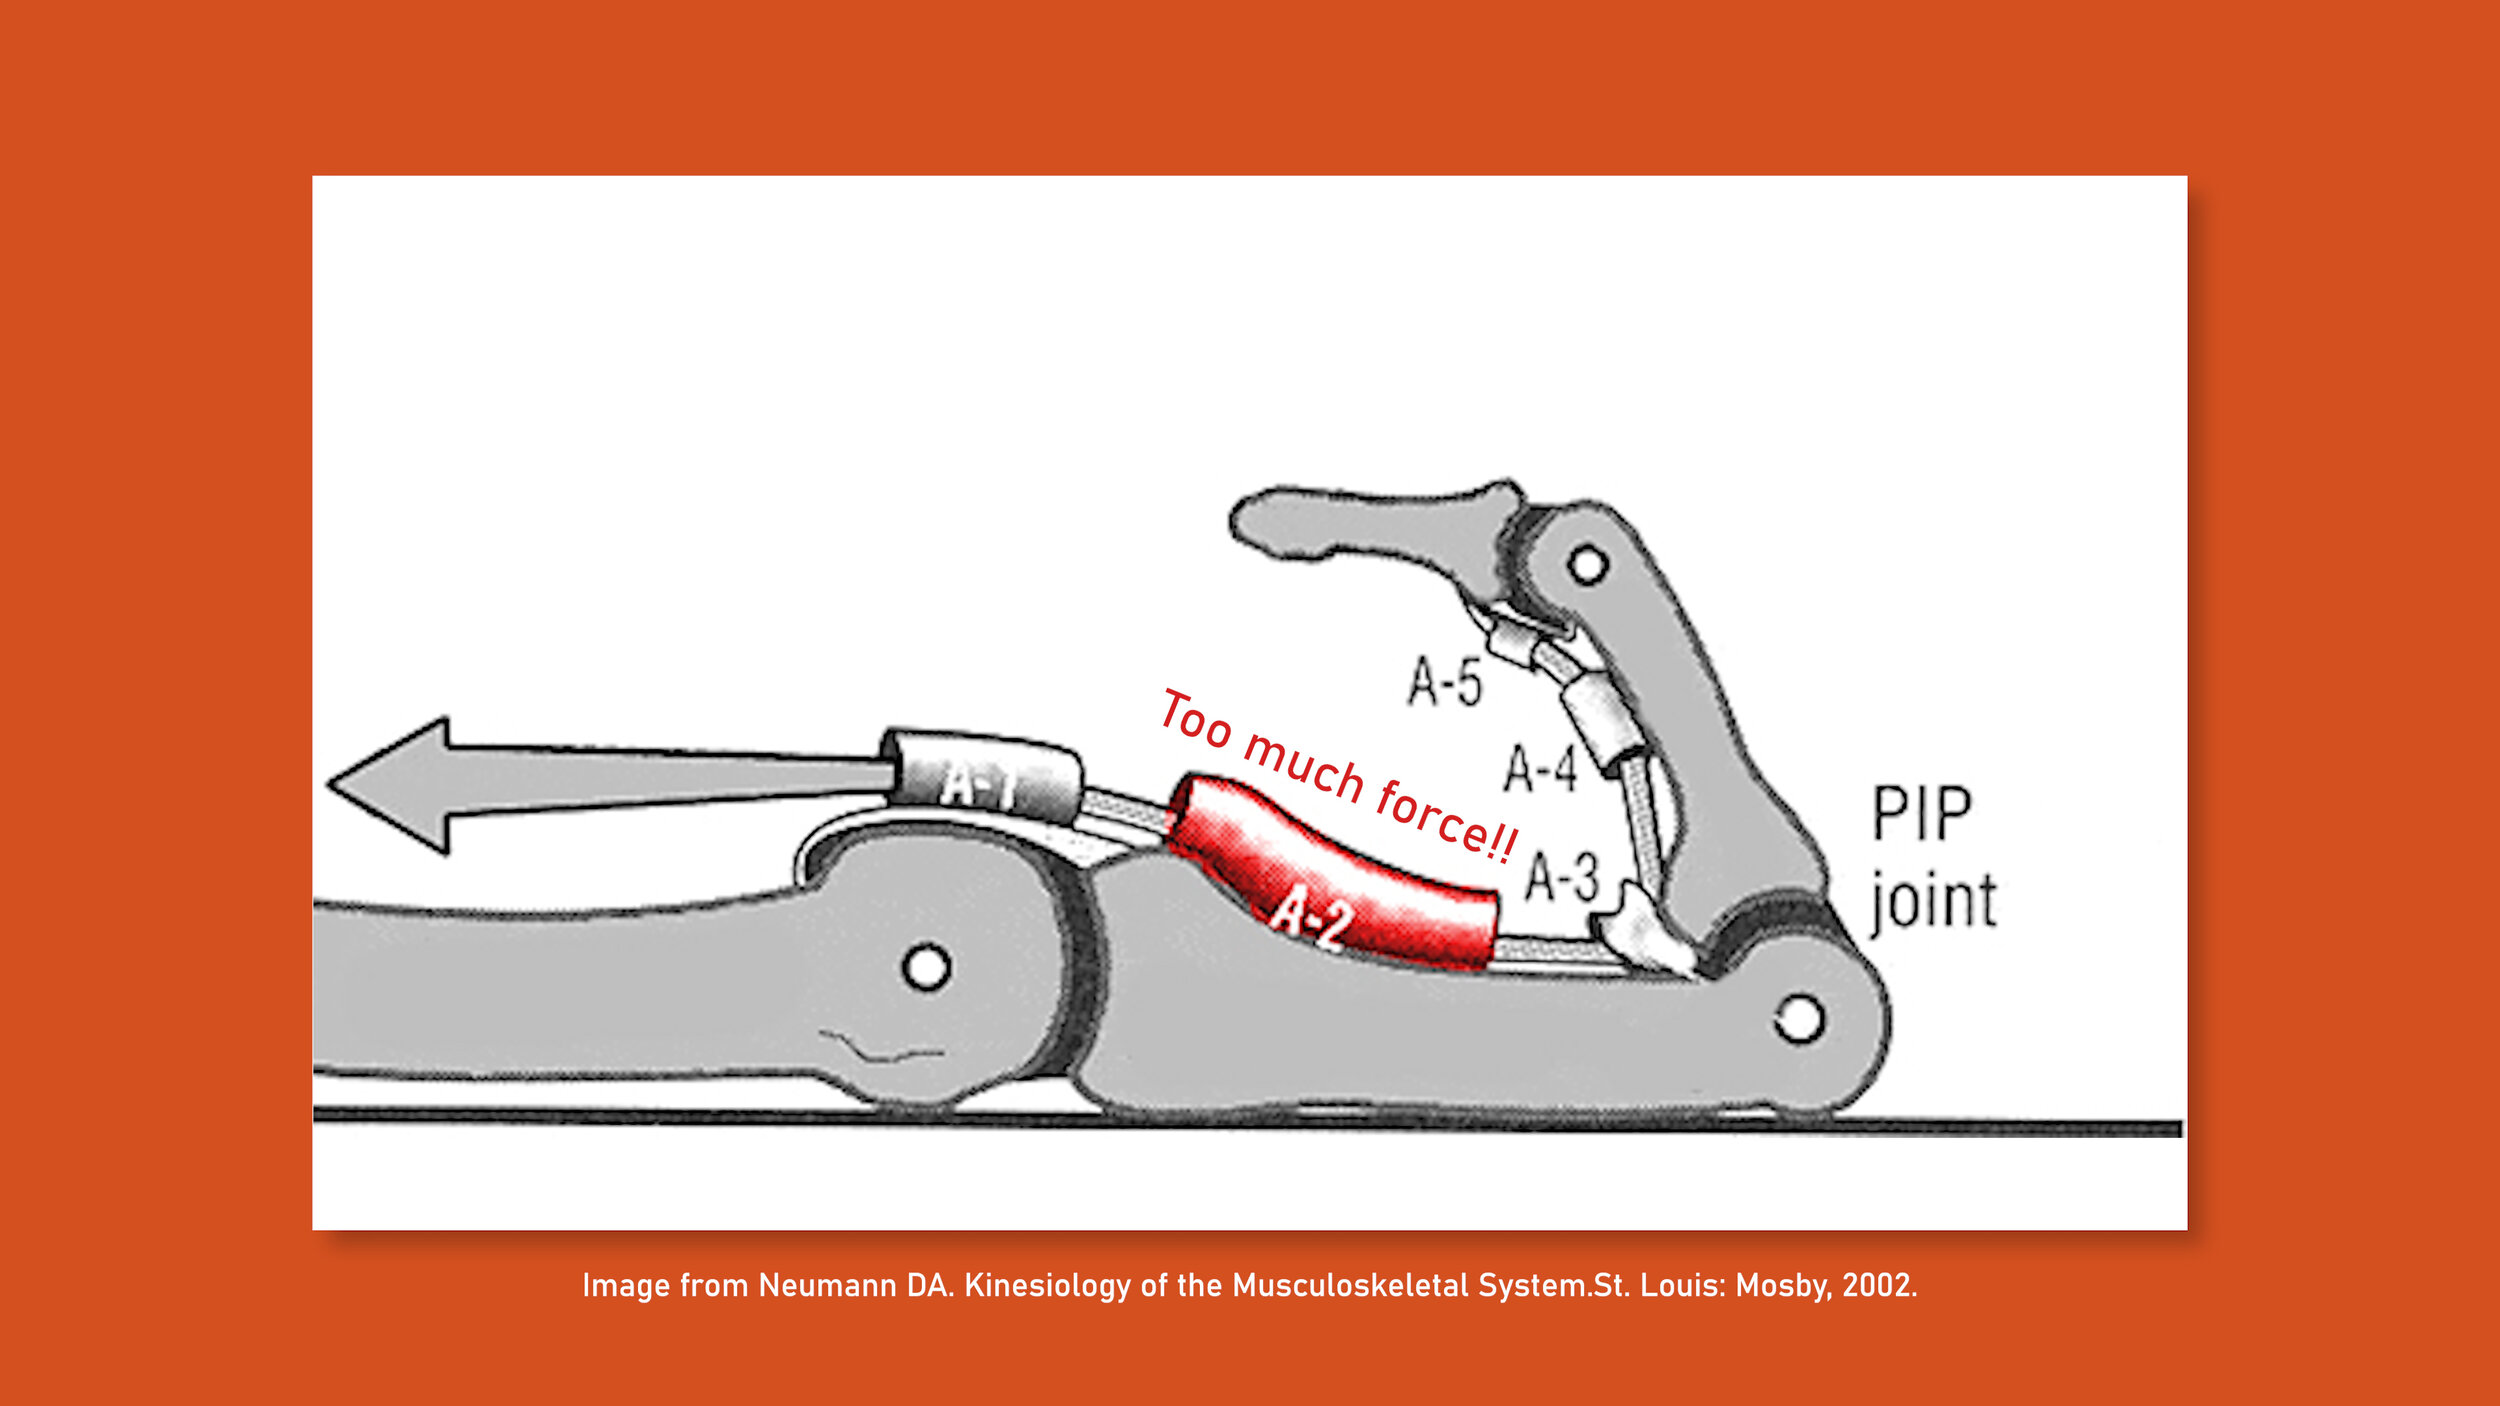
So, why the A2 pulley? Simple mechanics. The crimping position creates an angle that puts significant stress on the part of the A2 pulley closest to the proximal interphalangeal joint, which is why it is usually the first to go. In day to day use this doesn’t pose a problem, but when we subject our fingers to extraordinary forces we can exceed the limit the A2 can handle, which can then cause the flexor tendon to tear partially or completely through the pulley. If the force is great enough even the A3, A4, and A5 pulleys could then rupture as well.
In some studies, the limit or threshold of the A2 pulley is shown to be around 400 Newtons. A shock load, meaning a sudden or sharp increase in force, to a finger by a 150 pound person can create forces up to 450 Newtons, which would cause the pulley to fail.
Shock loading the finger is not the only way to injure it, of course.
The normal force we place on the A2 pulley with the crimping position is approximately 287 Newtons for a 150lb person, and will of course depend on the persons body weight. OK, good news right? That’s well below the failure zone of 400 Newtons. Like as long as you don’t shock load a single finger your A2 should be rock solid? Well, as many climbers who’ve torn or strained their A2 without shock loading can attest to, there’s more to it than that.
You may be trying a move that is consistently placing near the threshold of the tissue strength and the repetitive attempts is lowering the integrity of the tissue.
You may be trying a move that involves shifting too much weight onto a small ledge which causes the threshold to be exceeded (without shock loading).
You may be aggressively loading the pulley while your hand is opening up. This eccentric motion can create increased friction to the pulley causing injury.
You can even injure your A2 without exceeding the 400 Newton threshold. - Hint, it’s called overtraining.
I know you guys don’t want to hear about overtraining right off of the bat, so let’s talk about how we will test the A2 pulley if we suspect an injury. We will get into the overtraining aspect when we talk about injury prevention in a later section.
Speaking of suspecting an injury, an important topic to discuss before we get to testing is “popping”. A lot of people will associate popping with a complete rupture of the A2 pulley. Or they may say “well there was no pop so the injury isn’t that bad”. Both are incorrect assumptions. You can have a strain or a partial tear and have no pop. Vise-versa, you can have a pop, and have no injury. The pop may simply be a joint cavitation. Think about it. If you slip and place a lot of pressure on your hand, your hand is likely going to change position. You may start to increase the joint space as the force of your body weight pulls it open. That change can cause a joint cavitation, just like you would just normally cracking your knuckles. So, don’t rely on the pop 1 way or another. It is not definitive of an injury. Rather, listen to your body and see if there is immediate pain or discomfort, and perform the following tests!
Testing
An injury to the A2 pulley could be as simple as a mild strain, or as advanced as a complete rupture of the pulley. In order to better understand and classify our injury, we will look at four main testing criteria and how they can help you identify the severity of your injury.
Testing will come in a four main categories:
Observation
Palpation
Range of motion
Tissue loading
Observation
For observation, there are two main factors we will look at: swelling and bowstringing. Bowstringing occurs due to the flexor tendon now being pulled away from the bone. If your finger is extended, you won’t notice it, but if you flex your finger, you may notice the tendon pulling away from the bone, creating the “bowstring” effect. If you notice bowstringing, that’s the only test you need, you’re done. You don’t need to do any other tests, you just need to call your doctor's office and get an appointment. You likely completely tore multiple pulley’s. They will need to do testing and possibly imaging to determine the extent of the damage and plan your course of treatment.
Now, most pulley injuries are not going to have observable bowstringing because to truly observe bowstringing with the naked eye, you will likely have to have a rupture of multiple pulleys. An isolated A2 pulley injury (meaning, A3, A4, etc, are all intact) will have bowstringing as seen on a real time ultrasound scan but it will be so subtle you will not likely be able to observe it with the naked eye.
If you don’t notice any bowstringing, the next thing you will look for is swelling. The level of swelling can dictate the level of injury but it is not the only determinant. You will piece all of the findings together in the results section to determine the true extent of your injury.
Recap:
A pulley strain would likely have no to mild swelling
A pulley partial tear would have mild to moderate swelling
A full tear would have moderate to severe swelling
Palpation
Palpation, the process of using your hands to check the body for pain or other irregularities, is the second process in evaluating our injury. With this injury it is typically less aggravating than range of motion or tissue loading so we will perform this next to determine further steps.
You will need to palpate the volar (palmar) aspect, and the sides to truly comprehend the injury.
If you have mild tenderness, it may be more indicative of a pulley strain
If you have moderate to severe tenderness, it may be more indicative of a partial pulley tear
Determining a full tear is challenging. You may have severe tenderness or it may be absent as the disruption of nerve endings may limit the amount of discomfort. If you have no pain, look for other signs to determine your overall results.

Range of Motion
The third testing section is range of motion. This will involve fully flexing and extending your fingers. Since normal range of motion does not generate significant force at the pulleys, this should be safe to perform.
If you have a pulley strain, there should be no to mild discomfort with full range of motion
If you have a partial pulley tear, there may be mild to moderate discomfort with most range of motion, and more pain when making a full fist.
If you have a full tear, range of motion may be limited and pain may be moderate to severe or absent (recall the palpation section, a complete rupture may result in the disruption of nerve endings)
If you have a complete rupture of the A2 pulley and partial rupture of the A3 pulley, the results may be more similar to the partial pulley tear as noted above.
Tissue Loading
If you suspect that you have a complete rupture, do not perform tissue loading. If you think you have a pulley strain or partial tear tissue loading can still be safe if done appropriately.
You will need to do two things. First, you need to recreate the force in the position that originally caused the injury, which most likely was crimping. Second, you will need to recreate the force with the fingers straight to make sure it is not a strain or injury to the FDP tendon.
To safely recreate the crimp, you will use your opposite hand. Place your fingers on your palm and recreate the crimp position. You want to SLOWLY load the tissue. Any sign of pain is a sign to stop. You do not need to create more force and generate more pain. The pain is telling you to stop to protect your tissue from further injury.
If you have a pulley strain you will likely have mild pain with moderate pressure (don’t need to push more than that).
If you have a pulley partial tear you will likely have mild pain with mild pressure (again, you don’t need to push past mild pain)
Now, do the same thing as described above but with your fingers straight. If you have an isolated pulley issue and not a FDP strain, the pain should be less.
If you have a pulley strain, you should have zero to mild pain with the straight finger position.
If you have a pulley partial tear, you may have mild to moderate pain with the straight finger position.
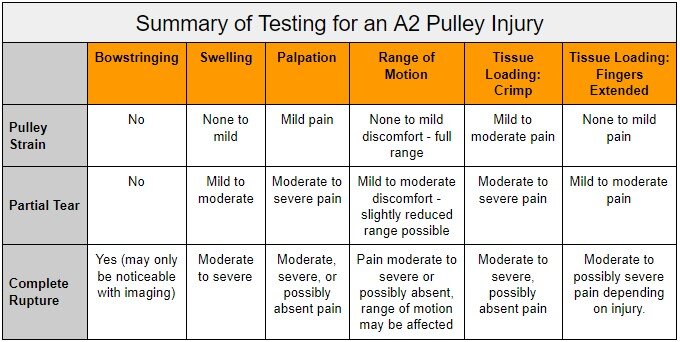
Results
OK so you did all of your tests. Here is a way to categorize your results. Now, just know, that not all injuries will fit perfectly into this box, it is simply a guide to help better understand your injury.
So hopefully by now you’ve got a good idea of how mild or severe your injury is, which means we can now delve into Treatment.
Treatment
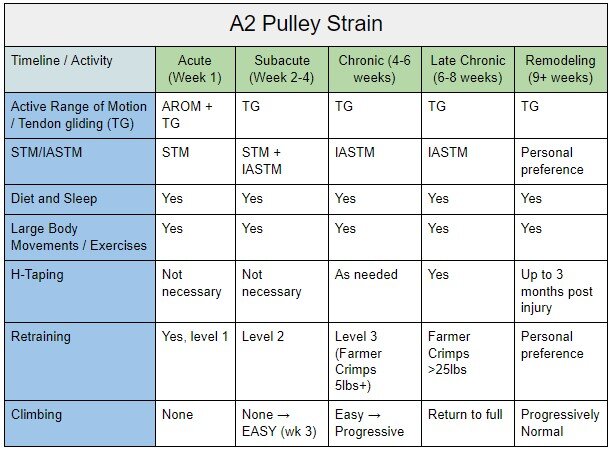
There are going to be multiple components of your treatment that you can do to help in the short and long term. Some of them you can continue throughout your healing process, and even when the injury is fully recovered just to promote healthy strong tendons. In the show notes we have organized all of the treatment aspects that we are about to discuss into a table which will help you follow along based upon your injury.
The idea of this section is to give you an idea of what to do, and also what you can expect to do to help treat this injury. But, it is always best to seek out professional help if you think you have a partial or complete tear. It’s great to have more information from someone who is experienced dealing with these injuries to help guide you on your way.
The treatments we are going to discuss are designed to optimize your body's ability to heal. They will assist with the collagen synthesis as the cellular matrix remodels, restore normal function with everyday activities, and will trigger adaptation to the stresses we plan to place on the tissue with climbing. Your body will only heal to the level that meets the demands you are asking it to do, such as with your activities of daily living. So the long term recovery for climbing will require high forces to be placed on the tissue, which we will introduce as retraining. Finally, we will talk about surgery and its implications.
But first, let’s start by talking about the initial treatment, and then get into later stages.
Active Range of Motion
Initially, your treatment will just involve healthy range of motion. If you cannot perform the full range of motion of the injured finger, you don’t need exercise or perform heavy tissue mobilization techniques, etc. You need to help protect the injury. Once you can go through a good range of motion without issue, you will work on tendon gliding. Tendon gliding can and should be performed on healthy tissue as well so even when you feel you are fully recovered, this is still a good strategy to continue with.
If you don’t have full active range of motion, it may be a good idea to incorporate passive range of motion, or seek help from a skilled healthcare professional.
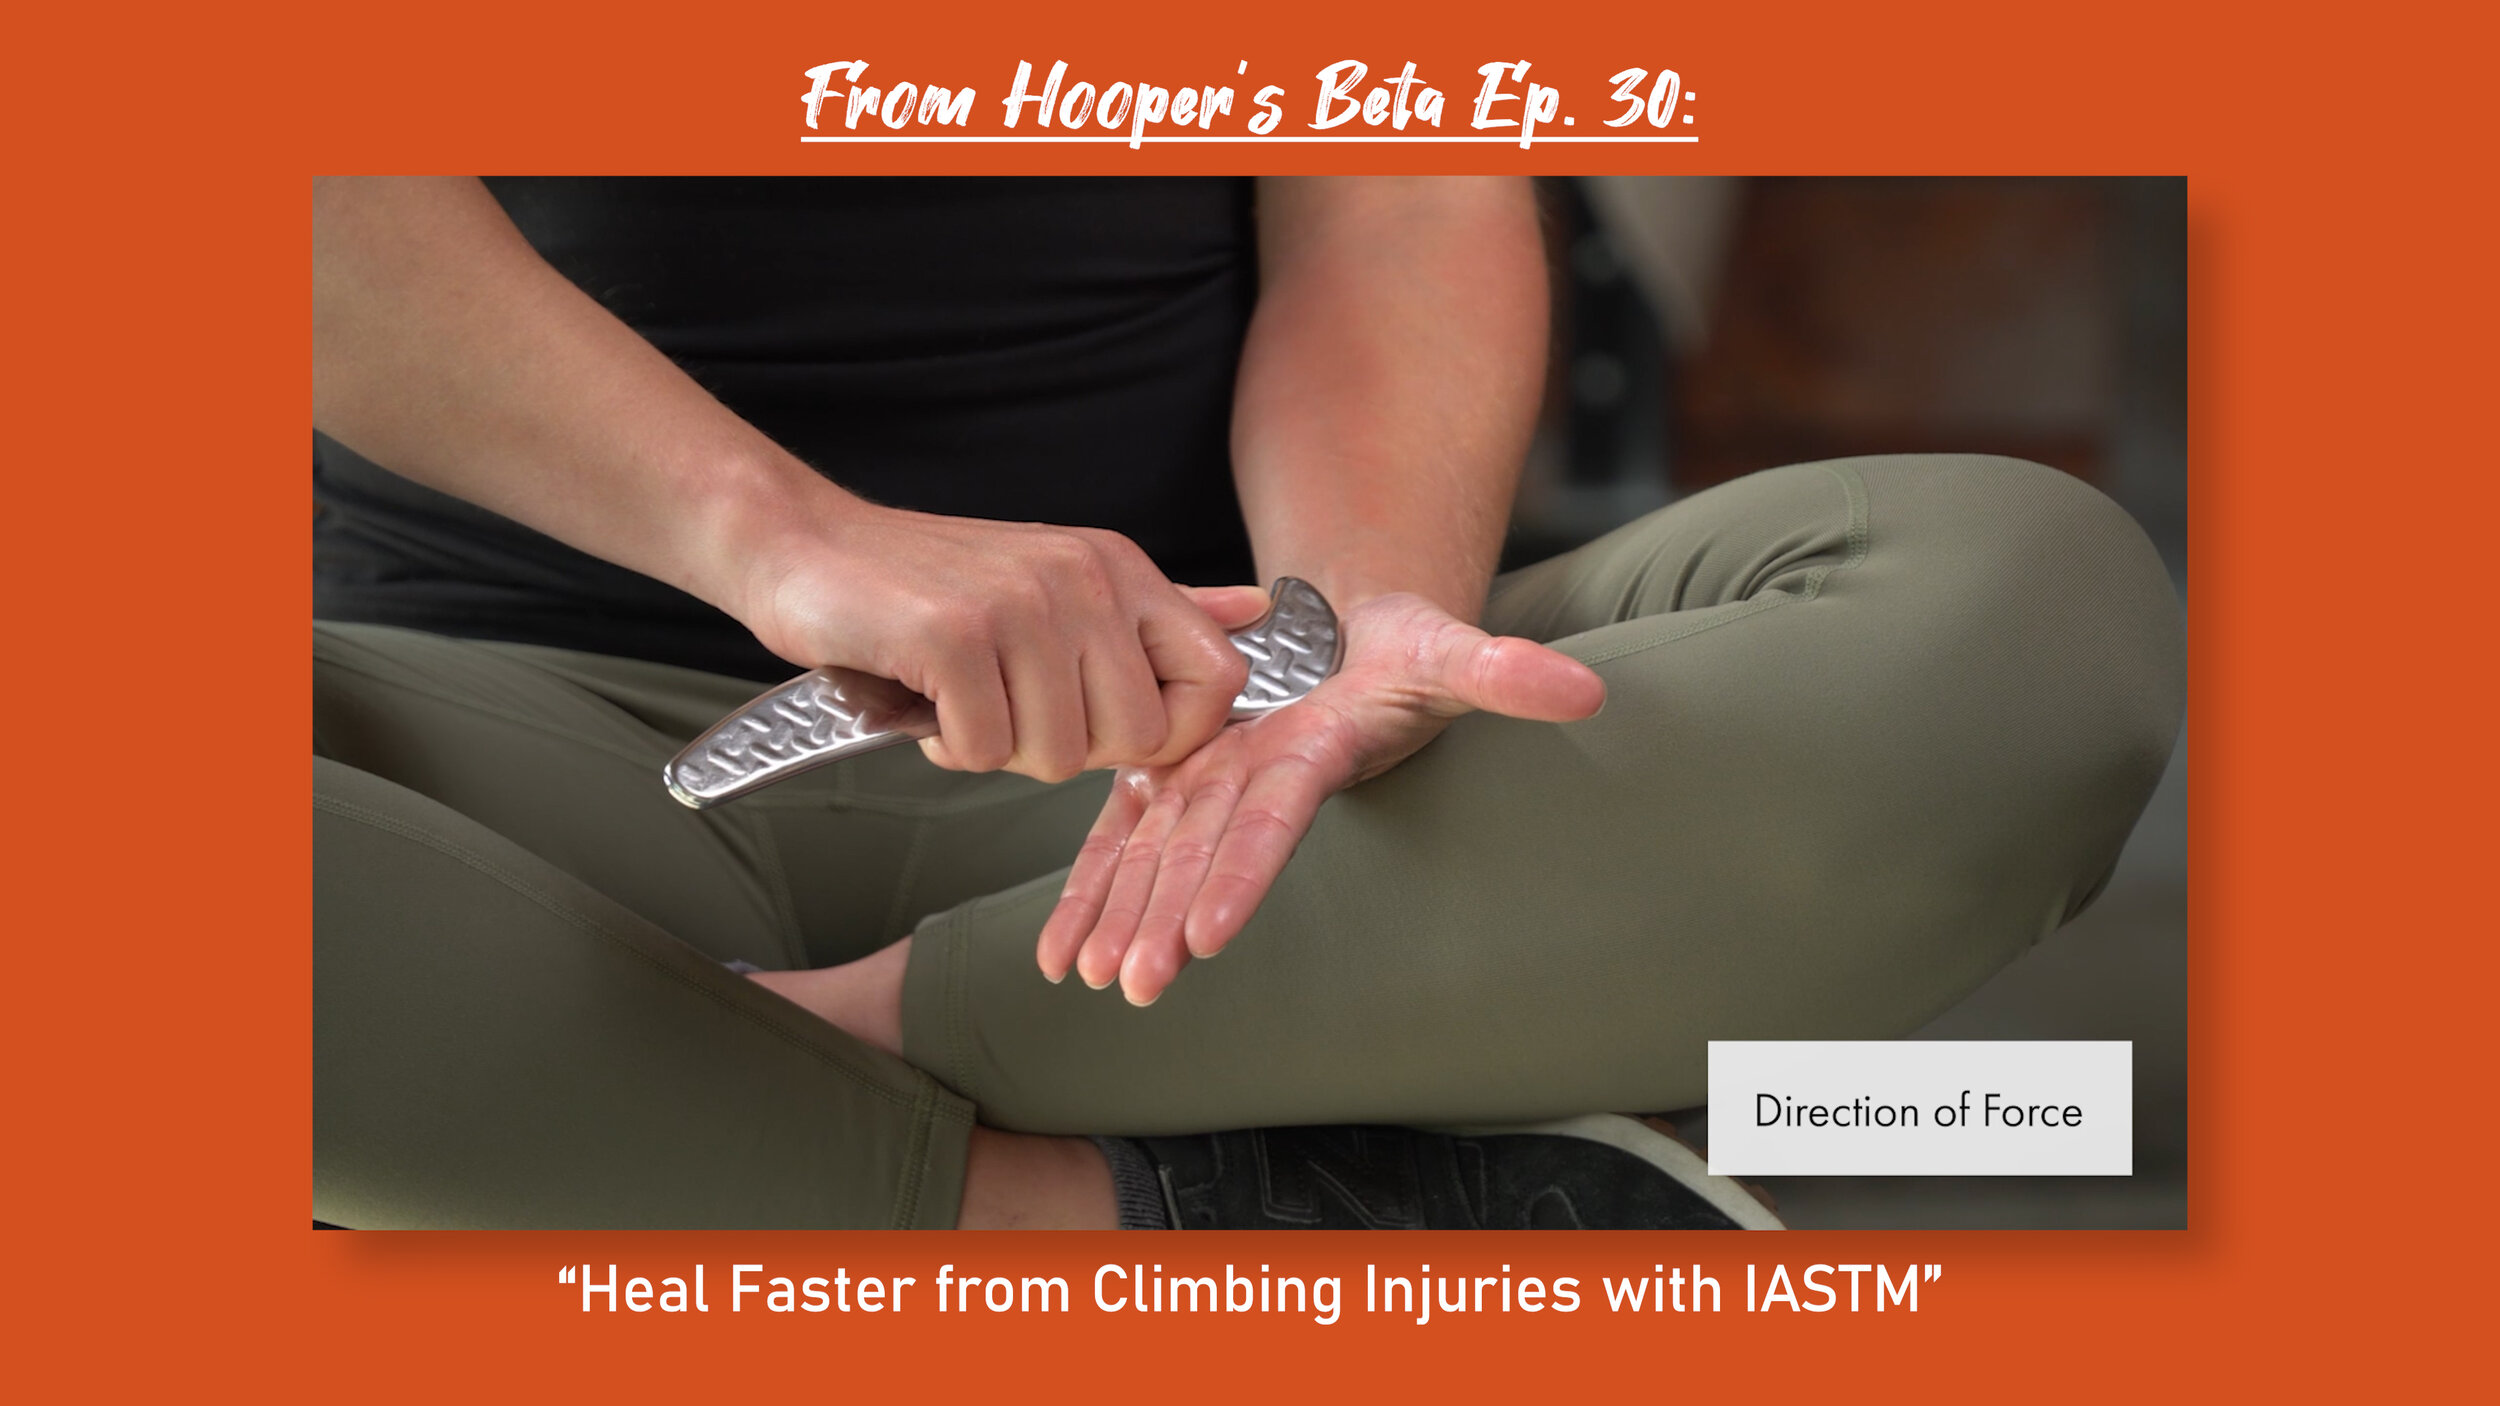
Soft Tissue Mobilization / Instrument Assisted STM
Soft tissue mobilization is mobilizing your tissue to promote remodeling through reorganization of the cellular matrix. This is appropriate even in the early stages of a pulley strain or partial tear but not with a full rupture. The advanced stage of this is with instrument assisted soft tissue mobilization which will be helpful as you leave the acute stage and enter the subacute and chronic phases of your healing.
IASTM is the controlled microtrauma to soft tissue structures that causes the stimulation of a local inflammatory response. Microtrauma initiates reabsorption of inappropriate fibrosis or excessive scar tissue and facilitates a cascade of healing activities resulting in remodeling of affected soft tissue structures (4) The remodeling of the tissue is a process which promotes growth of the cellular matrix through collagen formation.
If you’re interested in learning more about IASTM techniques, definitely check out our in depth video that we made on this!
https://www.hoopersbeta.com/library/using-instrument-assisted-tissue-mobilization-to-heal-faster-from-climbing-injuries
Diet and Sleep
Our next important category is diet and sleep.
If you are serious about healing, then you need to check your diet and your sleep. When we sleep is when we heal! If you aren’t getting adequate sleep (and have the option to) you aren’t doing yourself favors.
As for diet, we know that diet helps with healing. You need to provide your healing body the resources it needs to make a good recovery. This mostly means having adequate protein intake and not being in a significant calorie deficit.
I know that both diet and sleep are hard aspects to control. But if you’re serious about healing and recovering from this injury, you need to take diet and sleep seriously as well.

Exercise
It’s important to stay active even when you’re healing. Work on your strength training, mobility, etc. Exercise has loads of both mental and physical benefits. You may have to make some adjustments or modifications, but you can still do a lot of training with this injury. Keeping the body active may even hasten the timeline of your recovery.
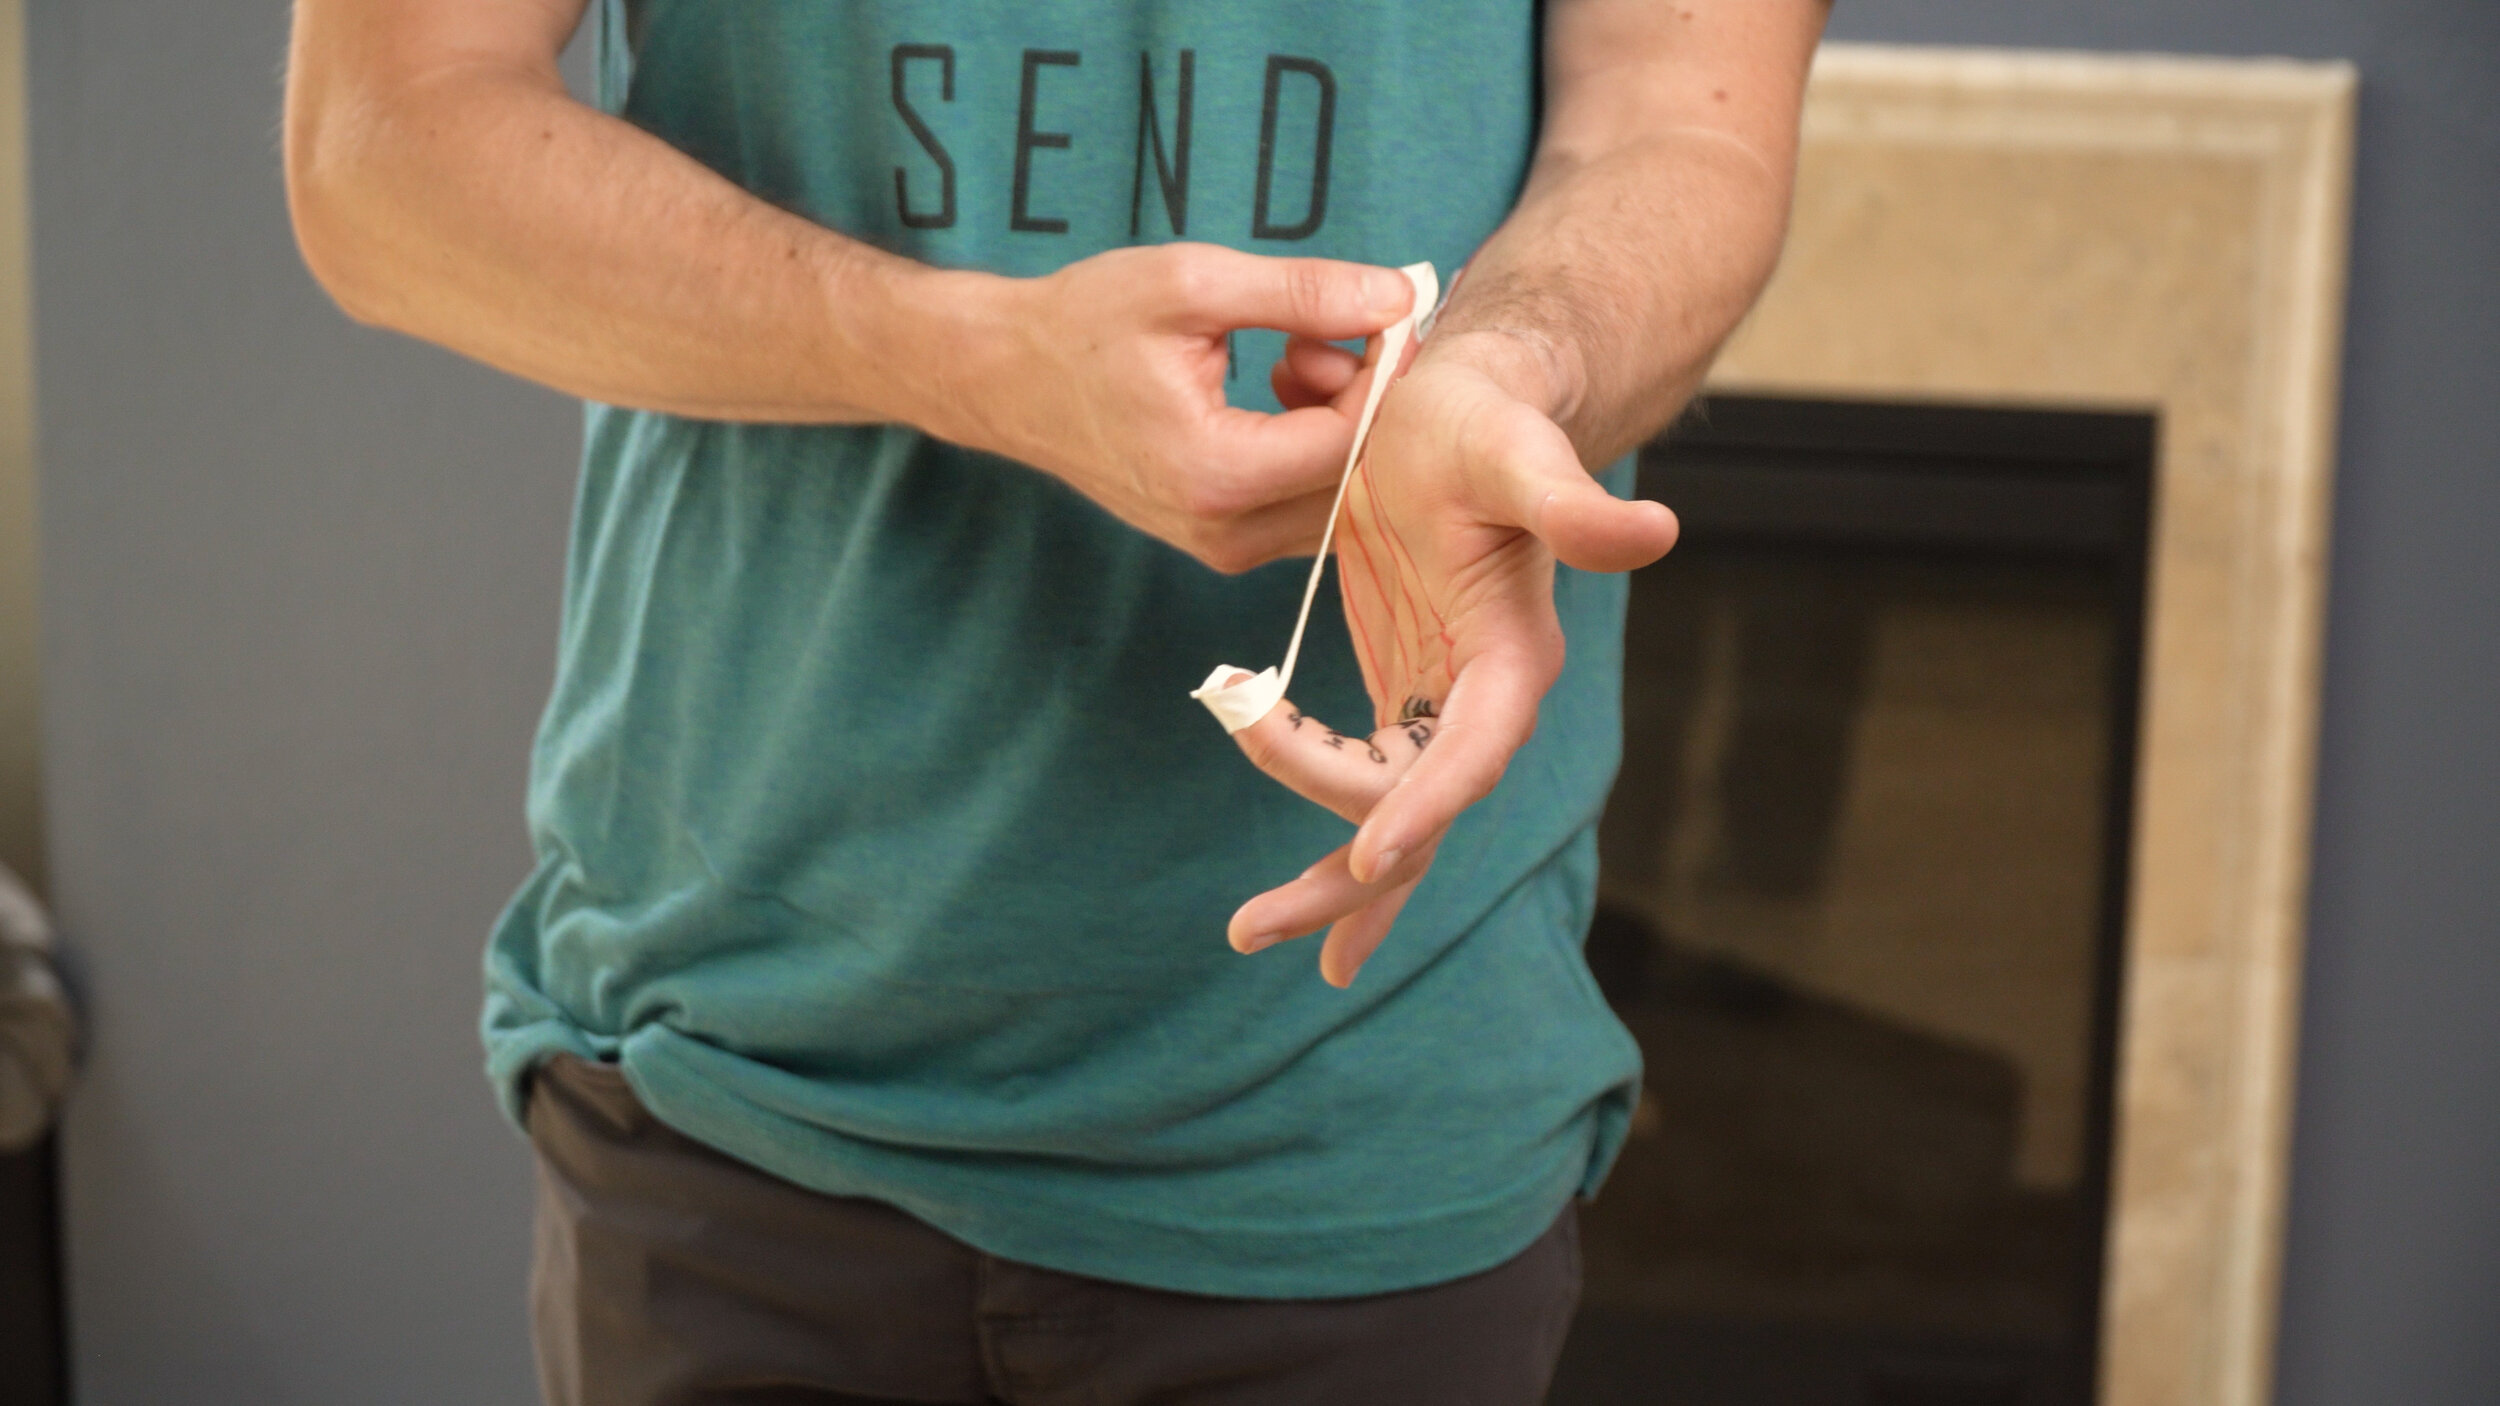
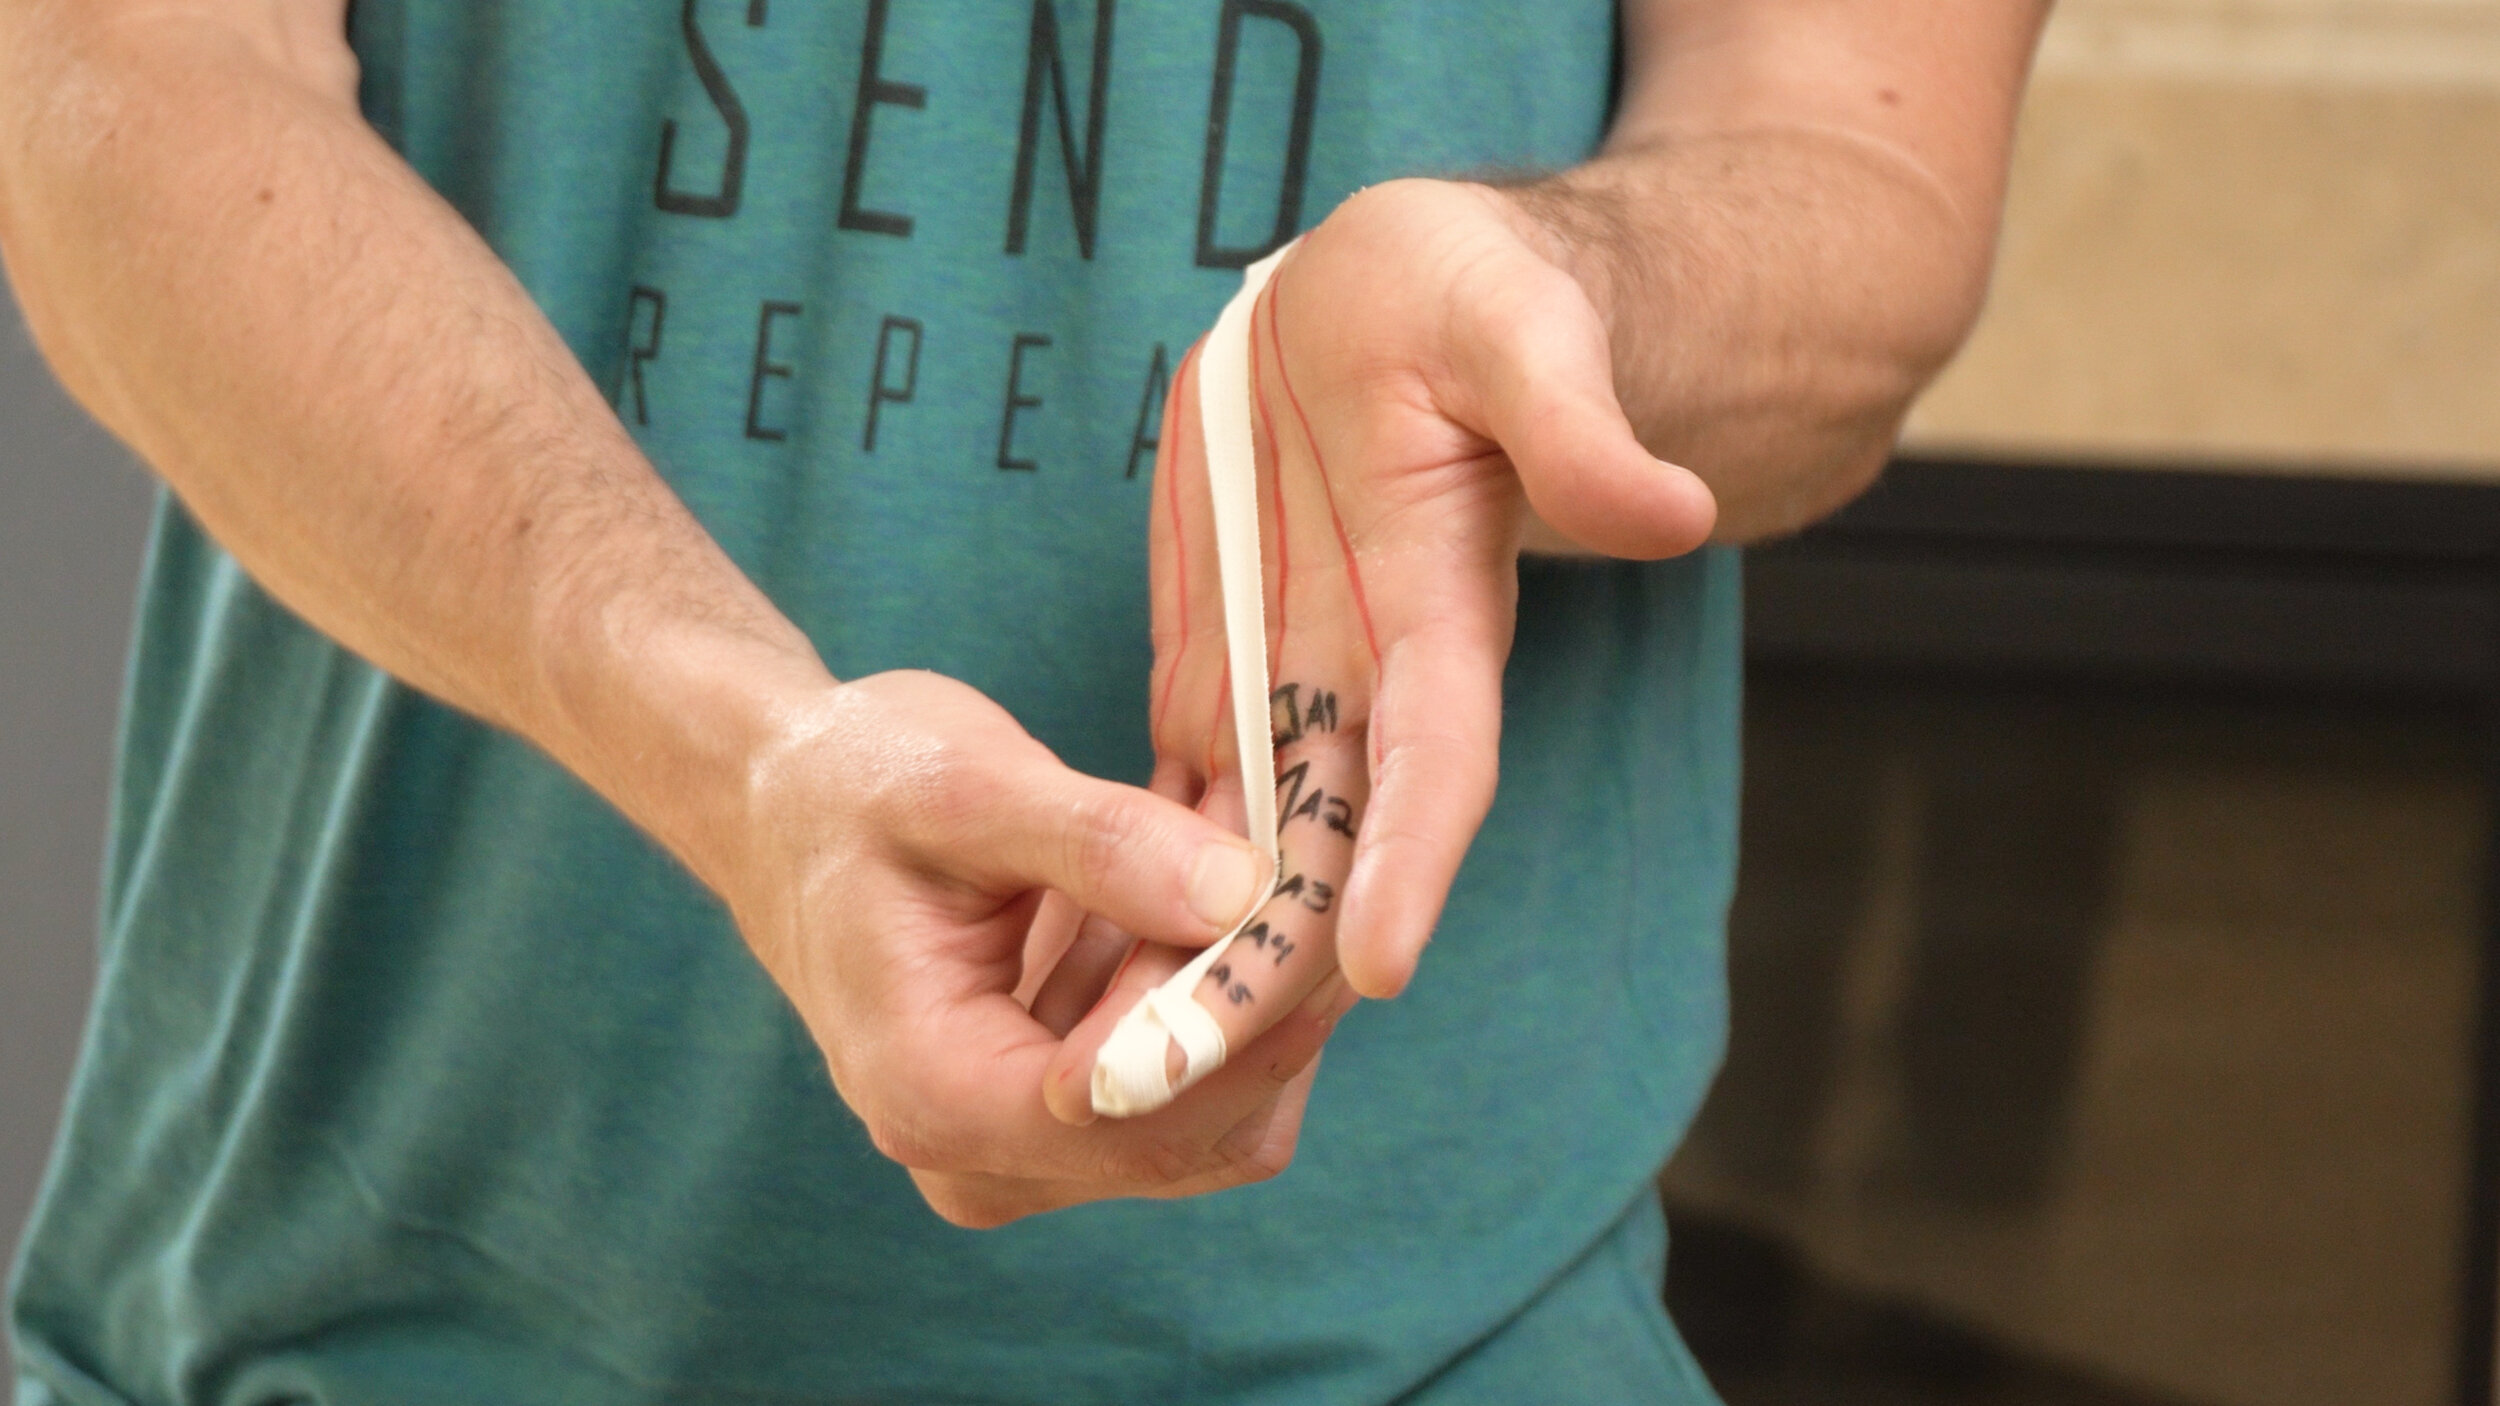
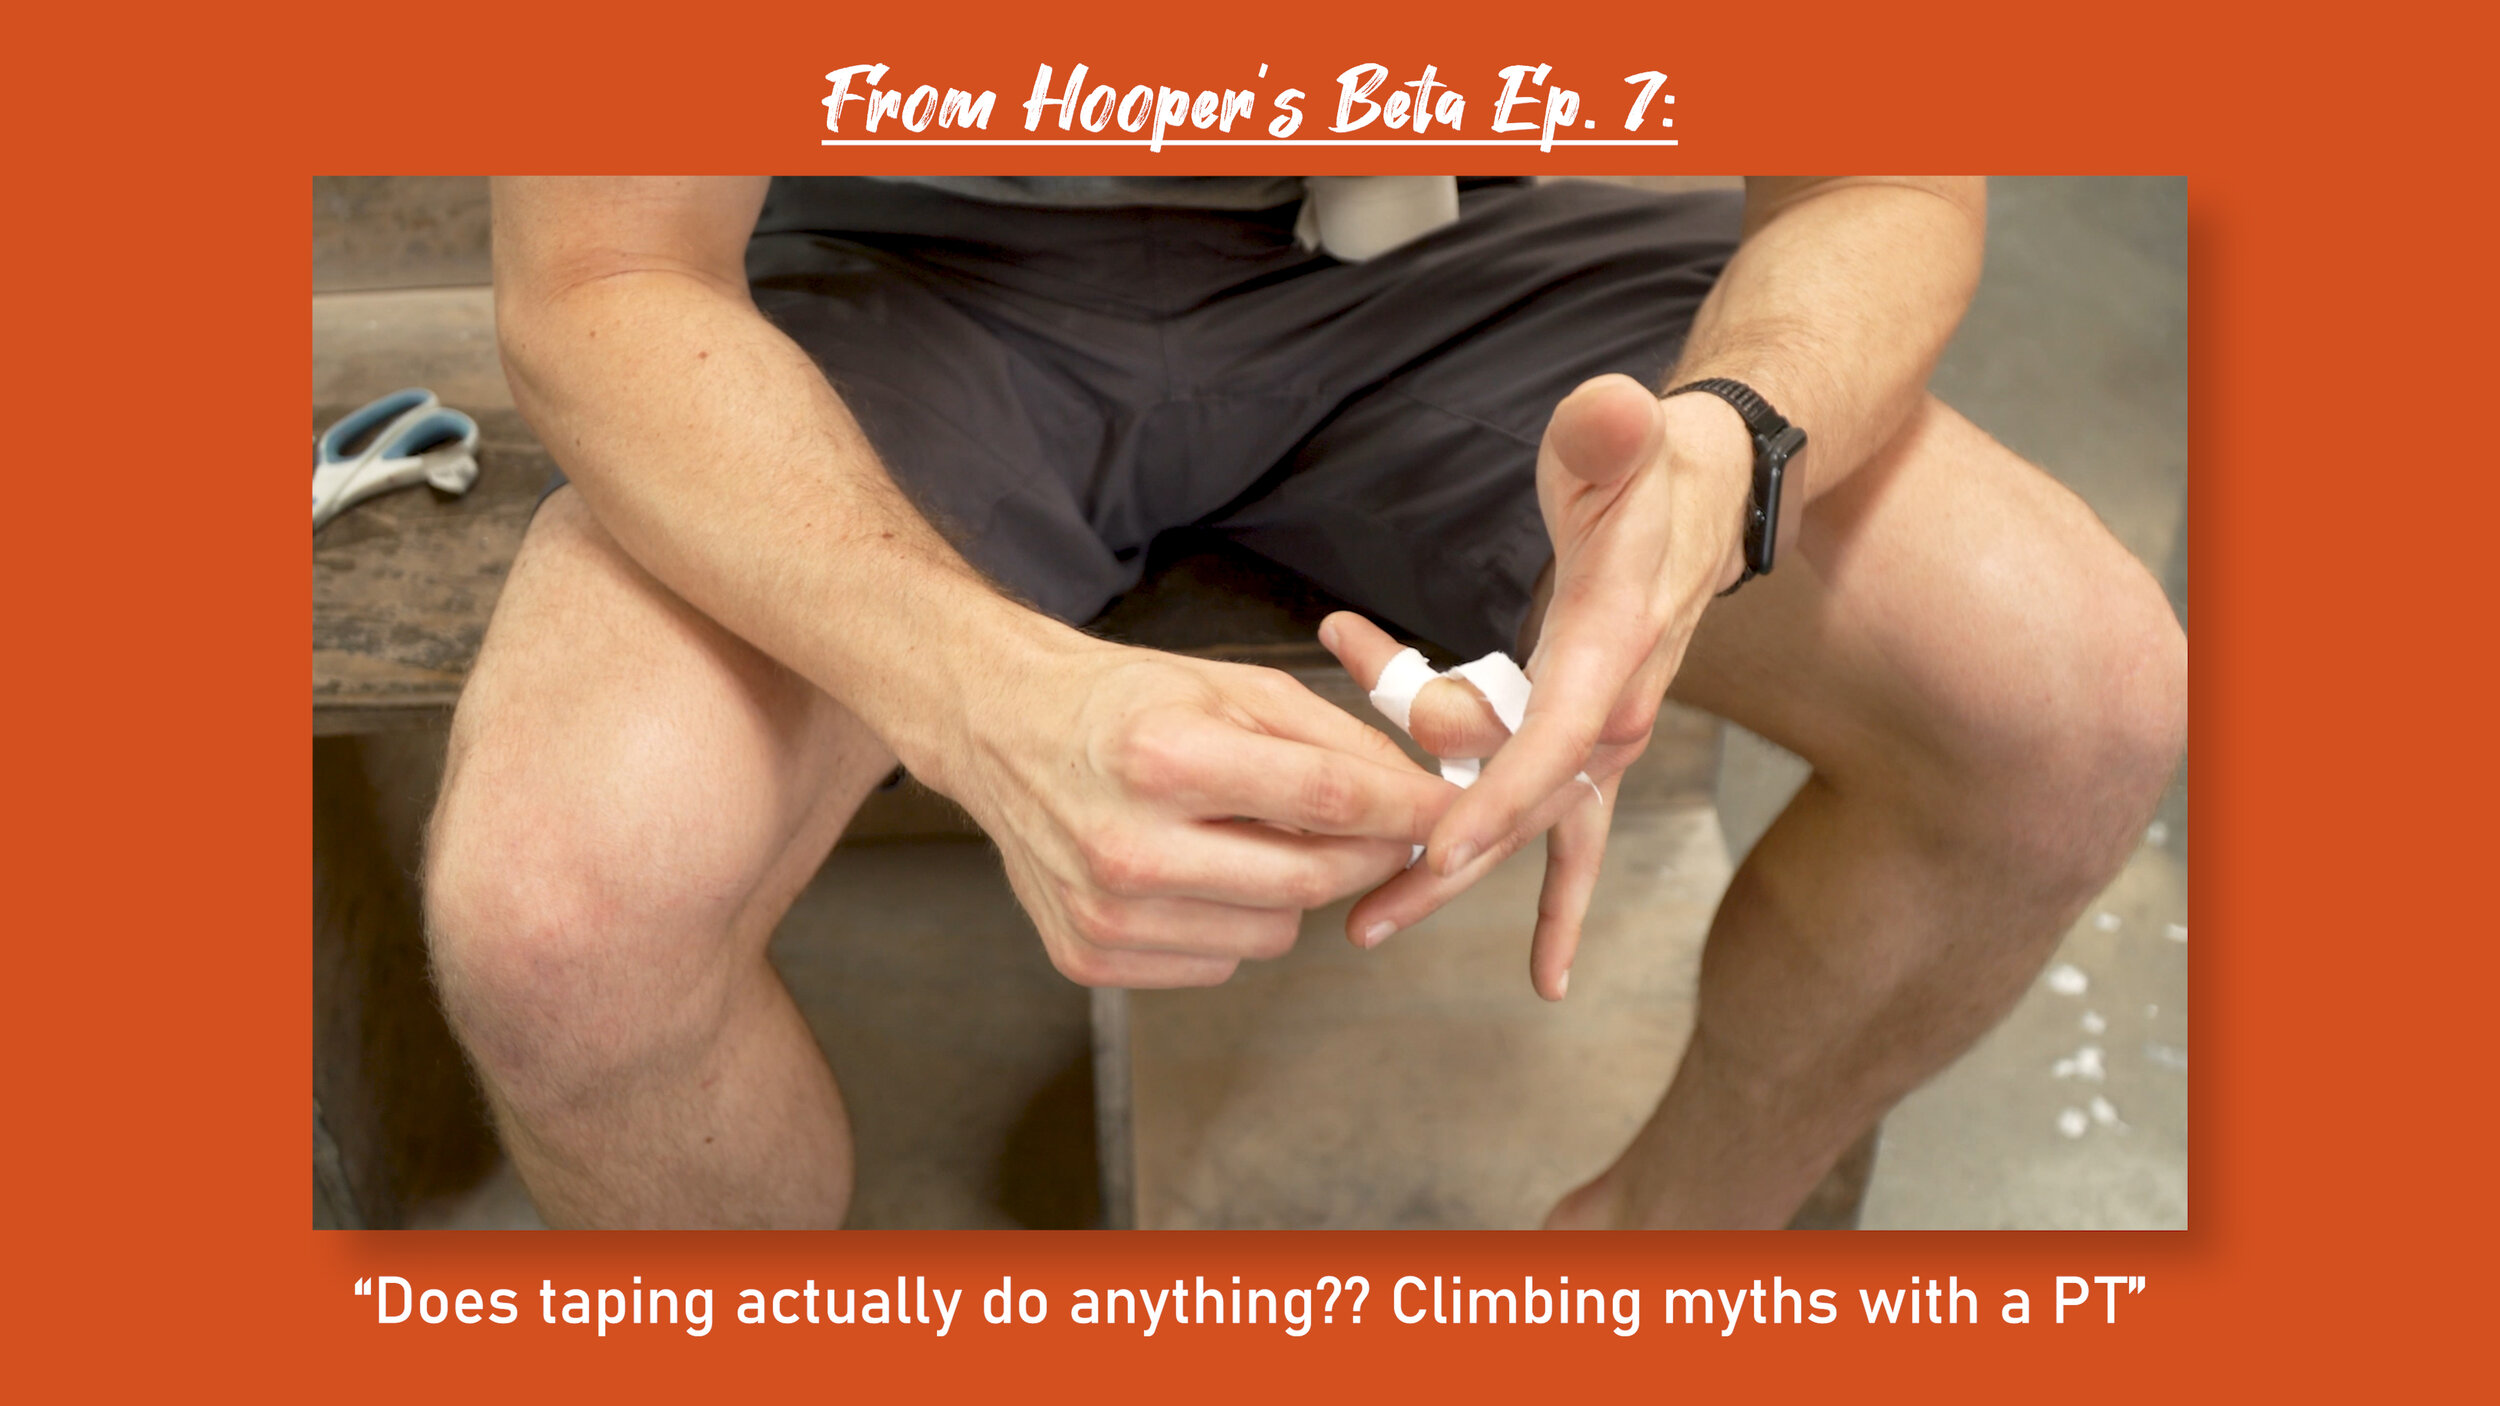
H-Taping
H-taping is supported when you have an A2 pulley injury. I choose to put this in the treatment section rather than prevention, as you should not be using H-taping to prevent an initial A2 pulley injury, that breeds bad behaviors. It can prevent a re-injury, though, which is important to understand. Research has shown that H-Taping can increase strength of crimping in an injured pulley by 13%. It has not shown to have an effect in an uninjured pulley simply because our uninjured strength exceeds that of the tape.
Surgery
The good news right away is that A2 pulley ruptures don’t require surgery. Rather, surgery is likely only indicated when there are ruptures of multiple pulleys (A2, A3, + A4). The prognosis with surgery is still fair and you will likely return to climbing, it will simply be a much longer journey. Your first time back on the wall should wait at least 4 months and you won’t be climbing anything challenging until at least 6 months post surgery. You will be doing functional training in that time, you simply need to be more cautious and slow to avoid a failure of the surgical repair or the graft that is used. It can take longer than 6 months to feel fully confident in climbing again which is not uncommon. Take it slowly and work your way back up.
Initial phases post surgery will involve immobilization for about 2 weeks, followed by range of motion exercises and conservative care. The functional training, such as retraining which we discuss below, won’t start until 3-4 months post operation. This is one where taping throughout will also be beneficial, mainly including H-Taping techniques. While this will not significantly reduce the loads placed on the repair, it will help slightly and any help is beneficial at this time.
So I hope you now have a good understanding of all the great scientifically-backed things we can do to help our bodies heal as quickly as possible. Now there’s one final but very important bit of treatment left to go over, and that’s getting your A2 ready to handle climbing again!

Retraining
The final stage of our treatment before we get back into climbing is going to be retraining. The goal of this is going to be to recreate the stress that caused your injury but applying low enough force to not reinjure it. This will serve two purposes. 1) It is going to trigger your body to further strengthen and support the injured area and 2) it will serve as the road map to get you back into climbing as you slowly increase the force that you place through the tissue.
Let’s dive into each of these.
The body is only going to reinforce injured connective tissue based upon the stress we put on it. Climbing is a lot different than your everyday activities, so just performing everyday activities is not going to trigger a response in the body equivalent to the level of healing you need.
When I say it serves as a road map, I mean that if you can’t hold more than 10 pounds on a farmer crimp, you sure as heck shouldn’t be placing a quarter of your body weight into your hands on a crimp while climbing. BUT, if you can indeed hold >25 pounds, then your tissue may be ready for more forces while climbing. This is a safer way to work back into climbing. It shows you how much force you can handle and better prepares you for the forces you will experience with climbing.
To do this, you need to start with way less force than you would imagine, and work your way up.
Here are the initial levels and examples
Level 1: Palm crimps are your most initial phase. This is your test, if this still hurts, you are still super injured. If you do not feel moderate pain with this (but rather it is minimal to mild) then keep doing this daily, multiple times per day (yes, 4-5 times is OK), 1-3 second holds, and relax. Once you can do this with no pain, move on to Puddy Crimps.
Level 2: Putty Crimps The next tier. Perform once Palm Crimps have become pain free. Keep the putty in your car or at your desk and do it multiple times per day for 4-5 minutes allowing for breaks occasionally by switching to the other hand. Once this is no longer painful, move on to Farmer Crimps.
Level 3: Farmer Crimps with progressive weight Now we can slowly progress and monitor how much force we are actually producing. Start with light weight (as low as 5 pounds the first time) and slowly progress. When you can do 20-25lbs you should be able to start doing light crimps while climbing on the wall but don’t get too aggressive. If you can do 25% of your body weight on one hand (if you weigh 150, that’s 37.5 pounds) you should start slowly resuming your climbing levels. For more information about farmer crimps, visit our other video here
https://www.hoopersbeta.com/library/farmer-crimps-are-a-secret-weapon-for-climbers-and-no-one-is-doing-them-hoopers-beta-ep-5

If you still are uncertain or don’t understand why you need to load the tissue again, check out our other video on eccentric tissue loading! https://youtu.be/Ehxbtz7O0p0
Note: As you work your way back up with climbing, try and avoid dynamic movements that would place a sudden load on your pulley, and rather climb in a controlled and cautious manner. It is a great time to work on your technique and your footwork to make sure every move you can do is well controlled.
I also recommend sticking to a progressive V-scale ladder. Meaning, stick to your first week back at V0-2, then next week V2-3, then V3-4, etc. This obviously depends on your previous skill level, but pick a scale that works for you and stick to it so you don’t return too quickly and just reinjure yourself again.
In summary, there is soooo much we can do to help speed our recovery. It’s on you to be diligent and committed to your rehab process. Don’t just wait there and expect your body to recover, take an active role in your recovery and I guarantee you’ll be much happier with your outcomes.
Below are multiple tables to help clarify at what stages you should be doing each activity.


Prognosis
Pulley Strain: a pulley strain will have the best prognosis and shortest timeline. You can expect to return to light climbing at around week 2 and expect to return to higher levels or near full by week 6+. You will want to use a dedicated scale such as a V point system to control your number of climbs. You should start with all easy climbs and work your way up
A V point system is simply going to be adding up your V points to total. Start with 10-15 V-points your first day back. Count V0 as ½ point in this case. That may mean 4 V0’s, 6 V1’s, and 2 V2’s. Sounds boring but sometimes boring is safe and safe means you will be back to climbing sooner.
Partial A2 pulley tear: You will want to be more patient with this. You can expect to start light climbing at week 4-6 and will want to slowly work your way up, not starting harder climbs until week 8+. You can expect mild limitations until around week 12.
Full A2 pulley tear: This requires the most patience and dedication. You should expect to not return to full climbing until at least 3 months post injury. 4 months would be even safer before pushing the tissue too hard. You can resume easy climbing after 6-8 weeks BUT this means EASY. My recommendation is to graph out your training over the next 4-6 weeks. Example:
If you were a V6 climber before your injury and you start climbing at week 8. Climb all V0-2 week 9. V0-3 Week 10 V0-V4 week 11, V0-V5 week 12, and then finally beyond that after. Listen to your body, if you need to work this scale slower, that’s fine. It’s worth it to wait a week or two to save months of rehabbing if you re-injure yourself.
Alright so say you’re all healed up and ready to climb again, but now you’re terrified of tearing your A2 AGAIN. What can you do to keep this from happening in the future? We’ve got you covered in the next segment!
Prevention
To prevent an A2 pulley injury, we need to discuss multiple different aspects from safe training, to proper diet, nutrition, and sleep. In this section, we will discuss a few important topics in detail and how they paint a big picture to help prevent injuries. To start, I want to talk about tissue adaptation and how we can get our pulleys stronger and more resilient to injuries. This is an important overarching topic as it involves multiple categories of prevention.
As a reminder, in laboratory tests it was found that the average force generated at the A2 pulley while in a crimp position is 287 Newtons whereas the failure point was 400 Newtons. When we talk about increasing the threshold of tissue, we are essentially talking about the ability to sustain higher levels of force and higher volumes of that force.
Tissue Adaptations
Our body responds to training by triggering physiological adaptations. These adaptations increase the threshold of tissue, as it has to adapt to forces placed on. We do that through climbing. When we “try hard”, we are placing excess demands on our connective tissue, which then triggers the body to adapt and strengthen the tissue. For example, if we are trying hard, or doing a MaxHang protocol, we may be placing in excess of 375 Newtons on our A2! This approach to the physiological failure point will force the body to adapt and strengthen the tissue, changing the failure point to perhaps 410 Newtons. Now, if you tried to move way above your threshold or you added too much weight to your MaxHangs, you may be at 390 or more Newtons. This is too close to the threshold so your body will actually stop you from holding on as it is trying to protect you from injury.
OK so let’s go back to the safer 375 Newtons. Training at this force level will cause a breakdown and then regeneration of the tissue so it can exceed that force safely in the future. OK, great. So let’s train at this level every day, amiright?!

Rest and Regeneration
In case you missed it, what I said was that these adaptations are a process of breakdown and REGENERATION. Sadly, our bodies don’t regenerate in just a day. That’s why we need to understand the important role that rest plays in our training. When you don’t rest enough, you are training on connective tissue that is broken down and not as strong. Your threshold may actually be 390 Newtons because it has been “broken down”. You are in fact LOWERING your working threshold, temporarily. This is how we can get injured. Your tissue cannot handle the same stresses you have applied to it before. You go into your training thinking “yeah I’ll do the same weight, I am fine!” But, with the lower threshold, we open ourselves up to injury. All you have to do to avoid it? Rest appropriately!

Note: A good hangboard protocol will call for 48 to 72 hours of rest between sessions. So yeah, a 30 minute hangboard session requires 48+ hours of rest! Rest is important guys and gals.
Diet, Sleep, and Hydration
While we are training at this level, proper diet, sleep, and hydration also play a role. As we discussed in our treatment section, sleep is when we heal the most. Diet and nutrition provide our bodies the essential nutrients and minerals it needs to recover, and obviously none of this is possible without water
Now, there are many other factors that go into preventing an injury. One of those is the 7 attempt limit. It is OK to try a move multiple times, in fact, sometimes it is necessary to get stronger and to build our neural adaptations! You may flail on it the first 3 times, then on the 4th time it feels easy, that is your body adapting to the demands and understanding “hey, I can handle this force, no problem, I wasn’t so sure earlier! But I got this, let’s send!”
BUT, If you keep failing…. Don’t try more than 7 times. Repeating the same move too much can put way too much stress on your system and cause it to fail. Respect your body and move on to something else so you can keep climbing. Note: this doesn’t always have to be 7. If it is your hardest move… maybe limit yourself to 5 attempts to be safe.

Different climbing types and styles
The old adage of “We love what we are good at and hate what we suck at”, I think that’s Ben Franklin right? ;)
In climbing, we tend to get pin holed into certain climbing types and styles. This is a bad idea. You shouldn’t ONLY be good at crimps, and you shouldn’t ONLY be climbing overhang. Work on different styles to be a well-rounded athlete. I’ve personally caught myself many times making the excuse of “this climb just isn’t my style” and “I just suck at those kinds of moves.” While everyone naturally has different physiological strengths and weaknesses, don’t allow those strengths and weaknesses to turn into excuses. Unless, of course, you use them as an excuse to train!
Not only will this prevent you from an overuse injury related to purely being a crimp climber or dynamic climber, but it will make you a well rounded climber when you get to climbing areas with many different styles of climbs.
Now, that doesn’t mean you HAVE TO. If you love cave climbing and only cave climbing? Great! This is your sport, do as you please. Also, if you are training for your hardest project in the cave, you will need to focus your training there to send, so it’s OK for projecting too! Just try not to get permanently stuck in that style.
In addition to that, it’s important to have different climbing styles. If you know that you are a purely dynamic climber…. That’s not really a self compliment. That’s saying you suck at moving with control. While it is OK to acknowledge our strengths, not every move needs to be dynamic. Take time to train alternate styles for the same reasons mentioned above.
Full Crimpin’ Aint Easy
Ohhh the final topic has to be full crimping, right? This is another huge mistake we see in climbing which has people in both far left and right camps. And by that I mean there are people who say to never full crimp and those who do too much.
Full crimping is not inherently bad. Our bodies are freaking amazing and can adapt to basically anything. Look at some of the amazing things we can do?
Do you think they woke up being able to do that? No way. They took TIME. they practiced. They allowed their body to adapt to these changes. They didn’t just say Hey I think I might be able to use that here and boom did it. Make sense?
The same goes for full crimping. You need to practice this or you are more likely to get hurt when you “pull it out of your back pocket to send your proj”. Now, this also doesn’t mean you should practice it every day. It is a tool. Tools are not used on every job and it should be used when appropriately, but that doesn’t mean you shouldn’t stay up to date with the tool to make sure when you have to use it you are ready to do so.
So in summary:
Train for tissue adaptation
Get proper rest and avoiding overtraining
Get proper sleep, have a good diet, and stay hydrated
Follow the Rule of 7 - Don’t attempting too many of the same moves
Climb different types of holds. Don't let yourself get pigeon-holed into climbing only crimps or only slopers
Embrace different climbing styles. There's a time to be dynamic and a time to be slow and controlled.
Don’t make every move a full crimp, but also, don’t fall into the trap of never training them.
Bonus Section
Bonus: why you got hurt in the first place
Benchmarks:
If the reason you got hurt was overtraining. Remember, the best thing to understand is load management. The body can handle tremendous amounts of stress, if it is trained properly. Write down your training, keep track of it and keep yourself safe out there.
One major tip I have is to create benchmarks. A benchmark should be a repeatable task that is not your max effort. For example…. You may know that you can easily do a +45 pound maxhang on a 20mm edge for 3 sets of 10 seconds each, no problem. Or, you may know that you can do a +7- pound pull up. If you have been climbing and training a lot, and all of the sudden these benchmarks feel really hard or impossible to reach, you are overtraining! You are set up for an injury. Rest, and see the amazing benefits of it, and then re-test those benchmarks.
Understand your level of training
A V4 climber wouldn’t likely attempt a V14 problem, so why are you trying the training program of a V15 climber? Know your limits. Safe training = continuous training. Can’t make gains if you’re hurt.
References
King, Elizabeth A., and John R. Lien. “Flexor Tendon Pulley Injuries in Rock Climbers.” Hand Clinics, vol. 33, no. 1, 2017, pp. 141–148., doi:10.1016/j.hcl.2016.08.006.
Vigouroux, Laurent, et al. “Estimation of Finger Muscle Tendon Tensions and Pulley Forces during Specific Sport-Climbing Grip Techniques.” Journal of Biomechanics, vol. 39, no. 14, 2006, pp. 2583–2592., doi:10.1016/j.jbiomech.2005.08.027.
Viru, Atko. “Mobilisation of Structural Proteins During Exercise.” Sports Medicine, vol. 4, no. 2, 1987, pp. 95–128., doi:10.2165/00007256-198704020-00003.
https://www.physio-pedia.com/Instrument_Assisted_Soft_Tissue_Mobilization
Disclaimer:
As always, exercises are to be performed assuming your own risk and should not be done if you feel you are at risk for injury. See a medical professional if you have concerns before starting new exercises.
Written and Produced by Jason Hooper (PT, DPT, OCS, SCS, CAFS) and Emile Modesitt
IG: @hoopersbetaofficial