How to Fix an FDP Injury for Climbers (Pain in Finger, Hand, or Forearm)
Hooper’s Beta Ep. 90
INTRODUCTION
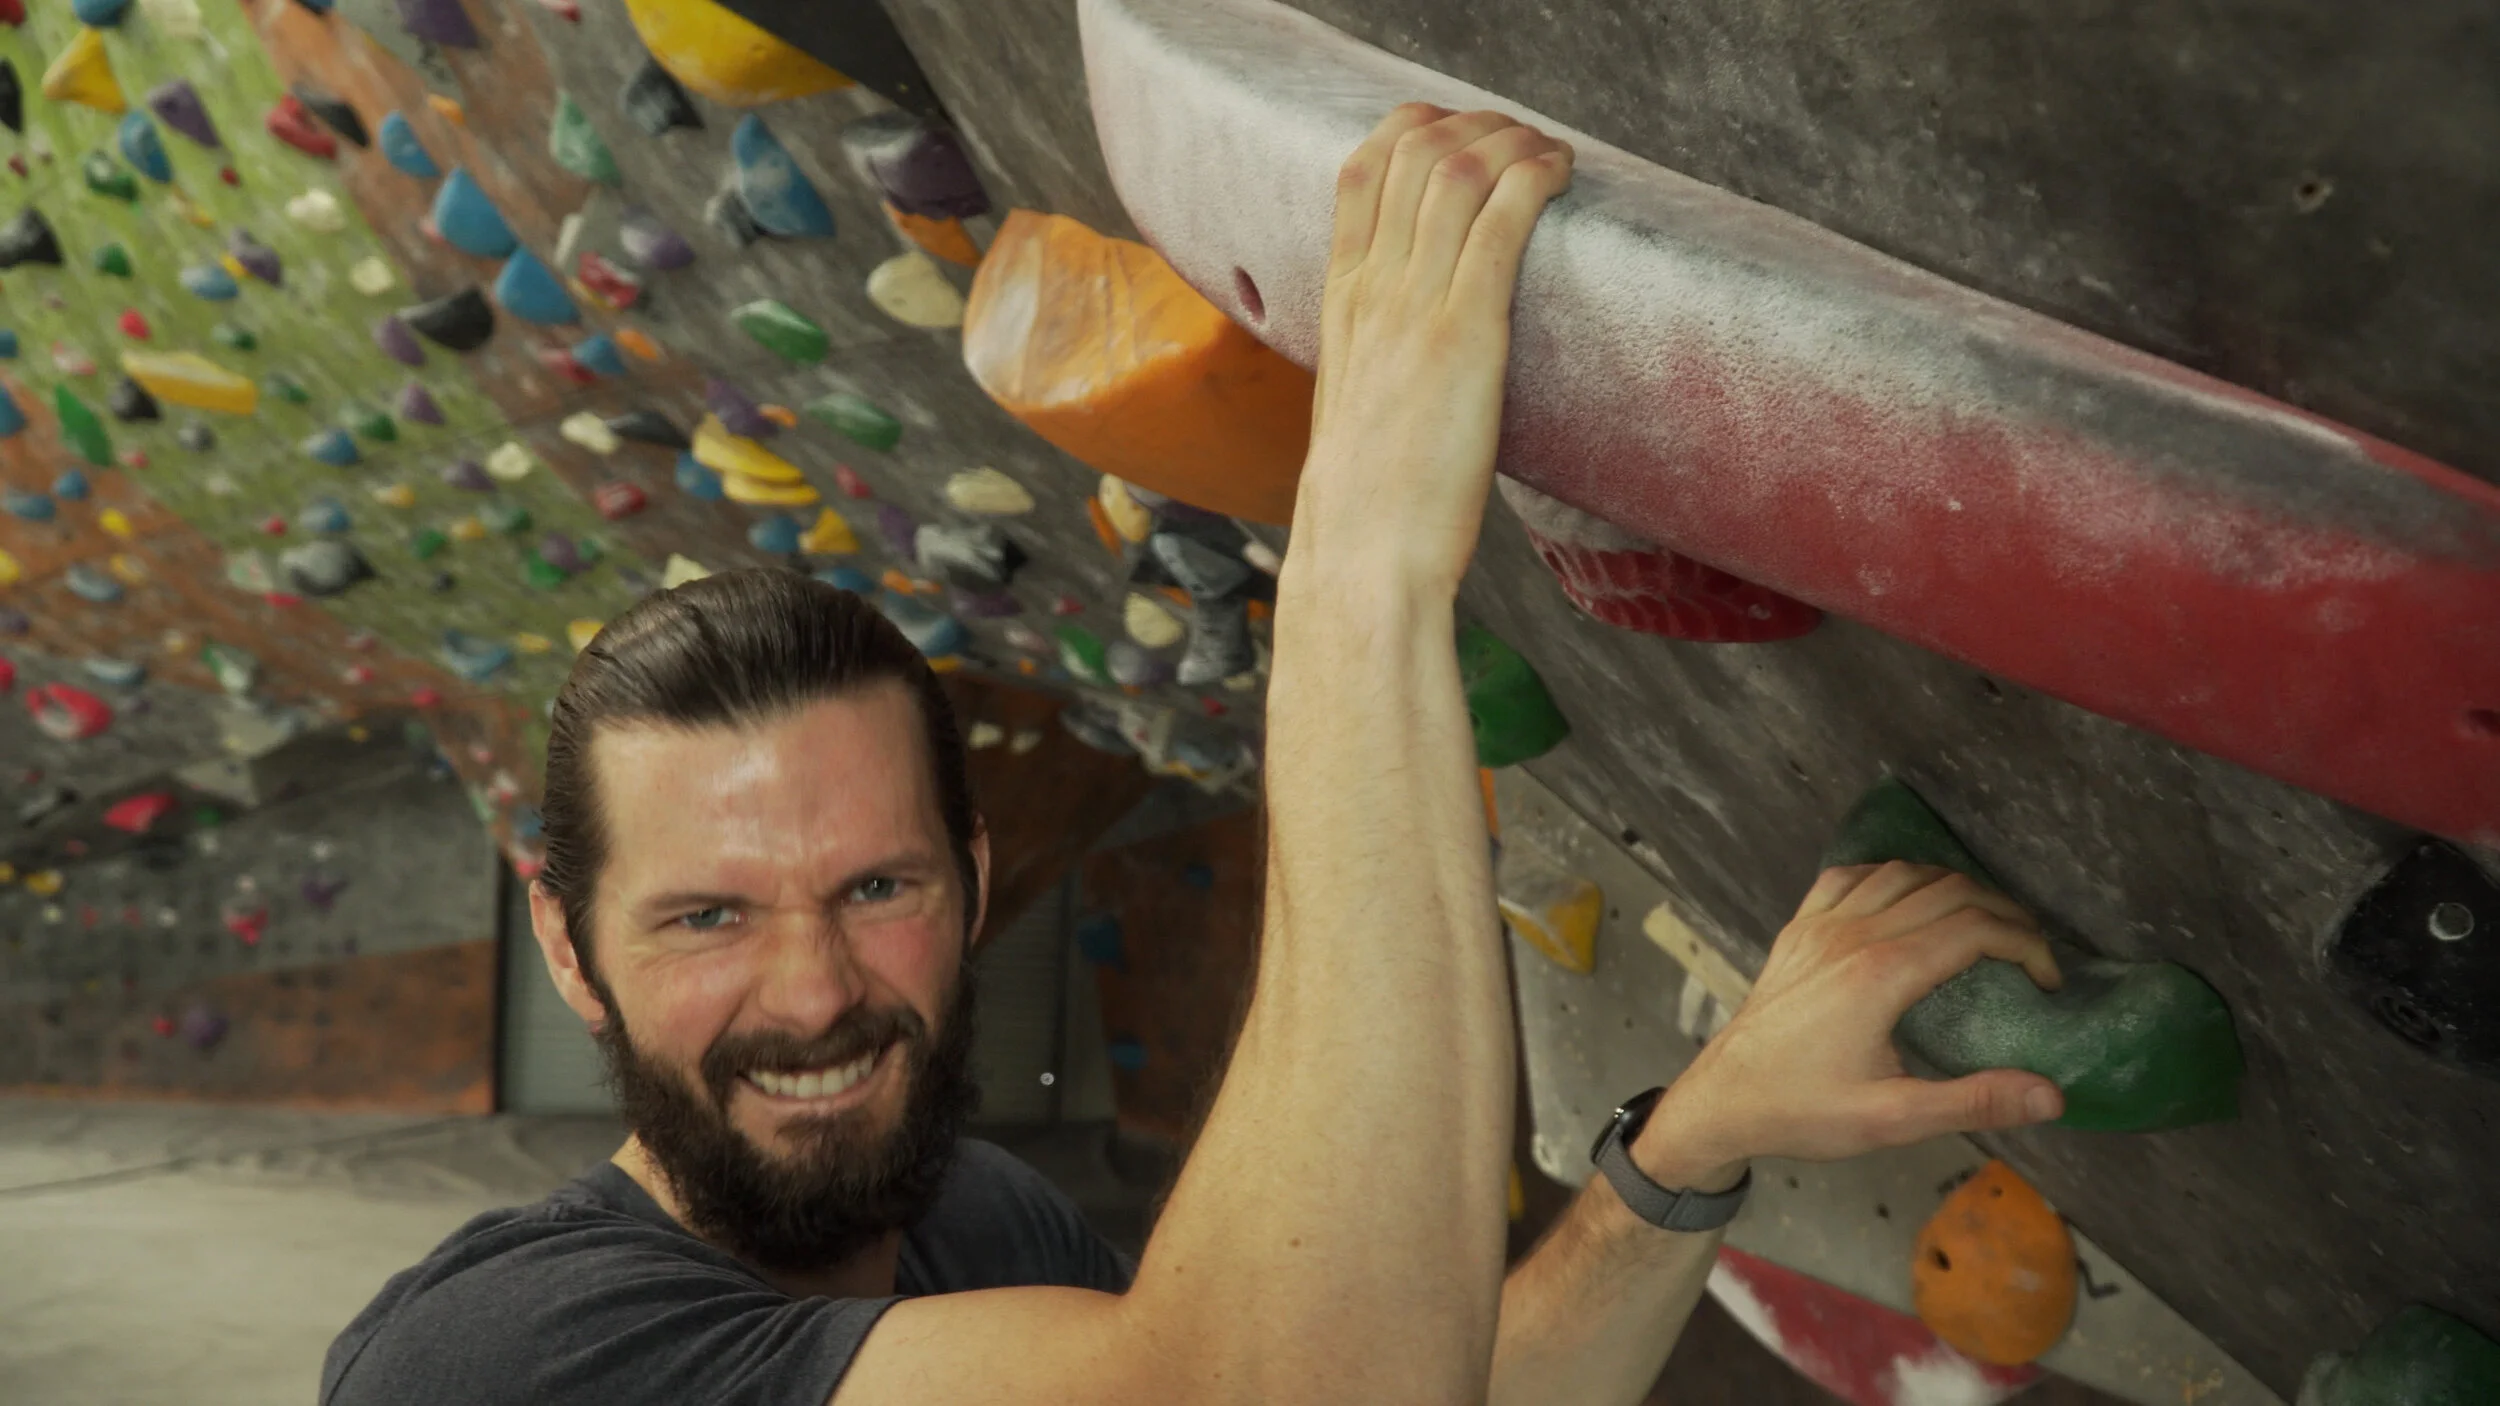
Do you like holding holds? How about gripping grips? Do you like slappin’ them slopers, squeezin’ them pinches, dunkin’ them jugs, and clampin’ them crimps? If you said “yes” to any or all of these questions, you just might be a frequent FDP abuser. Unfortunately, FDPs don’t always appreciate being yanked around, so today we’re learning how to do some sweet sweet rehab.
In this video we'll discuss the injuries and rehab activities associated with the flexor digitorum profundus, or FDP. We’ll start with relevant anatomy, then move on to internal risk factors, causes of injury, testing and symptoms, and finally how to heal and retrain to get you back to sending!
ANATOMY
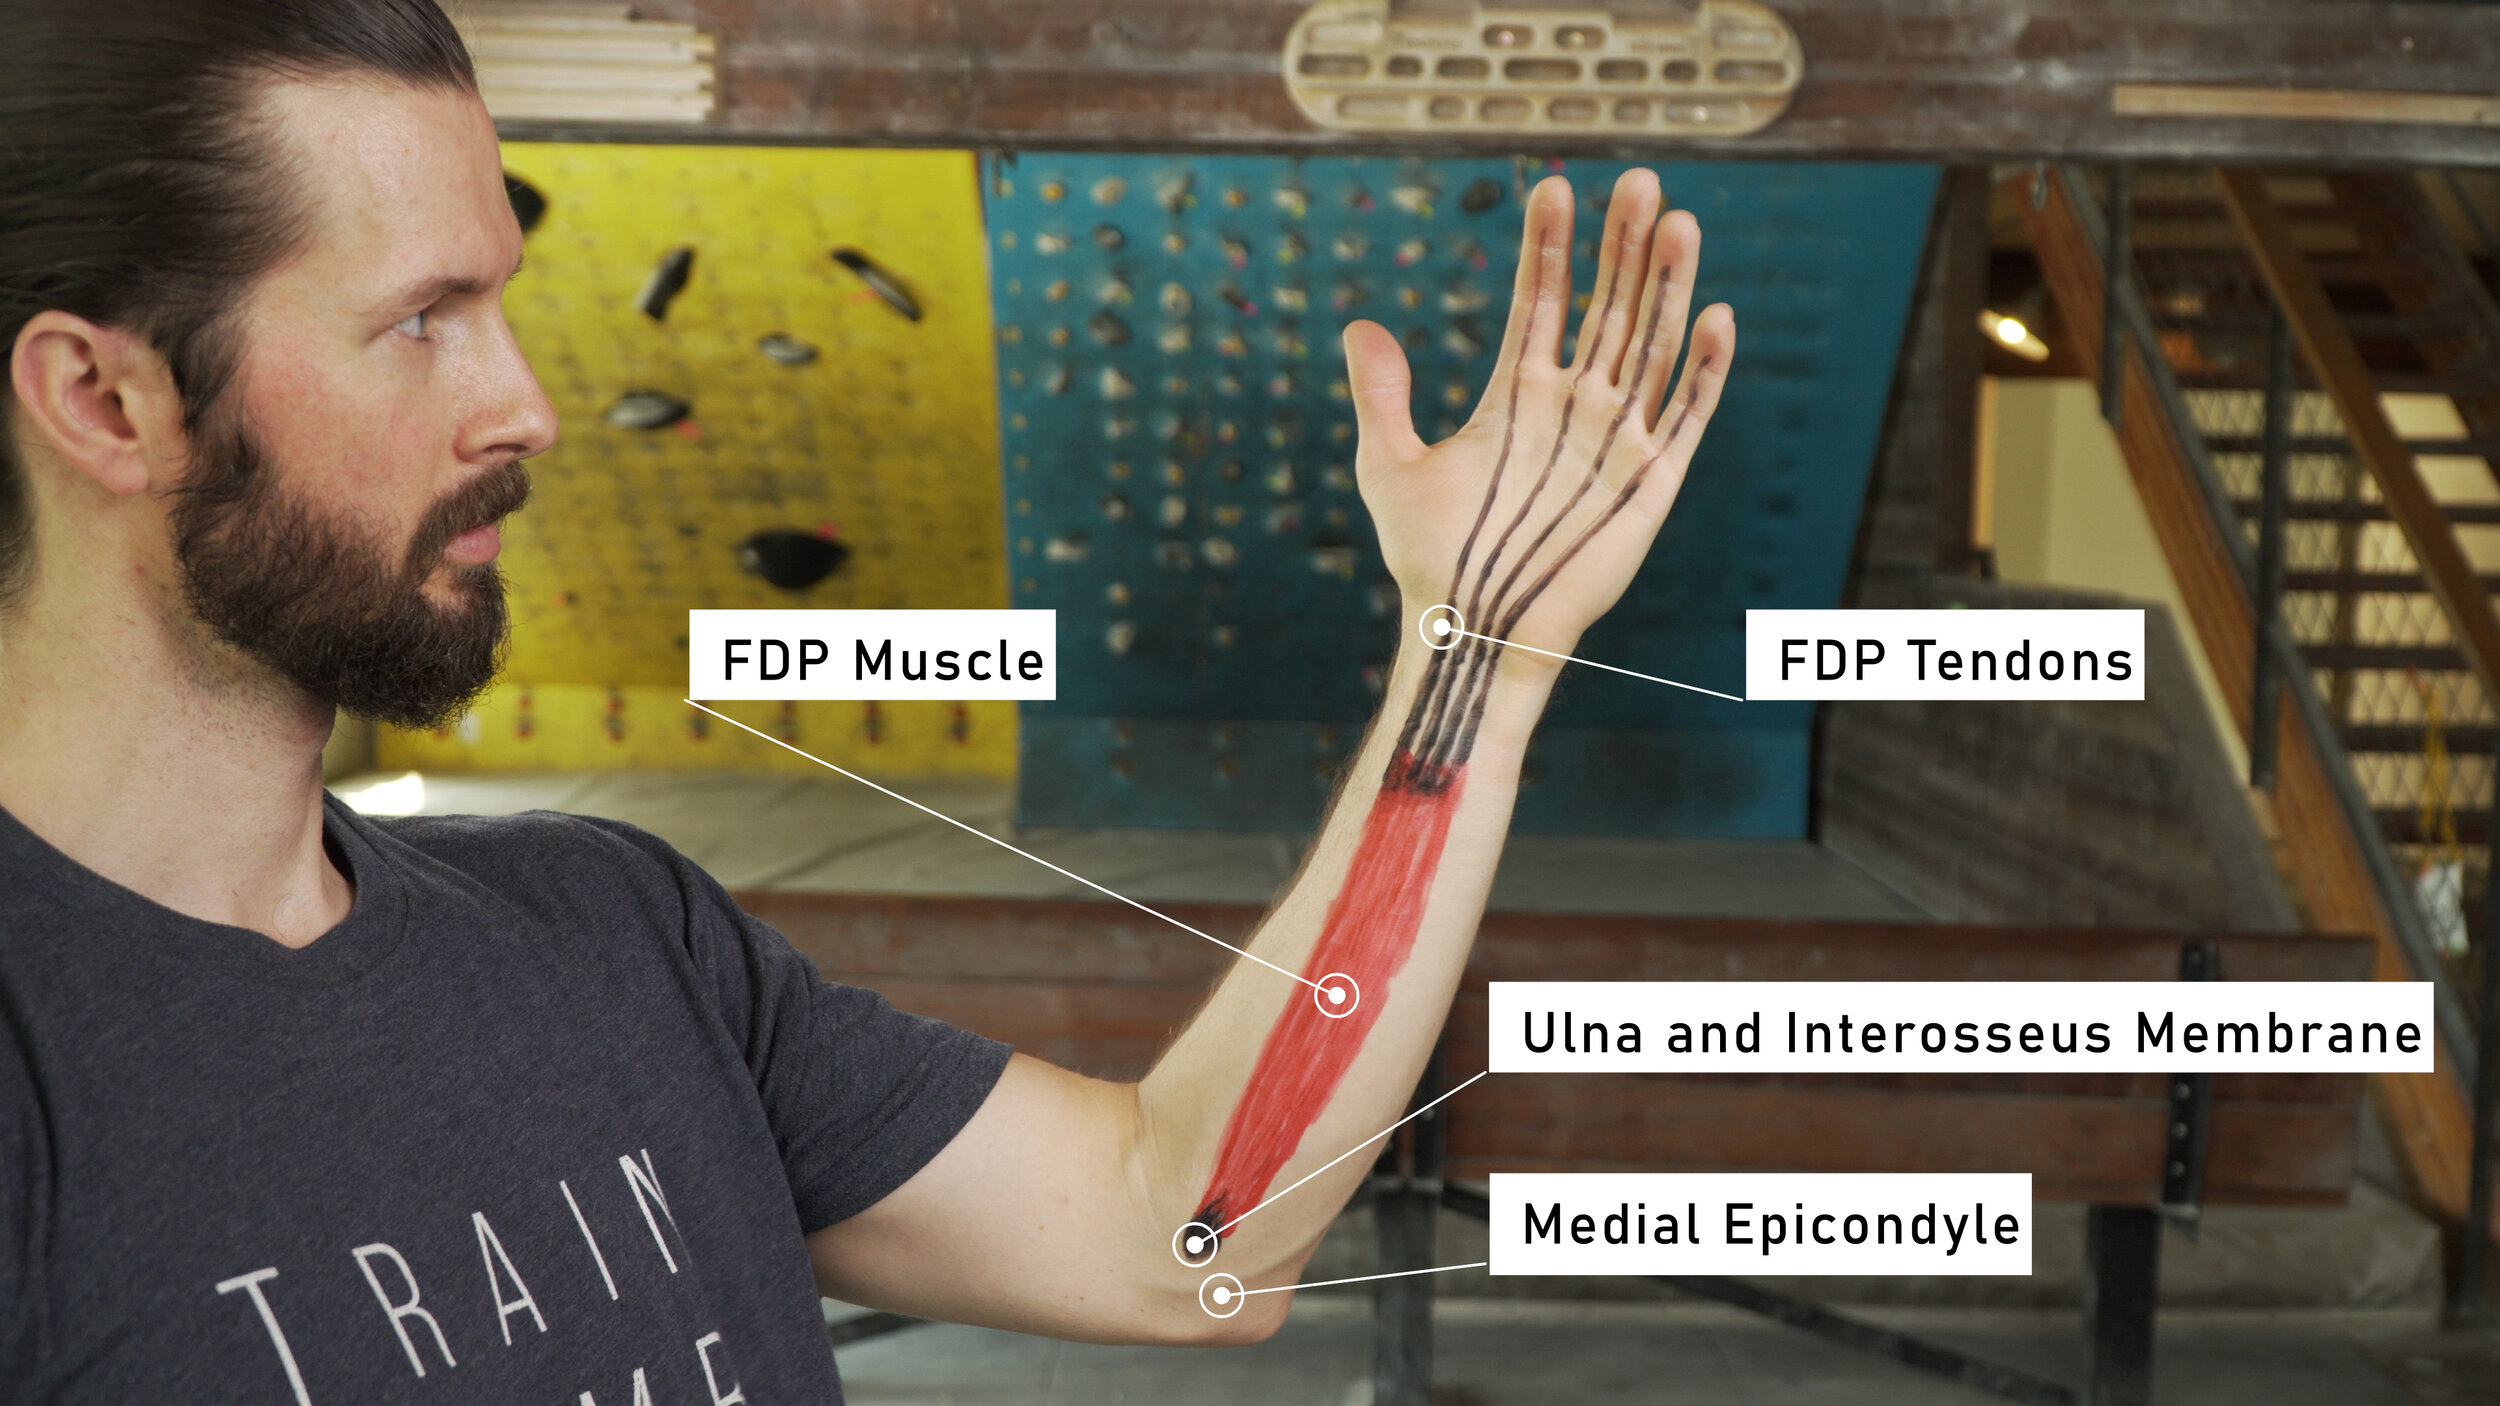
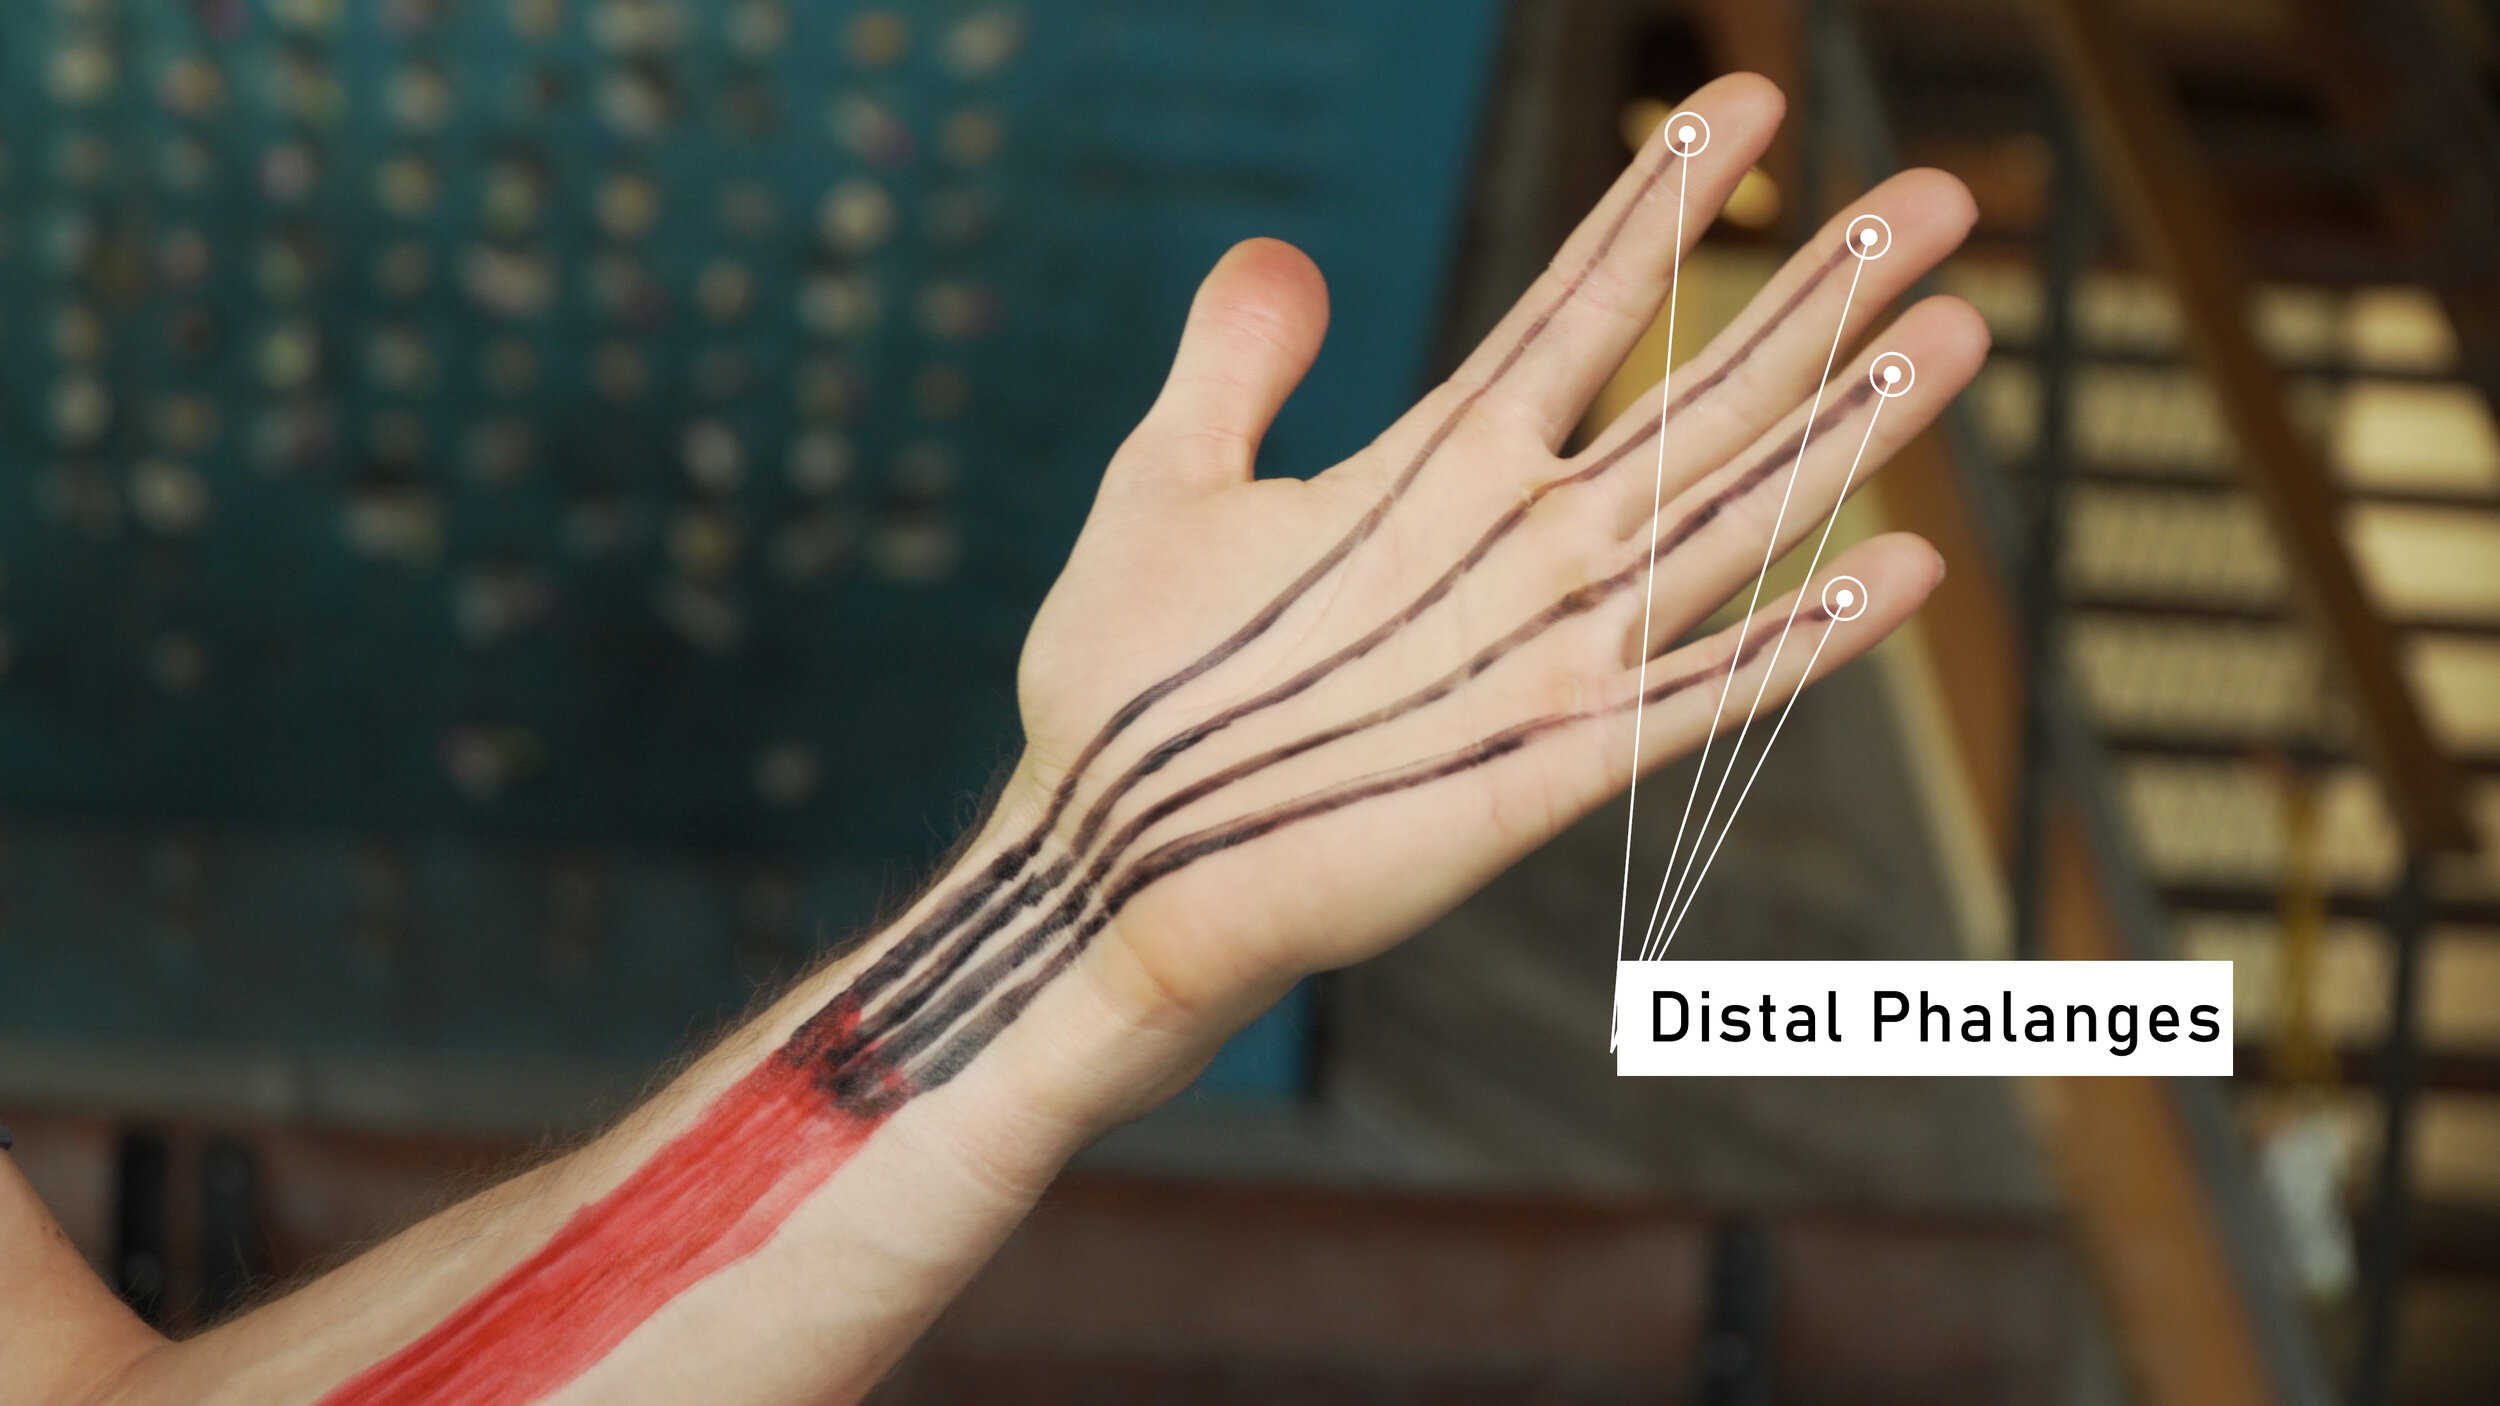
The FDP is the most important finger flexor we have. It helps in multiple hand positions, and developing its strength is vital to our advancement in climbing, but it’s also the second most commonly issued tissue for climbers. So what is it? The FDP is a muscle that originates on the ulna and interosseous membrane, unlike many of the other flexors that originate at the medial epicondyle. It travels down the anterior forearm and then splits into 4 tendons, which attach at the base of our distal phalange and allow the FDP to fully flex the fingers.
RISK FACTORS
There are three main anatomical traits, or risk factors, that can make your FDP more prone to injury.
#1: Weak FDP
The biggest anatomical risk factor is a direct lack of strength of the FDP muscles themselves. This makes them more prone to injury due to an inability to handle the strain and stress placed upon them while climbing.
#2: Weak Shoulders
Lack of strength in the shoulders is an additional internal risk factor. If you have a weakness in your shoulders, you will become more dependent on your forearms. This will place added strain/stress repetitively to the FDP which can produce an injury.
#3: Shortened FDP
Also, shortening of the FDP can make them more prone to injury as they are less able to handle rapid lengthening of the muscle body and/or tendon and are typically weaker in a lengthened position. Commonly due to a combination of strengthening the tissue without stretching or lengthening the tissue, this shortened tissue can produce injuries when combined with some external factors.
CAUSES OF INJURY
So we know what the risk factors are, but how does the FDP actually get injured in the first place? Again there are three main causes.
#1: Tissue Overload
The most common cause of injury is simply exceeding the tensile strength of the FDP. This can happen when your foot blows off a hold, which suddenly transfers all that load to your fingers. It could also happen when you don’t or can’t get all your fingers on a hold, meaning the load can’t be spread across all four fingers. Either way, when the tissue gets overloaded something’s gotta give, and in this case that means the tissue tears to some extent.
#2: Overuse
The second most common cause is simple overuse. Since the FDP is used for basically every type of hold in climbing, it gets a lot of mileage. Overuse happens when the FDP muscle or tendons are not given enough time to heal between periods of intense activity. This creates a snowball effect where the stress piles up, ultimately leading to weakening of the tissue and higher risk of more significant or chronic injury. Not taking rest days and overly intense training are the most common paths to overuse.
#3: Forced Hyperextension
When your fingers are forcefully extended beyond their normal range of motion the FDP tendons are lengthened to an unnatural degree, making an injury possible. This could be the result of a foot blowing while holding on with one hand, or it could be the result of an awkward fall. The rapid hyperextension while trying to maintain a flexed position can result in a more severe injury to the FDP, but a full tear is uncommon. An injury due to forced hyperextension can be more likely if risk factor #3, shortened FDP, applies to you.
Now that we know a bit more about the FDP and how it gets injured, let’s discuss the tests you can use to determine the severity of an FDP injury.
TESTING
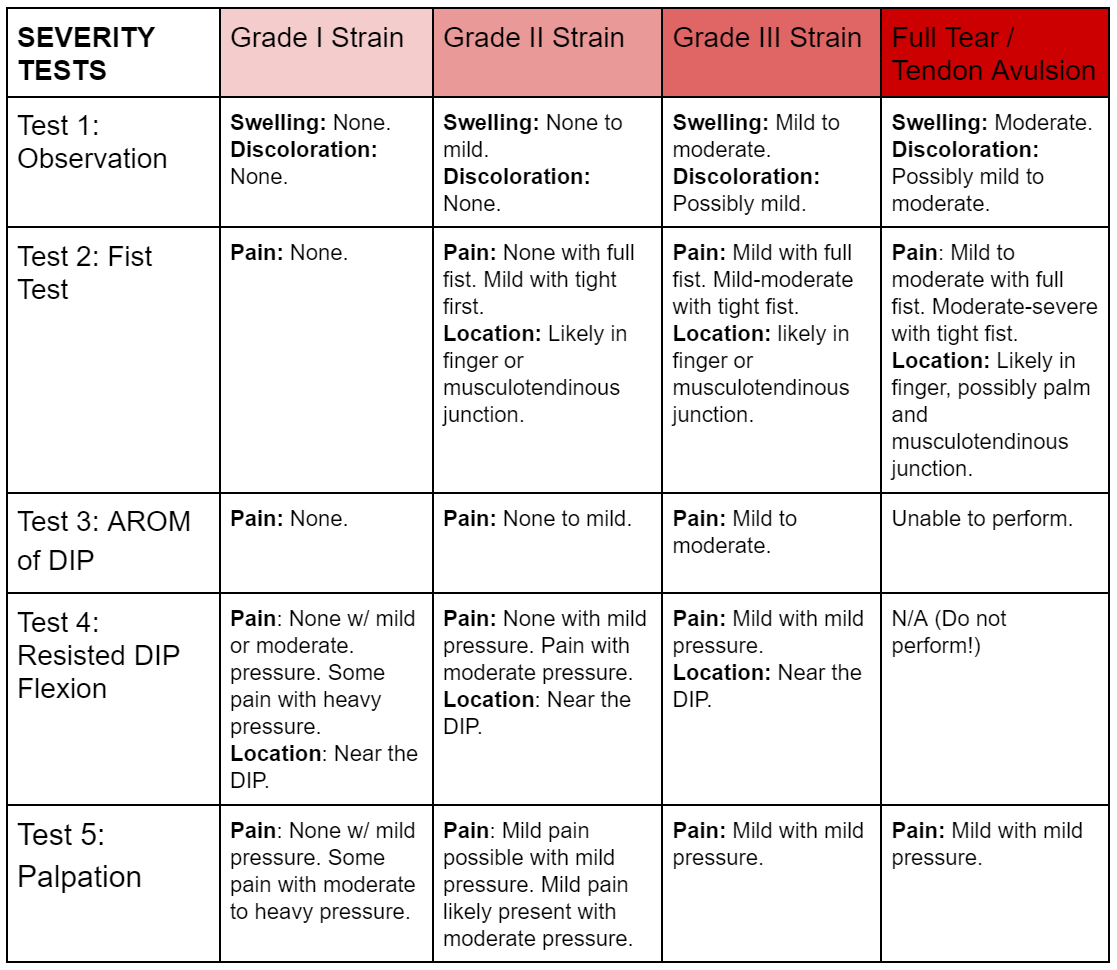
We’re going to do five simple tests and then compare our results to this super cool chart so you can see how significant your injury is. Be sure to note what you feel and observe during each test as well as the location and intensity of pain (none, mild, moderate, or severe). You don’t actually want to do anything that causes you more than mild pain, but you should be able to infer the intensity by how much or how little force is required to evoke symptoms.
Test 1: Observation
The first is simply observation. This is your no-risk, no-pain test. We are looking for swelling or discoloration here. The most likely location for swelling would be at the injured finger itself, particularly near the DIP joint. You may also experience some swelling in the palm closer to the base of the finger. Swelling may be harder to see in the forearm unless it is severe. Discoloration at the finger may occur but will likely be minimal if any, though discoloration in the forearm can be more pronounced.
Test 2: Fist Test
Simply open your hand fully, then flex to make a fist. If you can perform this without pain, gradually squeeze tighter.
Test 3: Active Range of Motion (AROM) of DIP
Simply try to extend your fingers fully, then flex ONLY at the DIP joint. You may need to use your other hand to stop the PIP from flexing so you can isolate the DIP joint.
Test 4: Resisted DIP flexion
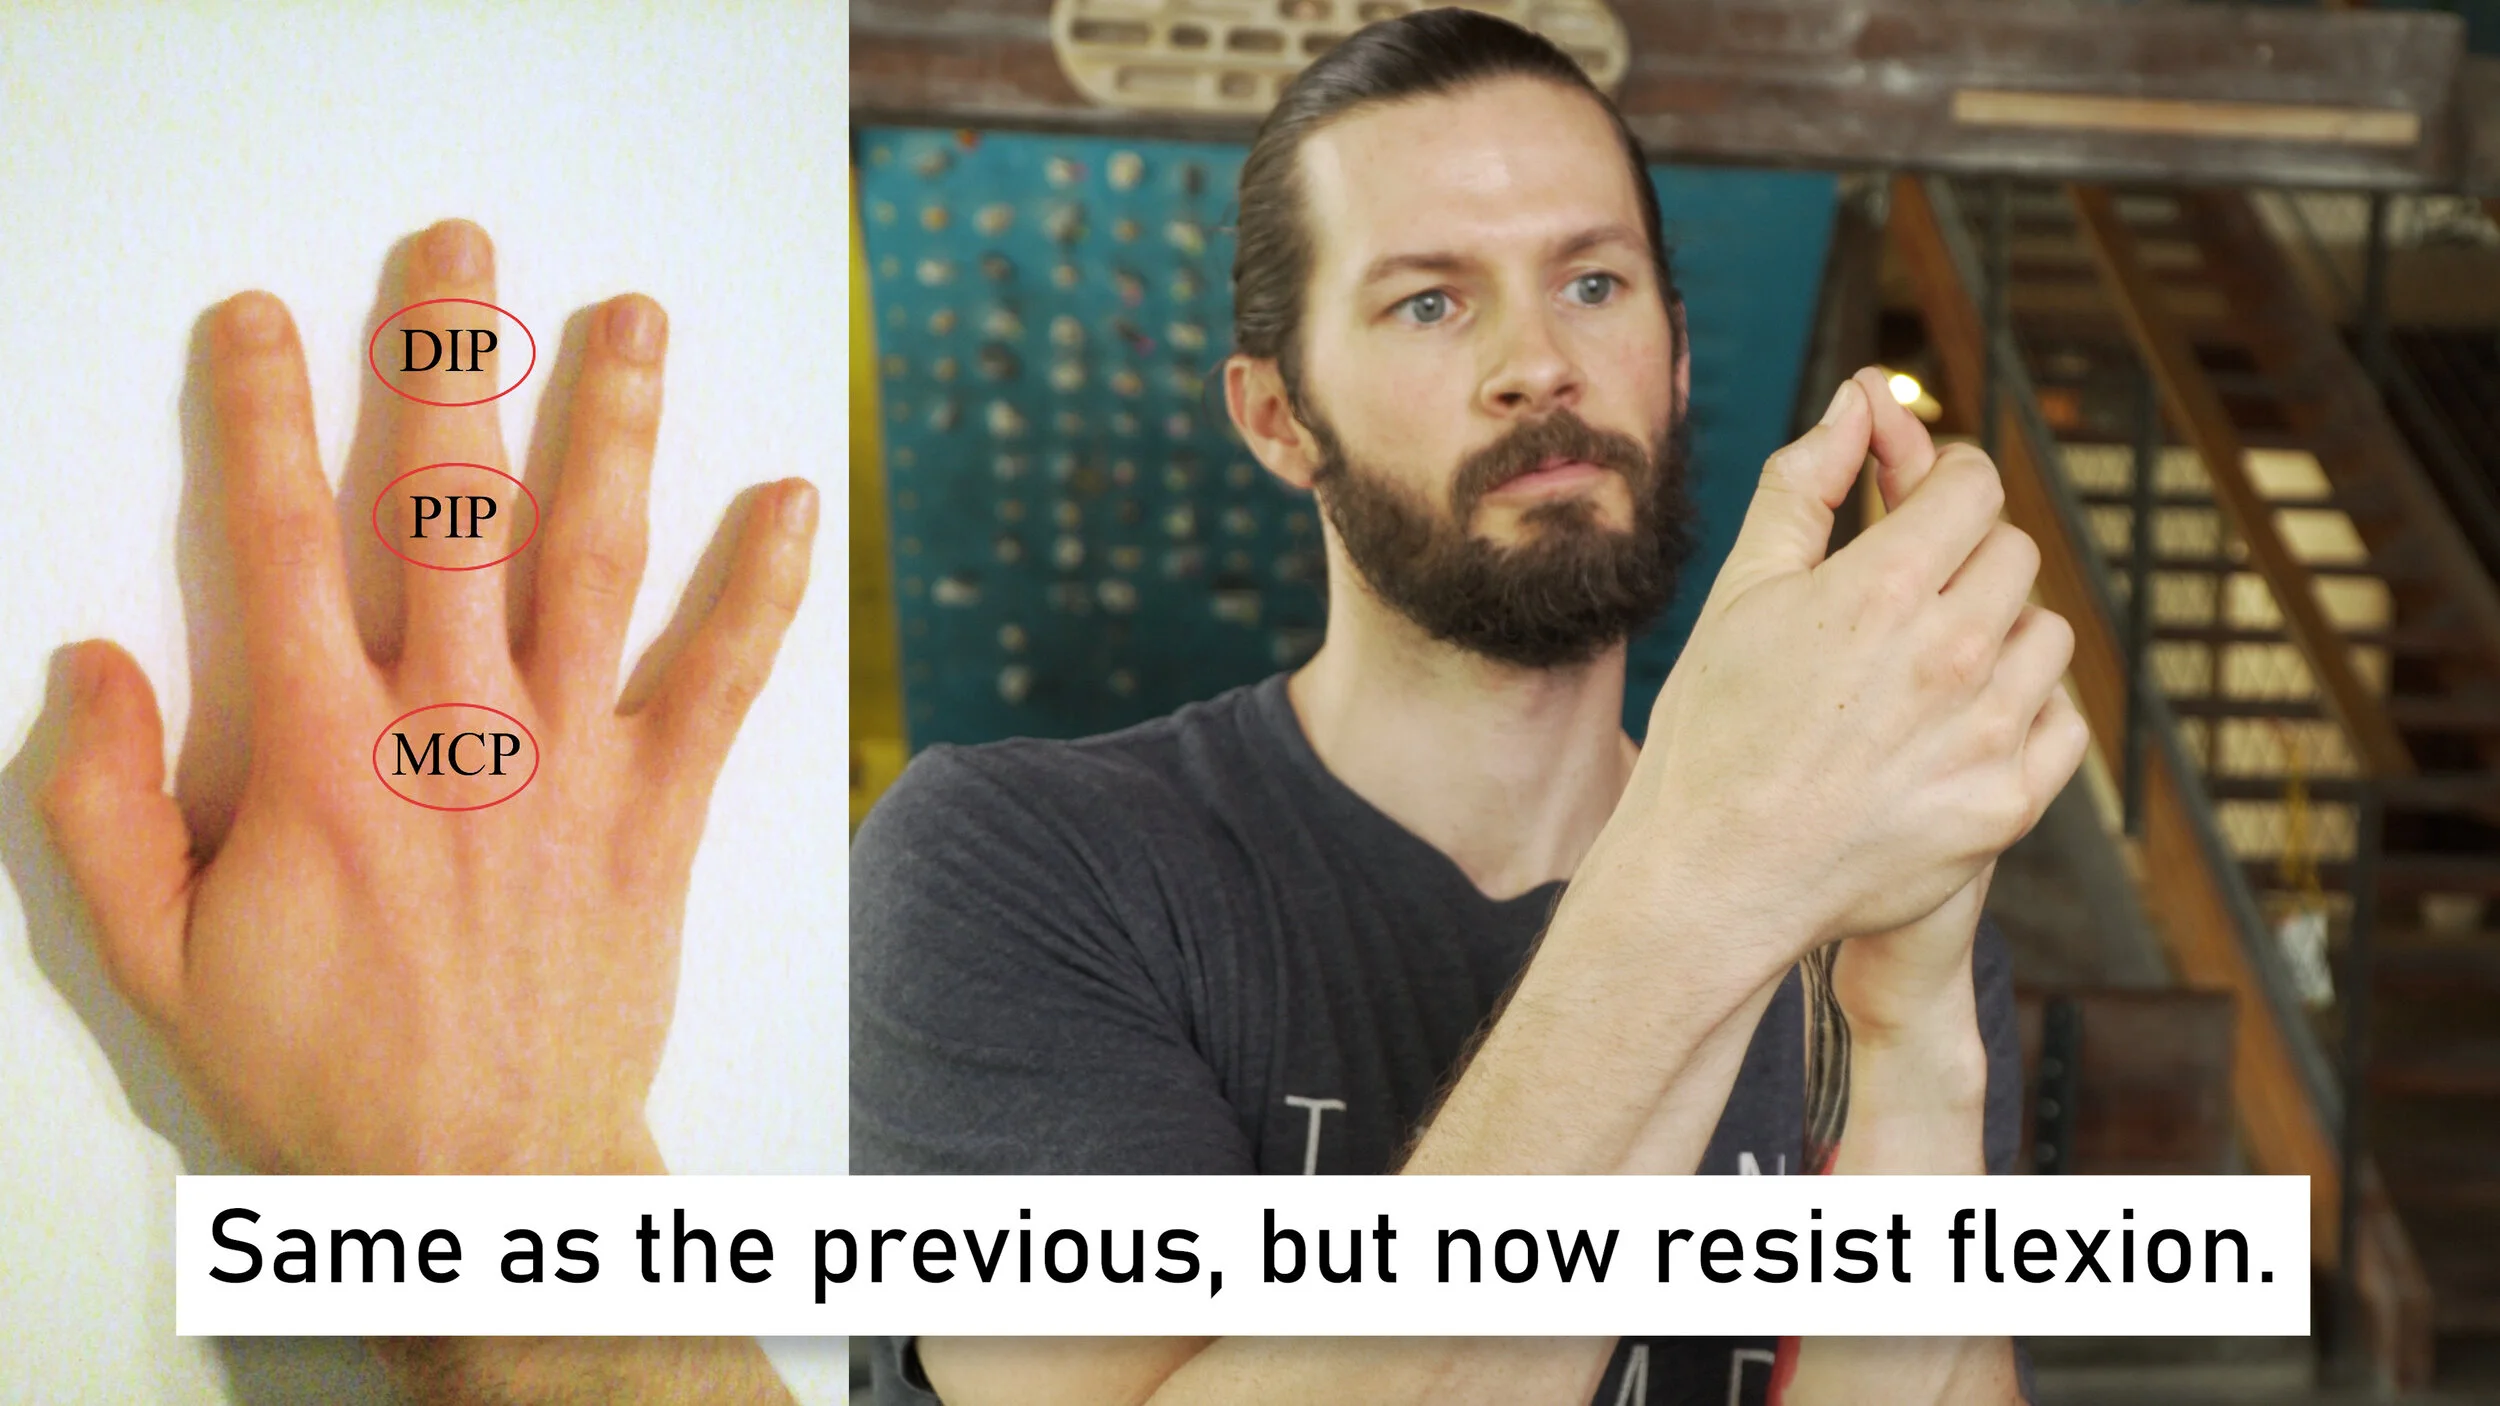
Hold the PIP joint of your injured finger in place with your healthy hand, then use the thumb of your healthy hand to resist flexion at the DIP joint. Start with mild pressure then work up to moderate and heavy pressure IF each stage does not produce pain. Do not perform if you were unable to move the finger in the prior AROM test.
Test 5: Palpation
While palpation won’t likely cause the injury to actually worsen, it may cause some discomfort which may affect the other tests. Hence, we do this last. Palpate the entire finger and along the track of the FDP and see what you feel. Start with mild pressure and progress to moderate or even heavy pressure IF each stage of pressure does not cause pain.
Results
Now that you’ve performed the tests, compare your symptoms to the chart to determine the severity of your injury. This chart and more will be available in the show notes, so check the link in the description for that.
*Note: The locations noted in the table are simply the most likely locations to feel discomfort if it is specific to that test. Symptom location may vary and can occur anywhere along the muscle/tendon for most injuries.
Now there’s one last thing we need to do before moving onto treatment. There is a chance that your FDP injury isn’t actually an FDP injury. To rule out other possibilities, we’ll again perform a few simple tests. This is known as differential diagnosis.
DIFFERENTIAL DIAGNOSIS
Here our main concern is ruling out a lumbrical, pulley, and FDS injury. These tests will involve loading the affected tissue in various hand positions and then noting the intensity of your symptoms. You’ll then use this information to see what best matches your results. I’ll have a chart up at the end for you to reference just like we did with the previous section.
For all these tests you can use a mobile board, hangboard, or just your opposite hand!
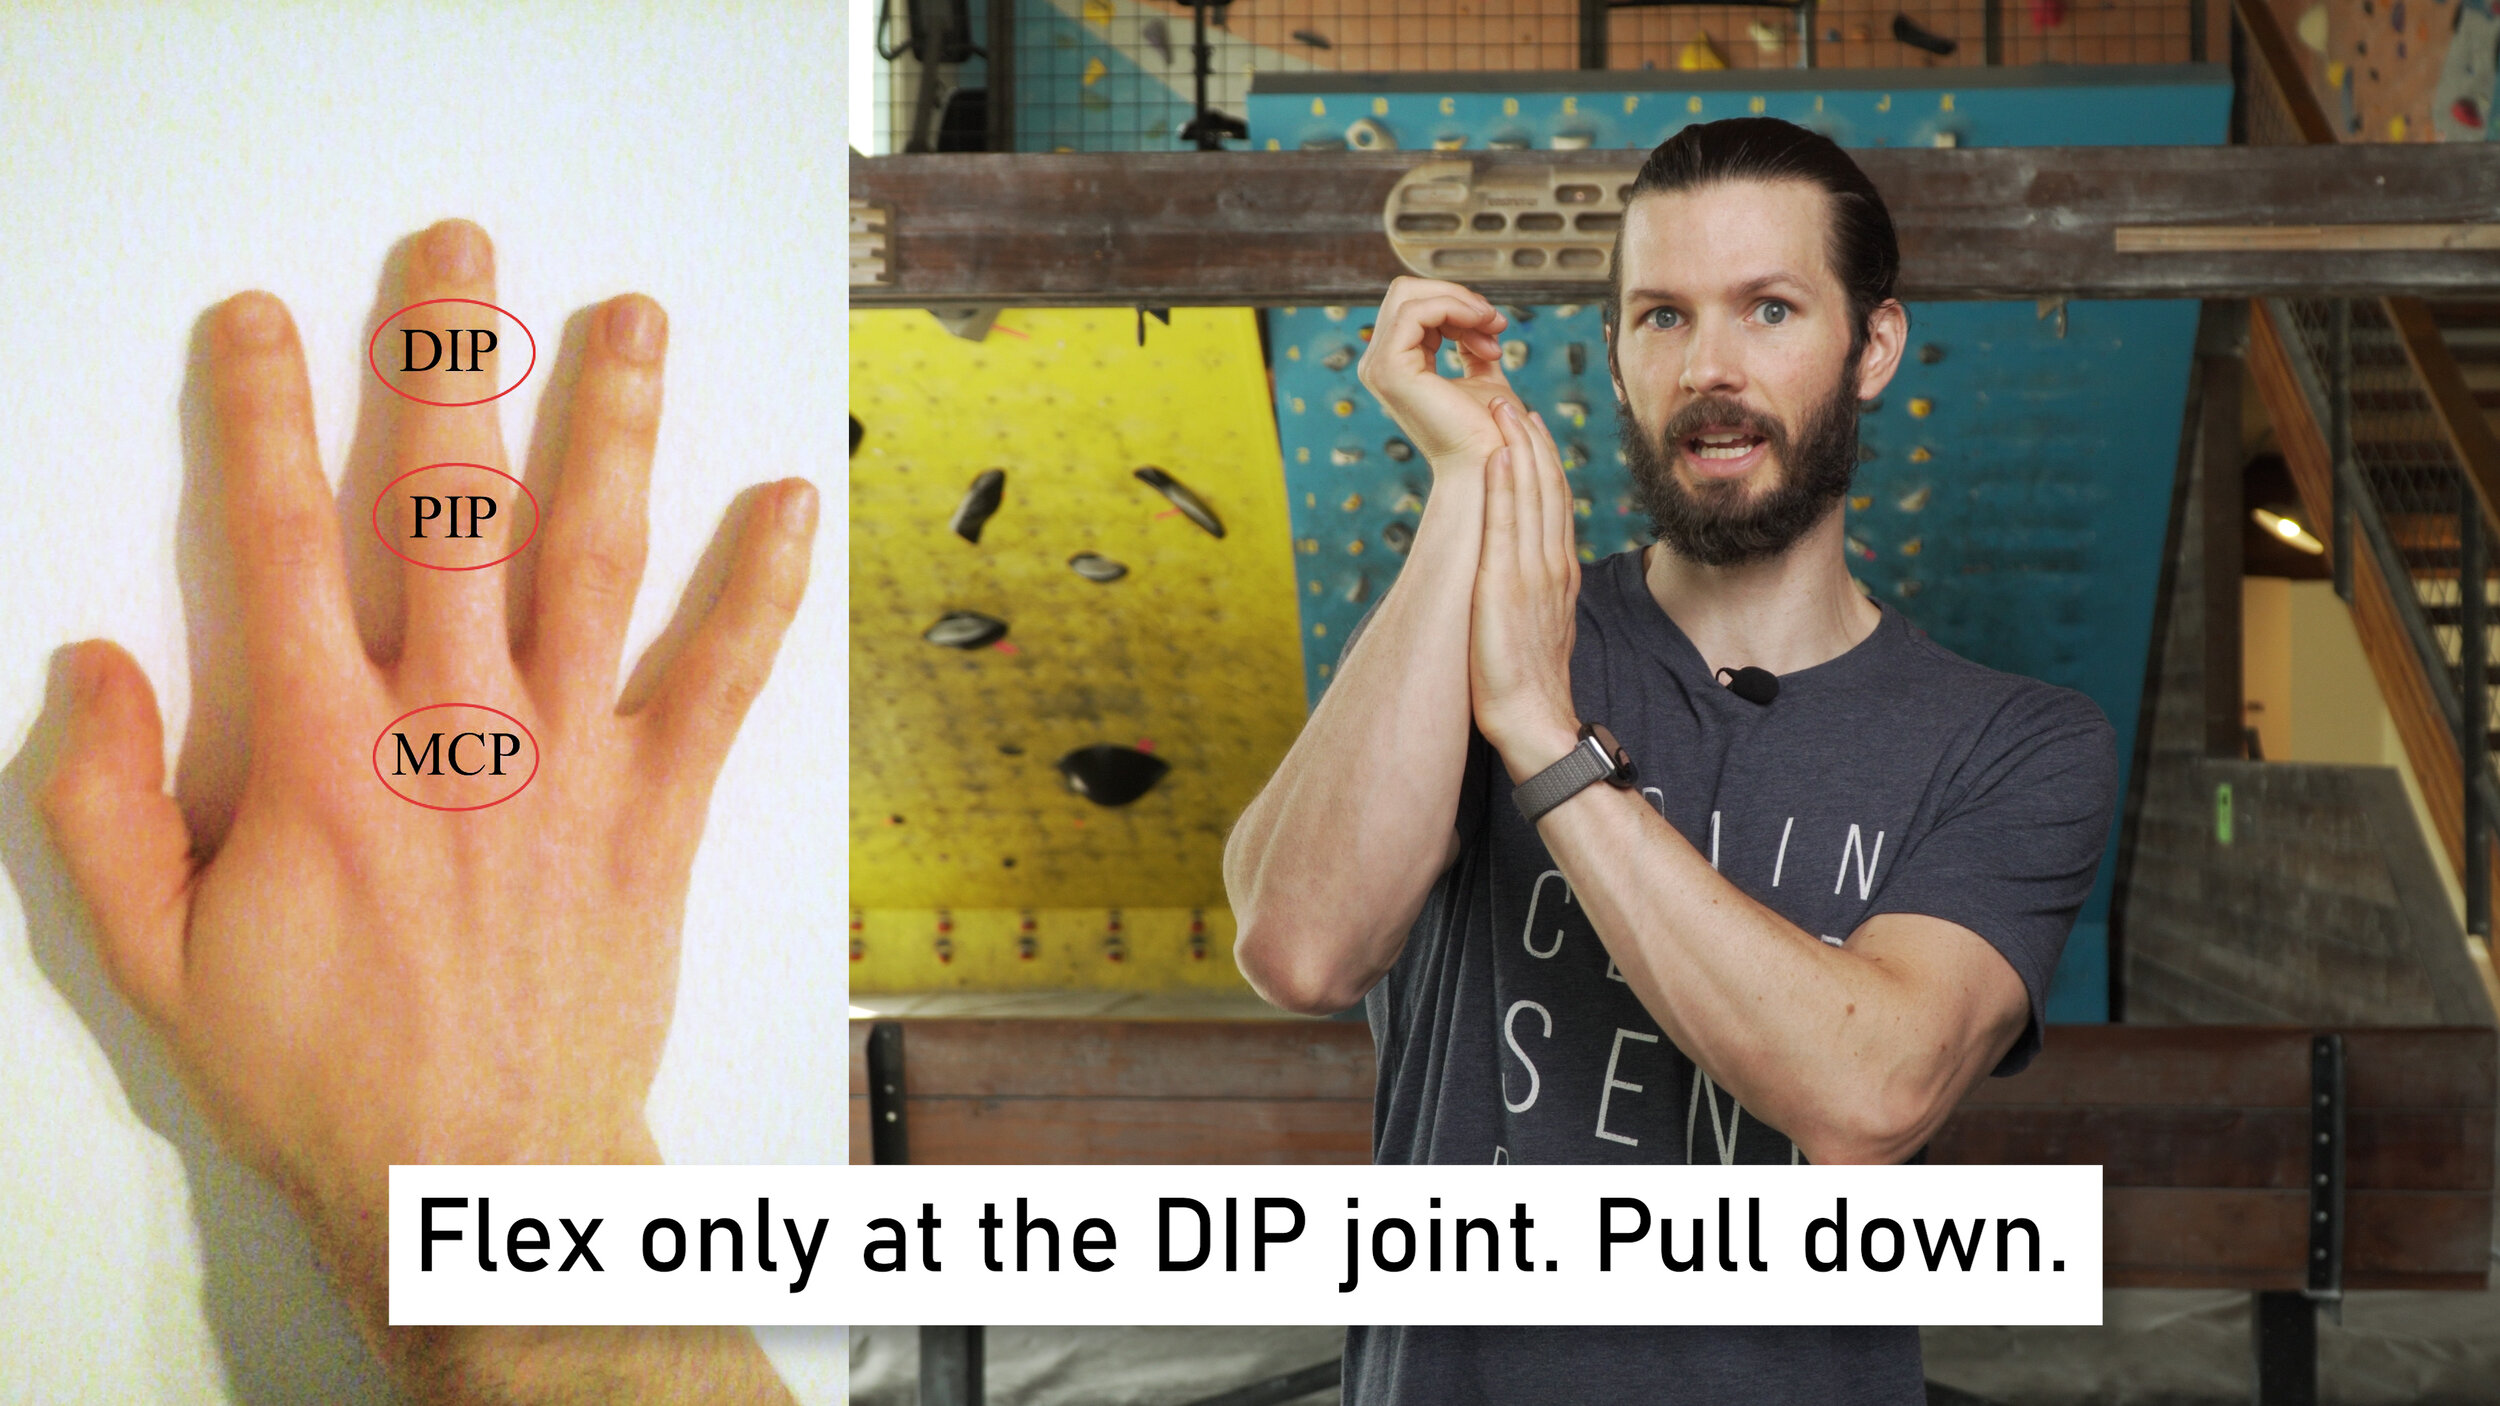
Test #1: Open hand (flexion at DIP)
Place the affected hand with just the fingertips on the palm of the unaffected hand. Keep the PIP straight and flex at the DIP. Pull down as hard as you comfortably can.
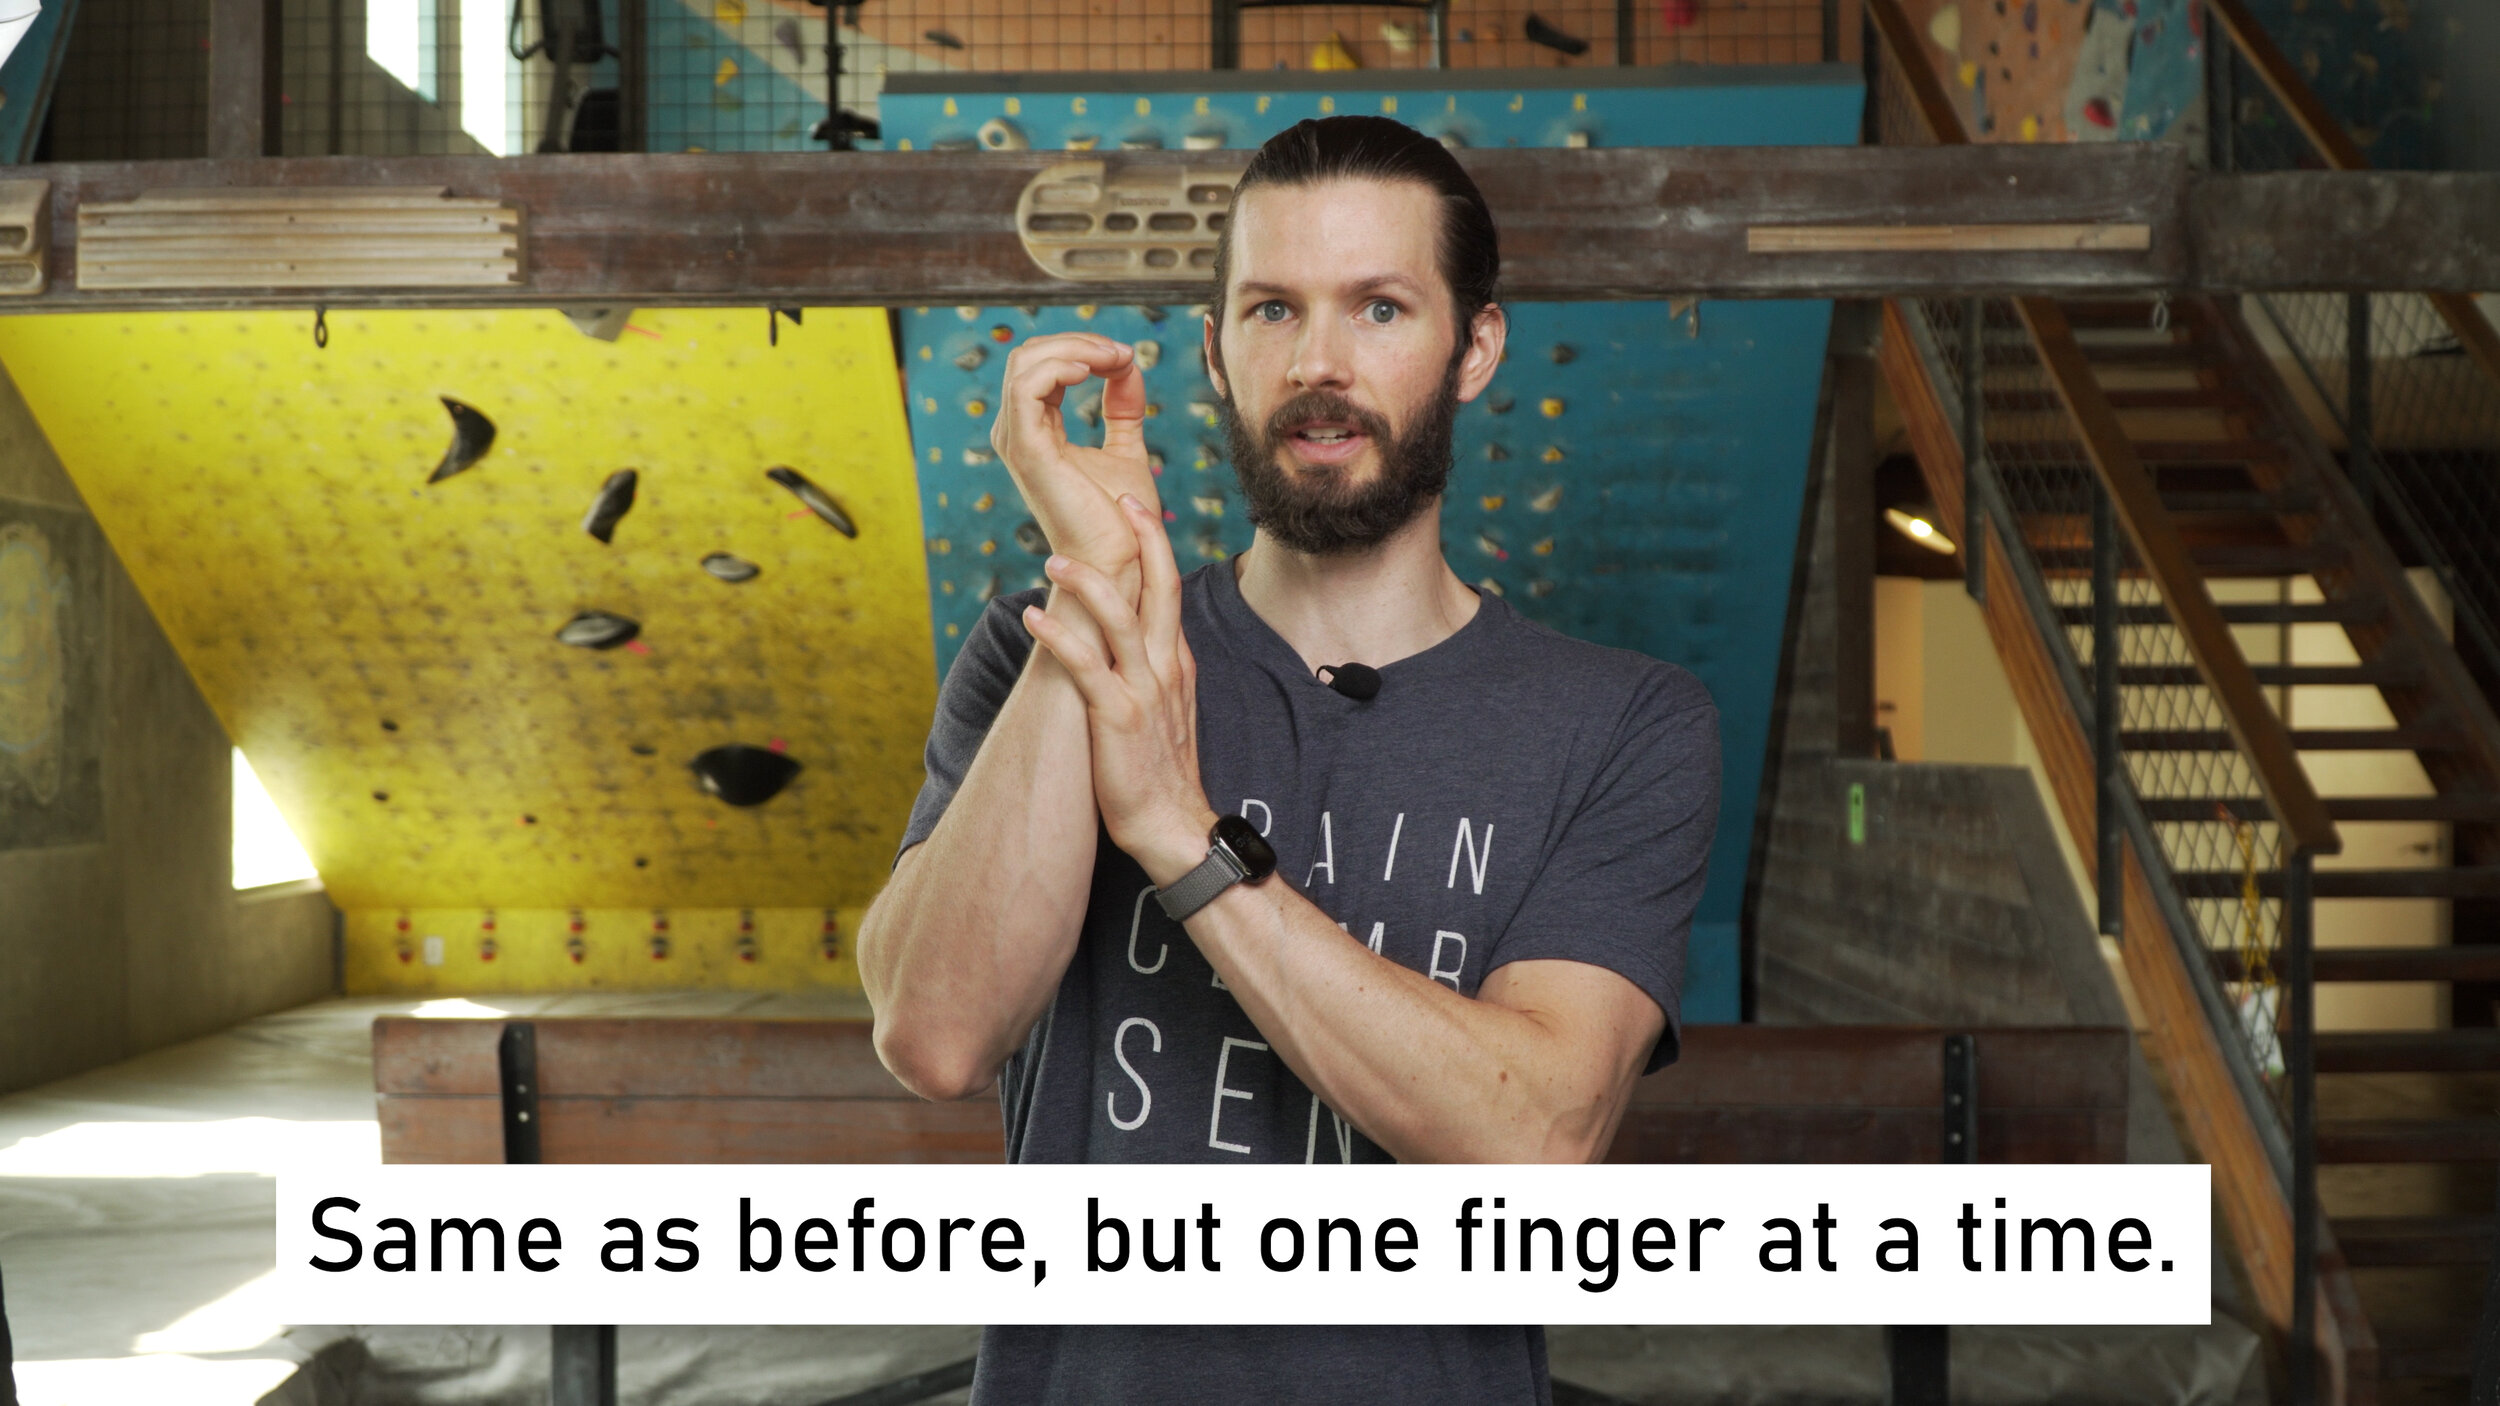
Test #2: Open hand single finger (flexion at DIP)
Same as before but now isolate just the affected and then neighboring fingers.
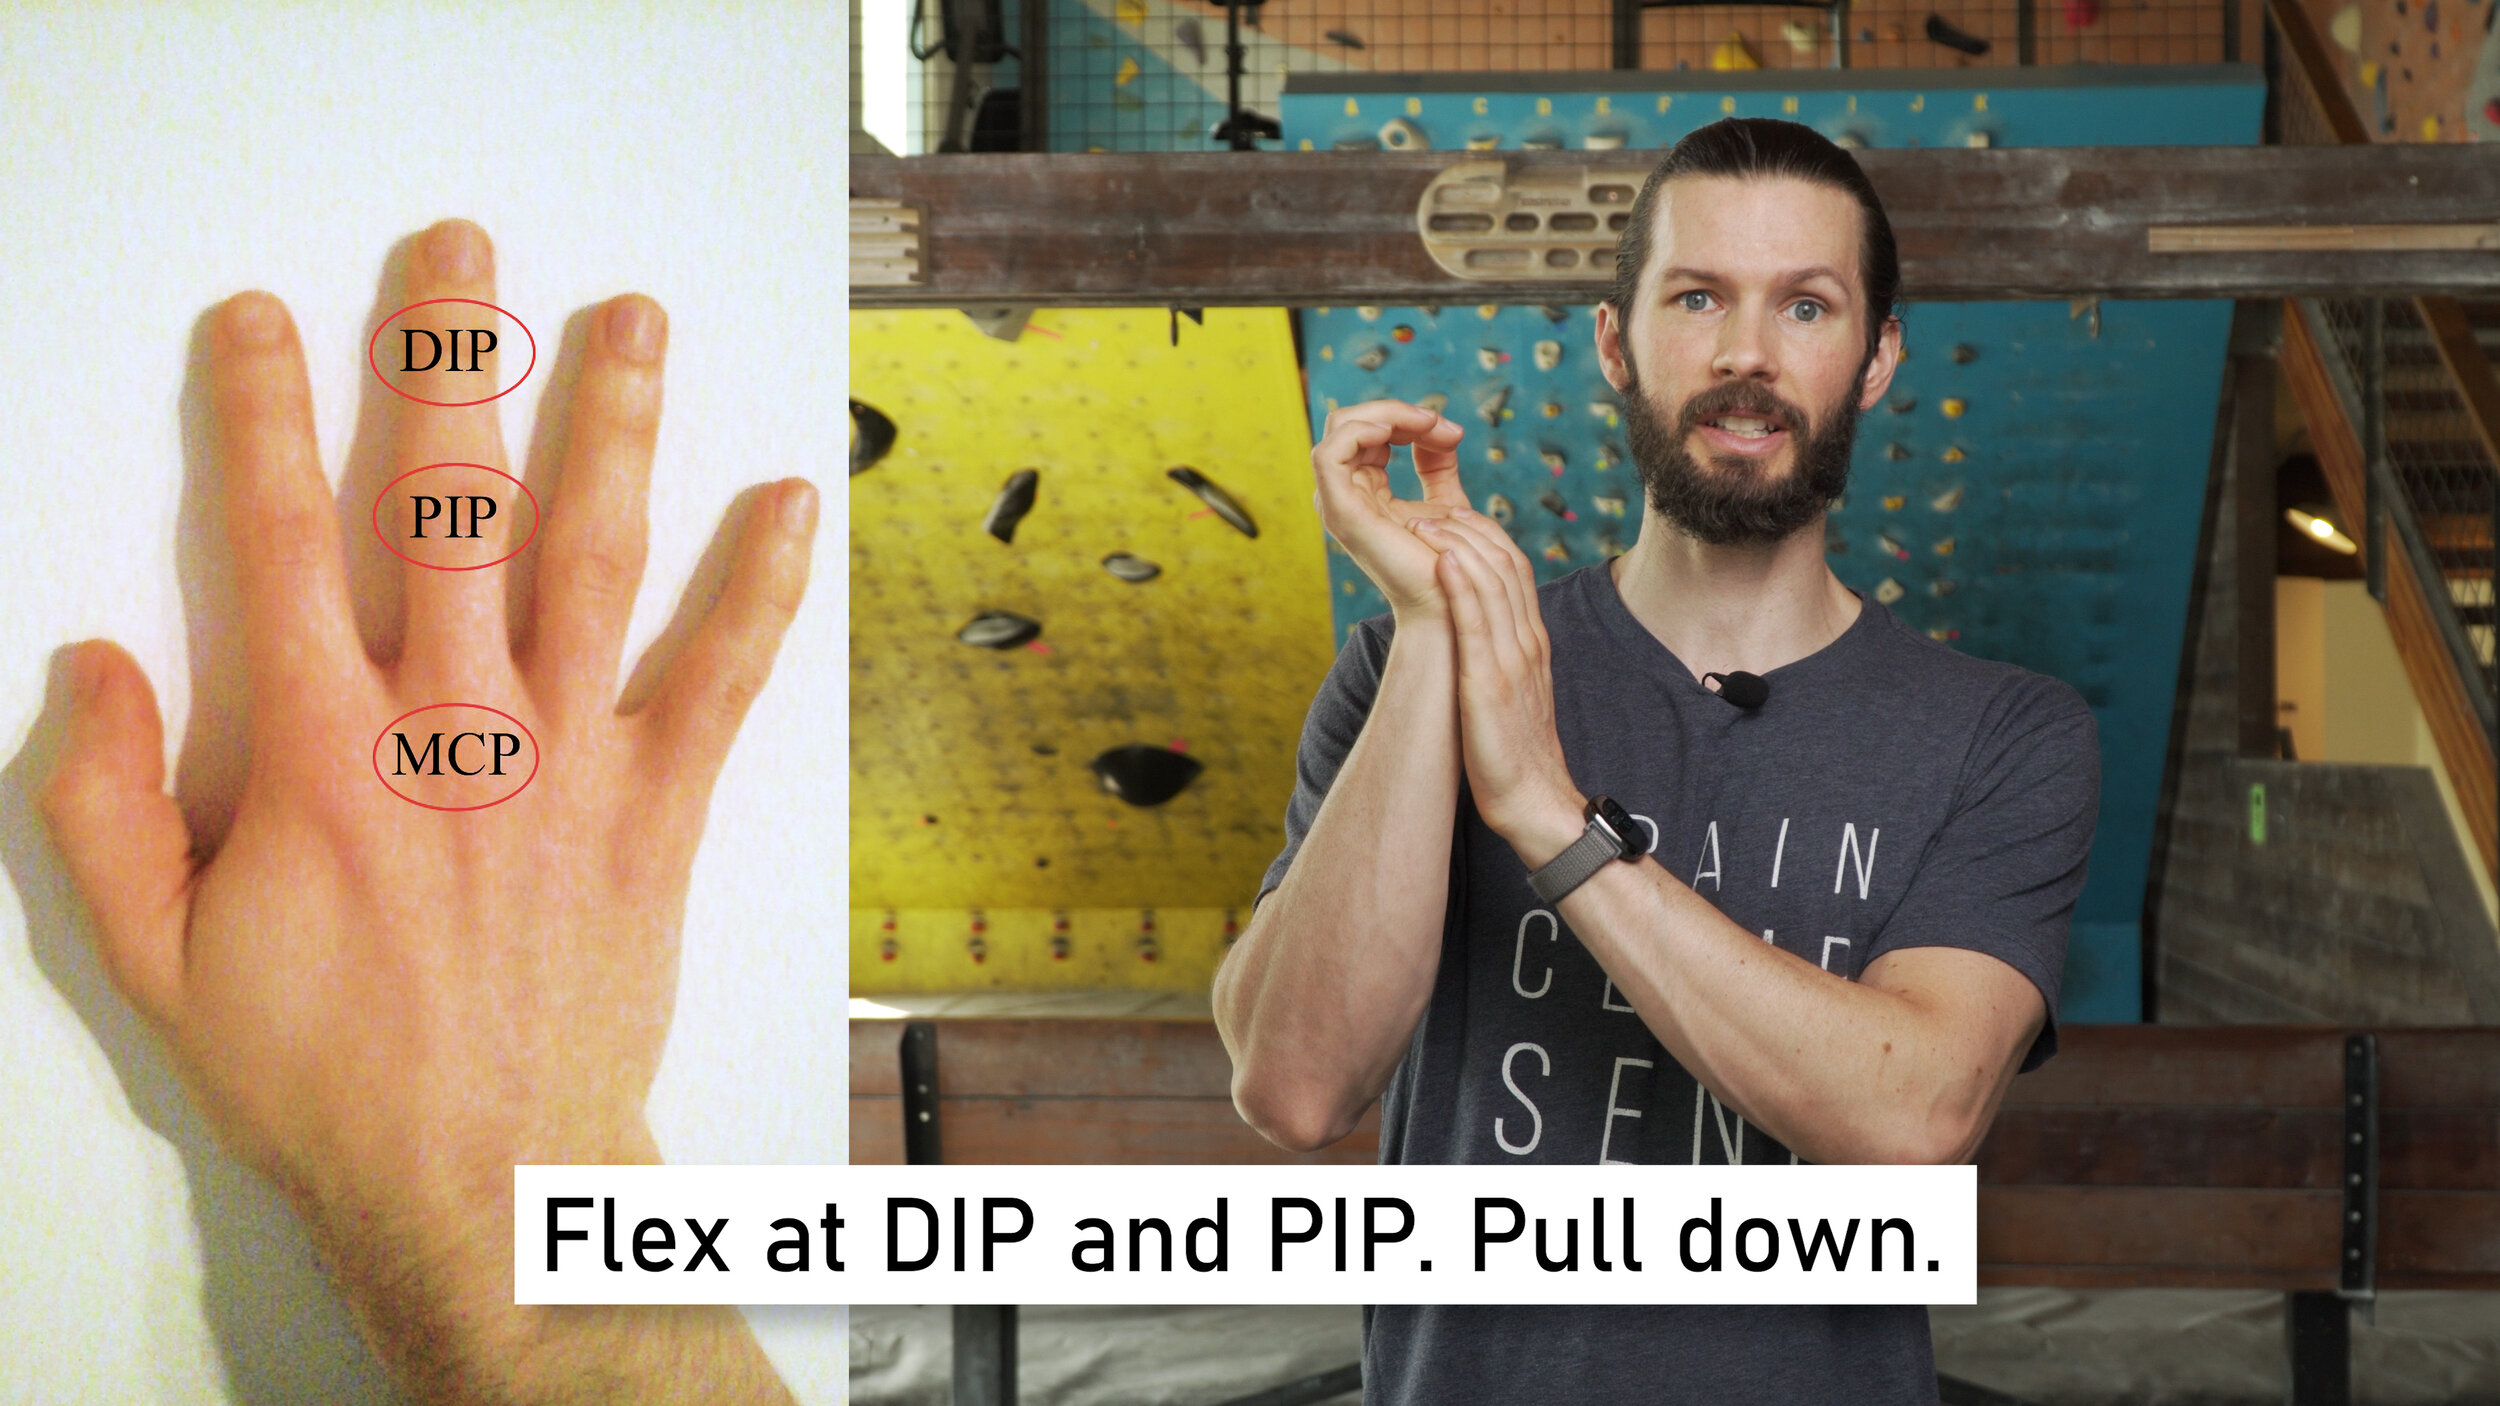
Test #3: Open hand (flexion at PIP)
Place the affected hand with the fingertips and middle phalange on the palm of the affected hand. Keep the PIP and DIP flexed now. Pull down as hard as you comfortably can.
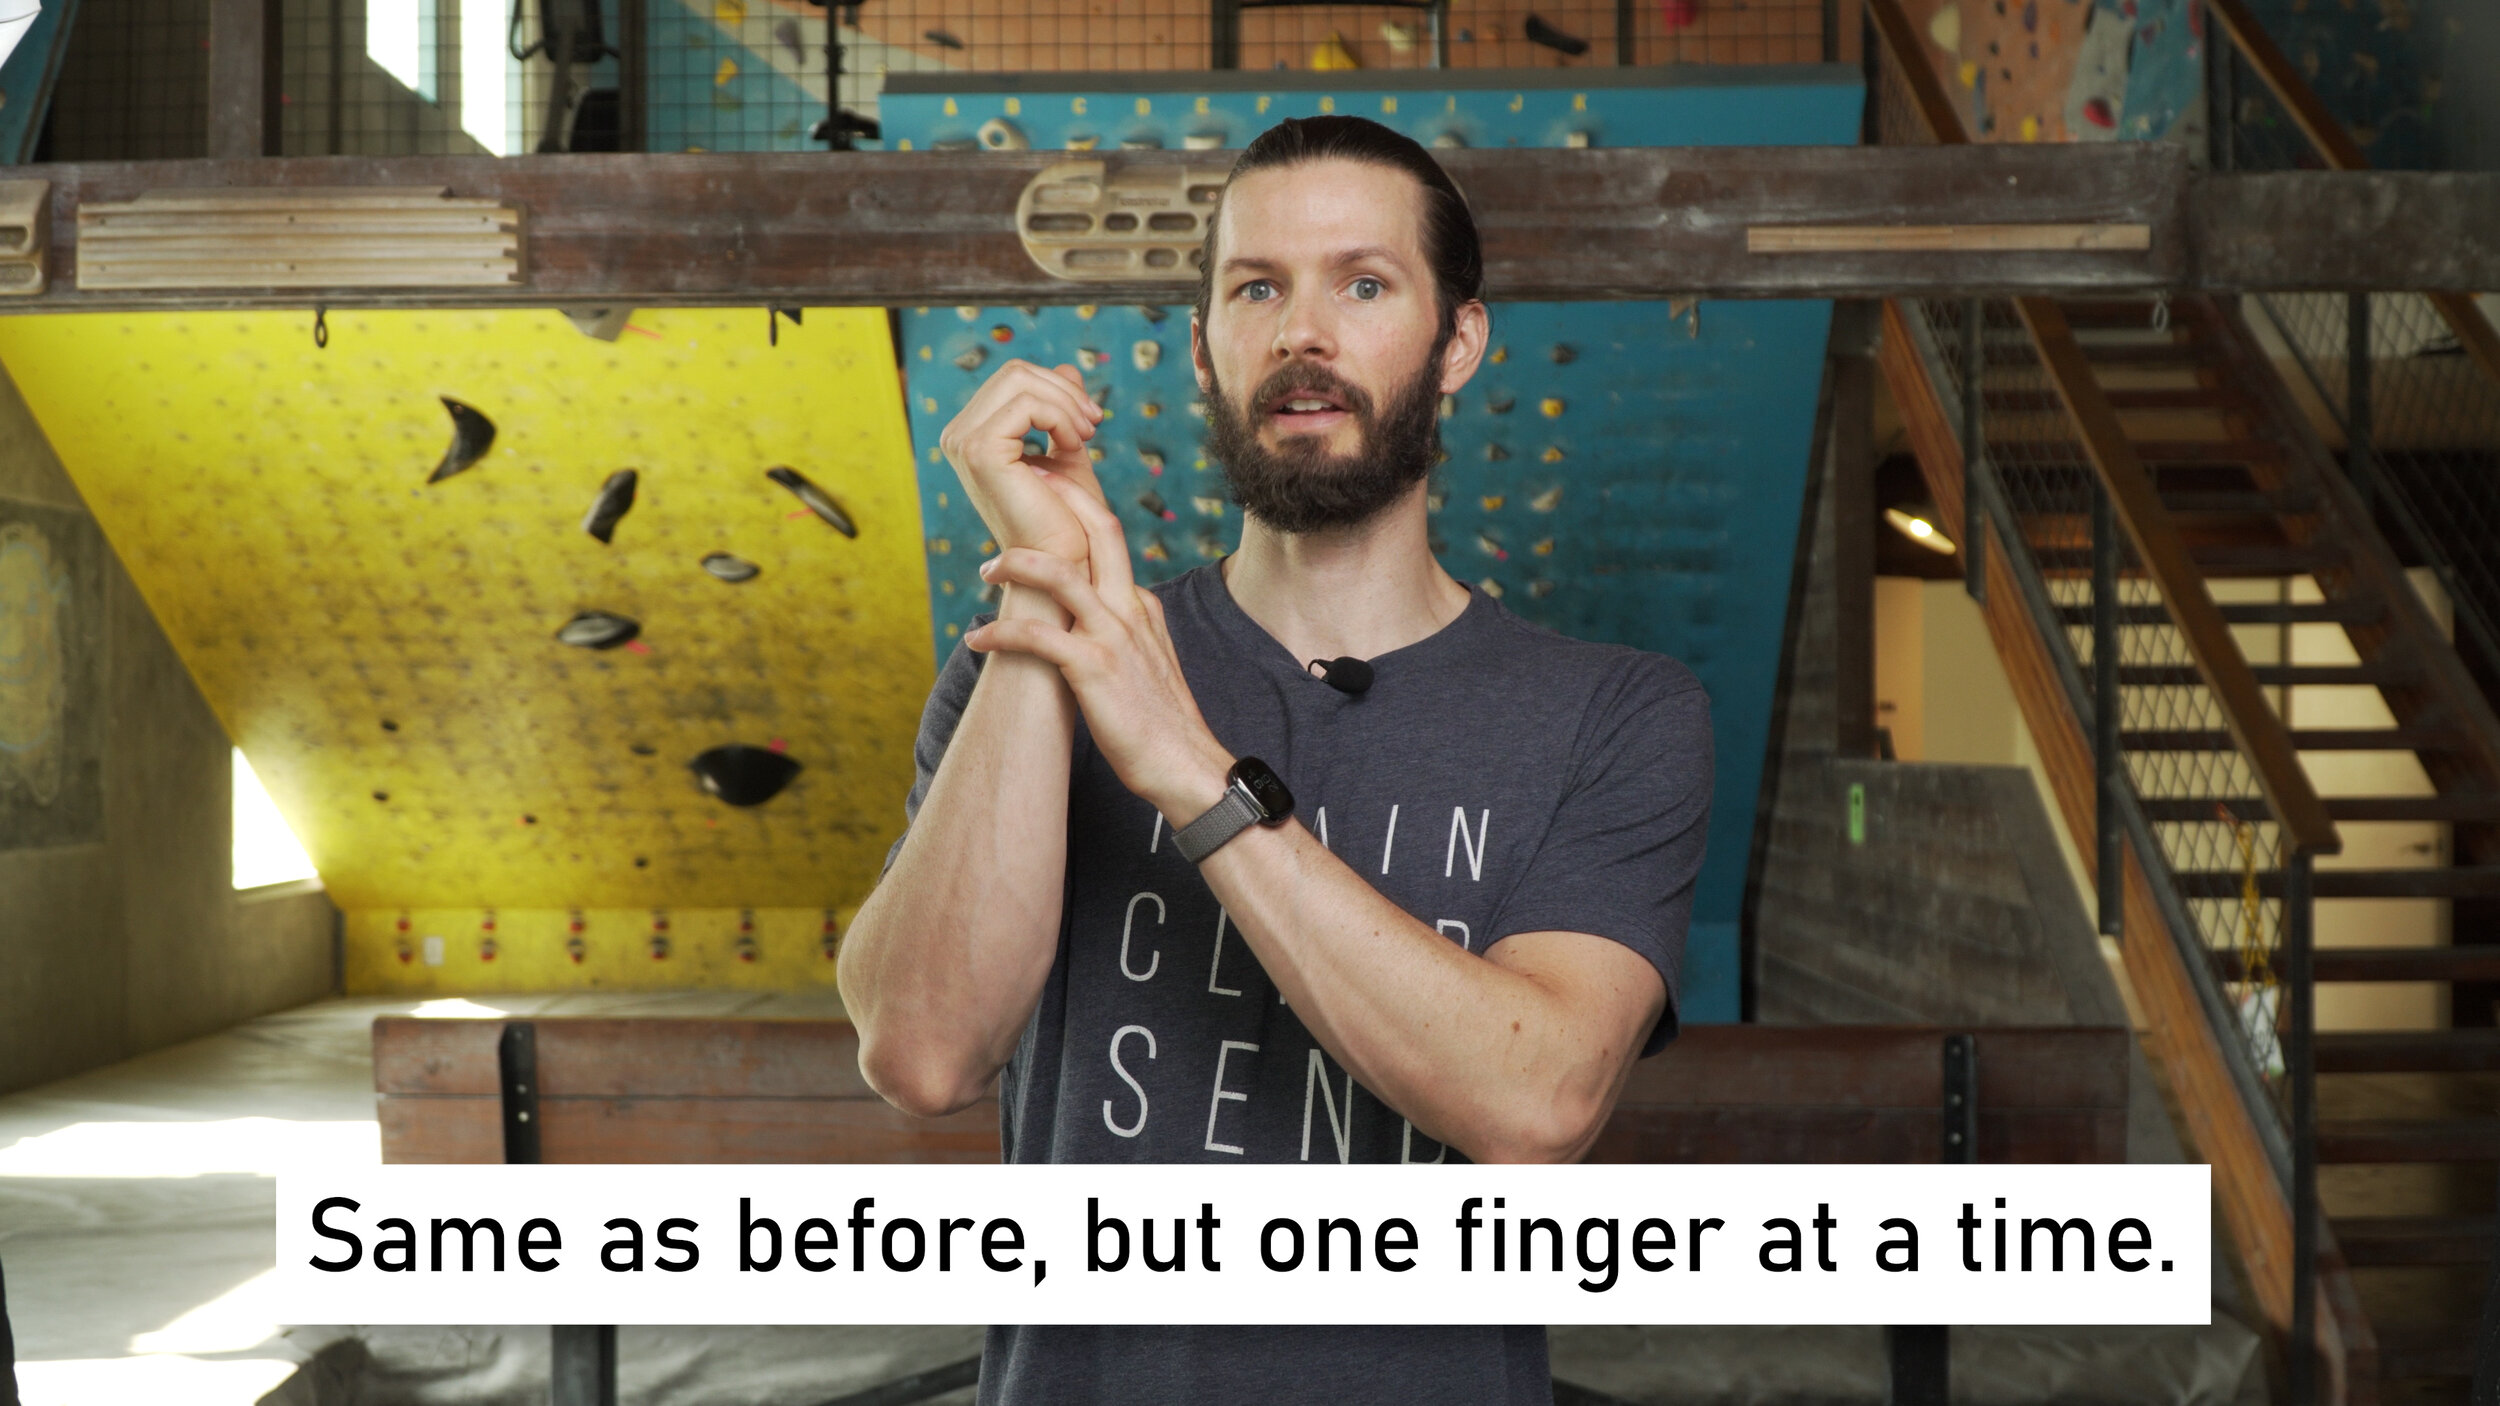
Test #4: Open hand single finger (flexion at PIP)
Same as before but now isolate just the affected and then neighboring fingers.
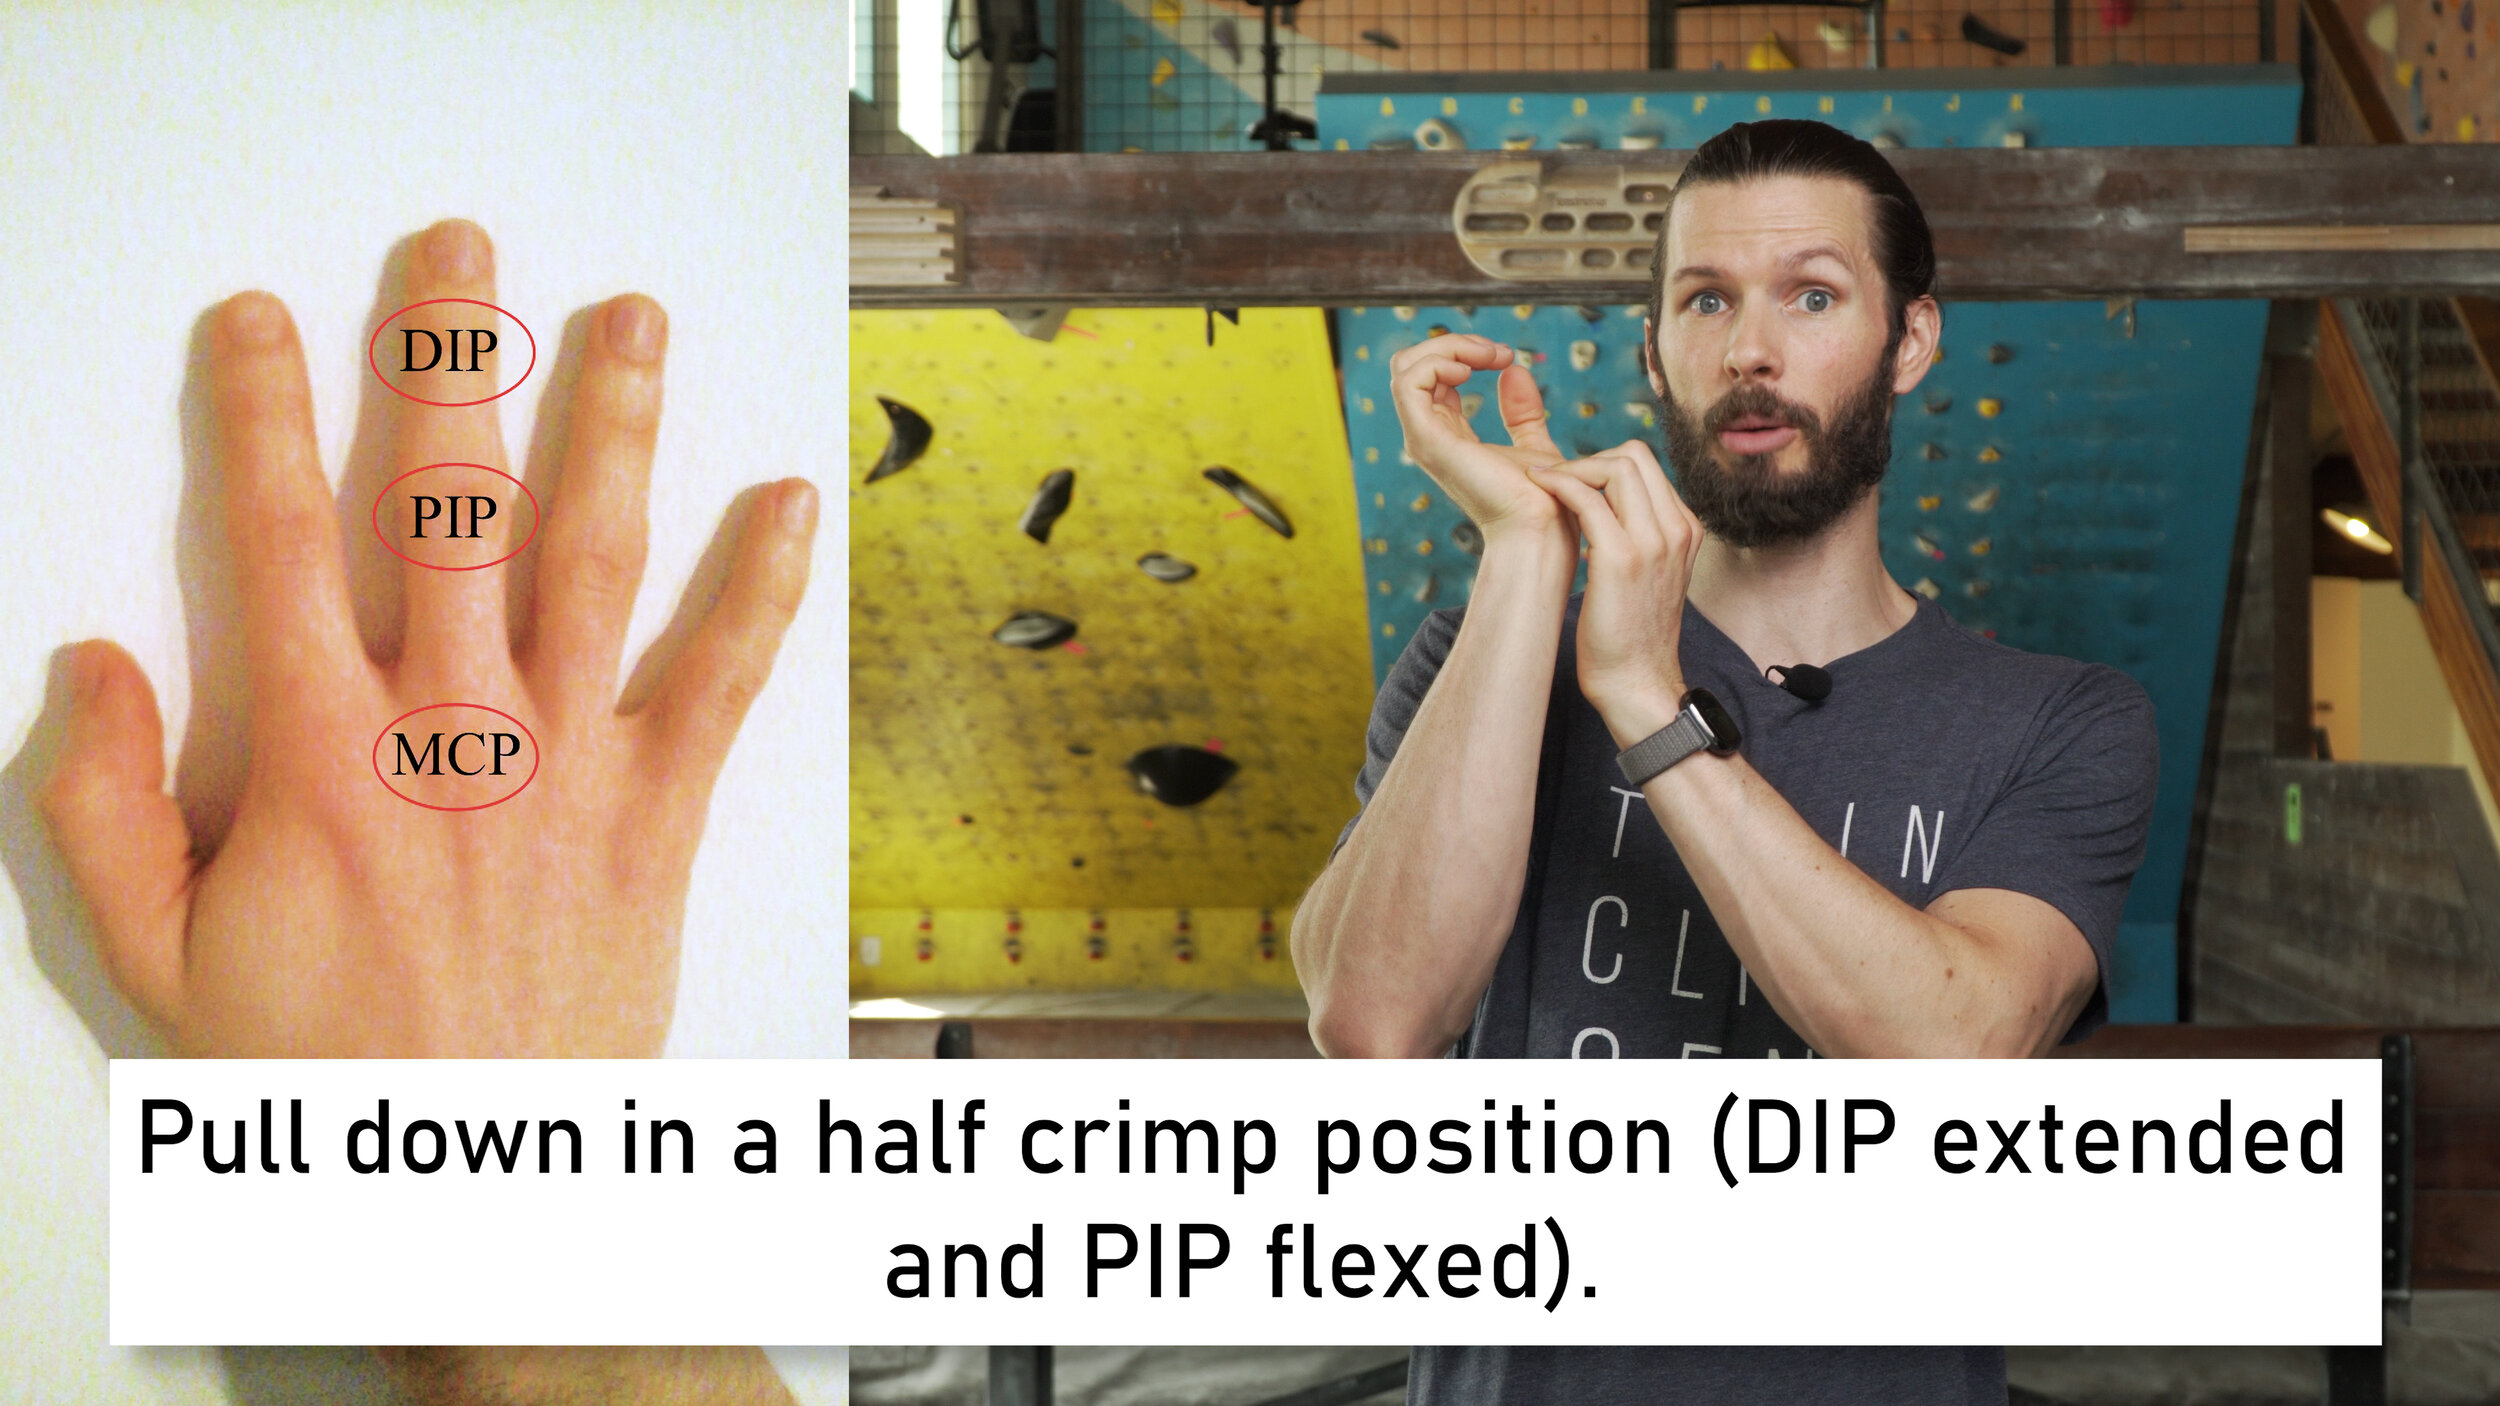
Test #5: Half Crimp
Keep the DIP Extended and the PIP flexed. Place the full pad of the distal phalange on the palm of your unaffected hand. Pull down as hard as you comfortably can.
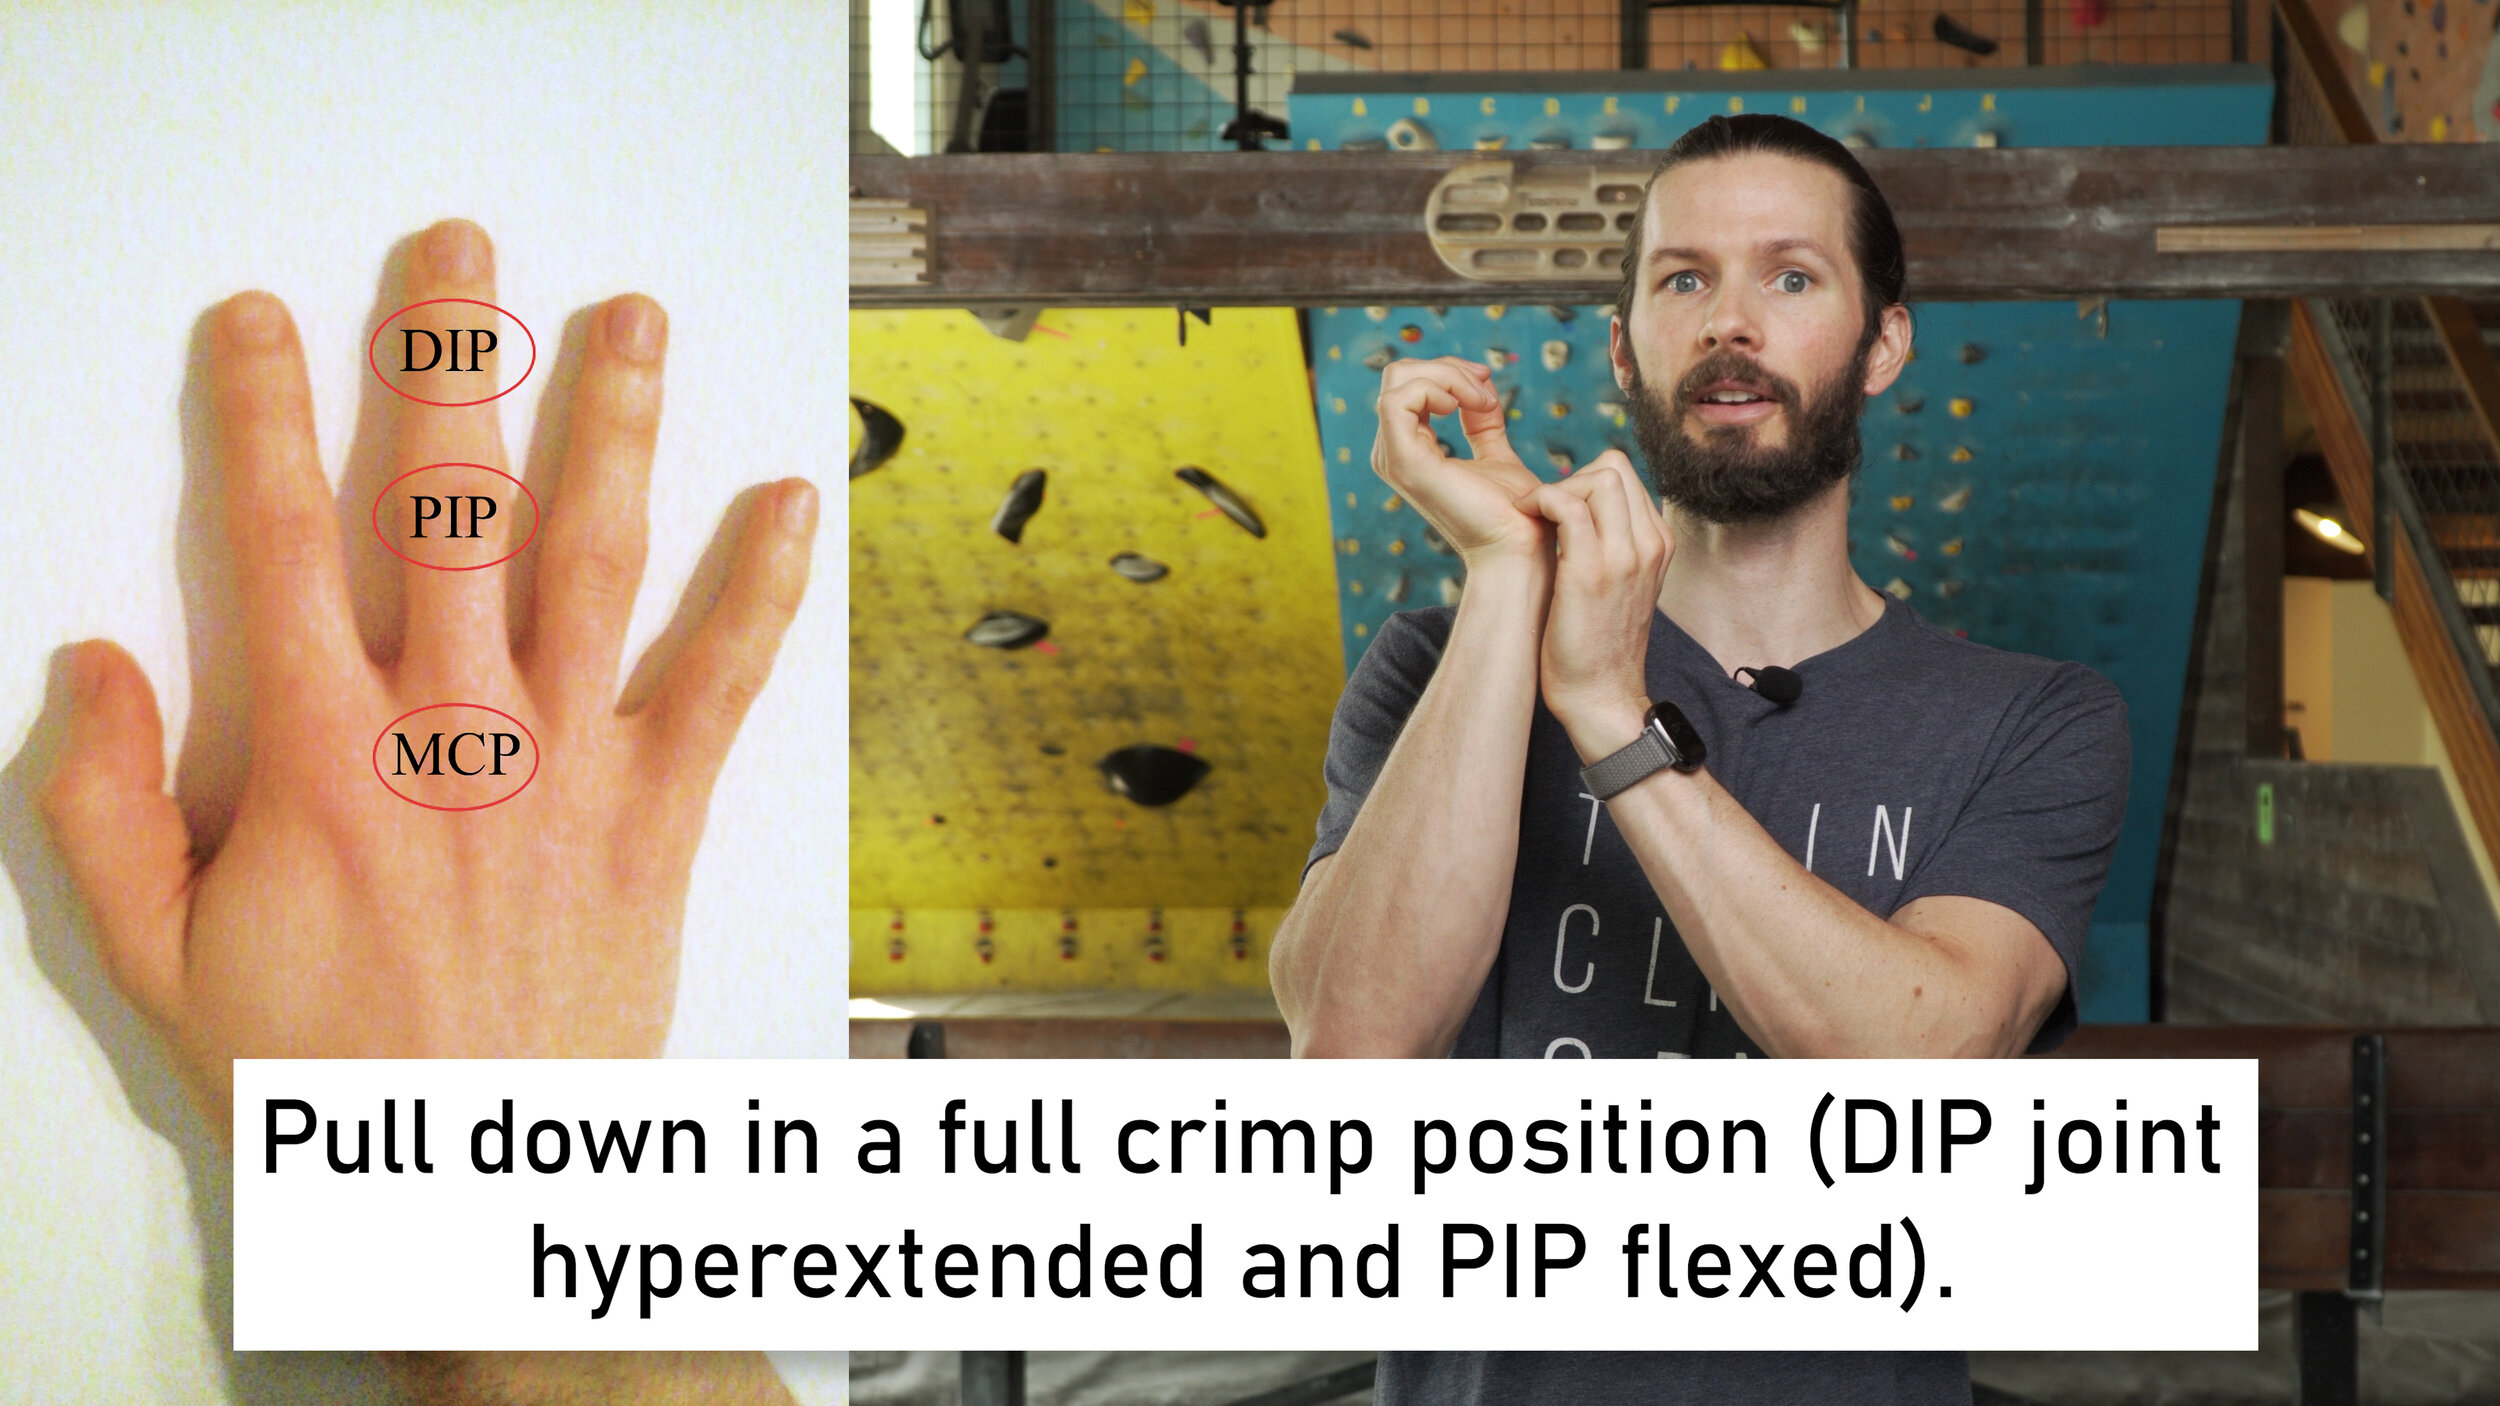
Test #6: Full Crimp
Hyperextend now slightly at the DIP joint while increasing the flexion at the PIP joint. Just the fingertips will now be on the palm of the unaffected hand. Pull down as hard as you comfortably can.
Here’s a chart you can use to keep track of your results.

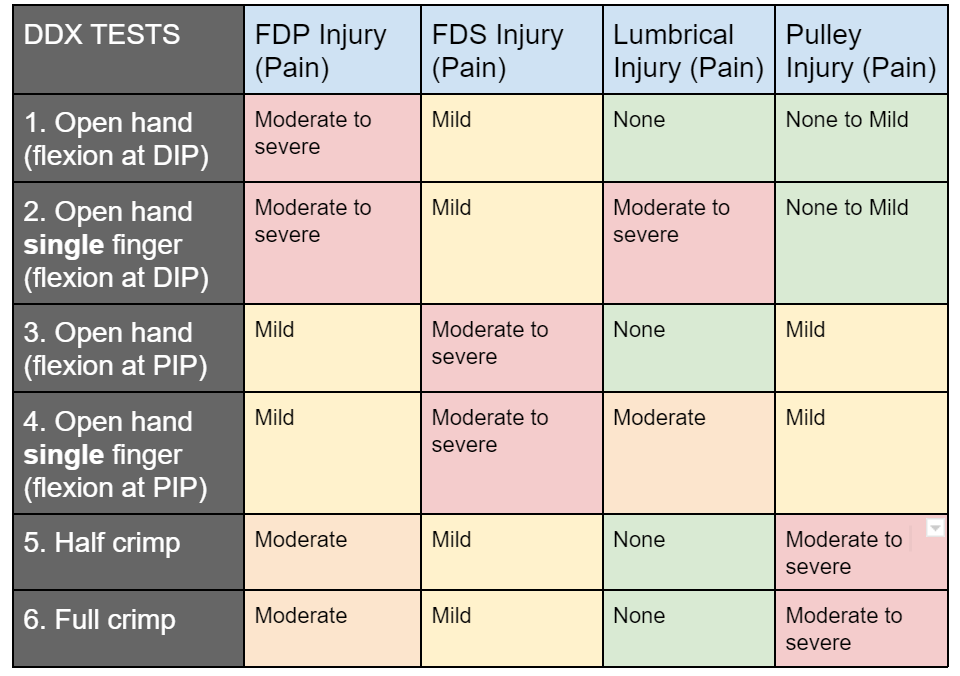
An FDP injury will have:
The most pain with resisted flexion at the DIP joint regardless of whether with 1 or 3 fingers
Only mild pain with resisted flexion at the PIP joint.
Moderate pain while loading in the half or full crimp position
A FDS Injury will have:
The most pain with resisted flexion at the PIP joint regardless of whether with 1 or 3 fingers
Only mild pain with resisted flexion at the DIP joint.
Mild pain while loading in the half or full crimp position
A Lumbrical Injury will have:
The most pain with resisted flexion at the DIP joint while loading only 1 finger and no pain when loading all fingers (open hand)
Moderate pain with resisted flexion at the PIP joint while loading only 1 finger and no pain when loading all fingers (open hand)
No pain while loading in the half or full crimp position
A pulley Injury will have:
The most pain while loading in the full crimp and half crimp positions
Only mild pain with resisted flexion at the PIP joint.
None to minimal pain while flexing at the DIP joint (depending on the location of the pulley injury)
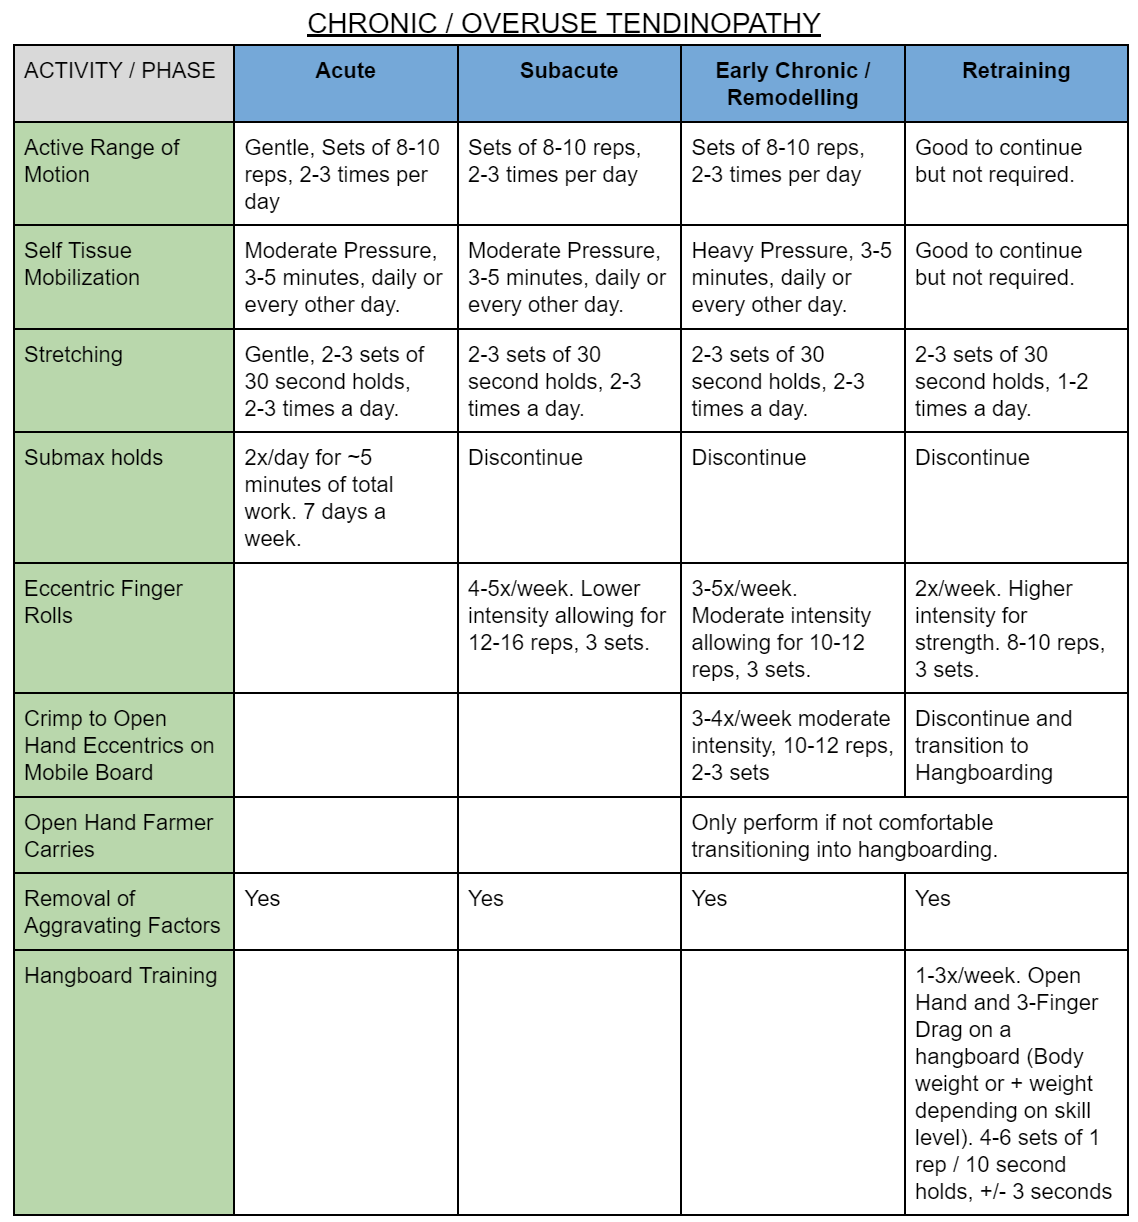
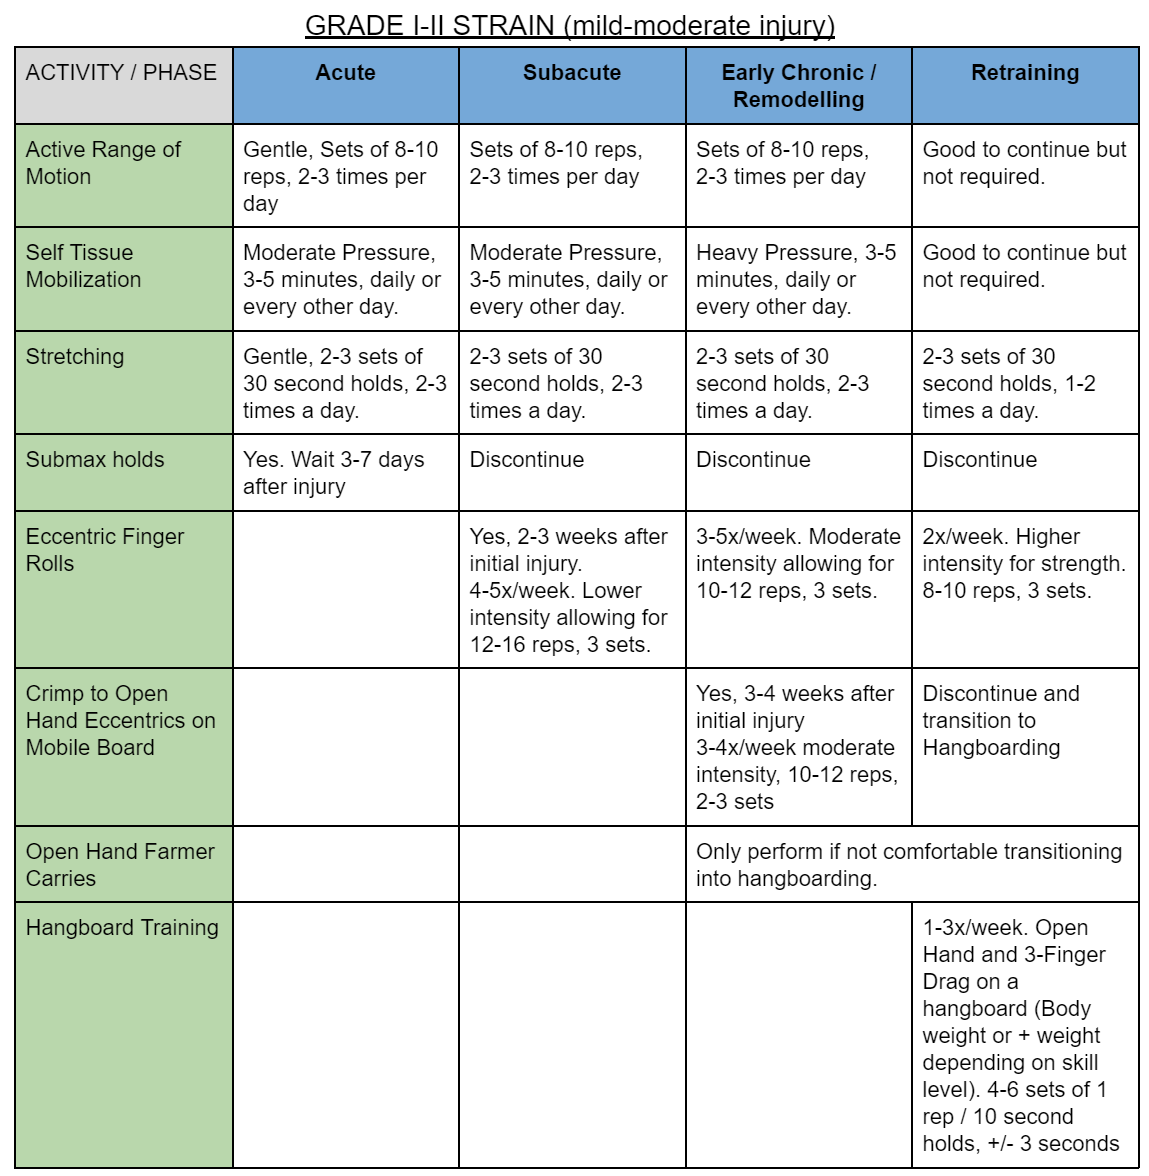
TREATMENT
Treatment of an FDP injury should be broken down into acute, subacute, early chronic/remodelling stages, and late remodelling stages. I’m going to show you a variety of exercises that will be used throughout your rehab process, but the frequency, order, and intensity of these will vary based on the stage you’re in. As such I’ve once again created charts in the show notes so you can have an easy reference and so this video isn’t filled with a bunch of information that is irrelevant to you.
Note: we will not be discussing treatment for a full rupture of the FDP as that requires surgery and a different rehab plan.
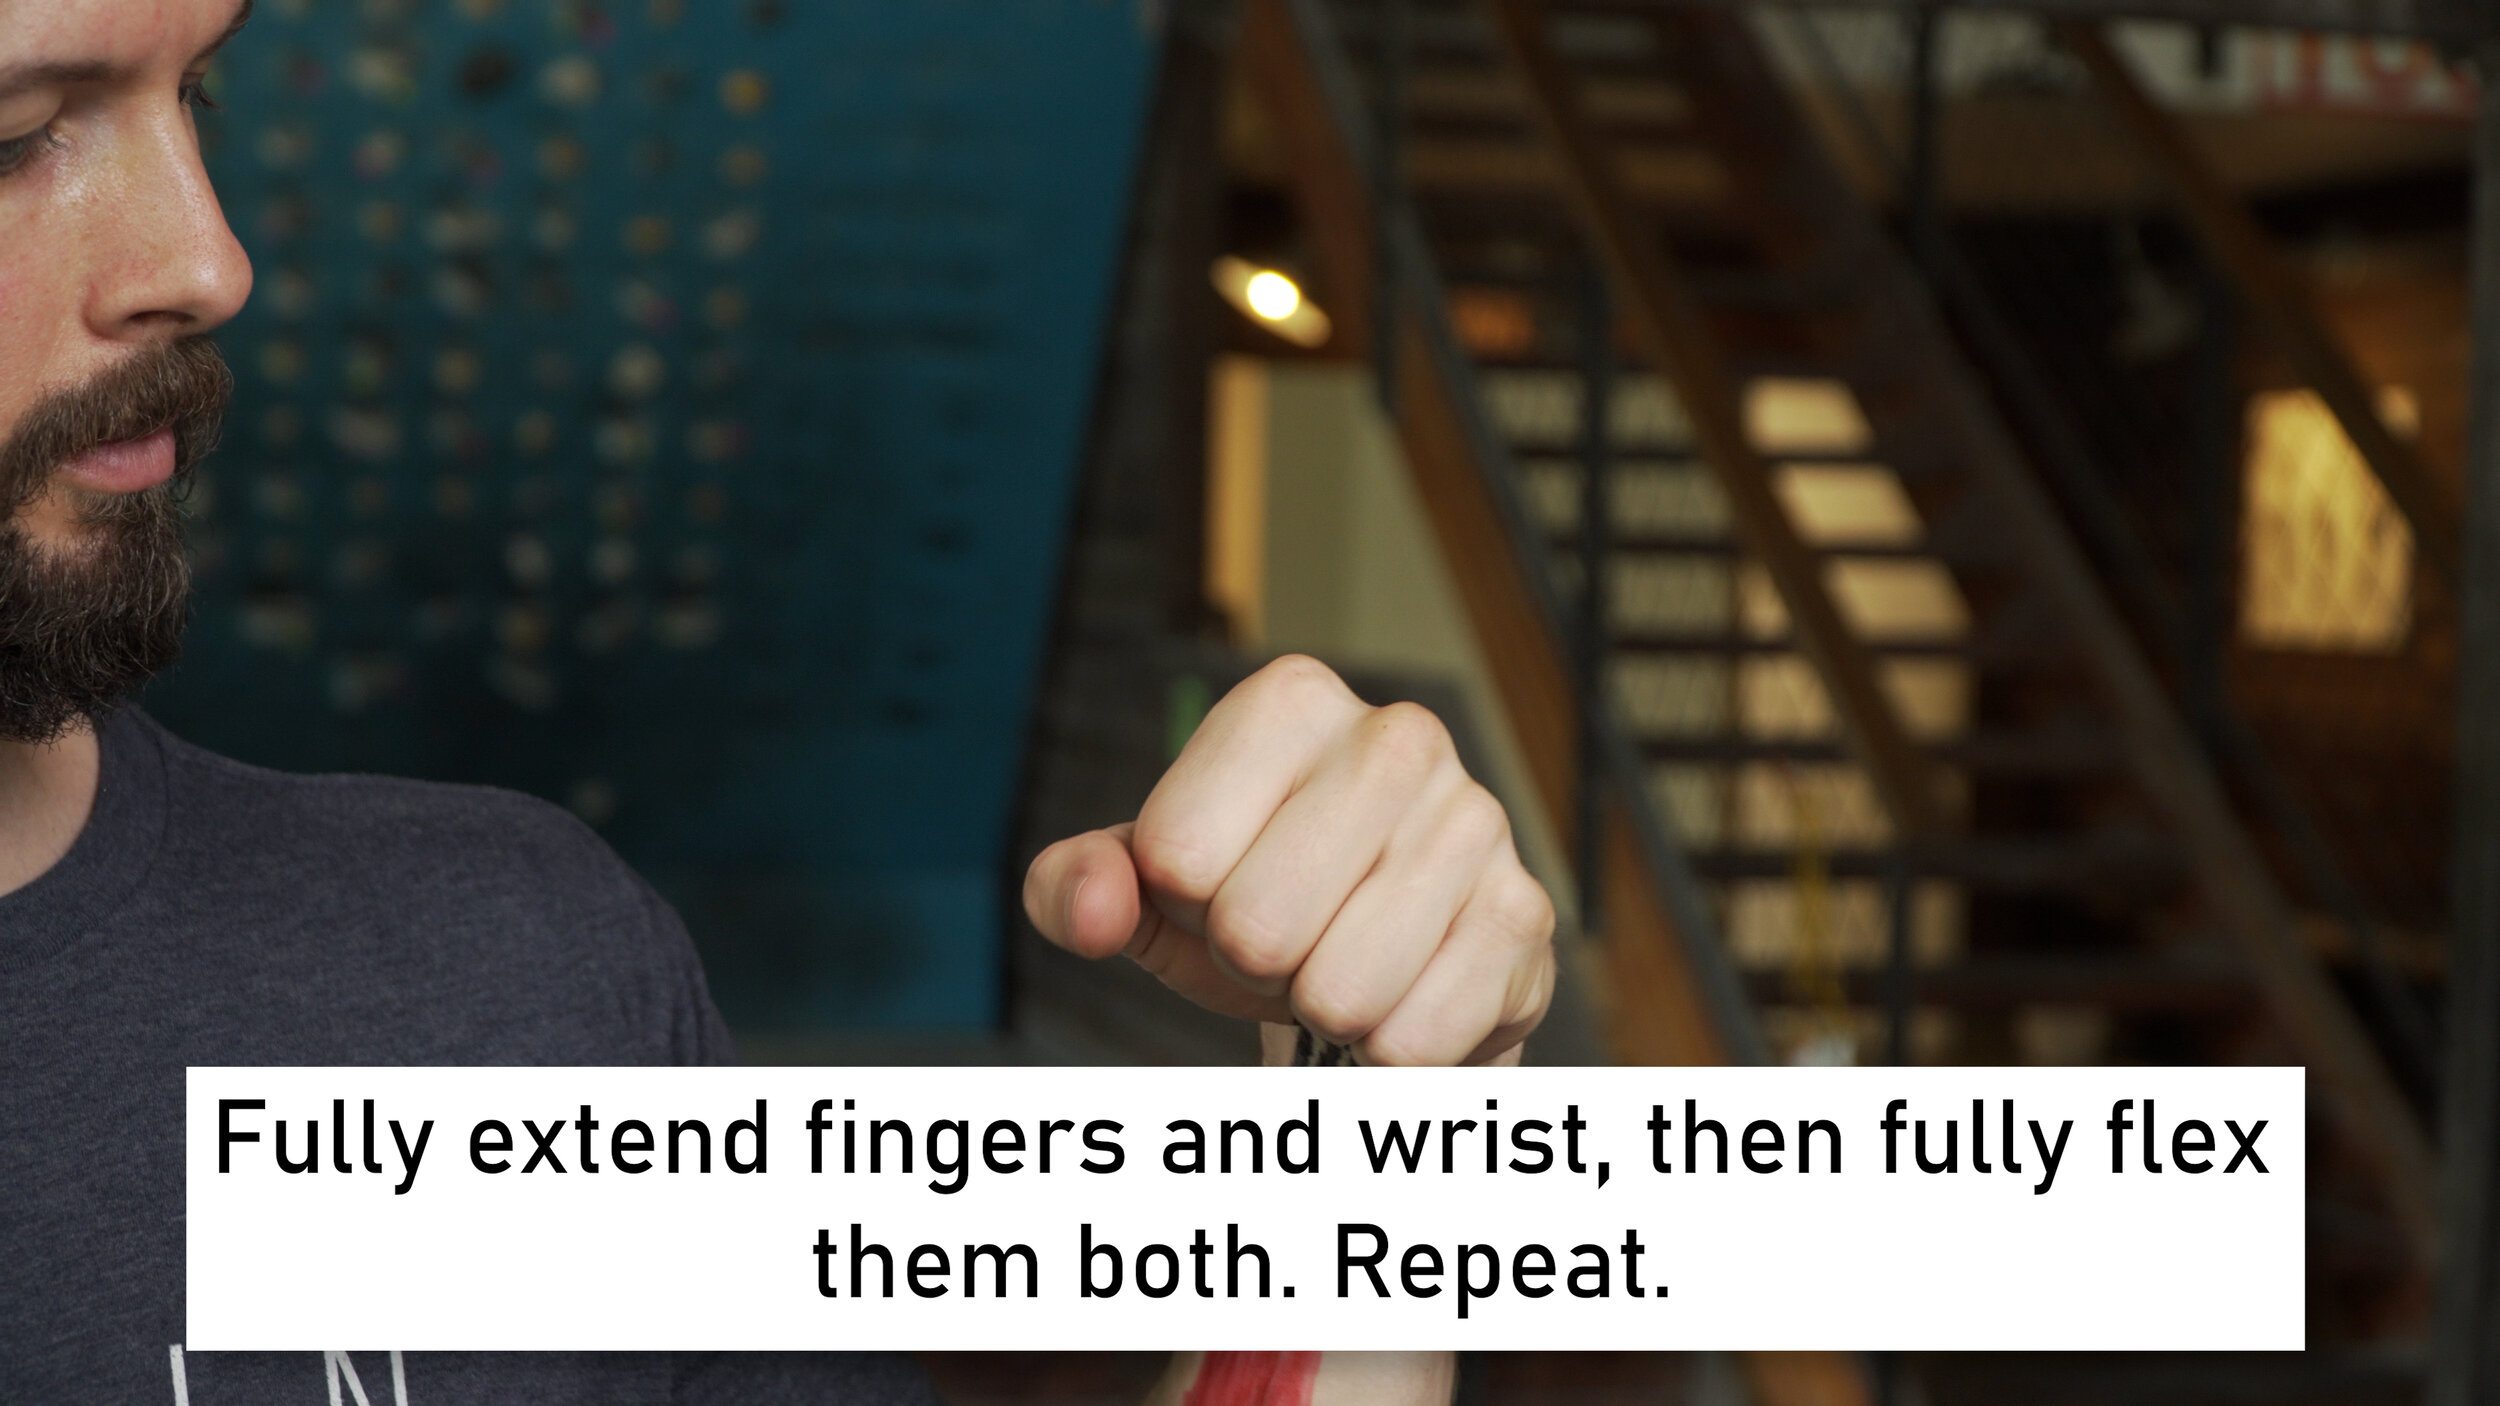
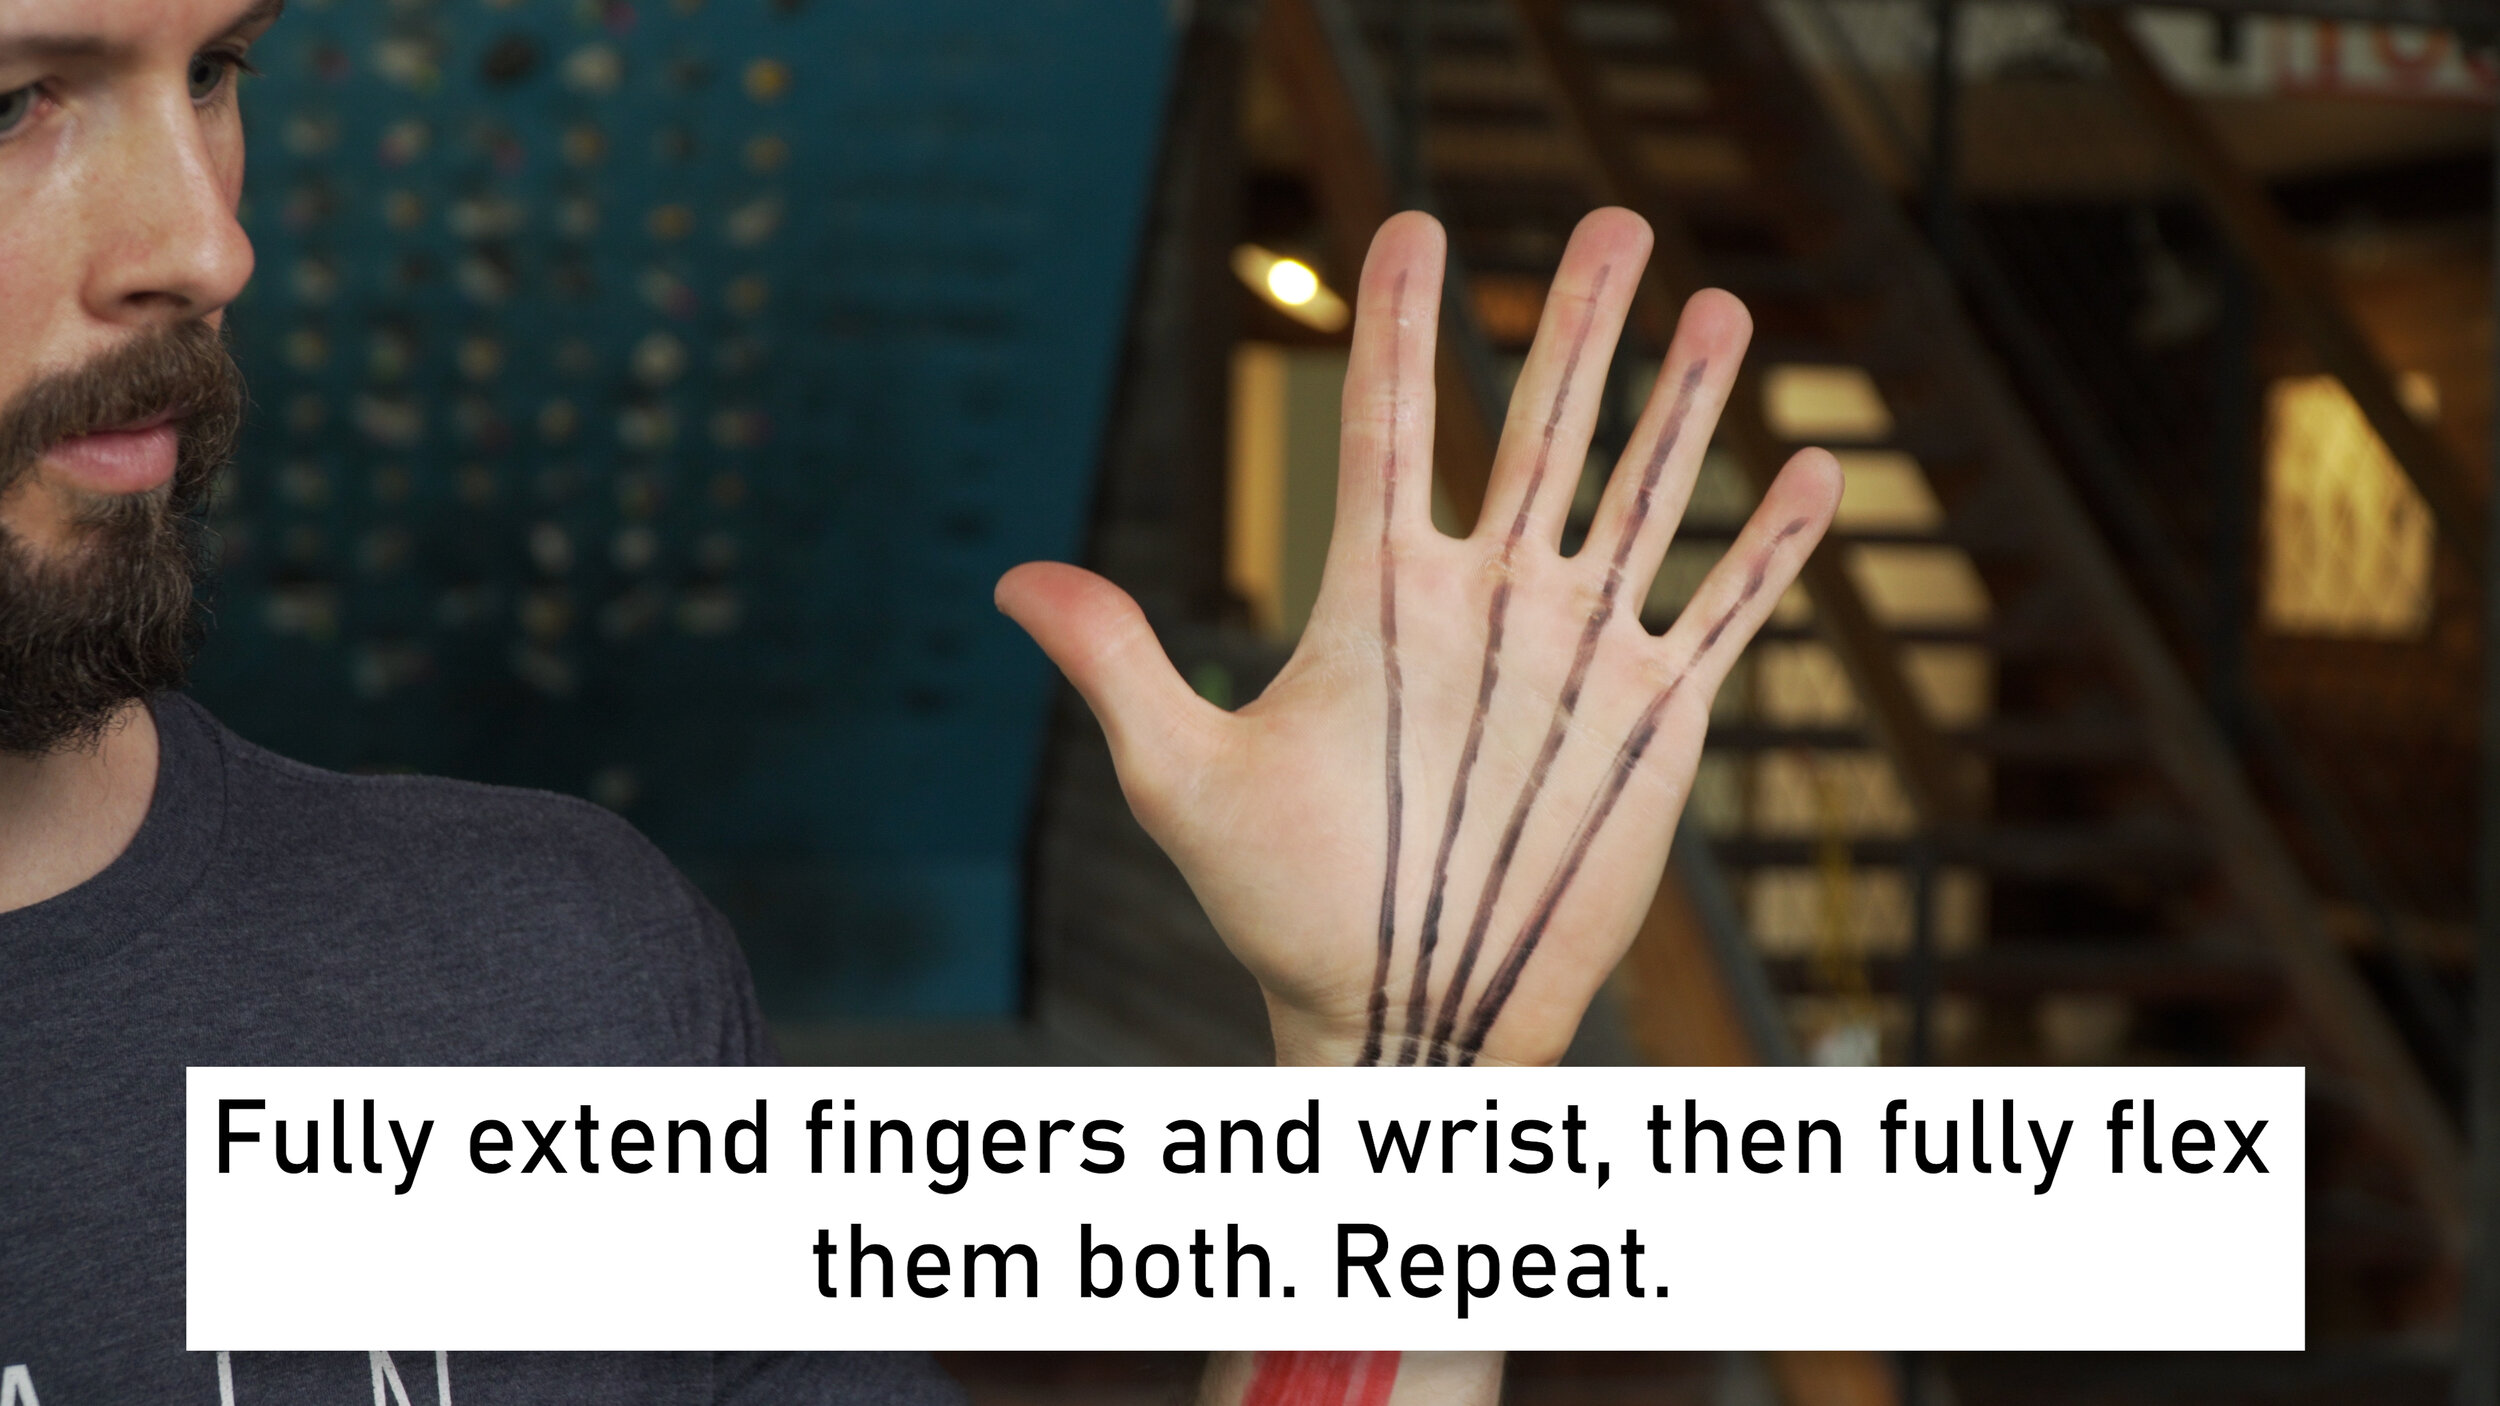
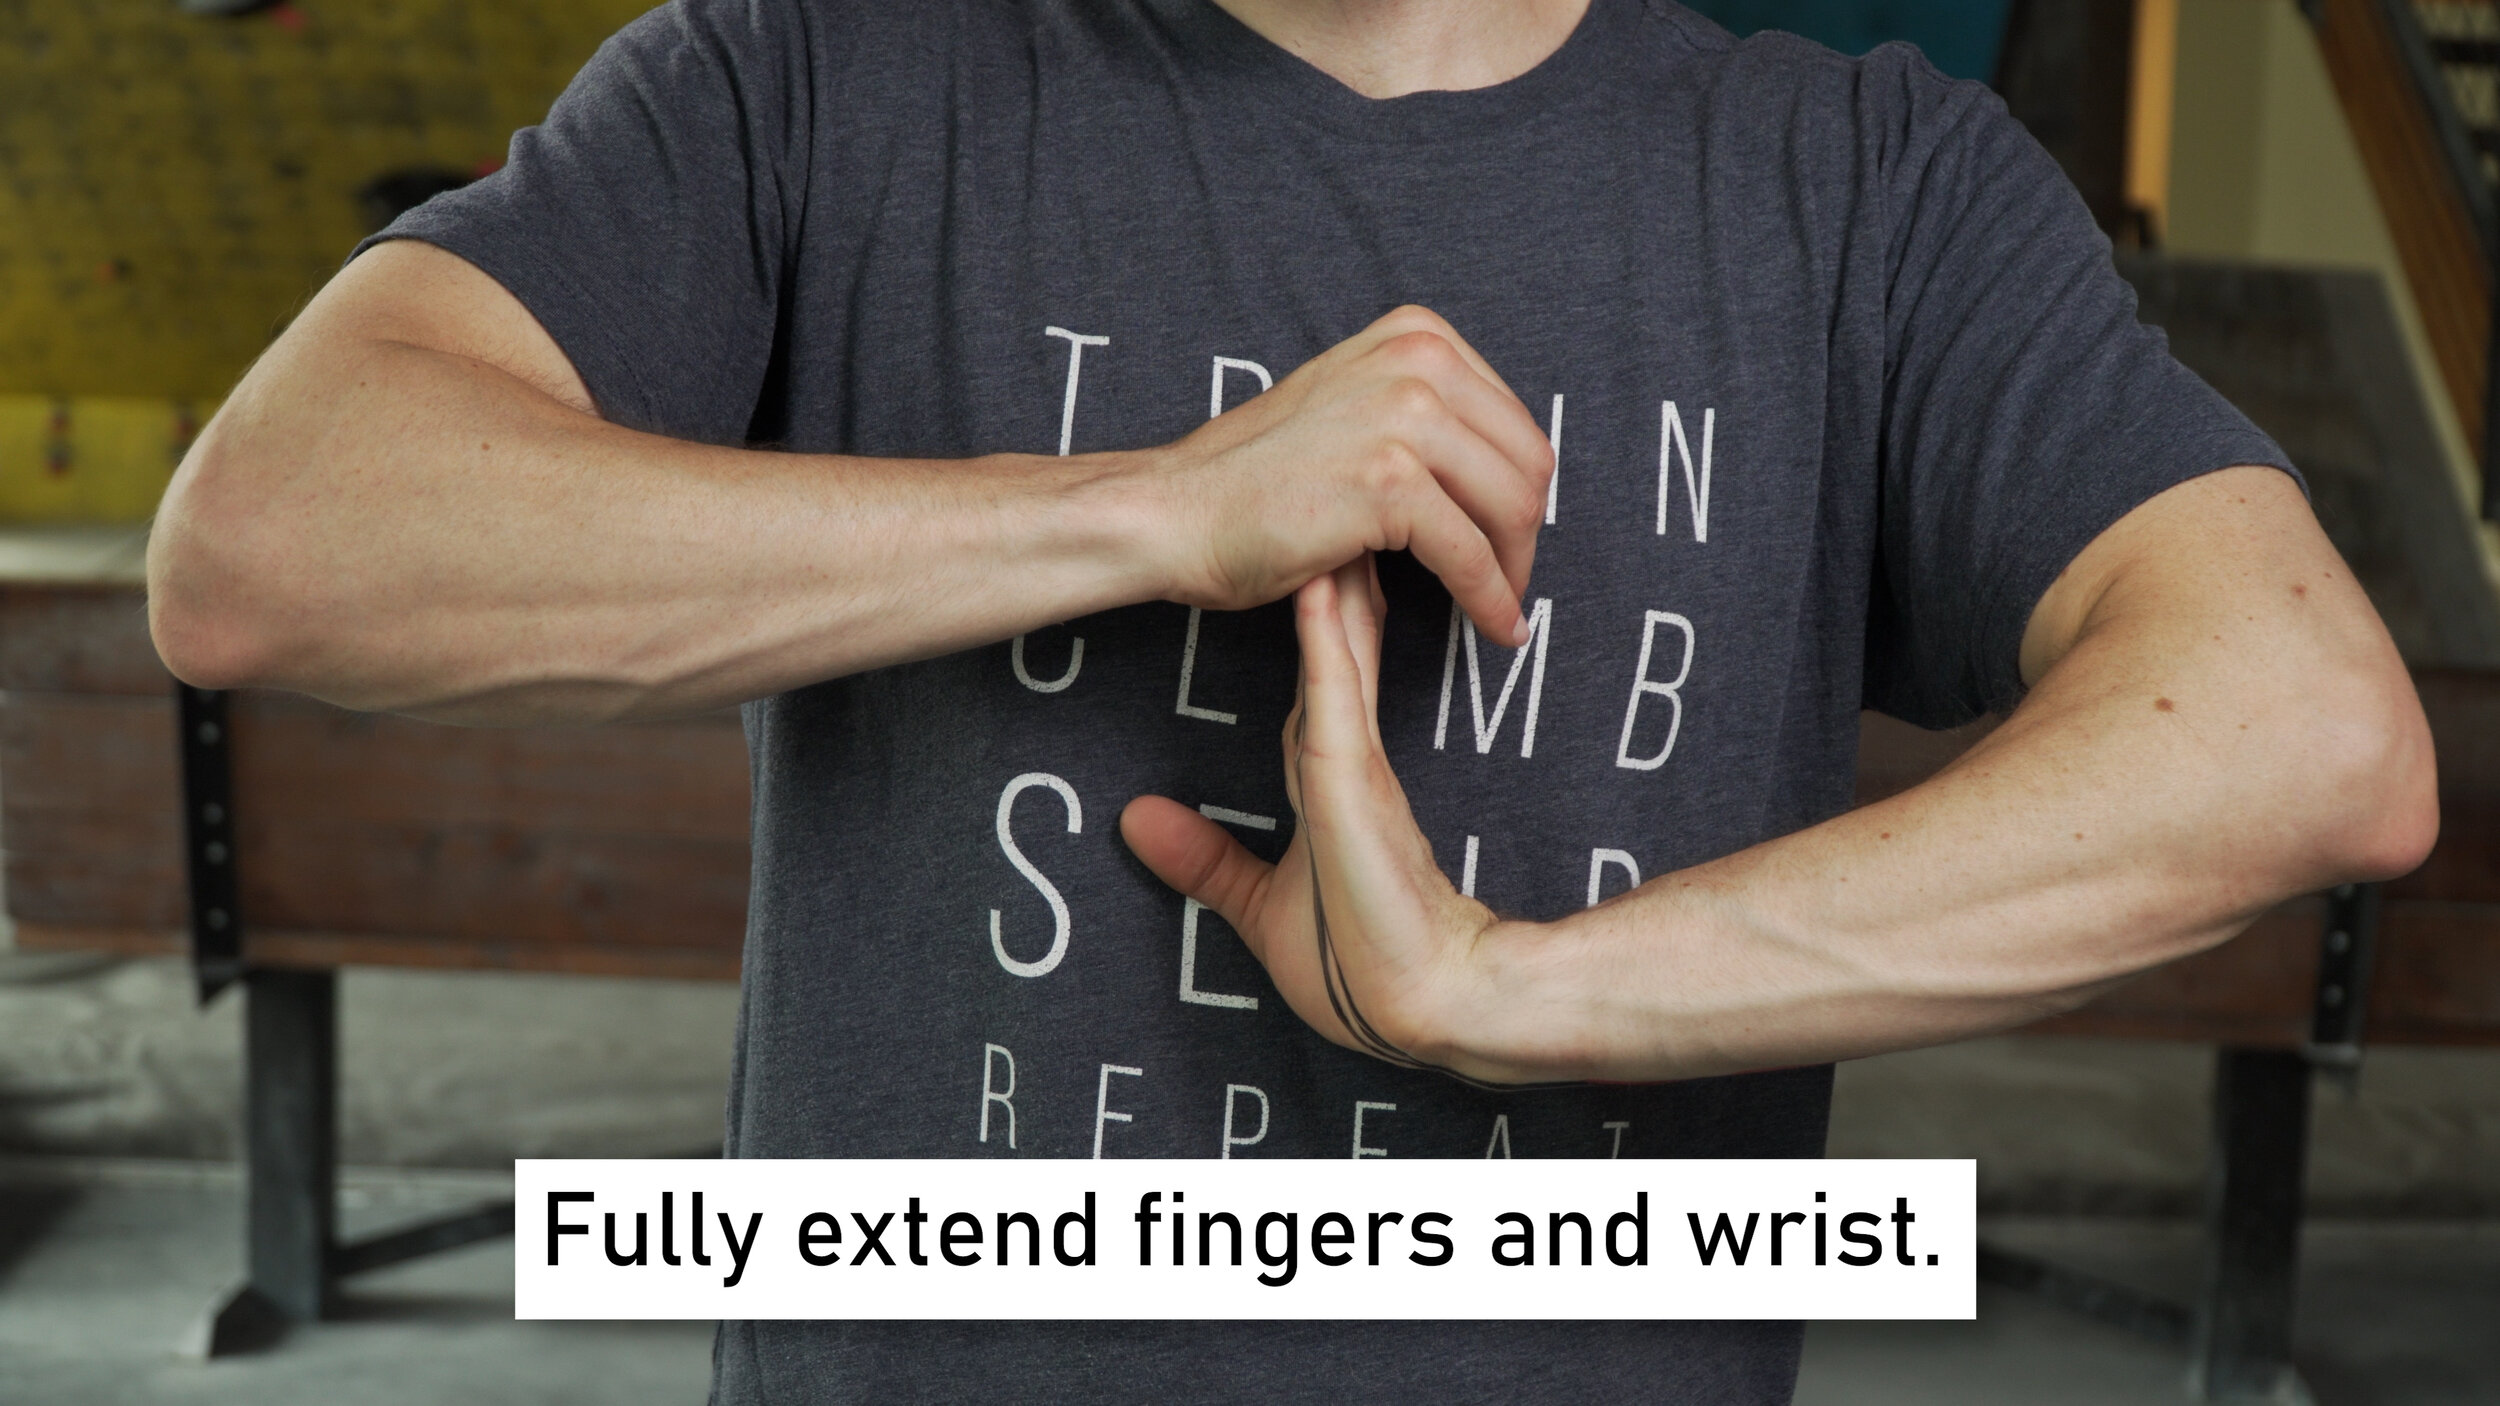
Rehab Activity #1: Active Range of Motion
For the FDP this involves going from full extension of the fingers and wrist to full flexion. This will just look like opening and closing your hand to make a fist but then curling that fist into greater flexion.
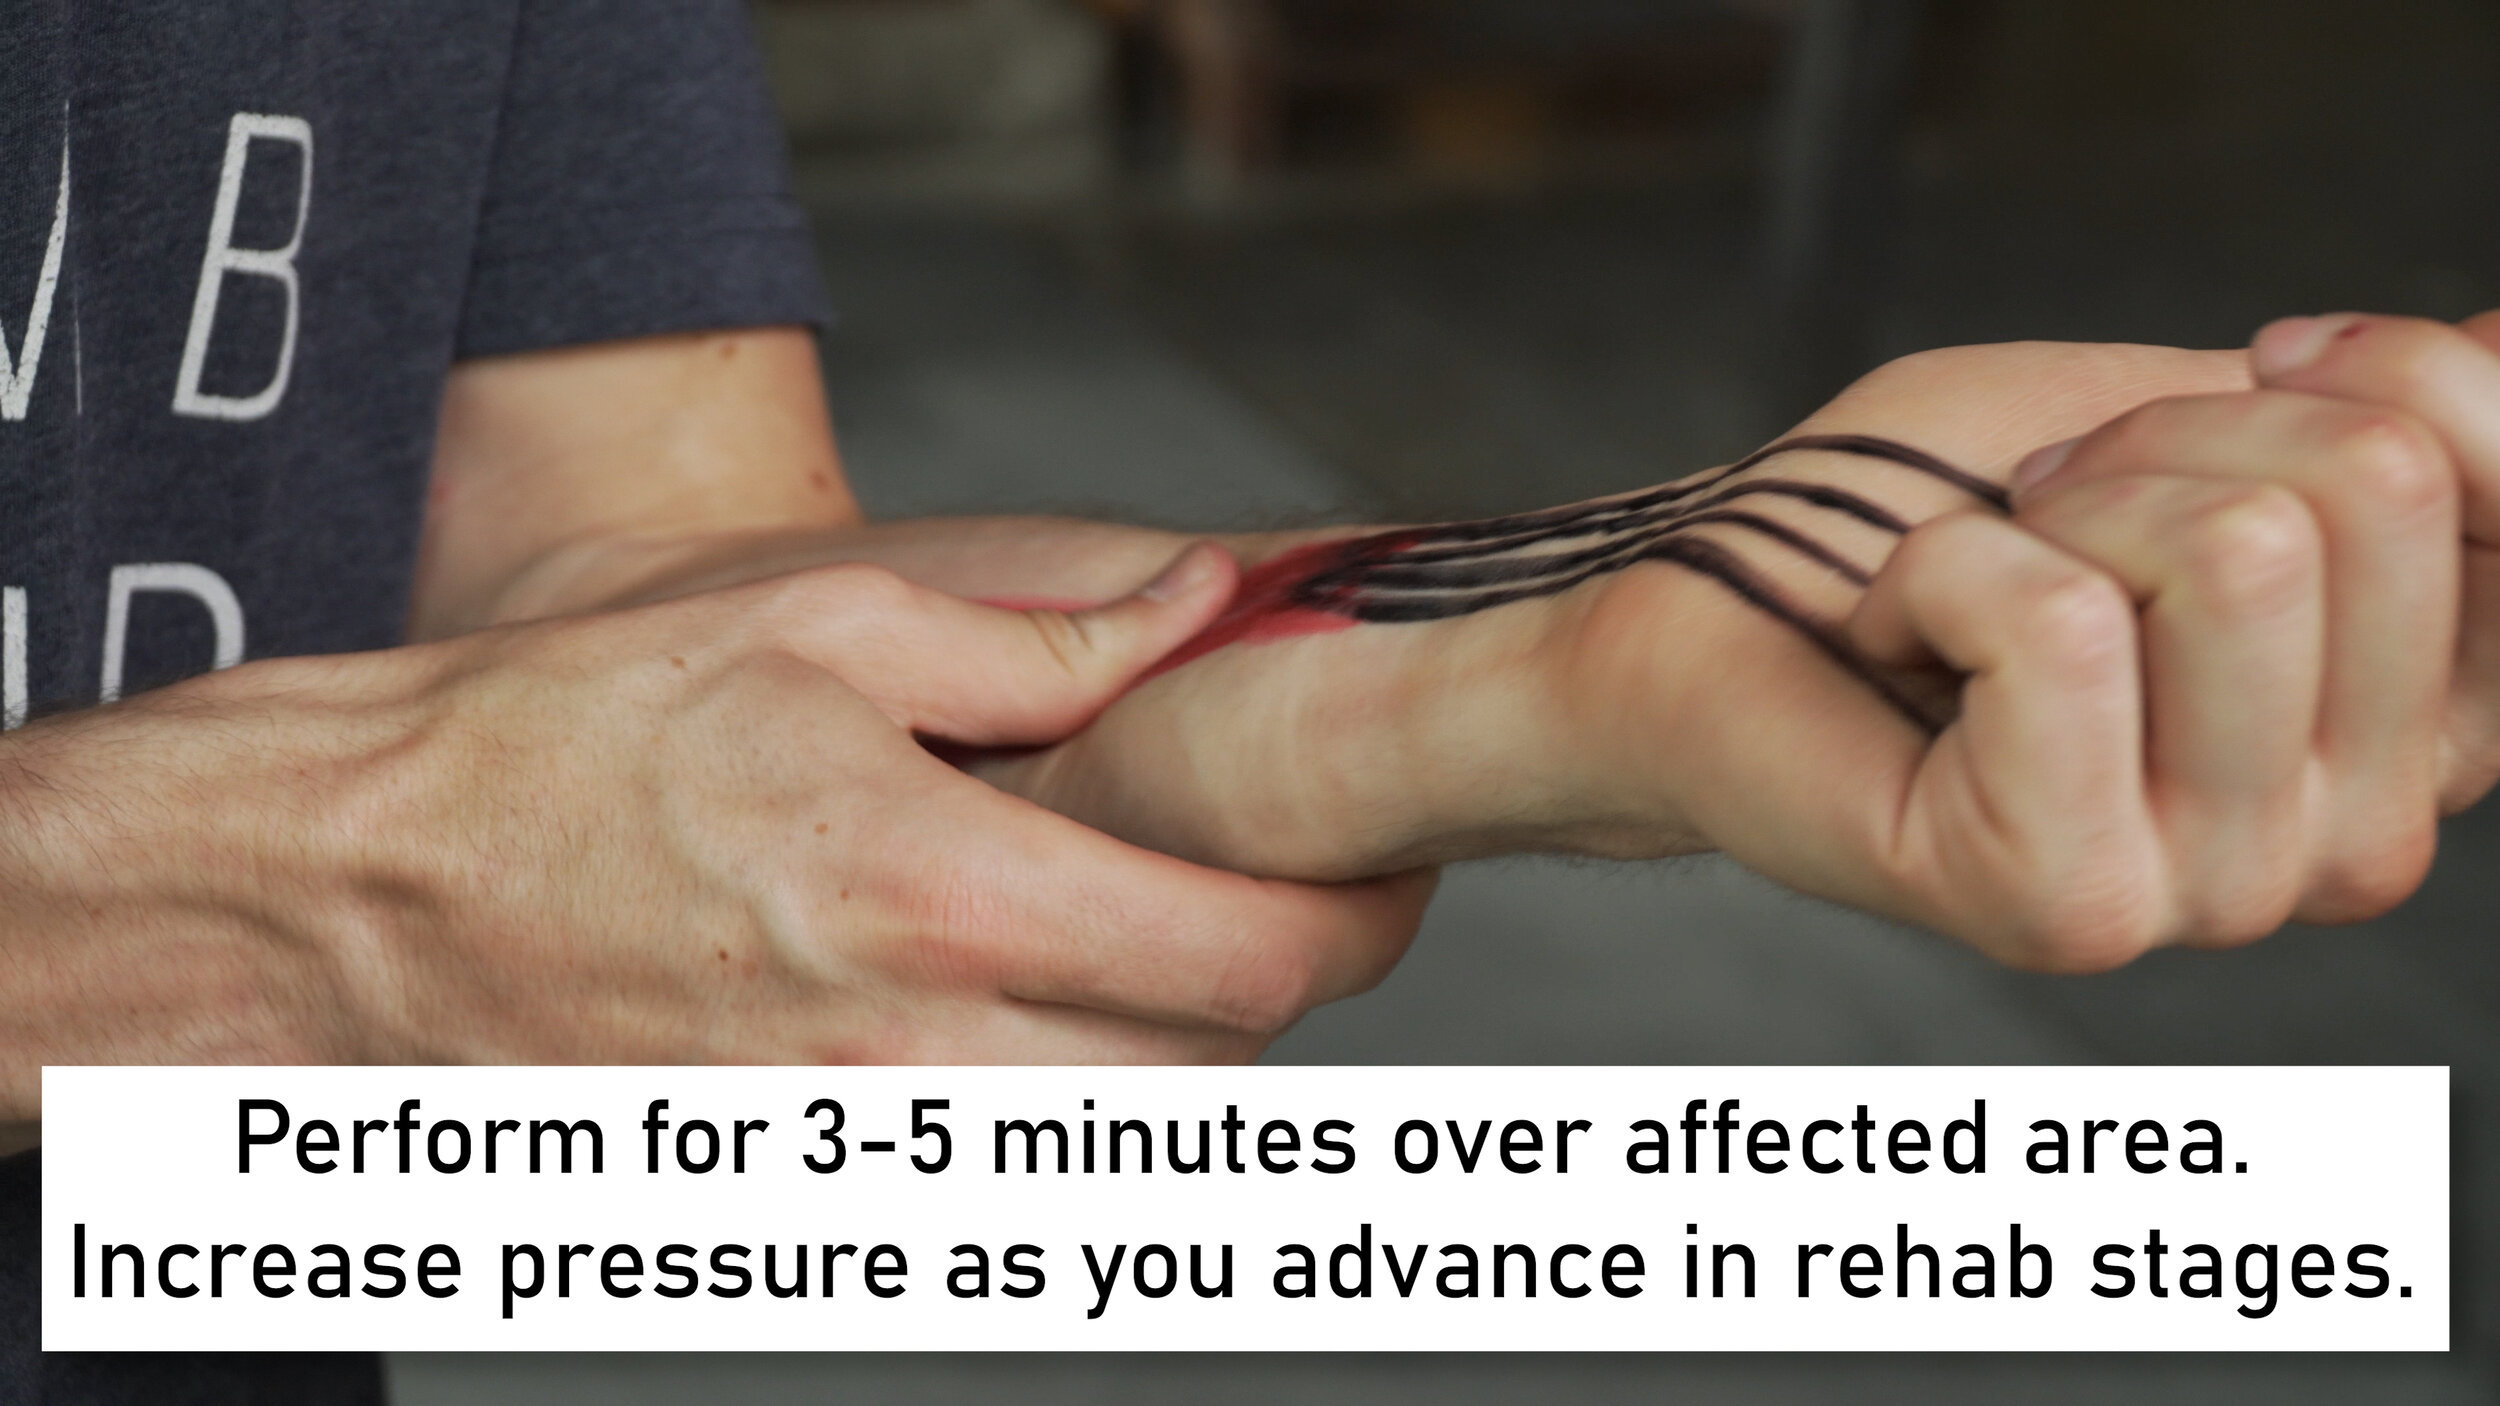
Rehab Activity #2: Self Tissue Mobilization
This can be as simple as massaging the affected area with your own hand, or as advanced as using an instrument to do so such as a graston tool or massage gun. Perform for 3-5 minutes total over the affected area with the amount of pressure depending on the stage of your injury.
Rehab Activity #3: Stretching
In order to target just the FDP, we will focus on full extension of the fingers and wrist while keeping the elbow flexed. We don’t want to extend the elbow here as the FDP does not cross over the joint and as such extending the elbow could create some neural tension or stretch other flexor muscles (FDS or wrist flexors). Hold for 30 seconds and repeat 2-3 times.
Rehab Activity #4: Submax Holds
Submax holds are relatively long-duration holds performed at low intensity. The purpose is to stimulate the tissue without loading it too far and causing harm. There are two important factors to follow to determine intensity: pain and fatigue. These submax holds should not produce more than a 2/10 on the pain scale. Regarding fatigue, this should not cause you to fail at the end of the rep. You should be producing a comfortable amount of force that is sustained for 30 seconds and repeatable after a 30 second rest. These should be performed on different holds, starting with a jug then moving to a sloper, drag, and finally crimp position. The intent is to start easy and then move to progressively harder hold types for the FDP.
Rehab Activity #5: Eccentric Finger Rolls
This is a wonderful exercise to truly promote healing of the tendon. It will elongate the tendon under load which will stimulate healing. I prefer doing this with an Olympic bar and having the forearms rest on a bench, though you can also use a dumbbell and rest the weight on your thigh. Start in a fully flexed position with the fingers and wrist flexed and the elbow slightly flexed as well. Slowly lower the weight until it is just about to fall off of your fingers, then curl it back up.
Rehab Activity #6: Crimps to Open Hand Eccentrics on Mobile Board
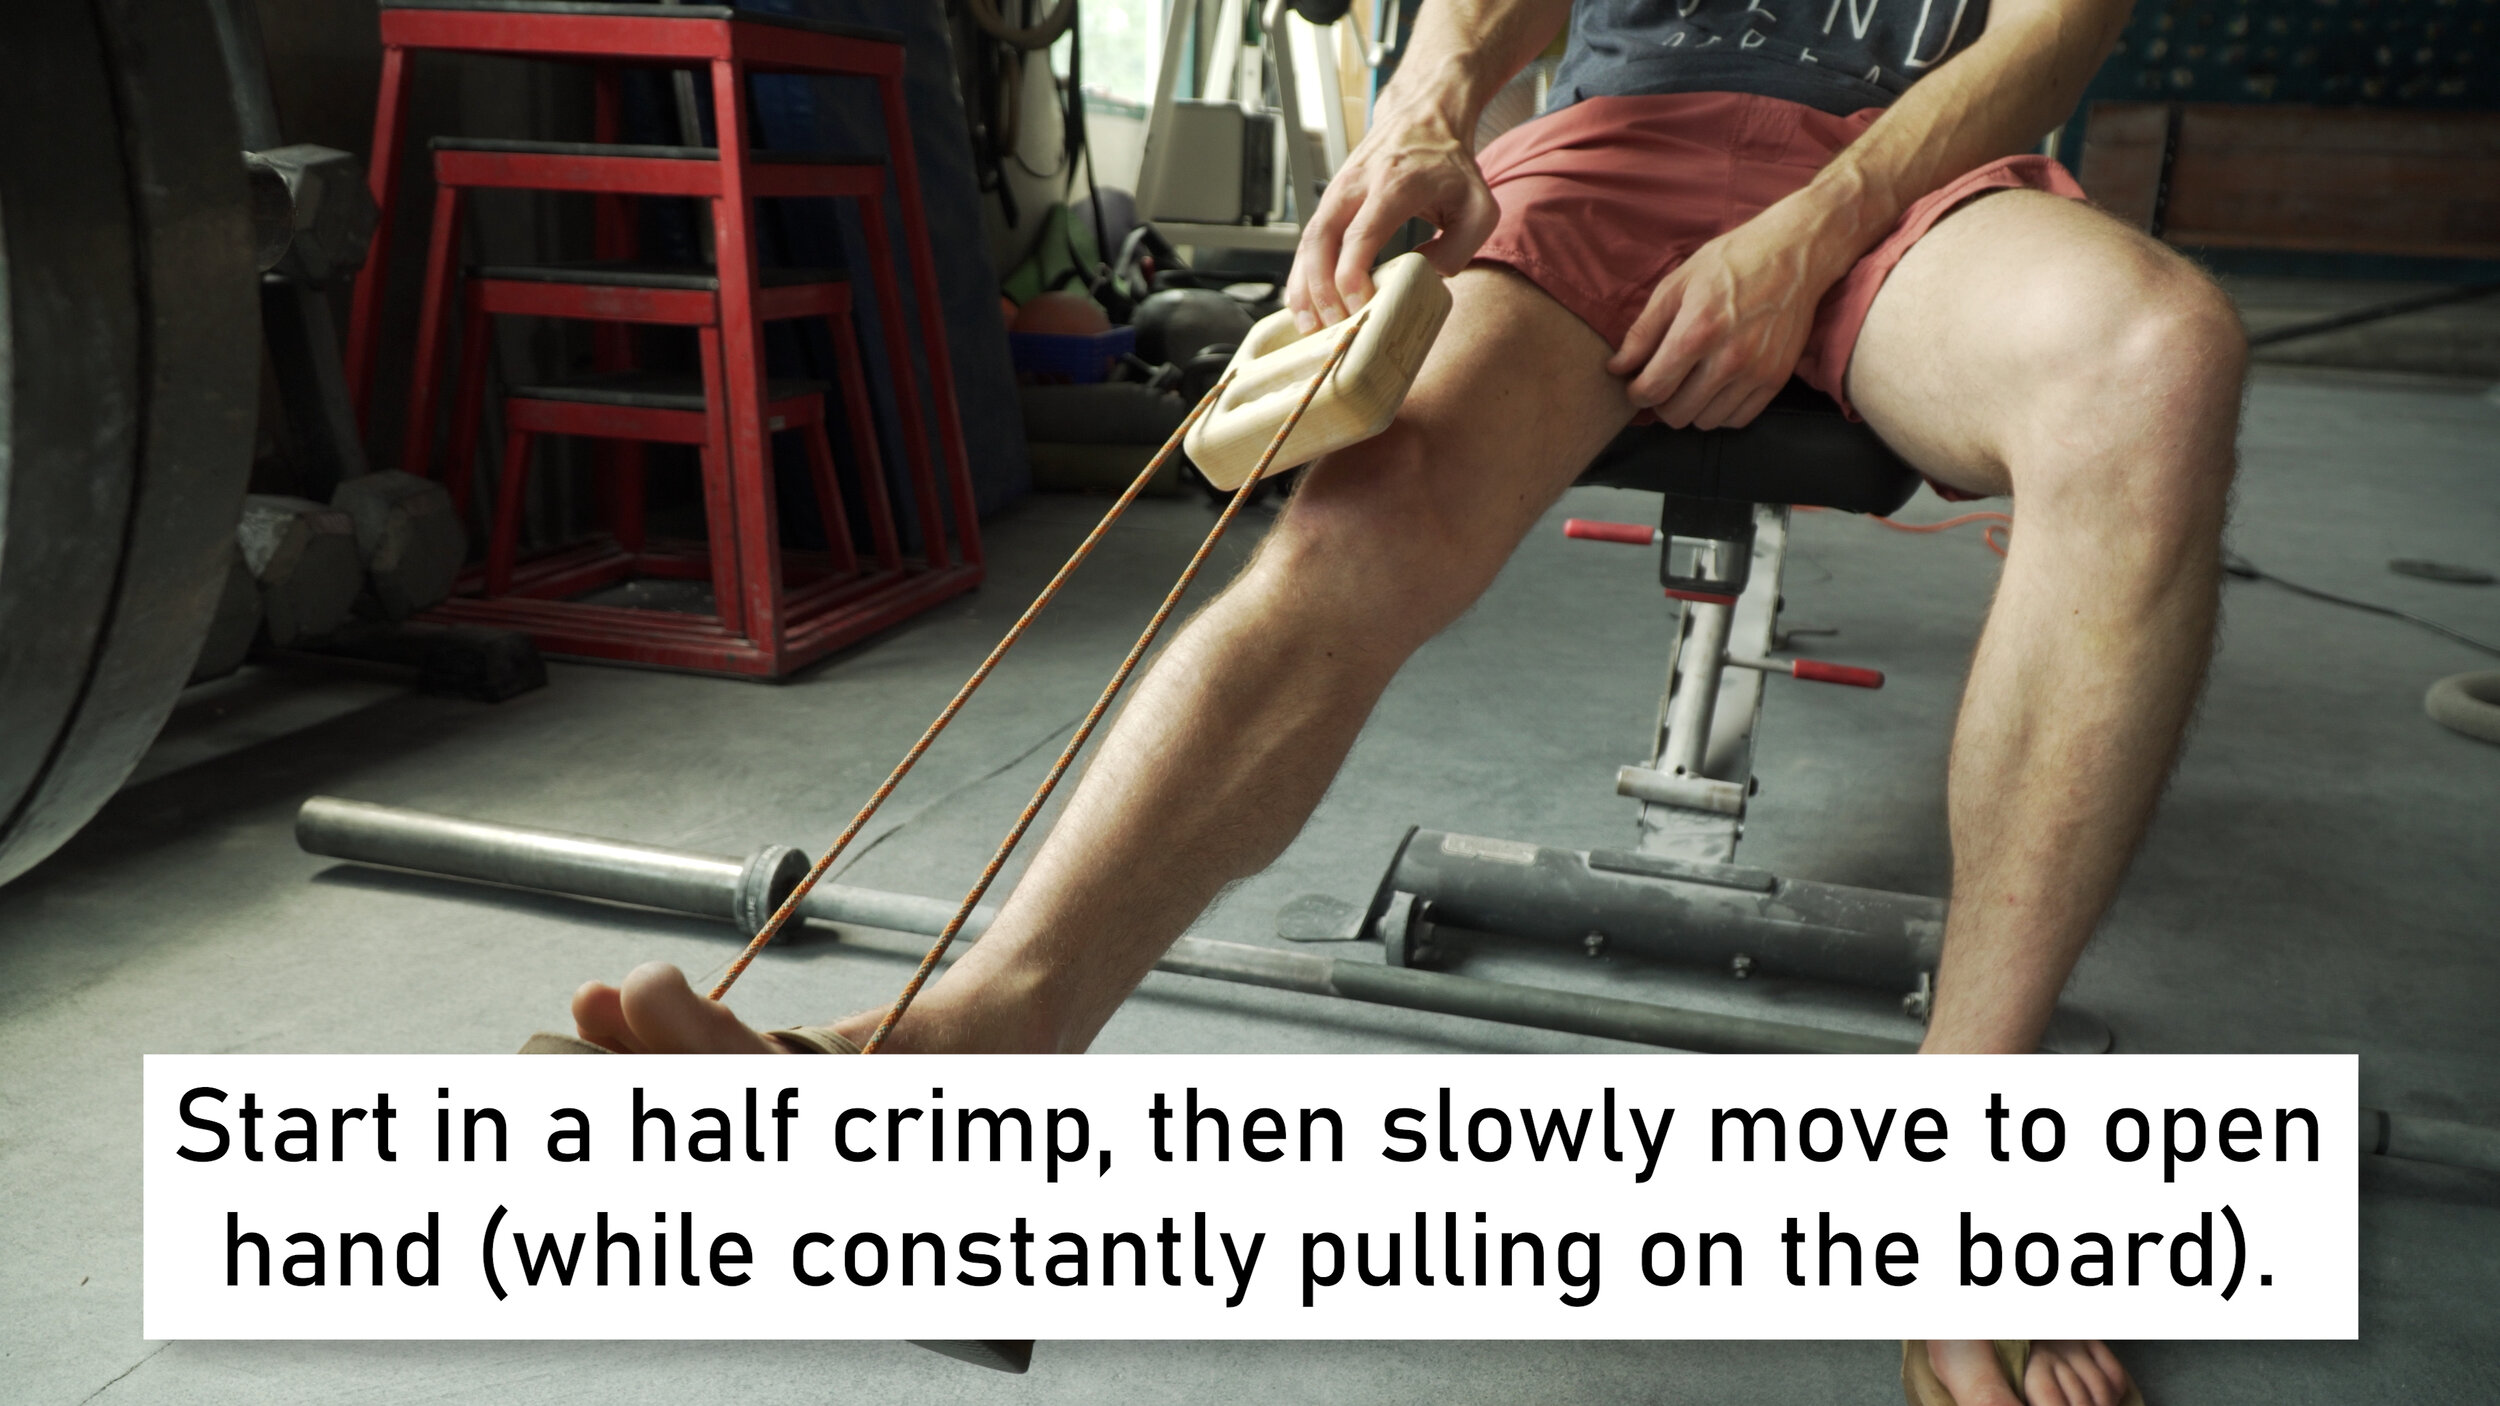
This exercise is exactly how it sounds. You’ll start (using a mobile board) on the half crimp position, and you’ll move slowly into an open hand position. All while having the fingers loaded with appropriate force. Curl back into the half crimp position, and repeat for sets of 8-10 repetitions with a 5 second eccentric period.
Rehab Activity #7: Open Hand Farmer Carries
This is only necessary for moderate to severe injuries or if you are uncomfortable progressing to hangboard training. The purpose is to bridge you from eccentrics on a mobile board to hangboarding /retraining. The weight added should be adequate for you to hold comfortably for the duration indicated on the chart without pain greater than 2/10. I recommend a metolius rock ring or a mobile board for this.
Rehab Activity #8: Removal of Aggravating Factors
This is particularly important in the chronic or overuse category. If your issue is over-training, over-climbing, or performing certain activities that continue to irritate your FDP, these need to be eliminated while you’re healing, otherwise you’re simply negating all the rehab work you’re doing and effectively working against yourself.
Rehab Activity #9: Hangboarding
Once you’re into the retraining stage you’ll need to start hangboarding to strengthen the FDP. This may simply mean incorporating more open hand work into your current hangboard routine, or starting a brand new hangboard routine specifically for open hand work. I recommend a max hang protocol using an edge that allows an open hand or 3-finger drag position (often about 20-30mm) with 4-6 rounds of 10 second holds.
Note: the acute phase will be day 0-5-7. Subacute 7-21. And earlier chronic / remodelling day 22-60, approximately. Retraining will be 60+
Note: retraining can begin ~60 days after initial injury, depending on severity of the injury.

PROGNOSIS
The timeline to recover from an FDP injury will of course depend on the severity. Chronic or overuse related injuries may have a correlation to the time you waited to deal with these issues. If you have had tendinopathy for 6-8 months, don’t expect a magic bullet to heal it in 2 days. If you follow a plan that removes aggravating factors and retrains the tissue, a mild to moderate strain will heal in about 2-3 months while a moderate to severe strain can take up to 4 months. As always, individual timelines will vary slightly.
PREVENTION
Before we wrap things up, is there anything we can do to prevent an FDP injury from occurring in the first place? Of course!
Listen to your body! Watch for signs of overuse. Write all your training and climbing frequency down so you can see if you’re doing too much.
Strengthen and Lengthen! Do some eccentric finger rolls to full extension of the FDP! This will promote healing of the tendon through a full range of the muscle/tendon, which will make it more mobile and more resilient.
Work on the open hand or 3 finger drag position while hangboarding! If you’re already hangboarding, this is a great opportunity to strengthen the FDP and make it more resilient to injury in the future.
Limit your attempts at your hardest problem to a good number to prevent an injury! I always choose 7 as my limit. But if it’s more challenging for you, move that down to 5! Repeating the same hard move over and over can definitely cause issues.
Watch our other videos about injury prevention for more tips like #3 ;)
CONCLUSION
And that’s it! If you knew nothing about the FDP before this video, you’re now infinitely more knowledgeable on this topic. Until next time, Train that FDP back into prime condition so you can Climb harder so you can Send that V13 using only open hands while your friends are all still full crimping V2s like gumbies. Aaaaand Repeat!
RESEARCH
TITLE
Tendon Injuries in the Hands in Rock Climbers:Epidemiology, Anatomy, Biomechanics and Treatment An Update
CITATION
Schoffl, V., et al. “Tendon Injuries in the Hands in Rock Climbers:Epidemiology, Anatomy, Biomechanics and Treatment An Update.” Muscle Ligaments and Tendons Journal, vol. 10, no. 02, 2020, p. 233., doi:10.32098/mltj.02.2020.08.
KEY TAKEAWAYS
Tendon avulsions, first mentioned by von Zander (39) in 1989, mostly affect the insertion of the FDP-tendon at the distal phalanx
Disclaimer
As always, exercises are to be performed assuming your own risk and should not be done if you feel you are at risk for injury. See a medical professional if you have concerns before starting new exercises.
Written and Produced by Jason Hooper (PT, DPT, OCS, SCS, CAFS) and Emile Modesitt
IG: @hoopersbetaofficial