How to Fix Lumbrical Pain (Lumbrical Injury, Pocket Climbing Injury)
Hooper’s Beta Ep. 84
INTRODUCTION
Oh no! If you’re here I guess that means you injured your lumbricals :/ sad. BUT, there’s hope my friends! Because in this video, we’ll show you how to solve that! We’re going to cover HOW to rehab from a mild, moderate, and even severe lumbrical injury, with information on range of motion activities, stretching, retraining, and lumbrical strengthening.

If you haven’t already, definitely check out our video on everything you need to know about the lumbricals! This will absolutely help you on your recovery journey as you’ll be able to better understand the anatomy and function of the lumbricals and why they get injured in the first place. That video will also help you determine the severity of your injury, which is important to know before starting rehab.
Rehab activities and timing for a lumbrical issue will depend on the severity, and if you suspect a high grade tear you need to see an orthopedic or hand specialist. If, on the other hand, you’re just suffering from a strain, Grade I-III, you will follow a standard protocol of range of motion, stretching, tissue mobility, and finally retraining.

Side note: with most grade I & II strains, you can continue to lightly climb! Just avoid exacerbating positions and consider buddy taping to help with this.
REHAB ACTIVITY 1: RANGE OF MOTION
If you have just a Grade I or II strain, I recommend starting range of motion right away. Active range of motion tendon mobility work will be best and I’ll describe all 3 movements in a moment. But first, I want to mention that the “L” position is the one to give the most attention to as it will best target the lumbricals. The “L” position is achieved by keeping the fingers extended but flexing at the metacarpal joint.

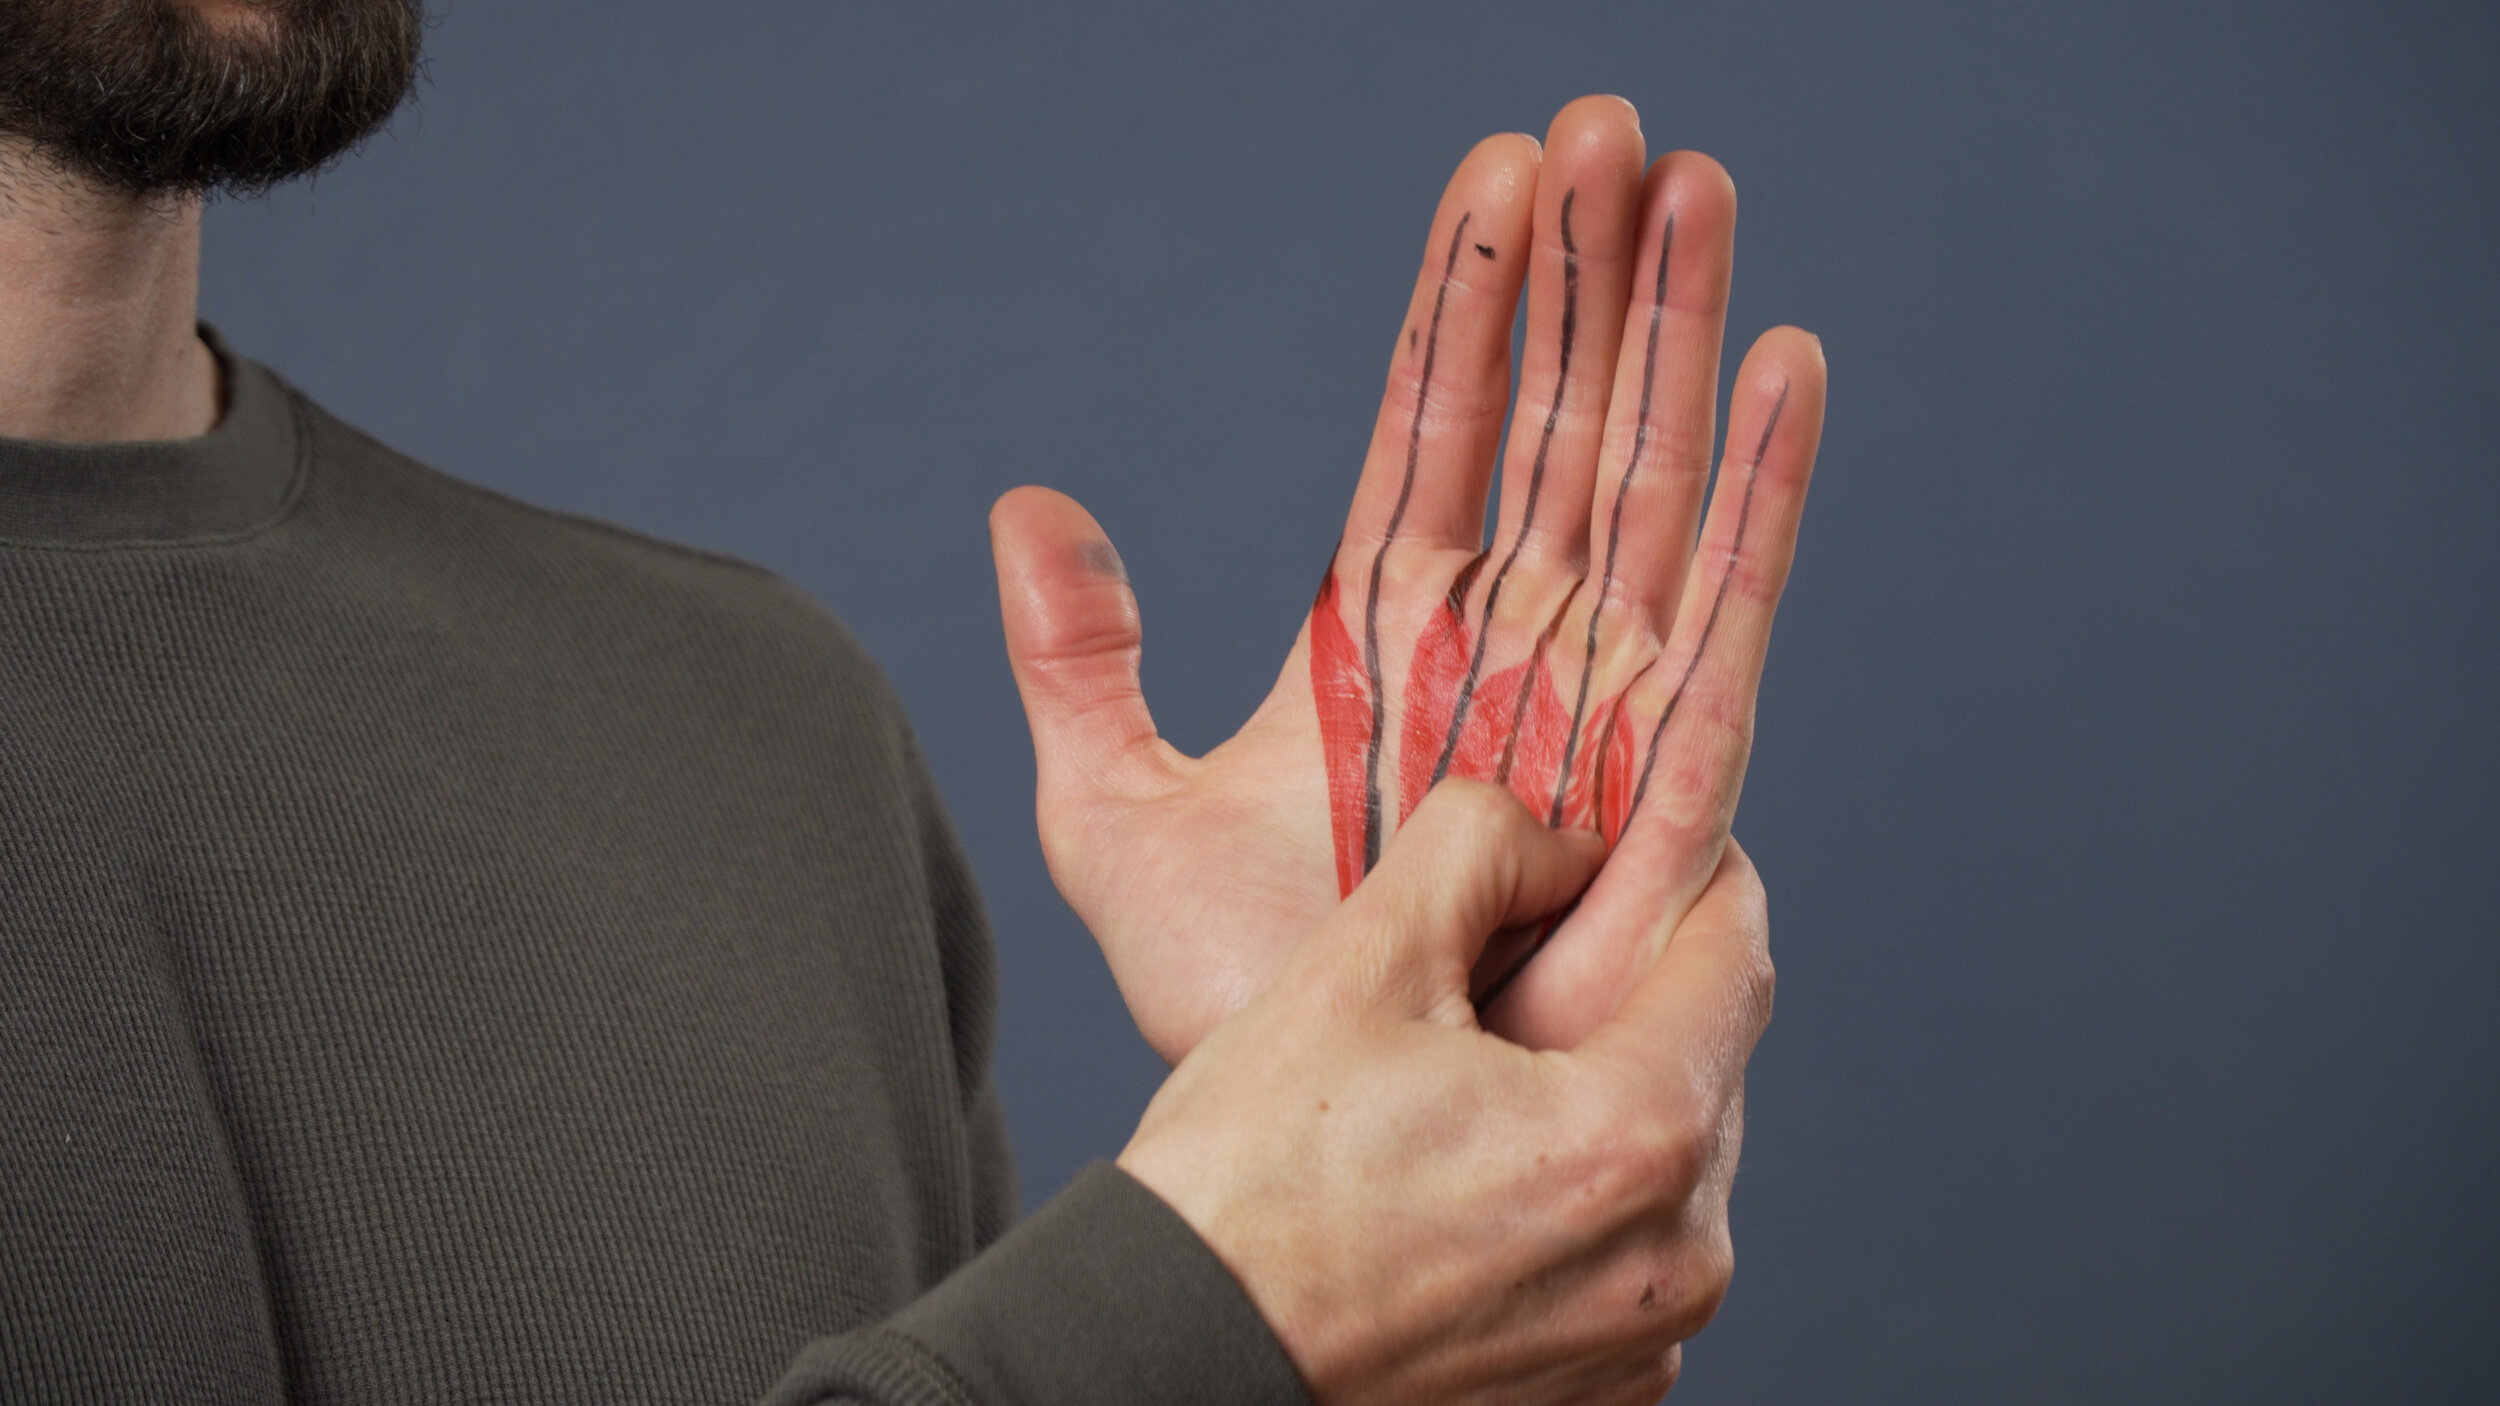
To do the active range of motion tendon mobility work as mentioned: pick 3 rows on your palm. #1 near the knuckle. #2 near the middle of the palm, and #3 near the base of the palm. Touch the pads of your fingers to each row while opening and extending your fingers all the way every repetition. This may look like “tendon gliding” but I don’t like the scraping or constant contact of the fingers pads sliding along the palm. Rather, we want to focus on just range of motion with flexion and extension of the joints.
If you have a Grade III or significant strain, you may still be able to start this as early as a day or two after the injury, but start out gentler. If there is discomfort with this, you may need to focus on a small, gentle range of motion. The more discomfort there is, the smaller and lighter your motion should be. If you do start this early, you will speed up the healing process.
Sets, Reps, Frequency: Perform 1 set of 10-20 repetitions, multiple times a day, every day of the week.
REHAB ACTIVITY 2: STRETCHING
The second step is to stretch the tissue, but because of the unique structure of the lumbricals and the likely cause of the injury being due to an awkward stretch of the tissue, we need to be more conservative with our stretching. We will have two forms of stretching as a result. One designed to generally stretch all of the lumbricals as one unit, the other to specifically mobilize the affected tissue. This second stretch is more aggressive as it recreates the position that likely caused your injury, so we will perform that stretch only after that first one is pain free.
Passive Range of Motion General Lumbrical / Intrinsic Stretch
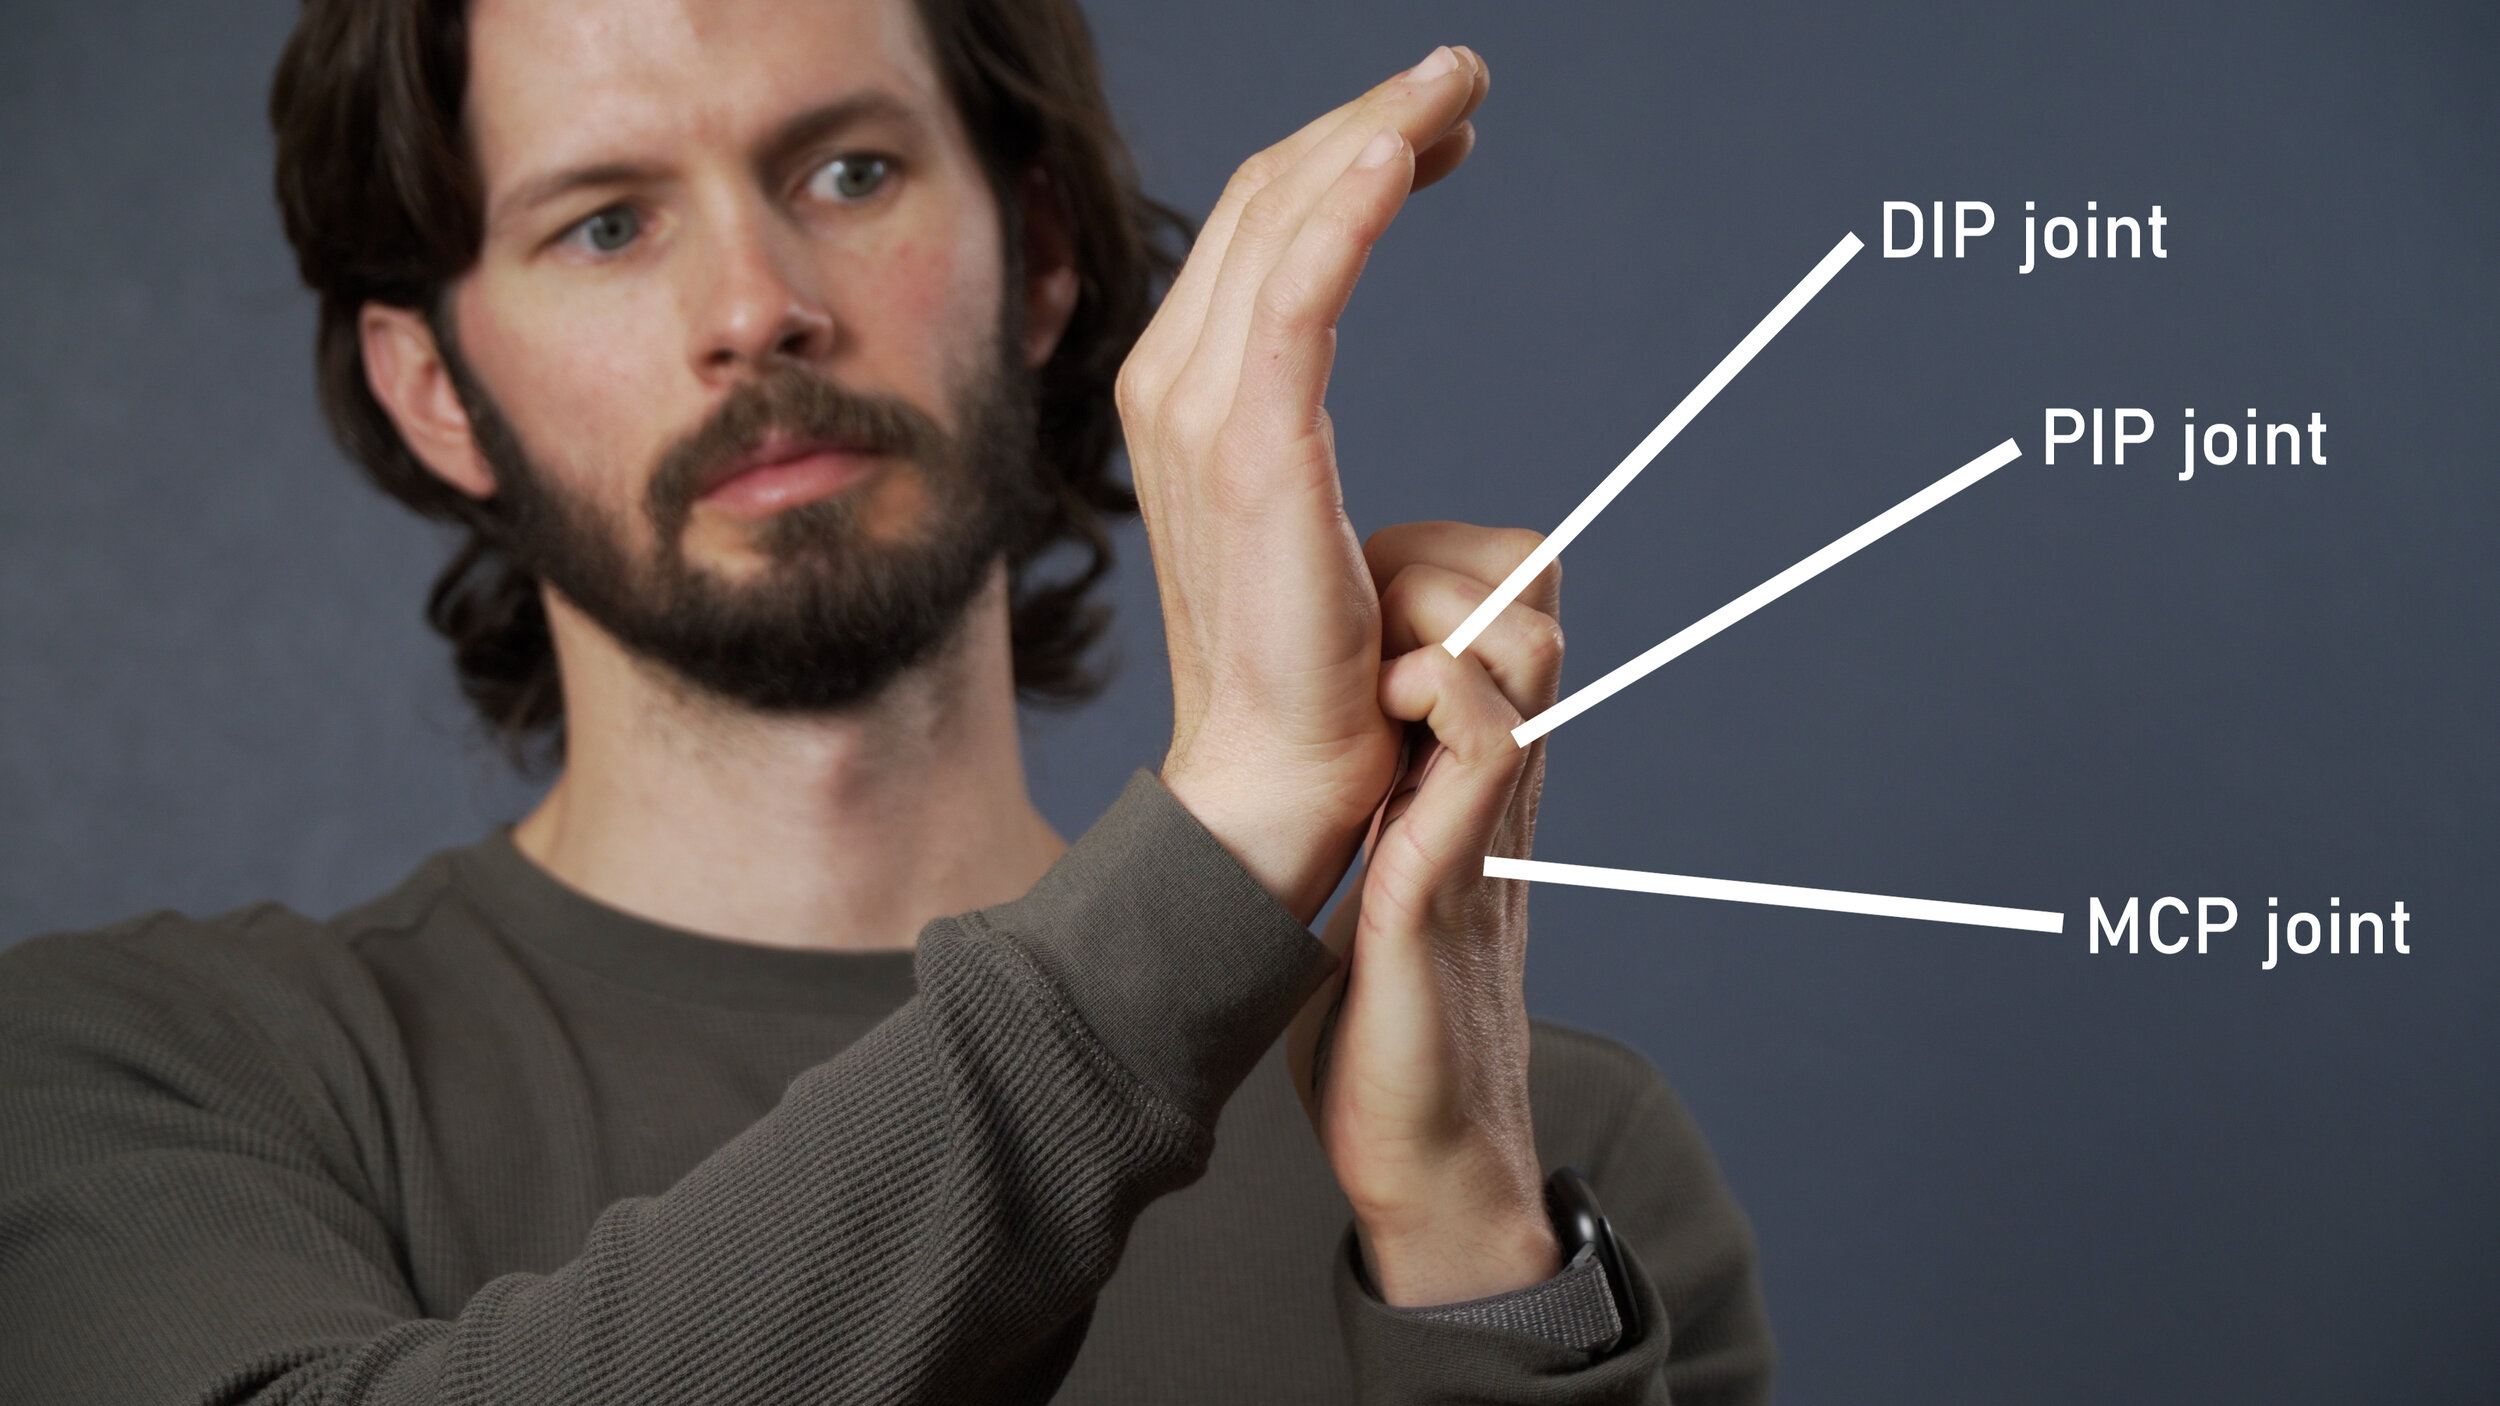
To perform the first stretch you will need to place the fingertips or finger nails of the affected hand on the base of the palm of your opposite hand. Your MCP will be neutral or slightly extended while your PIP and DIP will be flexed. The goal here is to continue to extend the MCP joint while flexing the PIP and DIP. All 4 fingers should be done at the same time as to avoid the “shredding feather” effect. Note: In the future it is possible to isolate one of two fingers at a time for a more specific stretch, but in earlier stages of your healing I recommend you focus on all 4 at the same time.
Sets, Reps, Frequency: You should start with holds of varying lengths, starting with a 5 second hold, then 10, and finally working up to 20-30 seconds. Perform this longer, 20-30 second hold, two to three times in total. You can do this 2-3 times per day.
Passive Range of Motion Feather Stretch
Now for the more aggressive stretch, or what I’m calling the “feather stretch.” For this we need to recreate the position that may have caused the injury itself to prevent any formations of scar tissue or adhesions. To do this, start with the affected finger in the extended position, holding it there with the opposite hand. Example: affected 4th digit on left hand, use the index finger on the right hand. Next, actively assist your affected hand, moving the adjacent fingers into a flexed position. Example: use the thumb and middle finger of the unaffected hand to help actively assist the middle and ring finger on the affected hand into more of a flexed position. Only move far enough to feel a gentle pull in the affected tissue.

Note: active assist means that you mean be slightly active with the affected hand while also adding passive movement with the unaffected hand.
Sets, Reps, Frequency: Hold this position initially for just 3-5 seconds, generating a gentle stretch, then release. Repeat this a few times until it feels comfortable aka 1-2/10 pain or less and no fear or guarding muscle. Then, go back to that position (affected finger extended, un-affected flexed) and hold it there with the other hand for 20-30 seconds. If you feel an ache coming out afterwards that takes more than 30 seconds to dissipate, you may have gone too far. If there is an ache that dissipates quickly, that is fine, but try not to push more than that. If this is pain free, perform 2-3 sets of the 20-30 second holds. If there is slight discomfort, perform 1-2 sets of the 20-30 second holds.
If this does not cause you pain, you can perform it two to three times per day. If it is still causing slight discomfort, perform once or twice a day.
Timing
If you have a Grade I or mild strain, I recommend the first passive stretch nearly immediately as your range of motion should be near normal. The second more aggressive stretch can begin a few days after that.
If you have a Grade II or moderate strain, you may be able to start the first stretch within a week especially if your range of motion is pain free. The second, the “feather stretch,” may need to wait a week before initiating. You should have little to no pain at rest, with no noticeable swelling before initiating the feather stretch.
If you have a Grade III or moderate strain, you may be able to start the AROM after a week but you may need to wait longer, such as two weeks, before initiating the stretching. You should have little to no pain at rest, with little to no noticeable swelling before initiating the first stretch. You should have no pain with the first stretch before initiating the feather stretch.
REHAB ACTIVITY 3: TISSUE MOBILIZATION
This section is… quite simple! Doing some self tissue mobilization or massage is always going to help for any grade of a strain and will even help in the remodeling phases of a tear. Any spare time you have, you may as well do some light tissue mobility work! Try to inversely match the intensity of the tissue work with the amount of discomfort. Meaning, if it hurts really bad to push on it, only push lightly so you don’t create that pain. If it doesn’t hurt at all, give it some more pressure to help stimulate the tissue. If you’re wondering why to do this, check out our other video on tissue mobilization such as with Instrument Assisted Tissue Mobilization, Massage Guns, or even Myofascial decompression!
For all injuries (grades I-III strains), you can start doing tissue mobilization within a day or two after injury, or once any swelling dissipates.
Sets, Reps, Frequency: Self tissue mobilization can be done multiple times a day and will be beneficial with even a few minutes of work. I recommend 3-5 minutes if possible, with a max of 12 minutes.
REHAB ACTIVITY 4: RETRAINING
OK so you’re feeling good, your ROM is improving, your pain is down, you can poke at it all you want and it feels solid. That means it’s time to retrain that tissue!
Retraining the lumbricals involves a few basic aspects. You need to work the finger flexors and extensors, you need to work the muscle itself, AND you need to work it in a similar way that it got injured to really strengthen the tissue.
Now, pump the brakes. I’m not saying you should go try that two finger pocket dyno that got you injured in the first place. Not at all. So let’s be clear, and break these components down.
Finger flexor & extensor training
Since the lumbricals really help find the balance of our finger flexors and extensors, we need to train them both up! Here are my recommendations to do that.

Finger flexion with active extension using dowel. AKA… the iron claw. Grab a soft dowl, cylinder, or even just a sharpie (a pen works as well but if it is thicker it works better). Squeeze it moderately (aka, flex your fingers) and while maintaining this flexed finger position, start to extend your fingers at your MCP/knuckle. You’ll end up just gripping the dowel between your finger pads and the base of your fingers and will stop in the “iron claw” position (MCP extended, PIP and DIP flexed). This is a nice, light exercise that activates the finger flexors with the extensors which helps with the proprioception, and also lightly stretches the lumbricals. Win, Win, Win!
Sets, Reps, Frequency: I recommend about 2 sets of 10 repetitions, with a 1-2 second hold on each repetition. Only perform it to an intensity that is comfortable. This can be done once or twice a day.
Future Progression: Reverse curl with overhand grip
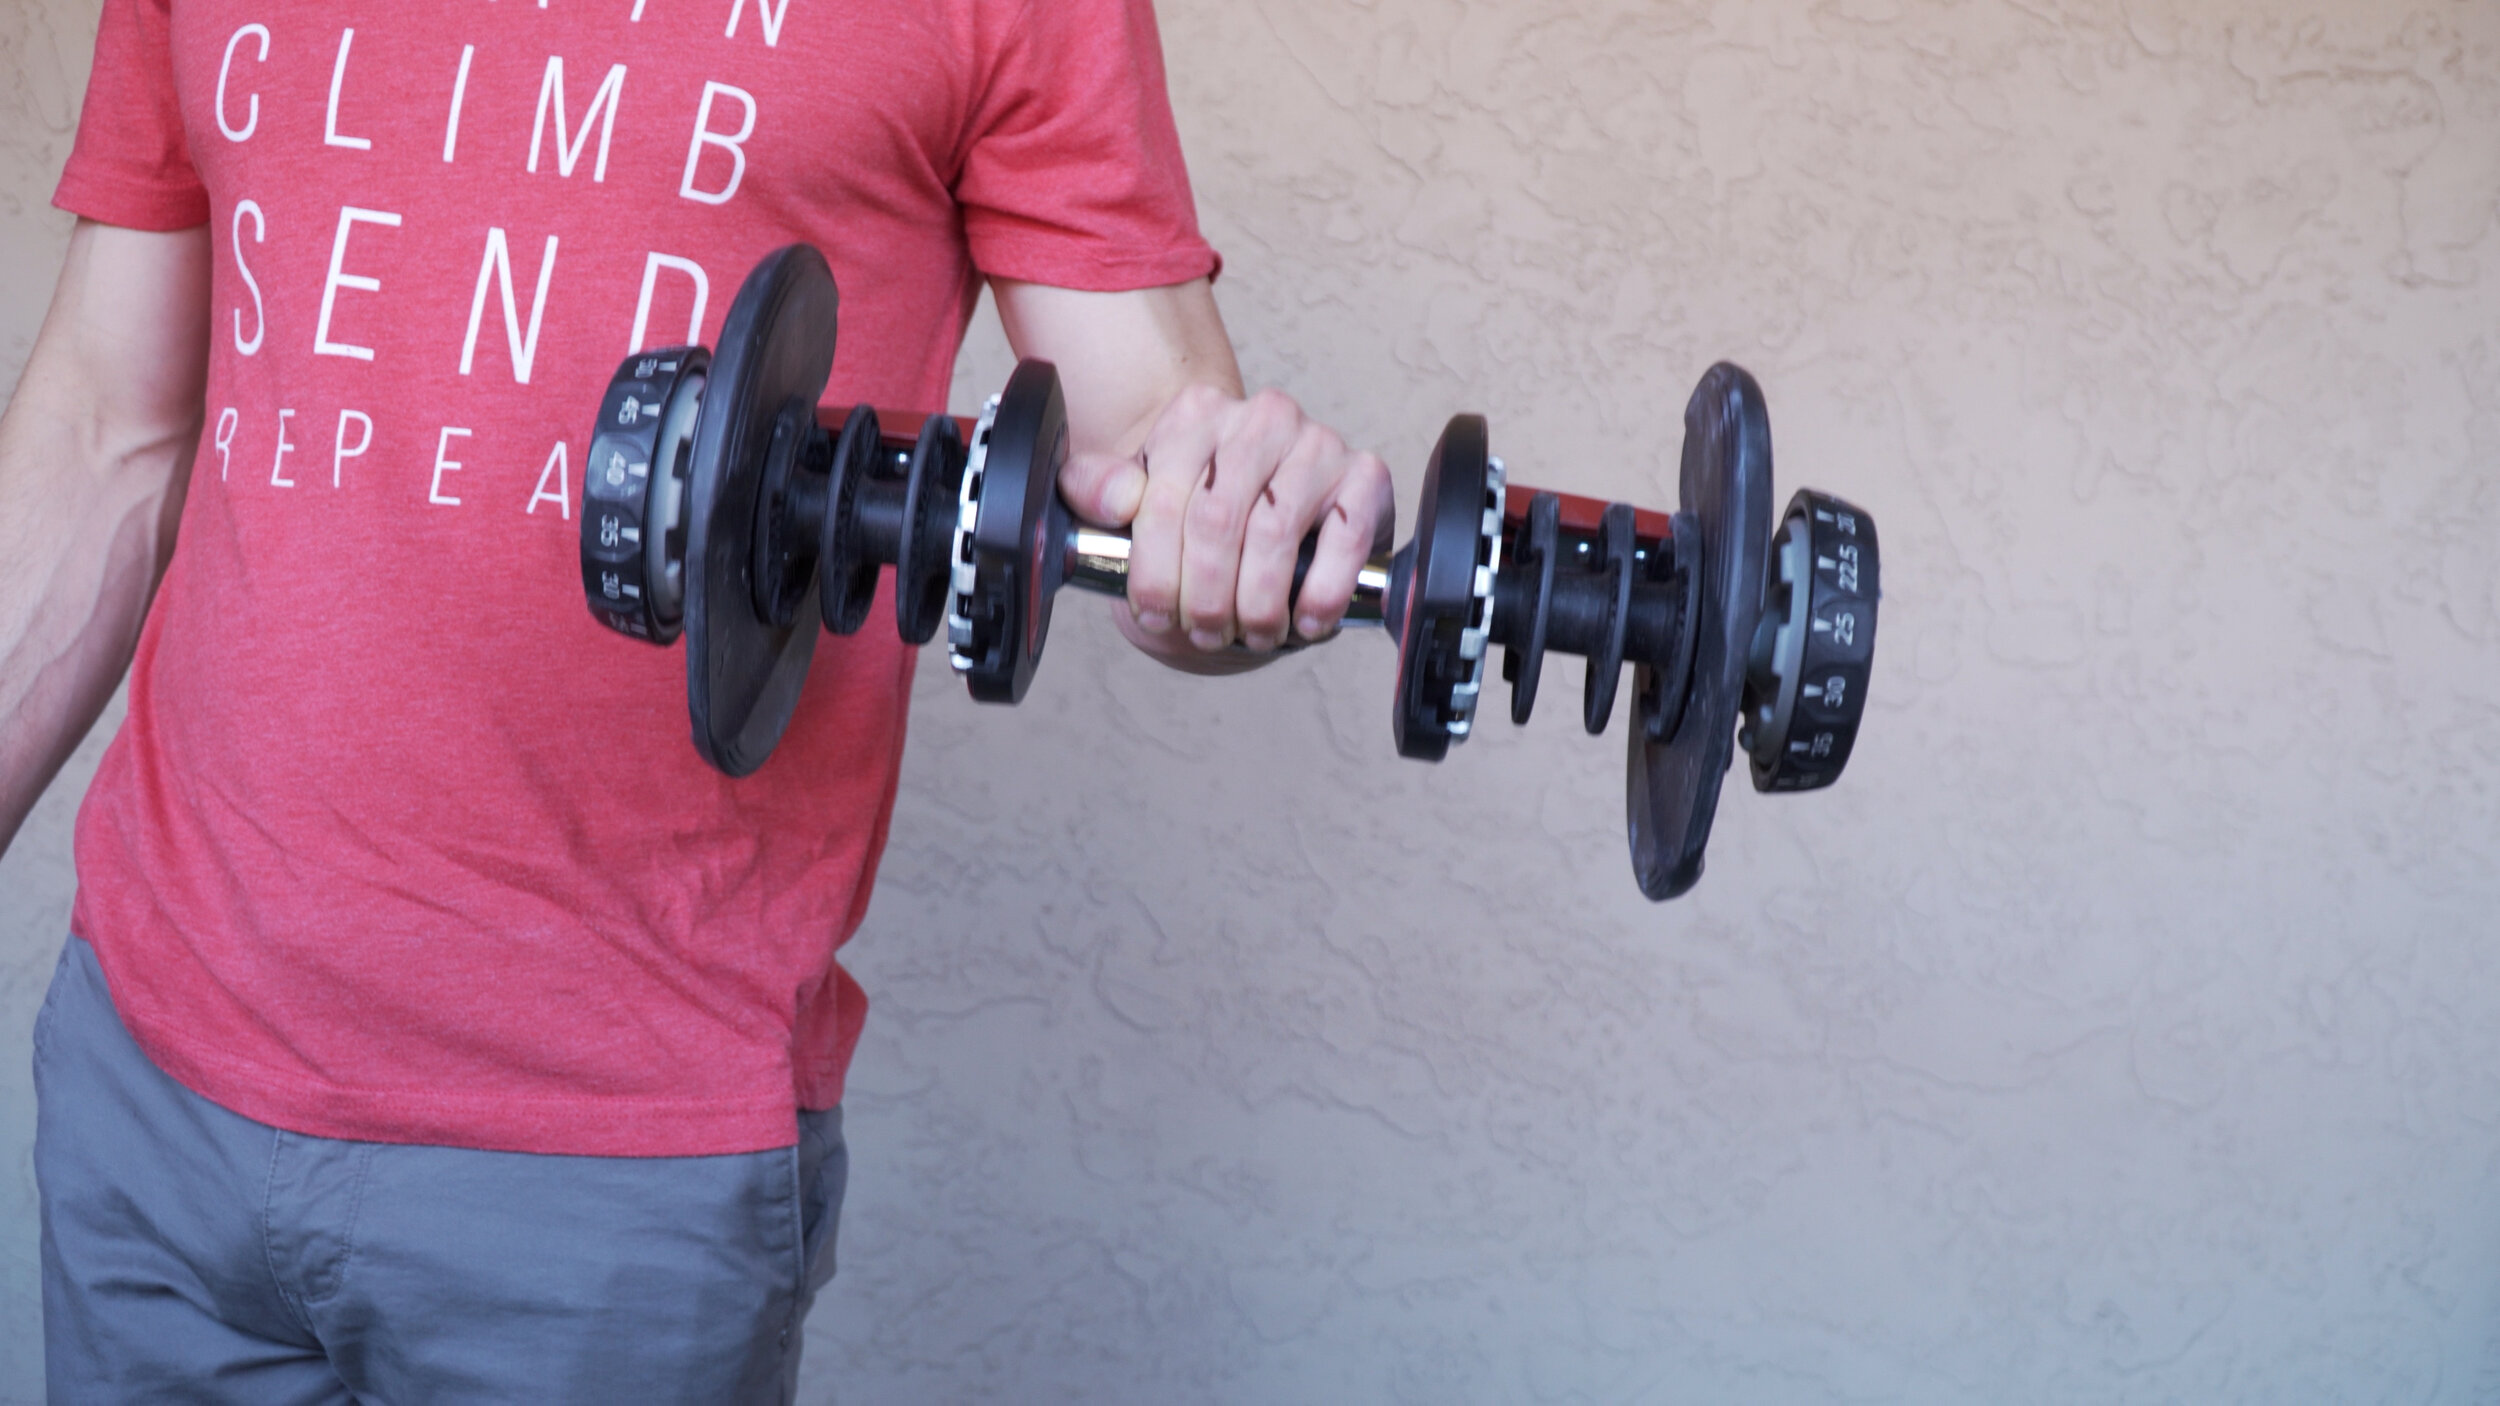
Once you have decreased pain, good range of motion, and can perform the aforementioned Iron Claw without pain, try some light weight reverse curls. This causes finger flexion with light activation of the extensors, but also works the wrist extensors which can have the added benefit of reducing elbow issues when you return to climbing.
Sets, Reps, Frequency: Perform 2-3 sets of 8-12 repetitions of this exercise. Focus on good, controlled/smooth repetitions. Perform only once a day, 2-3x/week. The frequency will depend on other activities such as if you’re currently climbing.
What else can we do that works the finger flexors and extensors? Climbing!
Once you have reduced pain and good range of motion, you can climb! Start casually climbing at least a few grades below your max, and work your way up! Avoid climbs with pockets or small holds initially. Note: you may also need to avoid some slopers as this will activate the lumbricals a bit, so just make sure you aren’t overdoing it and causing pain after climbing.
Lumbrical Strengthening
Specific lumbrical strengthening will also have a large benefit in hastening your recovery so you can climb confidently faster. It can promote blood flow and healing of the tissue which will also allow you to pull harder again and with less pain. Lumbrical strengthening can be done concurrently with your aforementioned flexor and extensor training. But remember, the lumbricals don’t have a HUGE contribution strength wise, so don’t get hyperfocused on this aspect. It is a component of the rehab, and can be done quite conveniently such as while watching TV or even as a stress reduction technique while making sweet climbing apps!
Level 1: Isometric Holds

One way to strengthen the lumbricals is an easy isometric activity. Place your hand in a pyramid-like shape on your desk, table, or any surface really. It will be making an obtuse L shape with only the wrist and the fingertips on the table. Push your fingertips down into the table and then imagine you are trying to pull the fingers in closer to you. The friction of the table and you pushing in should prevent this from actually happening, making it an isometric activity.
If you are doing this very early in your rehab, hold for 30 seconds, rest for 30, and repeat 5-10 times depending on the comfort level. Perform One set. Perform two to three times a day.
If you are doing this later in your rehab, hold for 5 seconds, building the intensity as you go, rest for 1 second, and repeat for 10 reps. Perform two to three sets, once or twice a day.
If you’re doing this really late in your rehab. Stop wasting your time. It’s time to move on.
Level 2: Putty or Foam L’s

The second level is going to be with resistance. Get some foam or some puddy and squeeze it between your fingers and thumb as if pinching in an L shape. Foam is definitely preferred here as it molds to your fingers while providing good resistance. Putty works but you will need to be a bit more creative.
If you are doing this very early in your rehab, hold for 30 seconds, rest for 30, and repeat 5-10 times depending on the comfort level. Perform One set. Perform two times a day.
If you are doing this later in your rehab, hold for 5 seconds, building the intensity as you go, rest for 1 second, and repeat for 10 reps. Perform two to three sets, once or twice a day.
Level 3: Farmer Pinches

The third level is going to use our farmer crimps but with a variation into pinching. You’ll need a pinch block or anything that can get your hand into that “L” position. Progressively make it harder as you add weight.
This should be done later in your rehab and initially should be light enough hold for 20 seconds.
If performing moderately early in rehab: perform 20 second holds with 40 second rests. Perform 6-10 reps, 1 set, twice a day.
If performing later in your rehab, hold for 10-15 seconds with a 45-50 second rest, 6-10 reps, 1 set once a day or 3-4 times a week (depending on how it feels)
Once you are feeling GREAT. You’re climbing well again, pinching stronger, and not having pain, it’s time for the final stage… time to meet your maker… time to become the master again…. Time to face the pockets and stare deep into their empty hole where their soul should be but isn’t because they are soul stealing wretched monsters!
Actually… I train pockets so I kind of like them. So I guess I like soul stealing monsters, or something like that.
Level 4: Pocket Re-Training

OK, so the final aspect of the retraining is to actually work on pockets and retrain your tissue to face the load that originally hurt it. This will be the final piece in re-training the tissue to make it more resilient to a re-injury.
My suggestion here is to start with farmer pockets. Use a metolius rock ring due to their cheap nature, or order a sweet tension block. Attach a bit of light weight, and face the beast head on!
As with the other rehab tools, if this is newer to you…
perform 30 second holds with 30 second rests. Perform 6-10 reps, 1 set, twice a day.
If you feel super comfortable doing that: advance to 20 second holds, 40 seconds rest, 10 reps, 2 sets, twice a day.
If you’re really ready to rehab: perform 10 second holds, with 60-90 seconds rest, 1 repetition, 6 total sets, and only once a day, 2-3 times a week.
One final note, hand positioning is important here. As a quick recommendation, try to keep the proximal phalanges aka the base of your fingers parallel to one another. This means that the MCP aka knuckles will be in a similar level of flexion/extension. Then, allow your DIP and PIP joints to bend as needed. This alignment at the base of your fingers is a safer position for the hand to be in. It will reduce the shearing on the lumbricals which will help prevent or reduce injury risk and will reduce the chance of exacerbating your injury.
And there you have it!
You have regained proprioceptive awareness. Healed and strengthened the muscle. And you’ve even re-trained it to help avoid future injuries! Yahoo!
But, what if you’re just watching this video and haven’t actually done the weeks or months or rehab to get to that point and you want to know if it will take weeks or months of rehab! Well, you’re in luck, because the prognosis section is next.
PROGNOSIS OF A LUMBRICAL INJURY
So, there’s good and bad news. The good news is that with most lumbrical injuries you can resume climbing quite quickly. In fact, if you only have a mild or moderate injury, then you go back to climbing almost immediately. However, you should buddy tape to avoid flexing one finger and extending the other, and avoid pockets and strenuous slopers!
If you’re experiencing a more severe lumbrical injury, you can still resume climbing quite soon, but I recommend waiting until you have good range of motion with little pain. When your pain is manageable, buddy tape, avoid pockets and major slopers, and begin working on your rehab!
So, that's “the good.” “The bad” is that this injury can linger for a while and can affect your performance. It can last 2-4 months depending on the severity, BUT if you don’t do anything about it, it can last even longer and limit your max strength, plus you’ll never want touch pockets again which disrupts your overall climbing. SO! Be proactive, do some rehab, and get those muscles working well again so you can climb your best.
FINAL RECOMMENDATIONS
OK now to the summary part! Here are my quick and easy recommendations.
To prevent an injury, train the lumbricals occasionally! Don’t just completely disregard them. These small muscles in our hands help create balance between the flexors and extensors, they are important!
Train them on pinches using farmer pinches. I love the fictitious pinch block and use it myself. There is even a nice sloper position you can use to help work the lumbricals!
Don’t completely avoid pockets then all of the sudden decide your favorite new climb has a pocket and you’re going to send it no problem. By that I mean, don’t avoid pockets, train them! Prepare your body before you demand to do it at the maximum level.
Train pockets safely. Use the method I discussed about keeping the MCP extension equal, essentially, keeping all of the digits parallel at the base of the finger, and you can improve your training without suffering an injury.
And that’s it! 4 simple recommendations to help you climb better.
Until next time. Train those lumbricals so you have balance again between your flexors and extensors. Climb those mega projects with perfect harmony. Send it like the yoga master you are. Repeat!
RESEARCH
Title
A biomechanical and evolutionary perspective on the function of the lumbrical muscle
Citation
Wang K, McGlinn EP, Chung KC. A biomechanical and evolutionary perspective on the function of the lumbrical muscle. J Hand Surg Am. 2014 Jan;39(1):149-55. doi: 10.1016/j.jhsa.2013.06.029. PMID: 24369943; PMCID: PMC4155599.
Key Takeaways
The lumbrical muscles have been considered to be involved in MCP joint flexion and IP joint extension. However, this muscle’s small cross-sectional area and measurements of the muscle’s strength in biomechanical studies suggest that this is a relatively weak muscle. This is especially true when the lumbrical is compared to the interosseous muscle, which has a similar function but is considerably stronger. The high number of muscle spindles in the lumbricals suggests that these muscles may have an important role in proprioceptive monitoring of the fingers. Furthermore, anatomical factors and the allocation of spindle fibers among the lumbricals suggests that this muscle is more involved in sensory feedback, which is important for precision pinch movements and precise manipulation of objects.
Title
Lumbrical muscle tear: clinical presentation, imaging findings and outcome
Citation
Lutter C, Schweizer A, Schöffl V, Römer F, Bayer T. Lumbrical muscle tear: clinical presentation, imaging findings and outcome. J Hand Surg Eur Vol. 2018 Sep;43(7):767-775. doi: 10.1177/1753193418765716. Epub 2018 Mar 28. PMID: 29591320.
Disclaimer:
As always, exercises are to be performed assuming your own risk and should not be done if you feel you are at risk for injury. See a medical professional if you have concerns before starting new exercises.
Written and Produced by Jason Hooper (PT, DPT, OCS, SCS, CAFS) and Emile Modesitt
IG: @hoopersbetaofficial