A Great 10-Minute Warm-Up for Climbers
Hooper’s Beta Ep. 58
Intro
What’s the best way to prepare your body for climbing? Today, we’re going to cover a simple but super effective three-step warm-up that requires just a few minutes of your time, a single theraband, AND it’s backed by SCIENCE.
Now because this is the internet, I have to start by saying that while I think these are the three OPTIMAL activities to do before climbing, that does not mean they are the ONLY things you can do. Everyone has their own opinions, routines, and rituals for warming up, and that’s great! Know your body and what works best for you. If you’re patient enough to go through a 60-minute warm-up, more power to you!
But most climbers, myself included, want to warm up as quickly as possible so we can get to the fun stuff. So the warm-up we’re talking about today is going to:
Use our understanding of anatomy to target important muscle groups and tendons
Stimulate neural activity, increase oxygen uptake, and improve activation potential of those muscle groups
AND do all of that in about 10 minutes or less
And the best part is, you can do them anywhere! So let’s jump into it.
3 Components to an Effective Warm-Up
Warm-Up #1: Tendon Glides
How: My suggestion for your first warm-up activity is tendon gliding. Tendon gliding is so easy it can be done as you’re walking to the crag or while you're driving to the gym (1 hand at a time please if you’re driving).
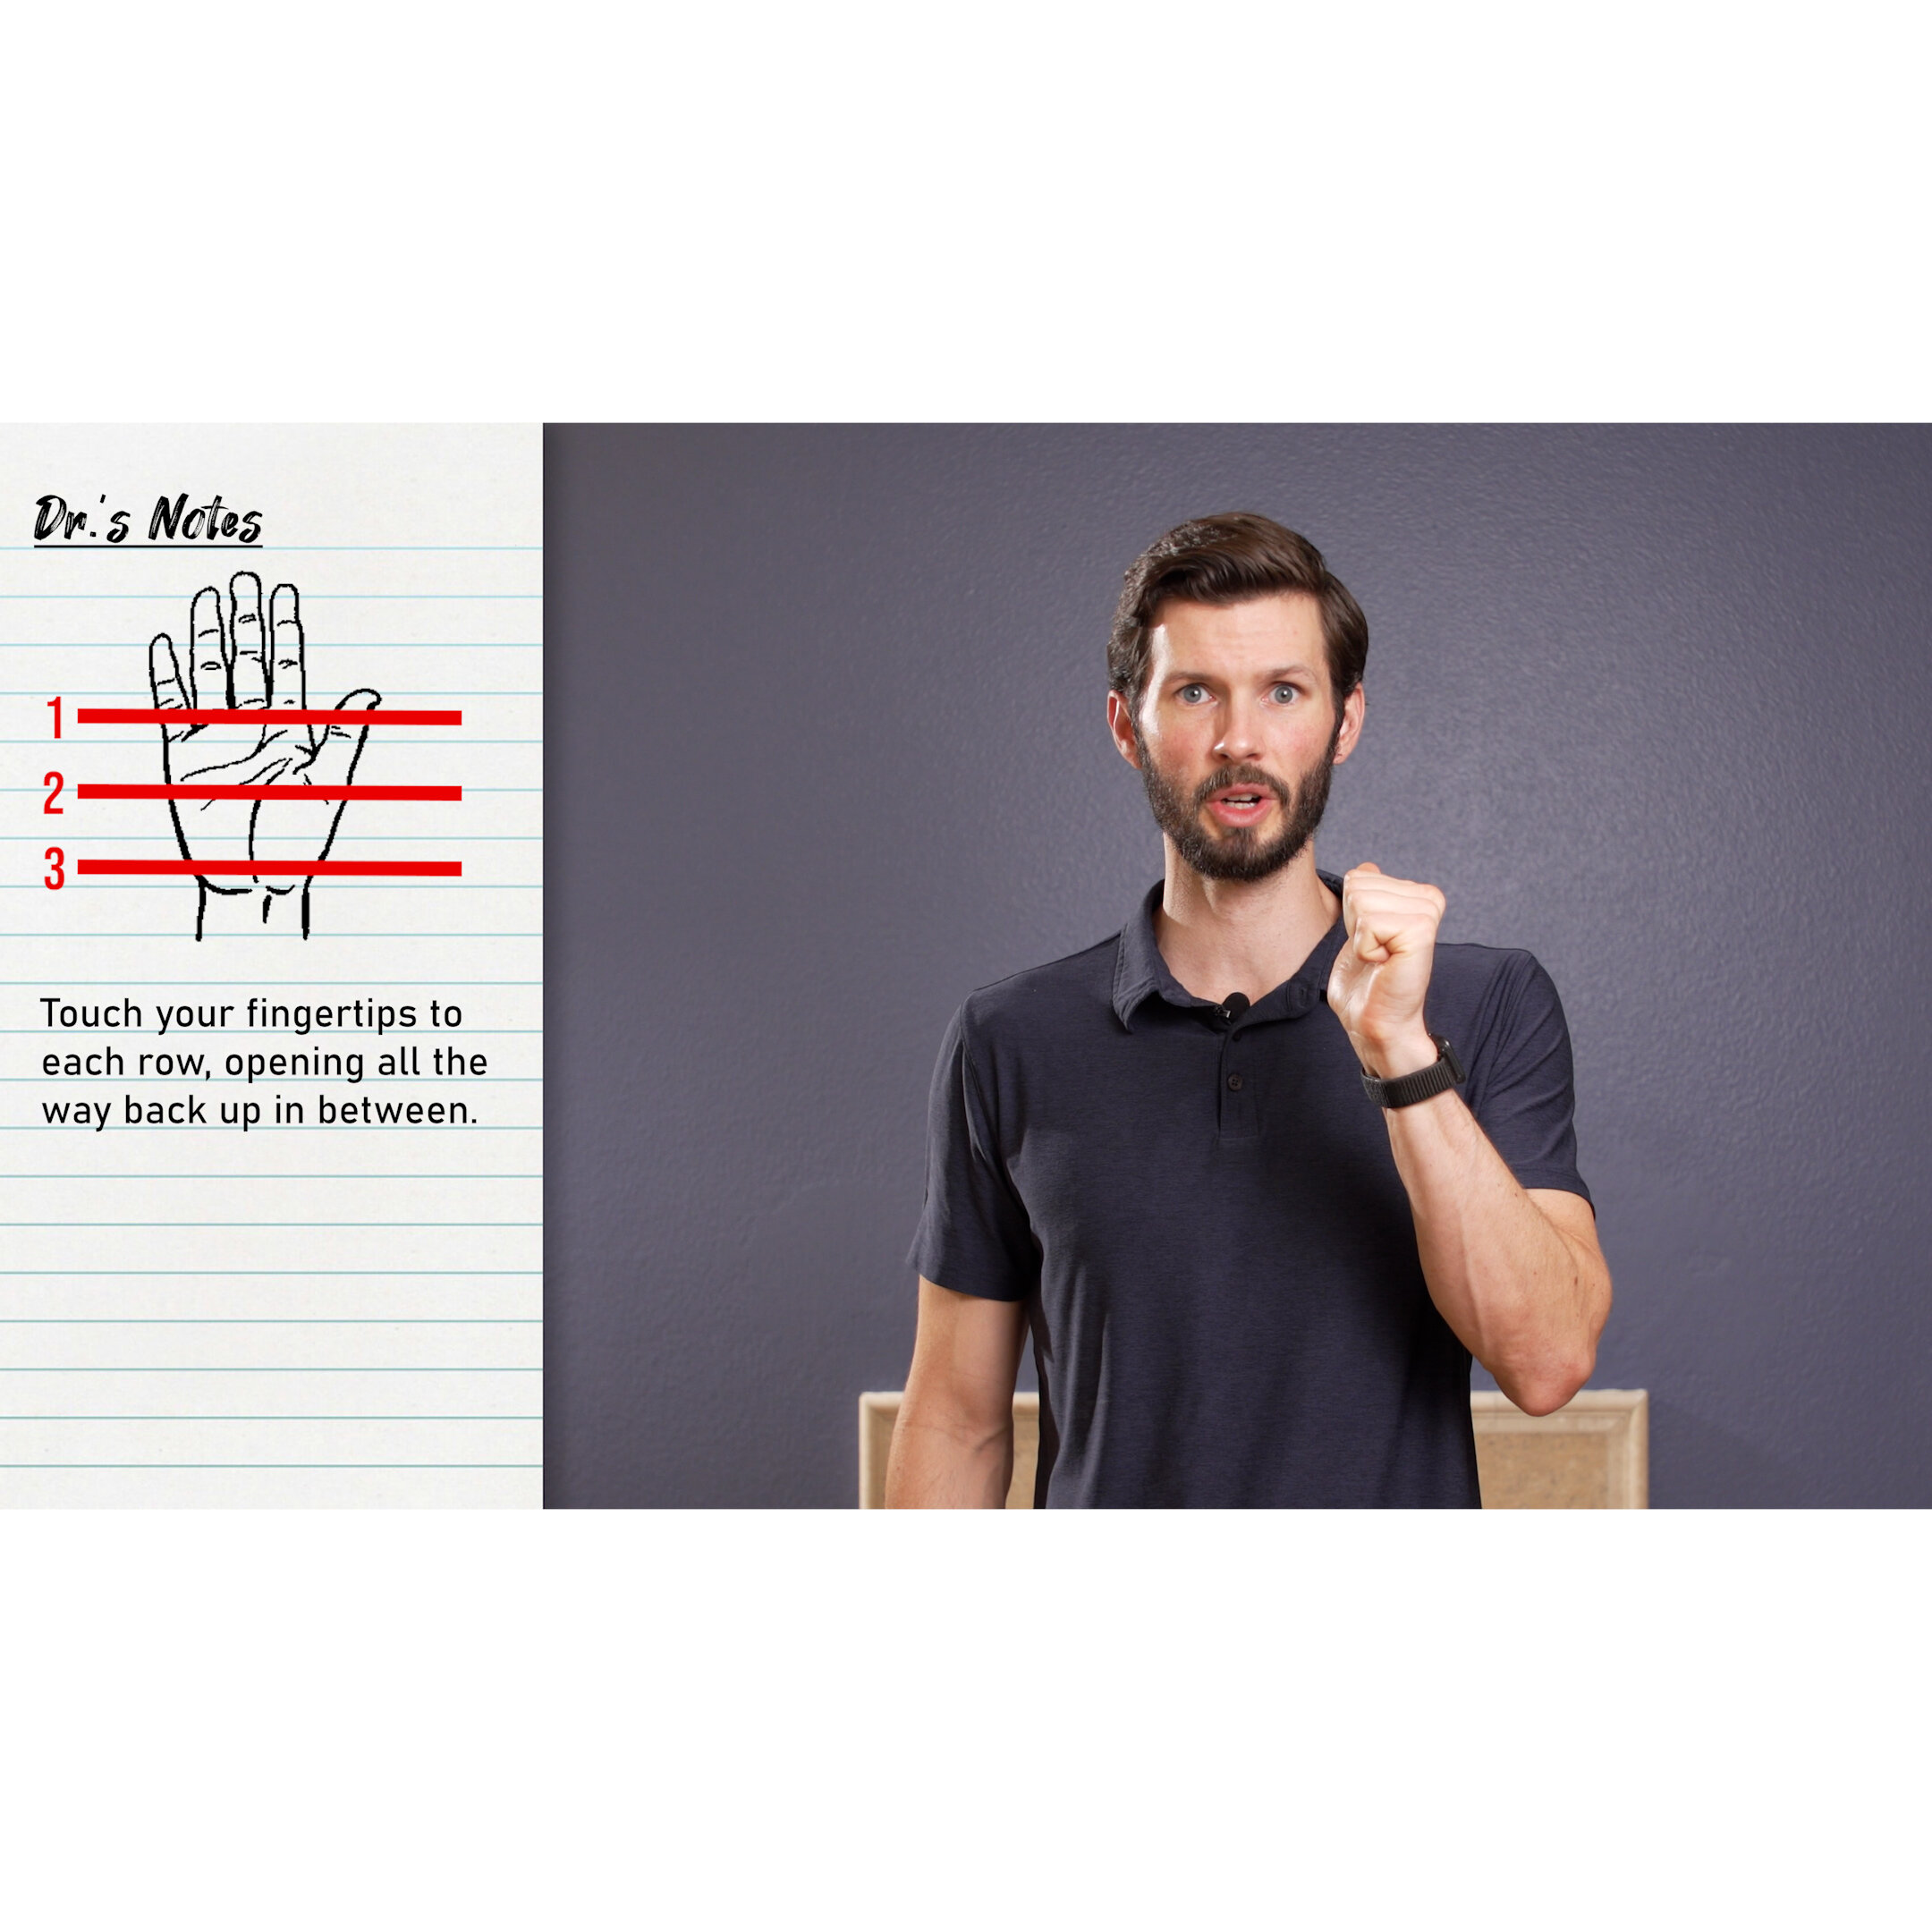
The easiest way to do tendon gliding is to think about picking three rows on your hand and touching the pads of your fingers to each row using as much range of motion as possible. The three rows will be at the the top row of your hand, then the middle of your palm, and finally the base of the hand/wrist. Fully flex your fingers trying to touch the pad of your fingers to the first row, open them all the way back up, then go to the middle row, again open and extend the fingers to their original position. Finally, while making an “L” shape with your hand, reach the pads to the base of the palm. Once again release and fully extend your fingers, and you have completed 1 cycle. Perform 10 cycles on each hand.
For a bit of extra credit. Here are my top two tips to make your tendon glides even more effective.
First, put some effort into it and squeeze harder and open wider! Doing this will cause even more gliding of the tissue AND will warm up the tissue more as you create a greater contraction of the tissue.
Second: move your wrist through flexion and extension as you do your tendon glides. This has been shown to cause EVEN MORE excursion of the tendons and will help activate and warm-up more muscles.
Just some added details about what position works what tendon:
The “Fist” position provides maximum excursion of the flexor digitorum profundus (FDP) tendon
The “straight-fist” position provides maximum excursion of the flexor digitorum superficialis (FDS) tendon
The “Hook” position provides max differential gliding as it moves the FDP much more than the FDS.
Why: Tendon gliding has been used in rehab since... forever. It is used to treat tenosynovitis, degenerative joint disease, it can help decrease swelling of the hand and the synovial spaces, it can improve your hand dexterity, and it can break up adhesions of the tendons to neighboring structures. BUT, this is about priming you for climbing, so how does it help with that? Primarily, tendon gliding causes movement of the flexor digitorum profundus (FDP) and flexor digitorum superficialis (FDS). These are the two main muscle/tendons that we use with climbing! The FDP has the most force on it during crimps and the FDS helps more while holding onto slopers. Tendon gliding will also improve your joint mobility. I’m sure some of you out there can attest that climbing has done some work on your joints and improving that mobility would be a good thing. OK so that’s cool…. Is there anything else?
Why yes! Tendon gliding has also been shown to force the extensor tendons to activate and glide. Those of you who have had lateral epicondylitis or tennis elbow can attest that we definitely put a lot of work on our outer elbow, so getting those muscles and tendons moving and warm would greatly help our climbing!
Finally, wait really there’s more? Yup. Tendon gliding also helps activate the intrinsic hand muscles as you go through that “L” position. So much from such a simple task.
In summary:
tendon gliding is as easy as moving your fingers to 3 spots on your palm.
It helps warm up FDP, FDS, extensor muscles, and the intrinsic hand muscles.
It improves joint mobility.
Warm-up #2: Shoulders (External Rotators)
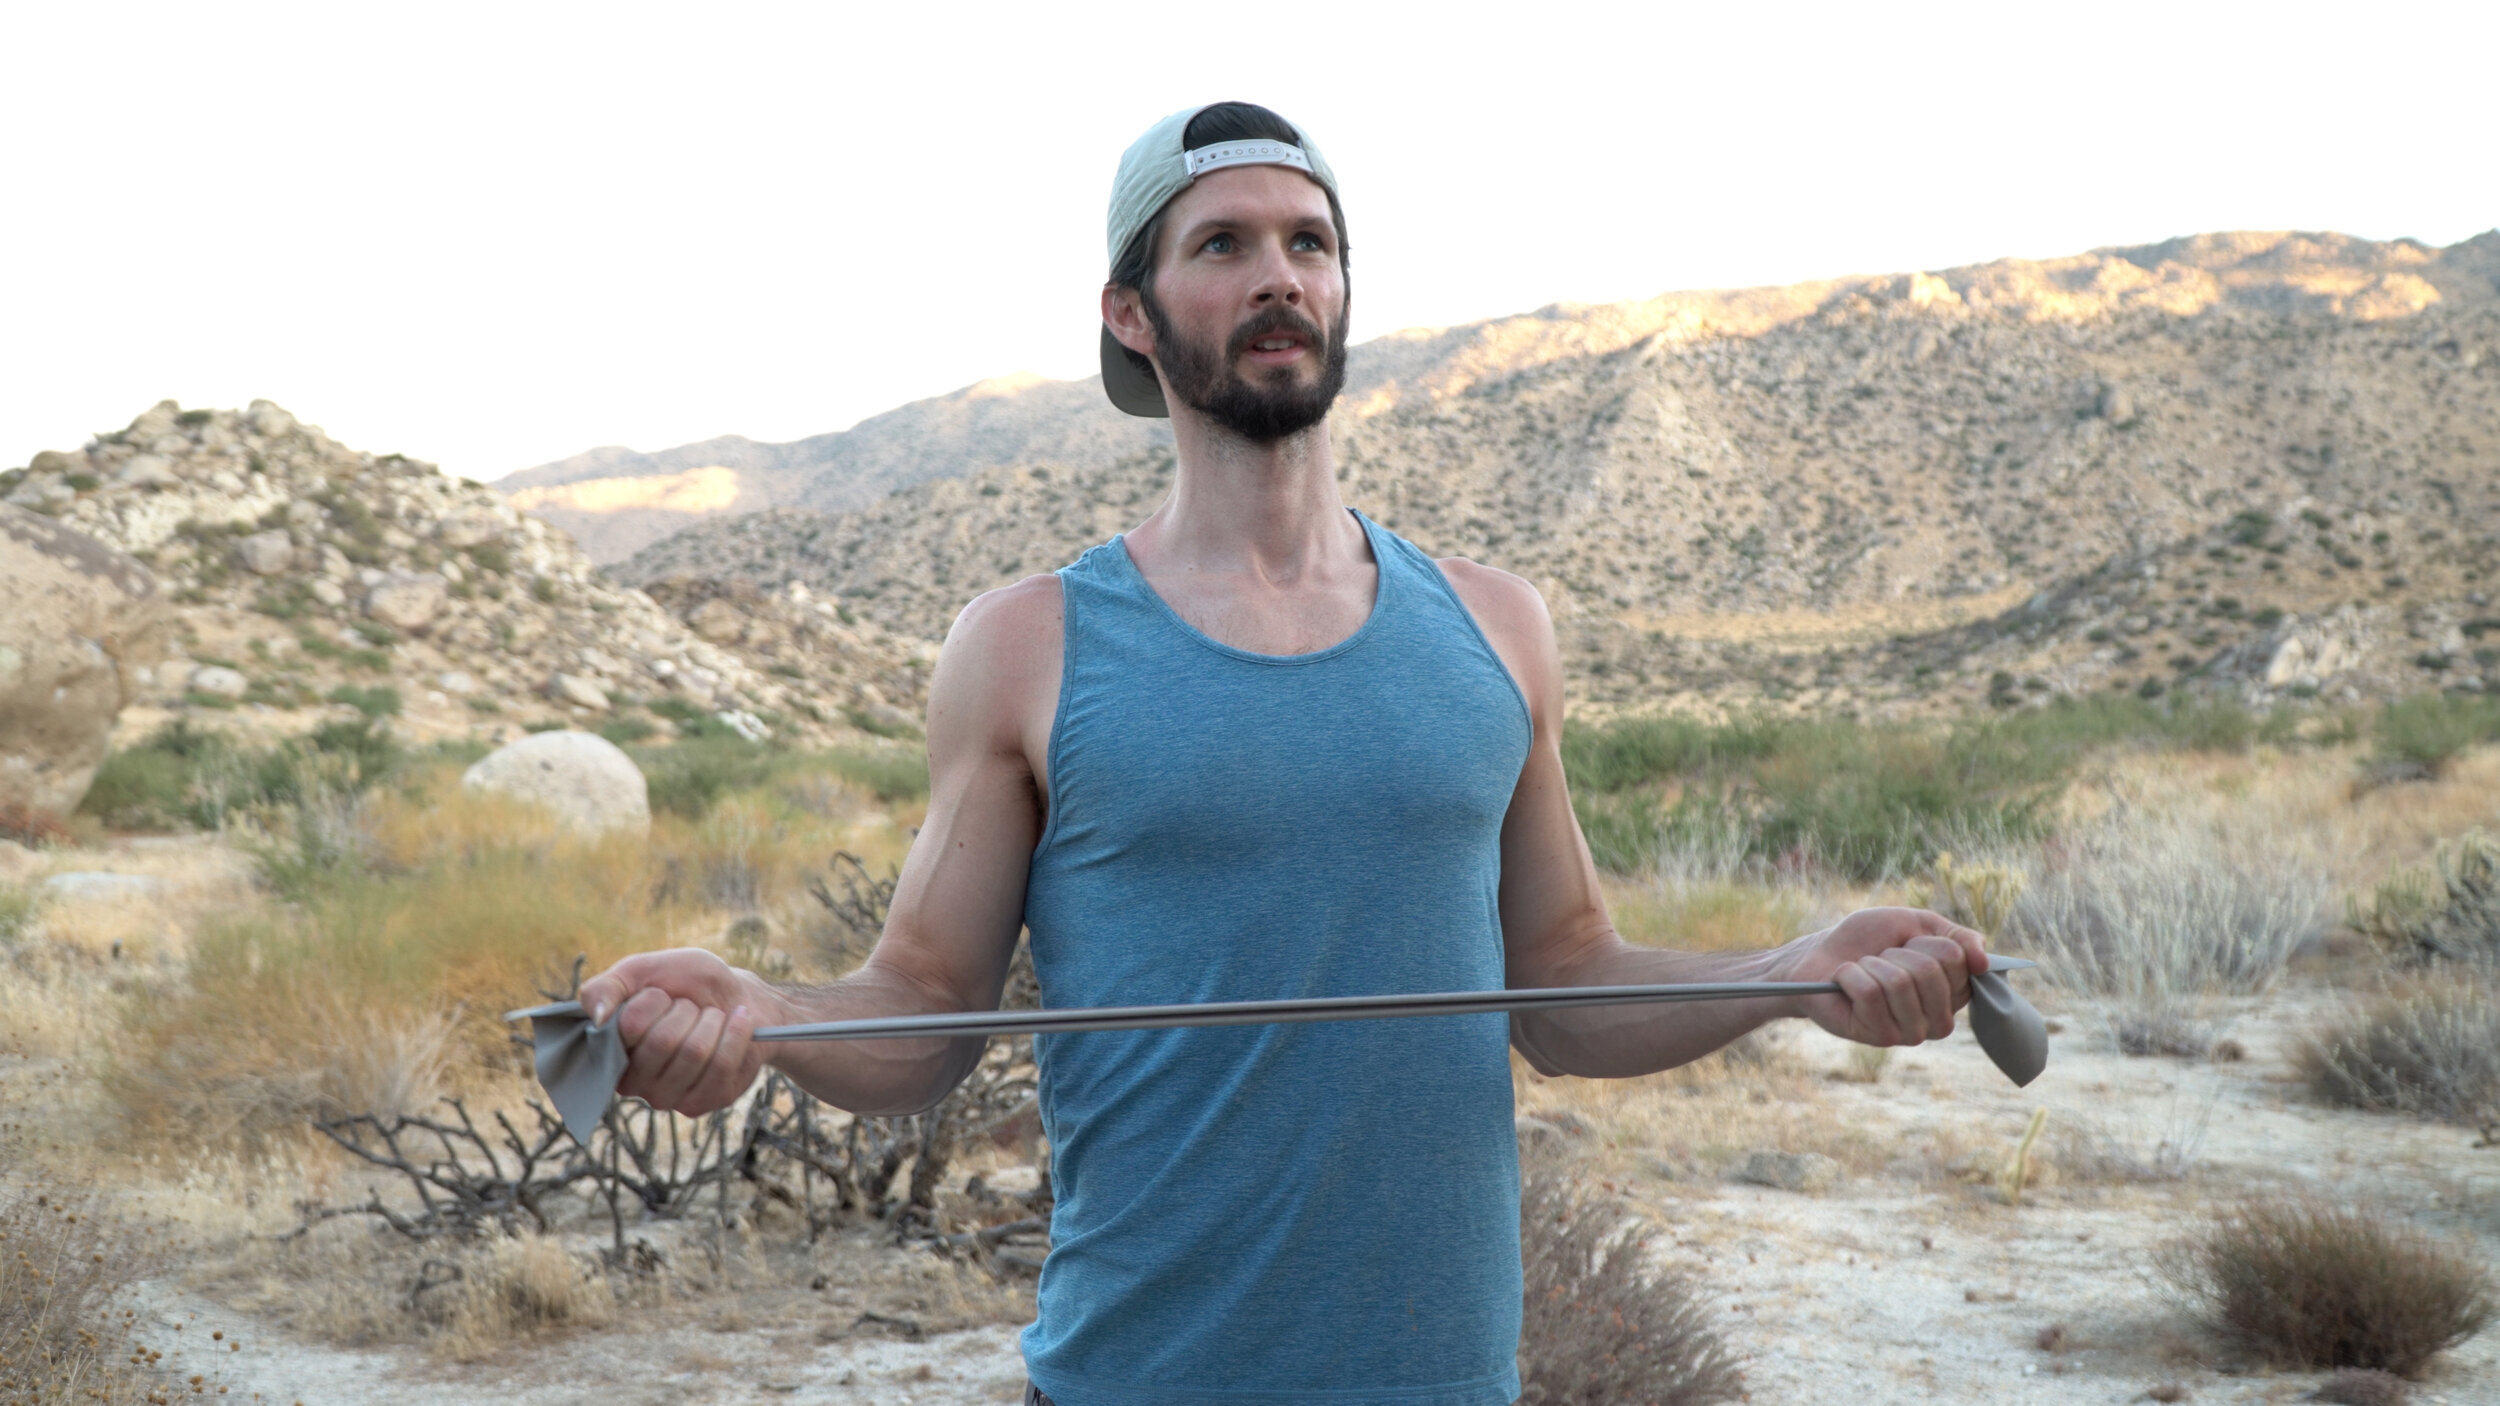
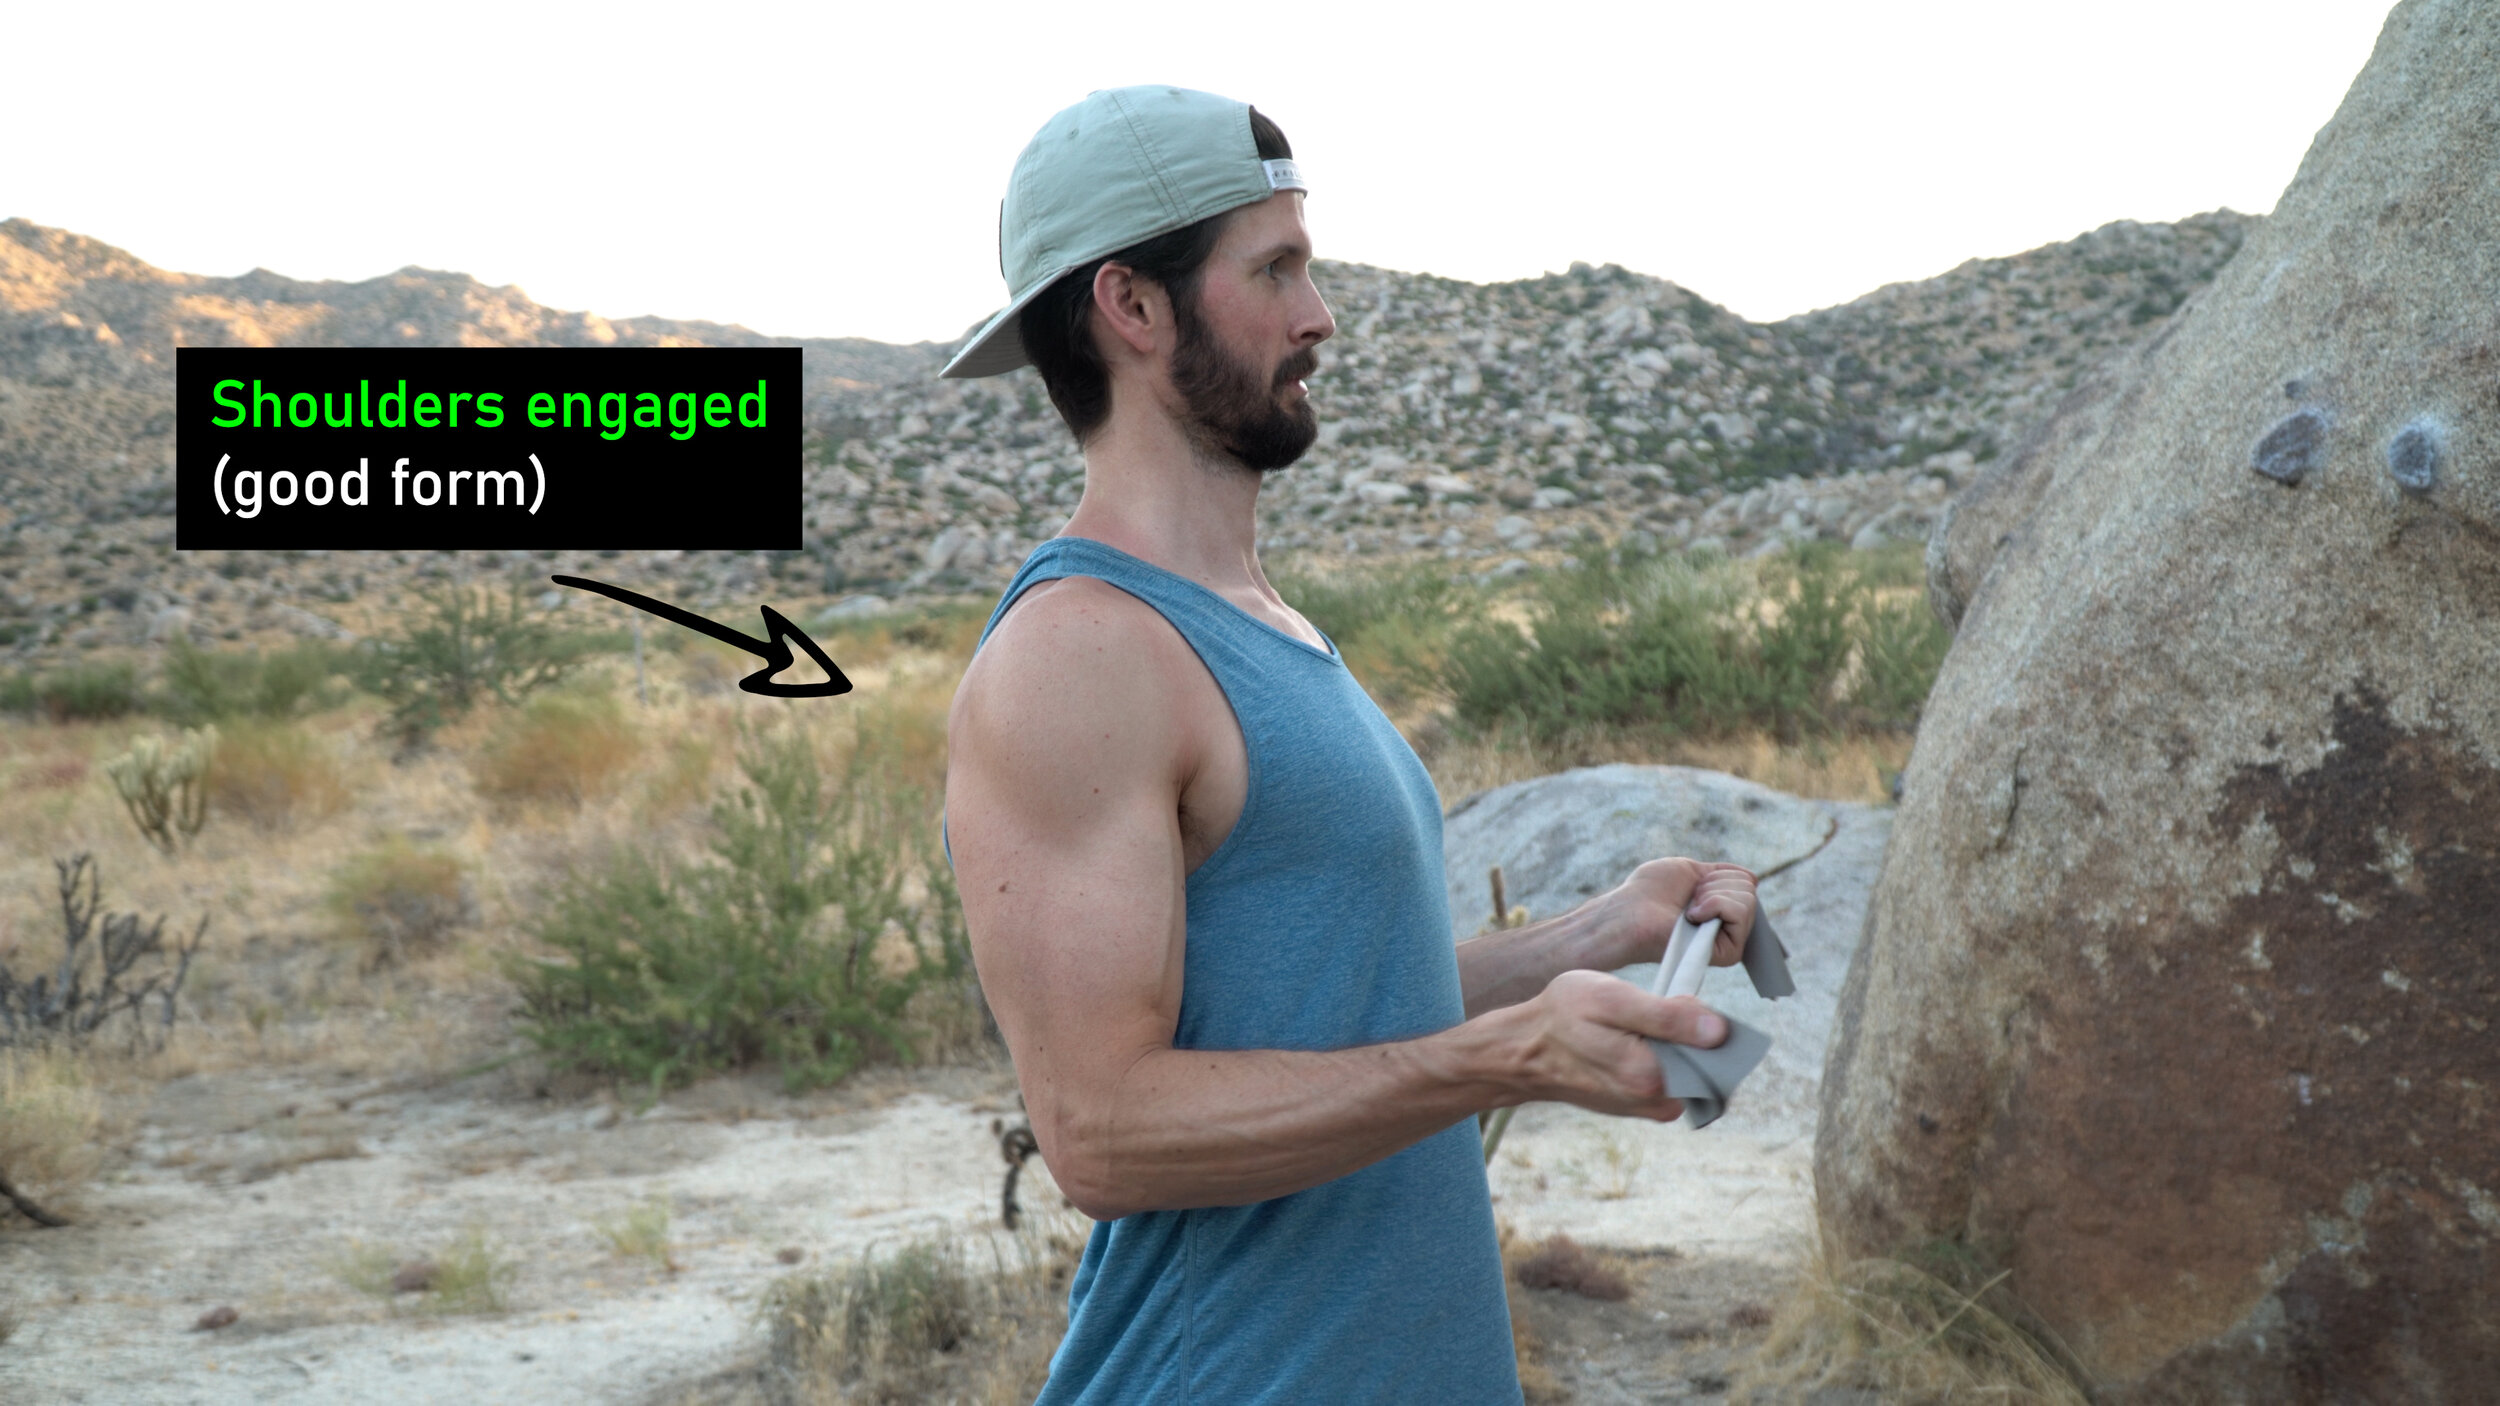
How: My recommendation to warm up your shoulders is to grab a theraband and do some “No Moneys” otherwise known as bilteral external rotation with scapular retraction. This involves external rotation of both shoulders and scapular retraction, so it’s a very efficient exercise.
To perform this, just grab a resistance band with both hands, squeeze the shoulder blades down and together (no shrugging), and rotate the arms out to the side while keeping your elbows near your body. I prefer the palms up for this exercise but thumbs up is also good. You should have enough resistance in your band to stop you from going further than 45-60 degrees out to the side. If not, either get a harder band, double yours up, or just grab the band with your hands closer together. Perform 10-12 reps while holding at the end of each repetition for at least a second and don’t move too quickly through this.
Why: “No Moneys” helps you to work on engaging both the scapular retractor and external rotation muscle groups together, creating synergy between those two muscle groups. This will help create stability in the shoulder and help share the forces between the two muscle groups rather than just placing it all on the shoulders. I mean, would you push a dead car out of the middle of the street by yourself, or would you ask your friend for help? Two muscle groups are better than one!
Another reason this is important is because the external rotators help stabilize the shoulders, especially when the shoulders are at or above the 90 degree position, which we obviously find ourselves in often with climbing. The external rotators makeup 2 of the 4 muscles of the rotator cuff. In case you didn't want to do the math, that’s 50%. That must be pretty important.
Quick side note: I’m also a fan of doing external rotation @ 90 degrees of shoulder elevation to be even more specific towards climbing (as we just mentioned, shoulder stabilty is particularly important at or above the 90 degree position). You can add this bonus exercise into your warm up routine as well, just remember, we are trying to keep this short and simple today.
More reasons why it’s important? Let’s look at some research //
It’s an effective way to warm up the infraspinatus:
findings suggest that ER should be performed in neutral to maximize infraspinatus isolation.
How active are they with internal and external rotation?
Subscapularis and infraspinatus were activated prior to all other muscles during external rotation and internal rotation perturbation trials respectively
The rotator cuff muscles demonstrate pre-activation in anticipation of perturbation prior to their representative global synergists, meaning that these muscles are turned on and ready to help stabilize the shoulder prior to a perturbation which could lead to instability. These guys are important! Imagine dry firing, all the sudden the force shifts, but if you have good strength and activation of the external rotators, you can improve stability of the shoulder.
Warm-Up #3: General Neurological and Physiological Priming
How: OK, so we have the hands moving, we have our shoulders warm, what’s last? … recruitment pulls!
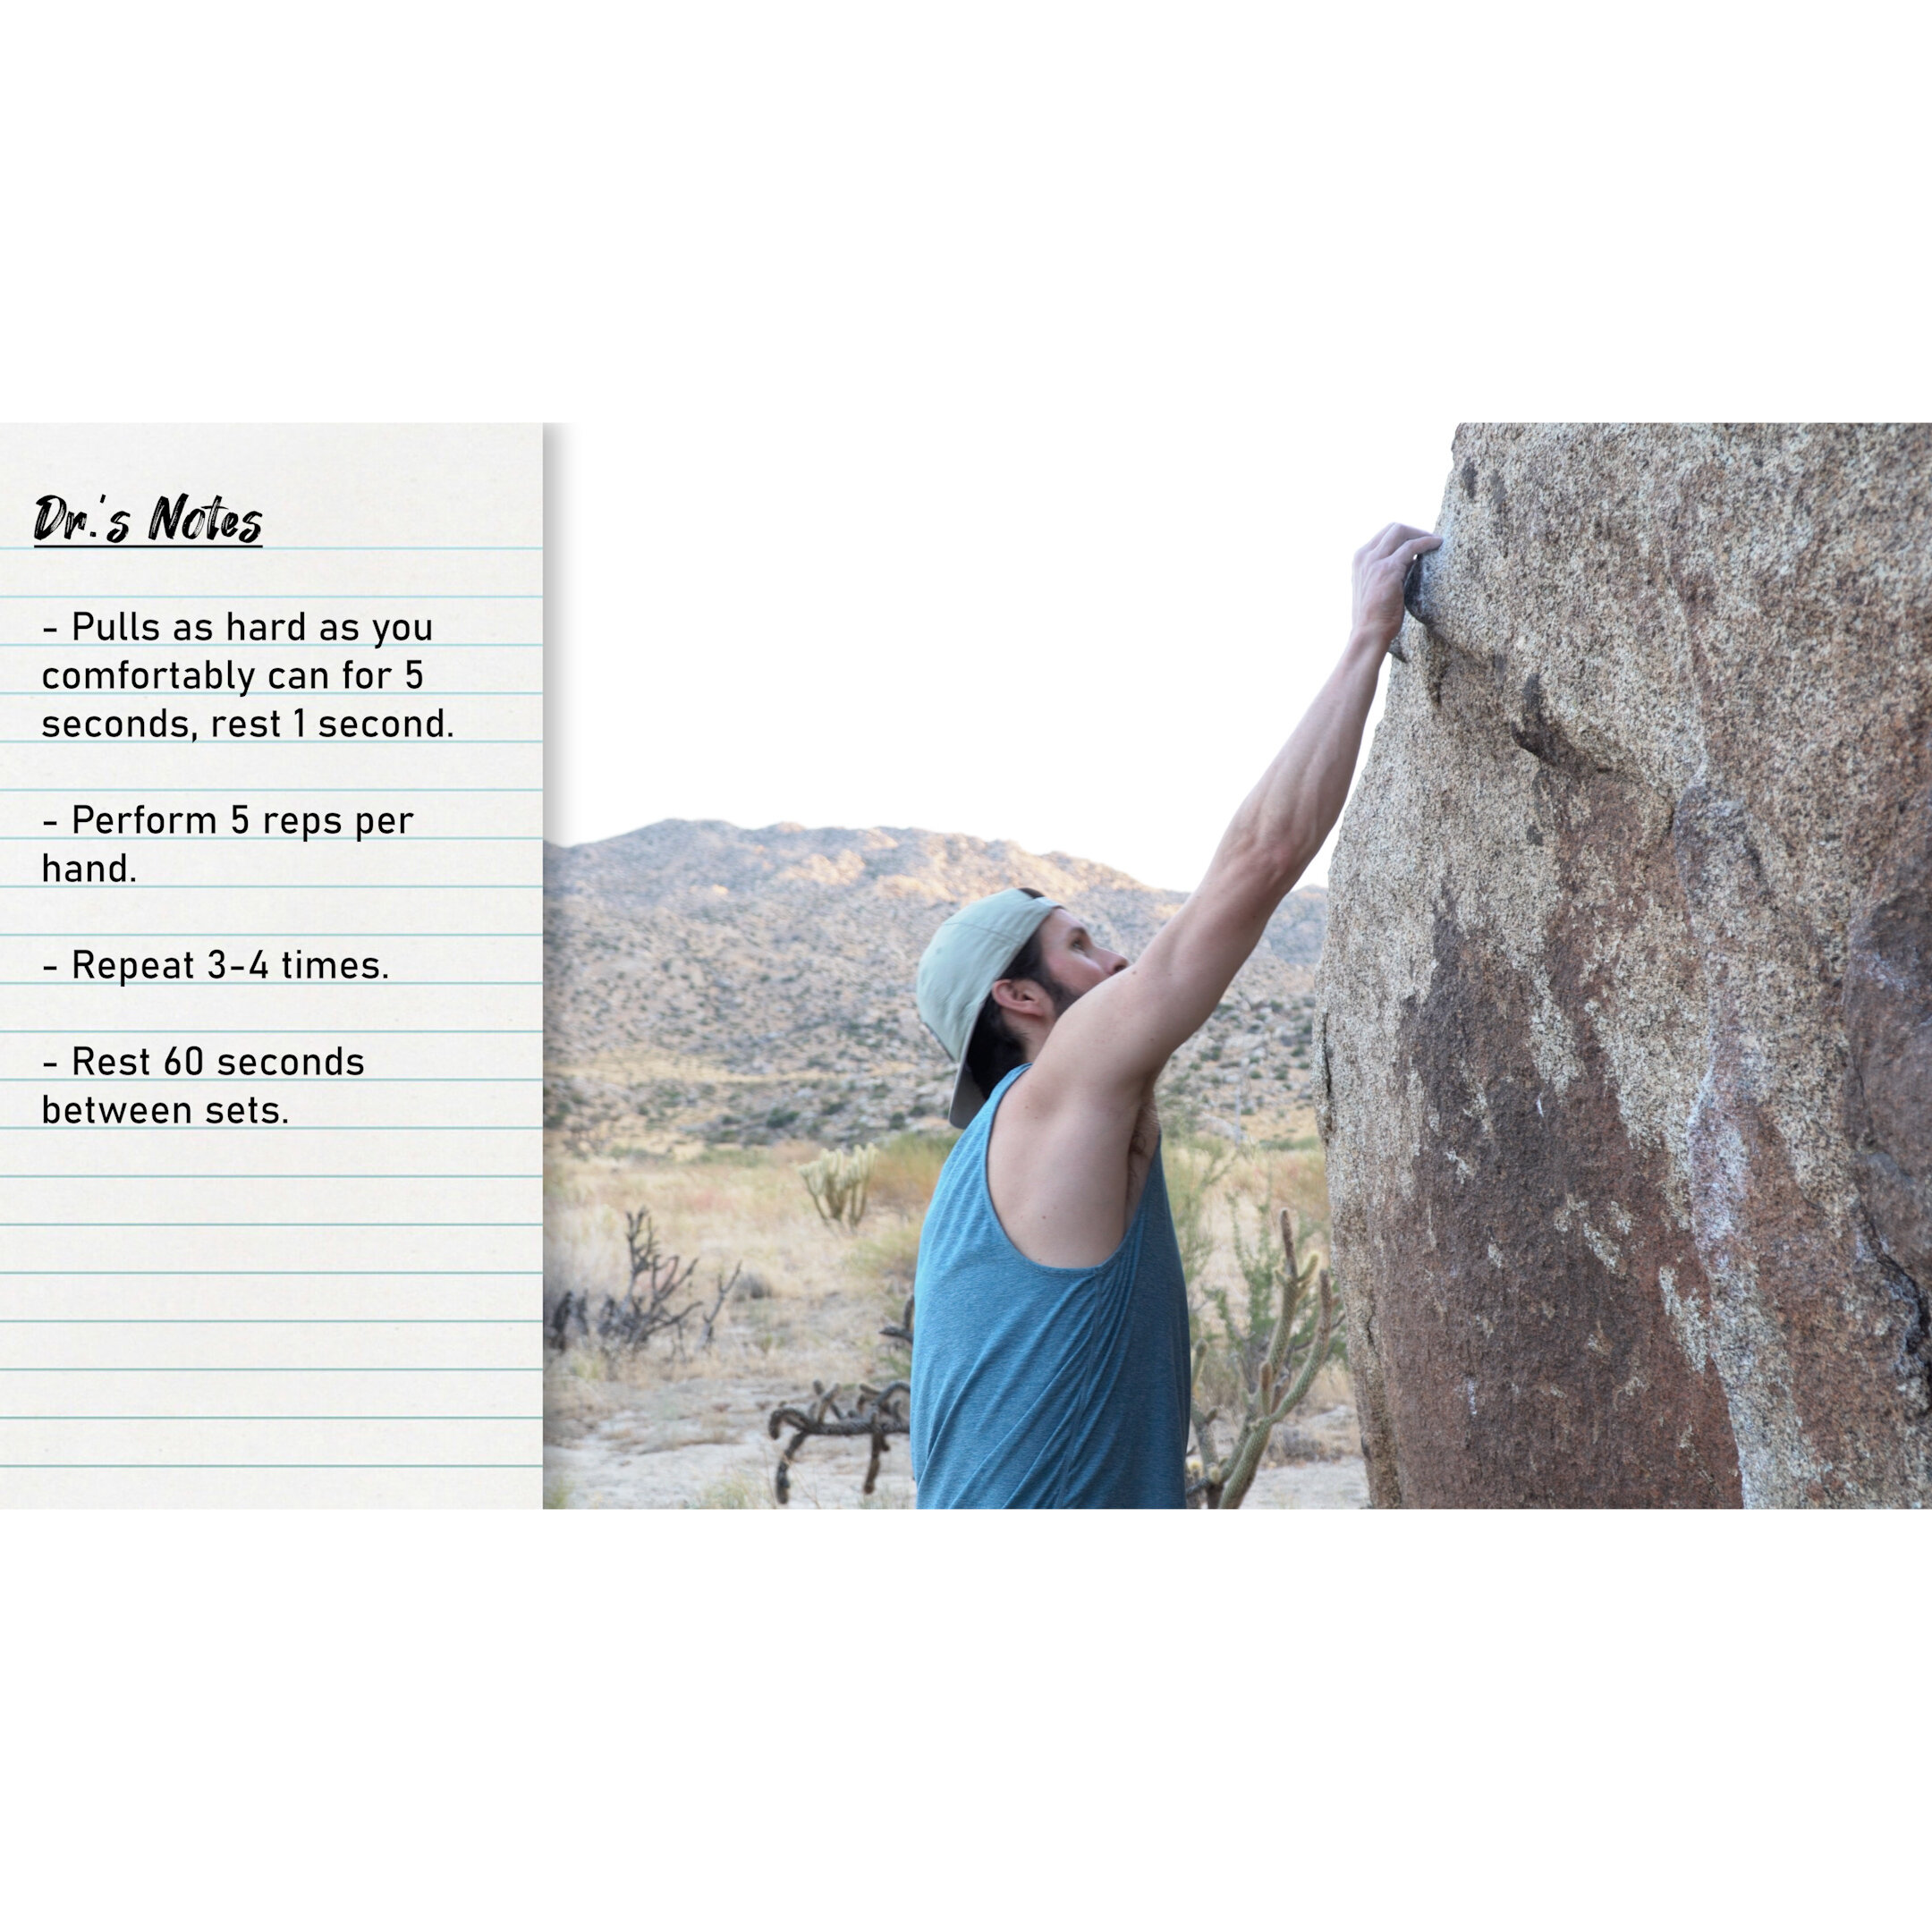
Before you hop on your project, it is important to load the tissue in a similar manner as you will be when climbing. So find a ledge (aka a rock), or use a portable ledge, and go into your different hand positions you need to prepare for the climb you’re about to hop on. That may be half crimp, open hand, or even full crimp. OR, if you’ve got a little extra time and want to MAXIMIZE your warm-up in order to MINIMIZE your injury risk, go through ALL the positions.
For each grip position you do, pull as hard as you comfortably can for five seconds, let off and rest for one second, and then repeat four more times. Perform multiple sets, about 3 to 4, before you climb. If your climb has more crimps on it, make sure to get at least 2 or 3 sets of that position.
You’ll notice that you get stronger with each set. That’s because you are doing all the good things: you’re improving nerve conduction speed, improving contractility of the muscle, and warming the tissue up.
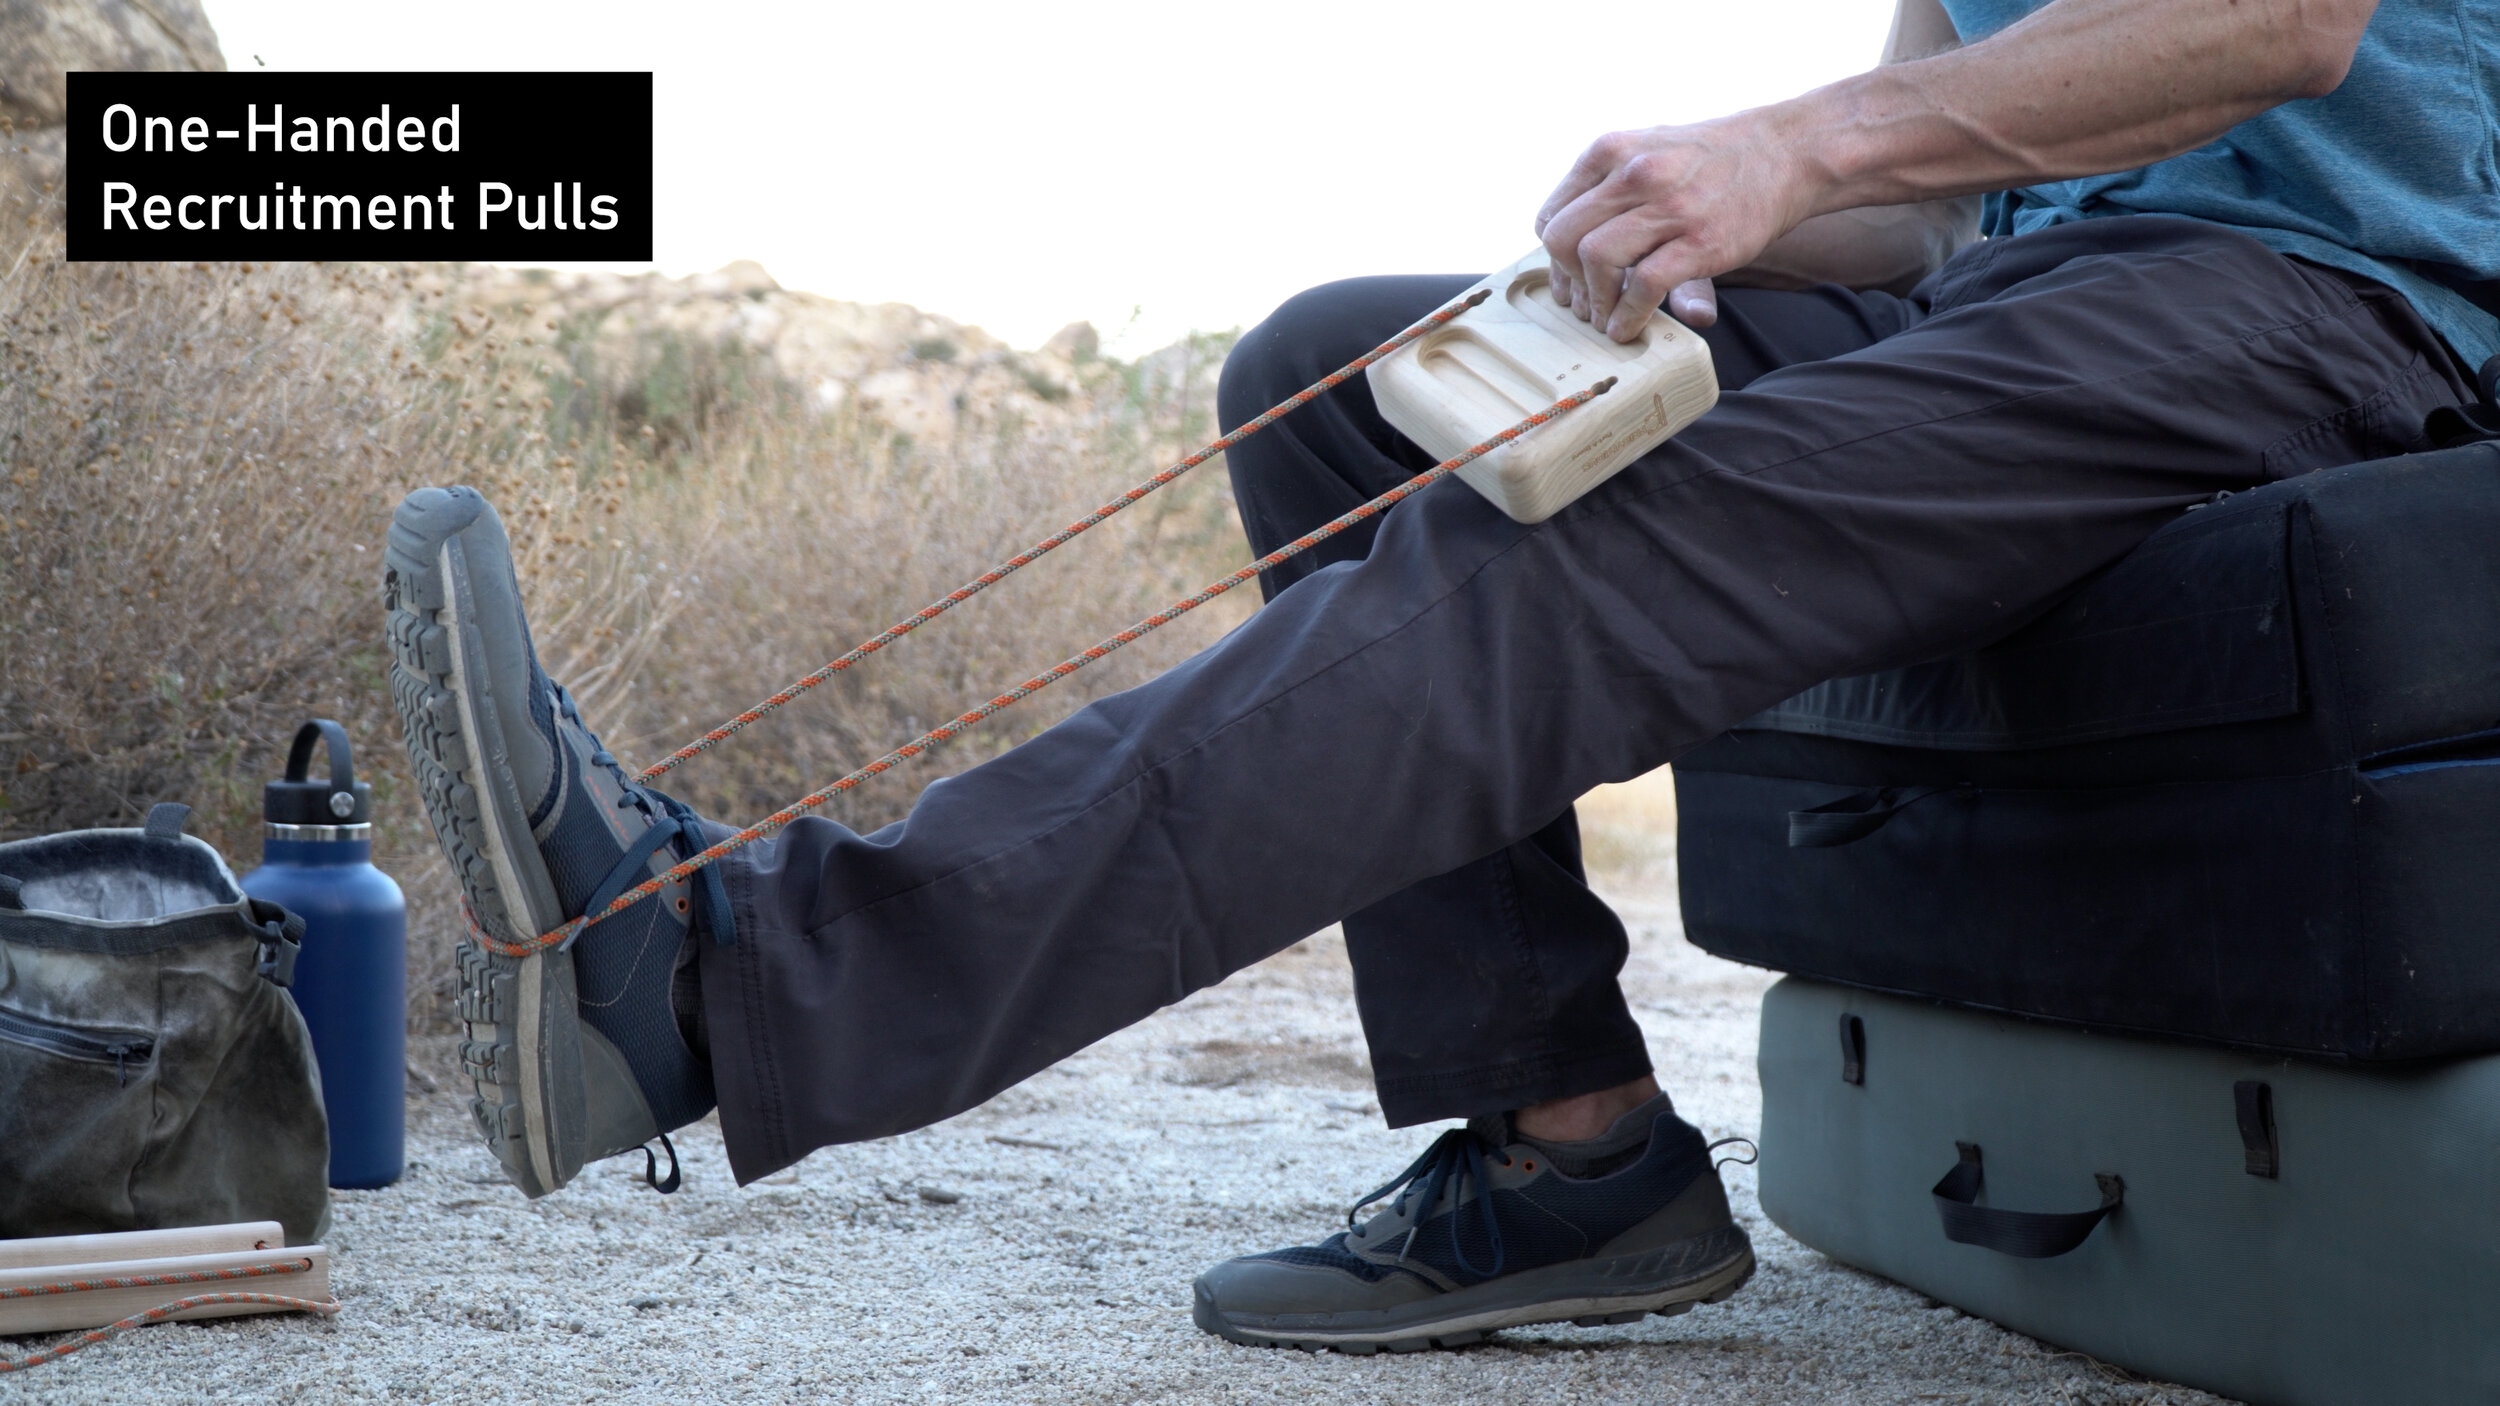
Recruitment pulls can be done with both hands together or 1 arm at a time but I recommend doing 1 hand. This is not only more realistic for climbing, but it also let’s you hit your max contraction because you likely won’t be able to pull your body off the ground with just 1 hand so you get a true isometric contraction.
Why: I’m a super fan of recruitment pulls. They are a great tool not only for warming up, but also for training and I even include them in our hangboard routines! What’s so great about them?
Recruitment pulls improve nerve conduction speed, improve contractility of the muscle unit, and warm up the muscle and tendon units. This all leads to improved recruitment patterns of the muscles such as the FDP and FDS, while also priming your pulley systems to be more well prepared for the strain placed on them while climbing.
I mentioned previously that you’ll notice you get stronger with each set you do. THINK ABOUT THAT for a second. Why would you want to pull on your project when you cannot pull at or even close to full strength? You’re just asking to injure yourself and you’re entering into your climbing session without being fully prepared. Recruitment pulls will make sure you climb stronger and safer than if you hadn’t warmed up.
Think about it another way. Have you ever worked on a move where your first few attempts felt hard or nearly impossible, then all of the sudden on the next try, boom, it just goes? Why did it become so much “easier” all of the sudden? Well one reason for that is your body may be making small adjustments in the way you hold onto it the hold, but the other reason is that you are doing exactly what recruitment pulls emulate. You are improving the nerve conduction velocity, improving strength of the motor units, etc. This is going to tell your brain “hey, it’s OK to hold onto this. I realized it’s not actually going to hurt us”. Whereas in the beginning, on those initial pulls, your brain wasn’t so sure. Hence, why you let go so quickly earlier. Recruitment pulls will emulate that process and let you hold on more securely immediately. They will load the tissue in a way to tell your brain what is OK and what is not. Essentially, this will help further with injury prevention!
BONUS?
Nordic hamstring Curls
Warming up the hamstrings can also be critical for climbing. Whether it’s a strong heel hook, or just a good toe keeping you close to the wall. Warming up the posterior chain and those hamstring muscles can really help your climbing performance.
Typically, nordic hamstring curls (nordies) will be done stabilizing at the lower leg by the calf either with a partner or a machine, but we don’t need it! All we need is a wall (or a rock). Grab a pad for your knees, scoot your feet back close to a wall (or rock). Keep your foot dorsiflexed, or with the toes pulled up to your faces as you scoot back into the wall/rock. Once you are as far back as you can you are in your starting position.
Next, and this is REALLY IMPORTANT, engage multiple muscle groups. You want to engage your core and squeeze your glutes. This creates stability in the midsection before you go into the exercise. Then, slowly lean forward and feel the huge engagement in the back of the legs. Start with very small motions to warm the muscle up before you go further and further. Try not to reach a failure point where you fall forward until you have about 8 reps in.
You can also perform single leg and rotation based variations of this but make sure you are familiar with the basic exercise before moving into advanced versions.
OUTRO
And your done!
That’s it. 3 simple things to do to get warmed up before climbing. You can, of course, do more. Do whatever suits you and your routine. But, those are 3 necessary things to incorporate before any warm up.
What are your favorite additional things to do before warming up? Share with your comments below.
Until next time….
Train. Warm Up (briefly). Climb. Send. Repeat.
DOUBLE BONUS: Why we warm up
OK so just a super quick final note for those of you wondering why we should even both with these activities. As noted by McGowan, et al. in their article: Warm-Up Strategies for Sport and Exercise: Mechanisms and Applications, warm-up activities can evoke temperature, metabolic, neural and psychology-related effects. These effects include increased anaerobic metabolism, elevated oxygen uptake kinetics and post-activation potentiation. Basically, it is going to PRIME your body for exercise which will lead to increased body awareness, better performance, and less chance of injury.
OK, now that’s all. Thanks again!
Research
TITLE
Functions of the subregions of the infraspinatus during lateral rotation
CITATION
Kuwahara Y, Yuri T, Fujii H, Kiyoshige Y. Functions of the subregions of the infraspinatus during lateral rotation. Surg Radiol Anat. 2017;39(12):1331-1336. doi:10.1007/s00276-017-1886-z
KEY TAKEAWAYS
The middle and inferior subregions of the infraspinatus, teres minor, and the posterior deep supraspinatus acted as a lateral rotator
TITLE
The stabilizing role of the rotator cuff at the shoulder--responses to external perturbations
CITATION
Day A, Taylor NF, Green RA. The stabilizing role of the rotator cuff at the shoulder--responses to external perturbations. Clin Biomech (Bristol, Avon). 2012;27(6):551-556. doi:10.1016/j.clinbiomech.2012.02.003
KEY TAKEAWAYS
All three rotator cuff muscles demonstrated pre-activation in anticipation of the perturbation prior to their representative global synergists
Subscapularis and infraspinatus were activated prior to all other muscles during external rotation and internal rotation perturbation trials respectively
TITLE
Infraspinatus Isolation During External Rotation Exercise at Varying Degrees of Abduction
CITATION
Ryan, Gareth, Johnston, Heather, Moreside, Janice - 2017/05/17, Infraspinatus Isolation During External Rotation Exercise at Varying Degrees of Abduction, 27, 10.1123/jsr.2016-0217, Journal of sport rehabilitation
KEY TAKEAWAYS
Our findings suggest that ER should be performed in 0° of abduction to maximize infraspinatus isolation.
TITLE
Tendon Gliding Exercises
CITATION
Marwan A. Wehbé; Tendon Gliding Exercises. Am J Occup Ther 1987;41(3):164–167. https://doi.org/10.5014/ajot.41.3.164
KEY TAKEAWAYS
The two flexor tendons in each finger have different excursions and can glide separately
Trauma and disease often compromise the intricate arrangement of the flexor tendons, usually by producing adhesions. These adhesions bind a tendon to the neighboring sheath and bone, as well as to contiguous tendons, resulting in loss of tendon gliding and loss of joint motion and, therefore, loss of strength as well as dexterity.
3 positions produce 3 different results
The “Fist” position provides maximum excursion of the flexor digitorum profundus (FDP) tendon
The “straight-fist” position provides maximum excursion of the flexor digitorum superficialis (FDS) tendon
The “Hook” position provides max differential gliding as it moves the FDP much more than the FDS.
Increasing Excursion:
Effort and wrist motion will greatly amplify tendon excursion in the fingers as well as the thumb
Effort
Making effort while attempting to make each position increases excursion
Wrist motion
Increases tendon gliding to an even larger degree than effort
Benefits
Can displace excess interstitial fluid which can improve synovial edema and swelling
Also forces the extensor tendons to glide
Produces isometric contraction of the extrinsic muscles and stretching of the intrinsic mechanism
Used in treatment for tenosynovitis and degenerative joint disease
Disclaimer:
As always, exercises are to be performed assuming your own risk and should not be done if you feel you are at risk for injury. See a medical professional if you have concerns before starting new exercises.
Written and Produced by Jason Hooper (PT, DPT, OCS, SCS, CAFS) and Emile Modesitt
IG: @hoopersbetaofficial