Why Climbers Get “Phantom” Elbow Pain & How to Fix It
Hooper’s Beta Ep. 112
INTRODUCTION
Ulnar nerve entrapment issues are all too common in climbers, but not too easily diagnosed. In fact, I would argue that true ulnar nerve issues are often misdiagnosed as climber’s elbow (medial epicondylitis). The reason for that is the overlapping location of symptoms as well as overlapping mechanisms of injury. So if you have nagging or mysteriously intermittent pain, tingling, or burning at the inside of your elbow or fingertips, you might want to stick around.
We’re going to cover:
Why the ulnar nerve gets irritated
The nerve tests you can do on yourself
How to narrow down your diagnosis
And how to rehab and fix the issue
So let’s get into it!
WHY SO TRICKY?
On occasion, ulnar nerve issues are actually quite easy to identify when they cause symptoms in your pinky and sometimes ring finger. It may be numbness, tingling, burning, or a dull ache and may be associated with increased pain at the elbow.

But, it’s not always so straightforward. Often you may just have pain at the elbow which increases with certain positions or tissue contractions.
The fleeting or seemingly random onset of symptoms can make ulnar nerve issues confusing because the pain can feel like some sort of inconsistent elbow tendinopathy. Maybe you climb for hours with no pain, but then you open a car door and it hurts. Maybe it’s only specific arm positions that cause issues but everything else is fine. Maybe you get weird sensations in your elbow when looking up for your next hold. If you experience symptoms like these, you should be questioning the true nature of your injury as it likely is not a tendinopathy/tendinitis.
Let’s find out what’s really going on.
MECHANISM OF INJURY
The two major challenges of diagnosing and fixing ulnar nerve irritation are:
Making sure it really is a nerve issue and not something else entirely, like FDP tendinopathy
Identifying what’s actually causing the nerve issue to begin with

You see, the ulnar nerve can cause pain at the elbow because of mild entrapment at other locations such as the shoulder, neck, or thoracic outlet. There will always be some compression of the ulnar nerve in the elbow in certain positions, but entrapment at other sites can cause this compression to increase beyond its normal range and cause pain. This means that even though the symptoms are in your elbow, the root cause might be somewhere else, so we can’t just assume entrapment is happening only at the elbow.
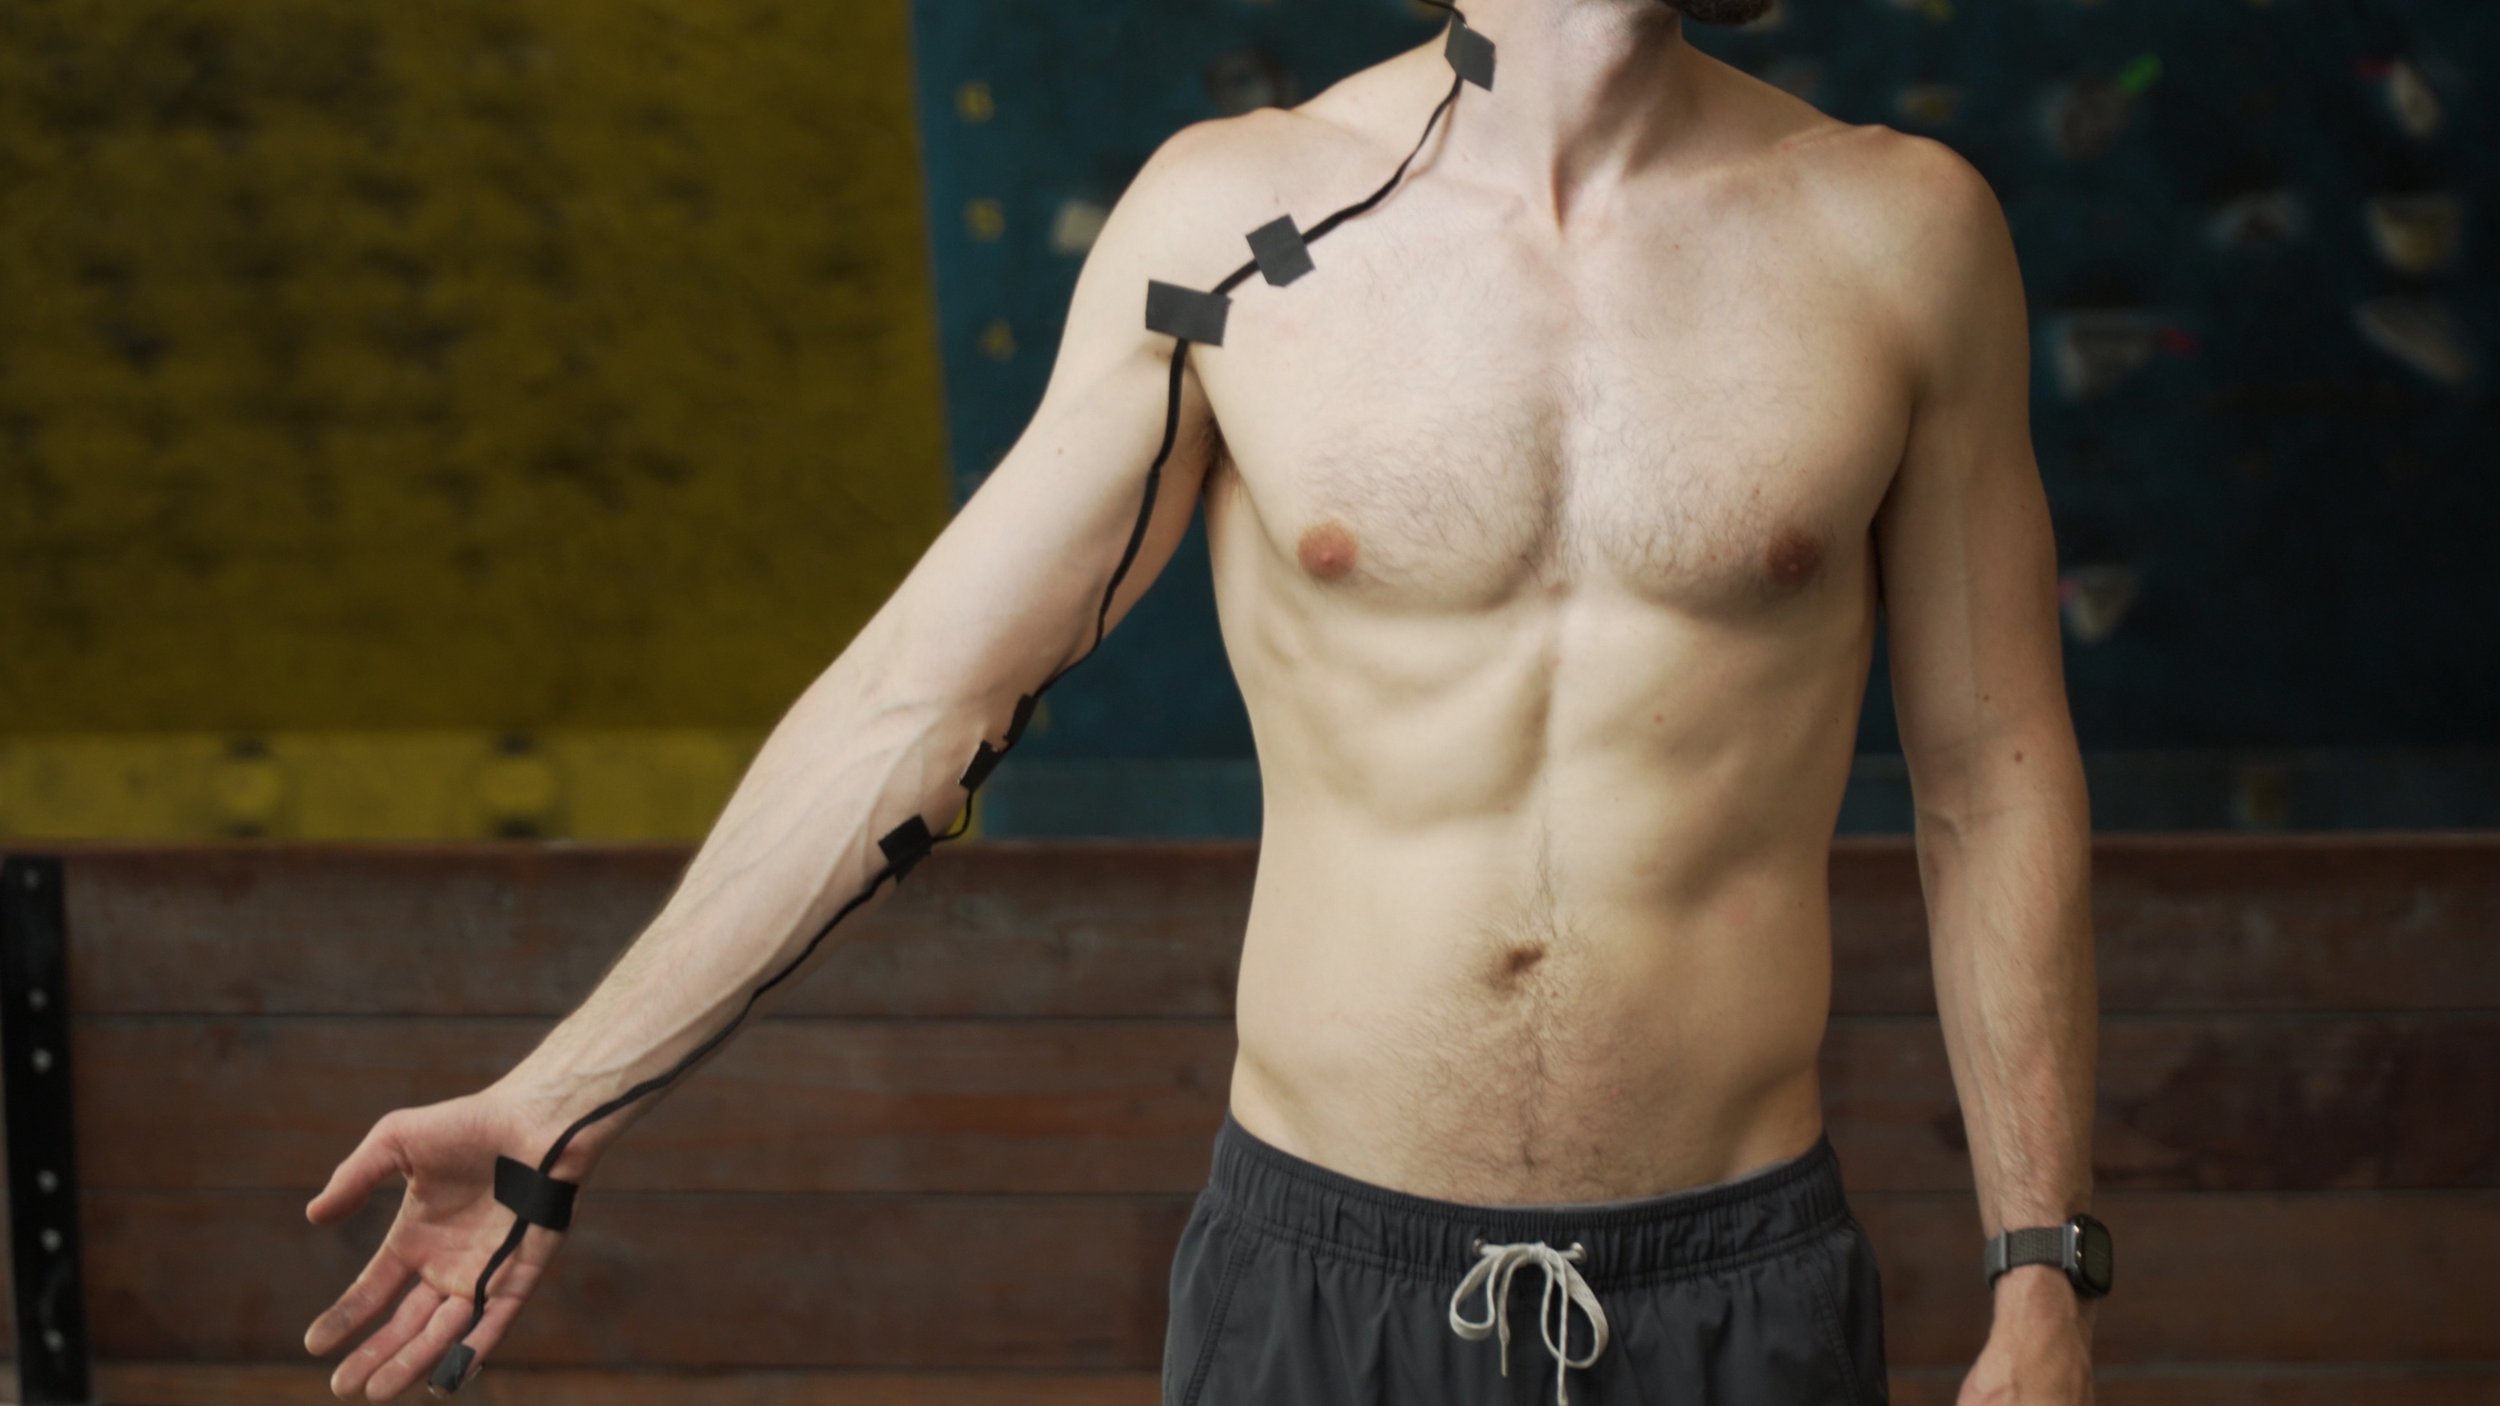
To illustrate this a bit better, let’s look at a common move in climbing: the lock-off. This is a particularly nasty lock-off though… and it’s on a sloper!
Your elbow is maximally flexed, which compresses the ulnar nerve at the medial elbow in the cubital tunnel.
Compression Sites
Cubital Tunnel (elbow)

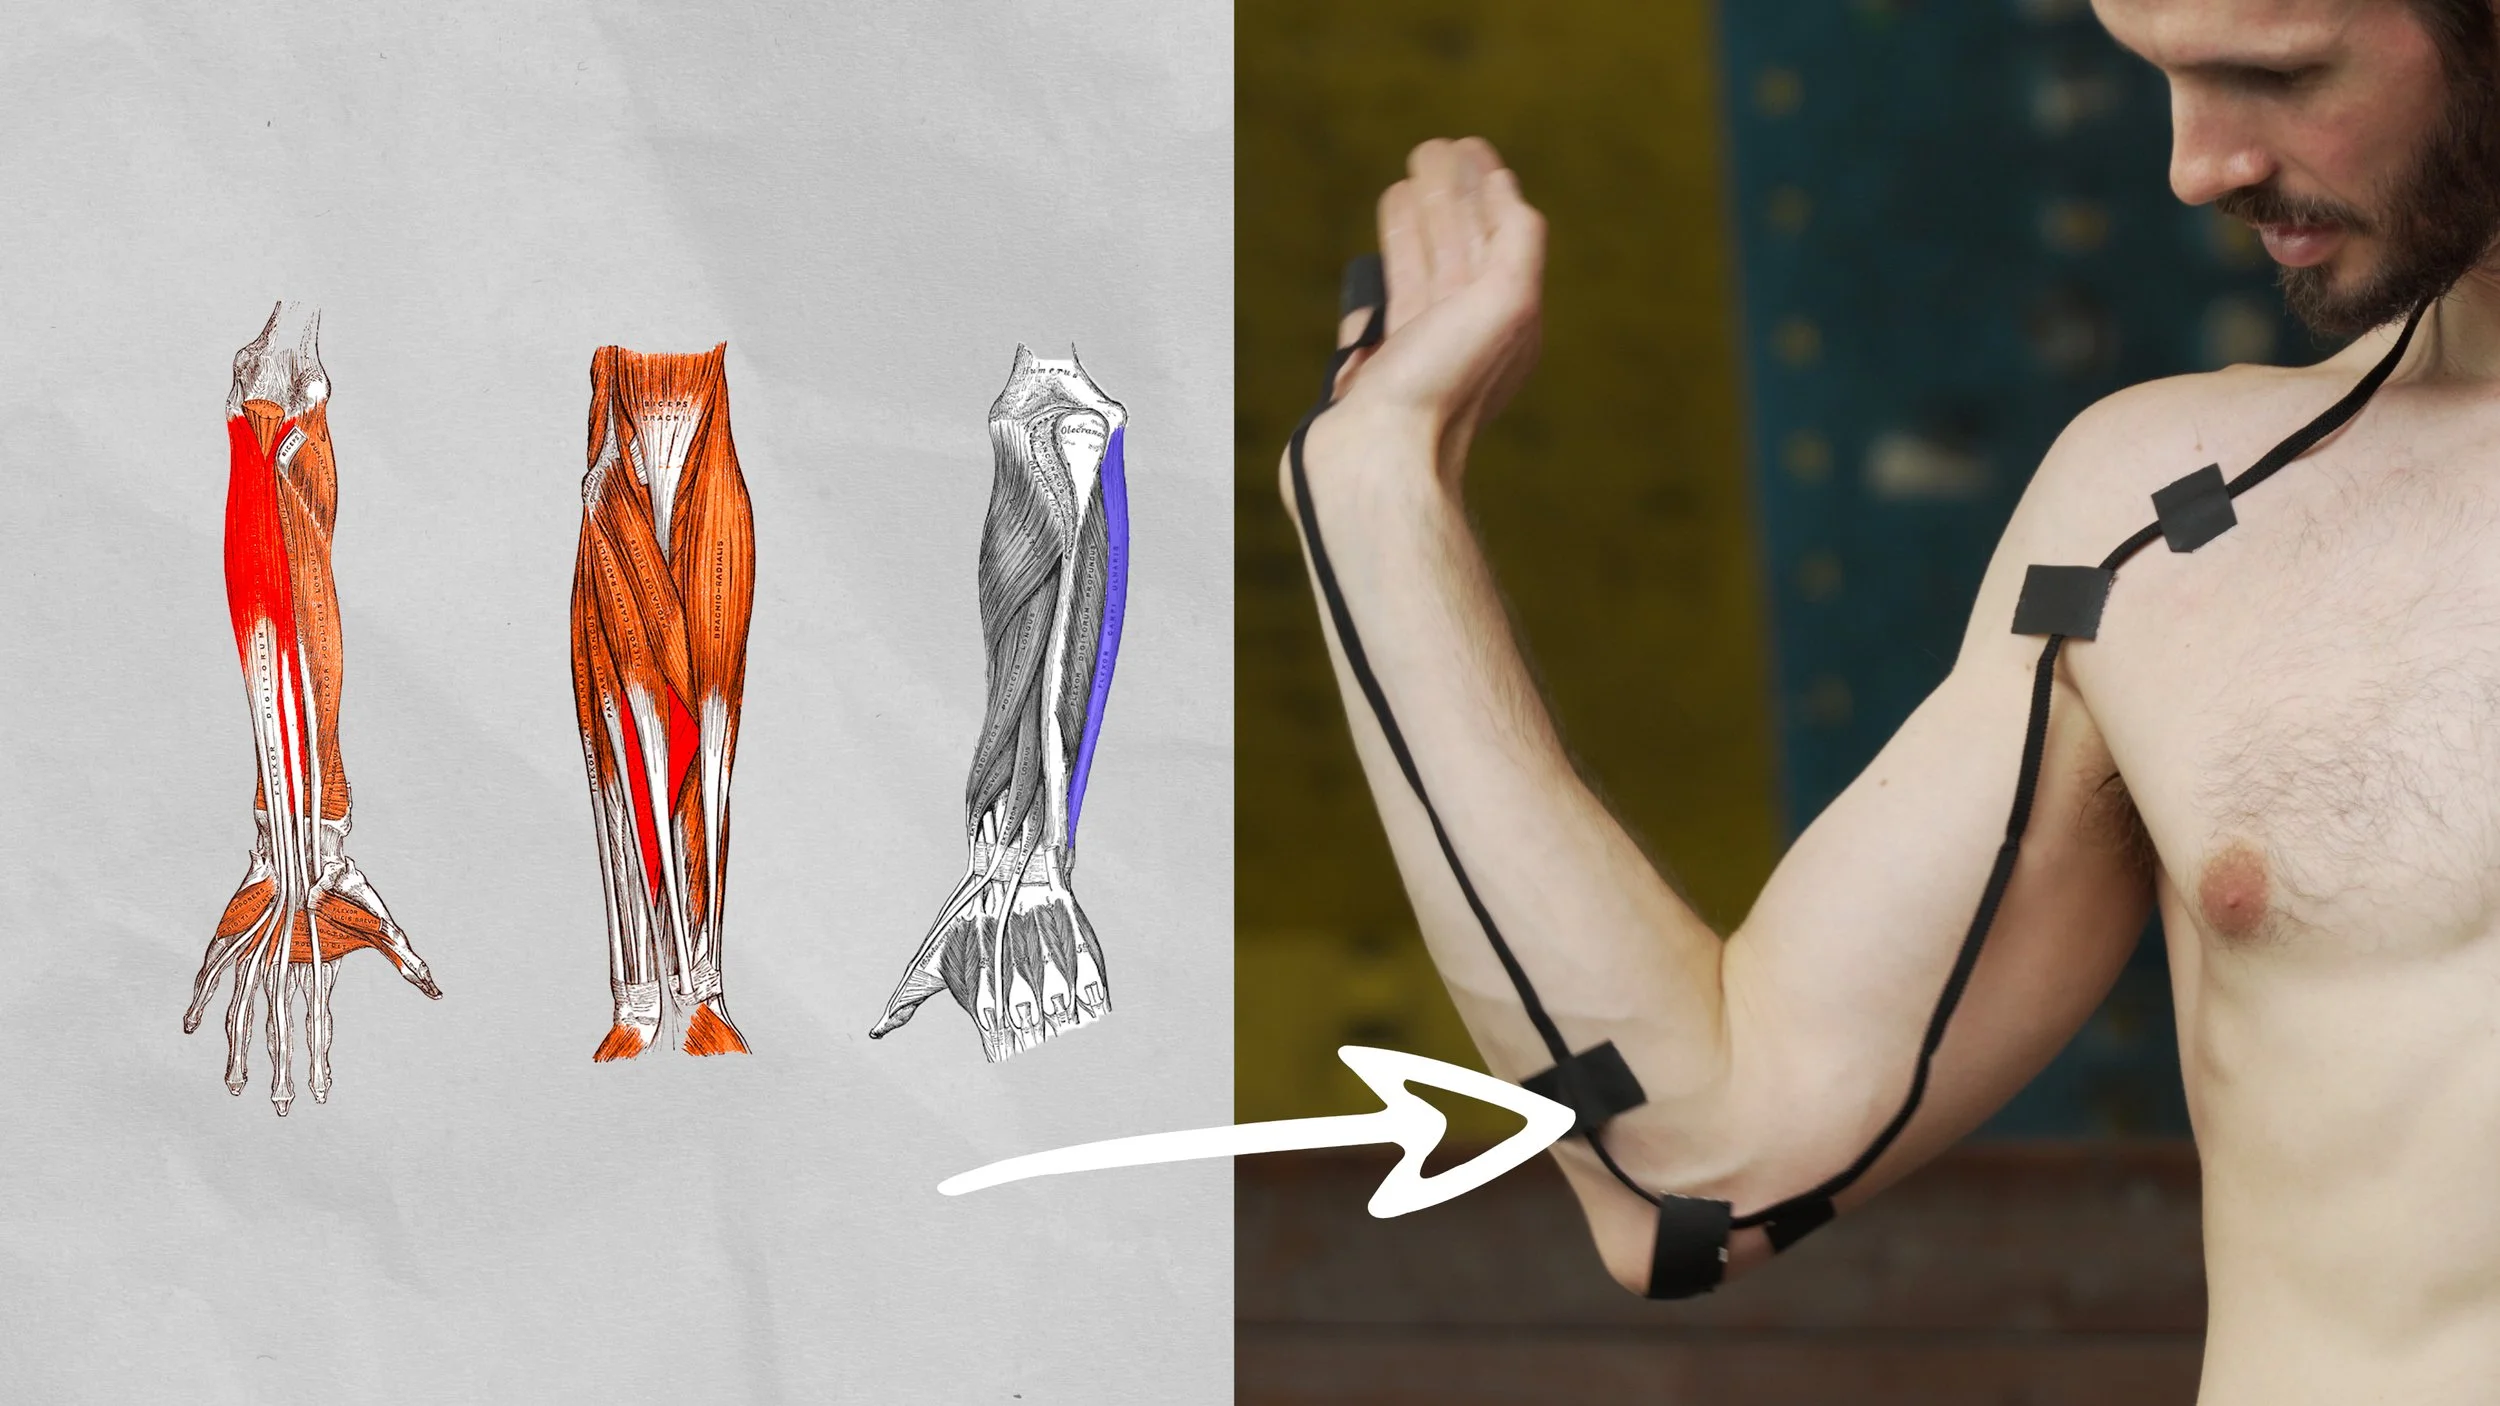
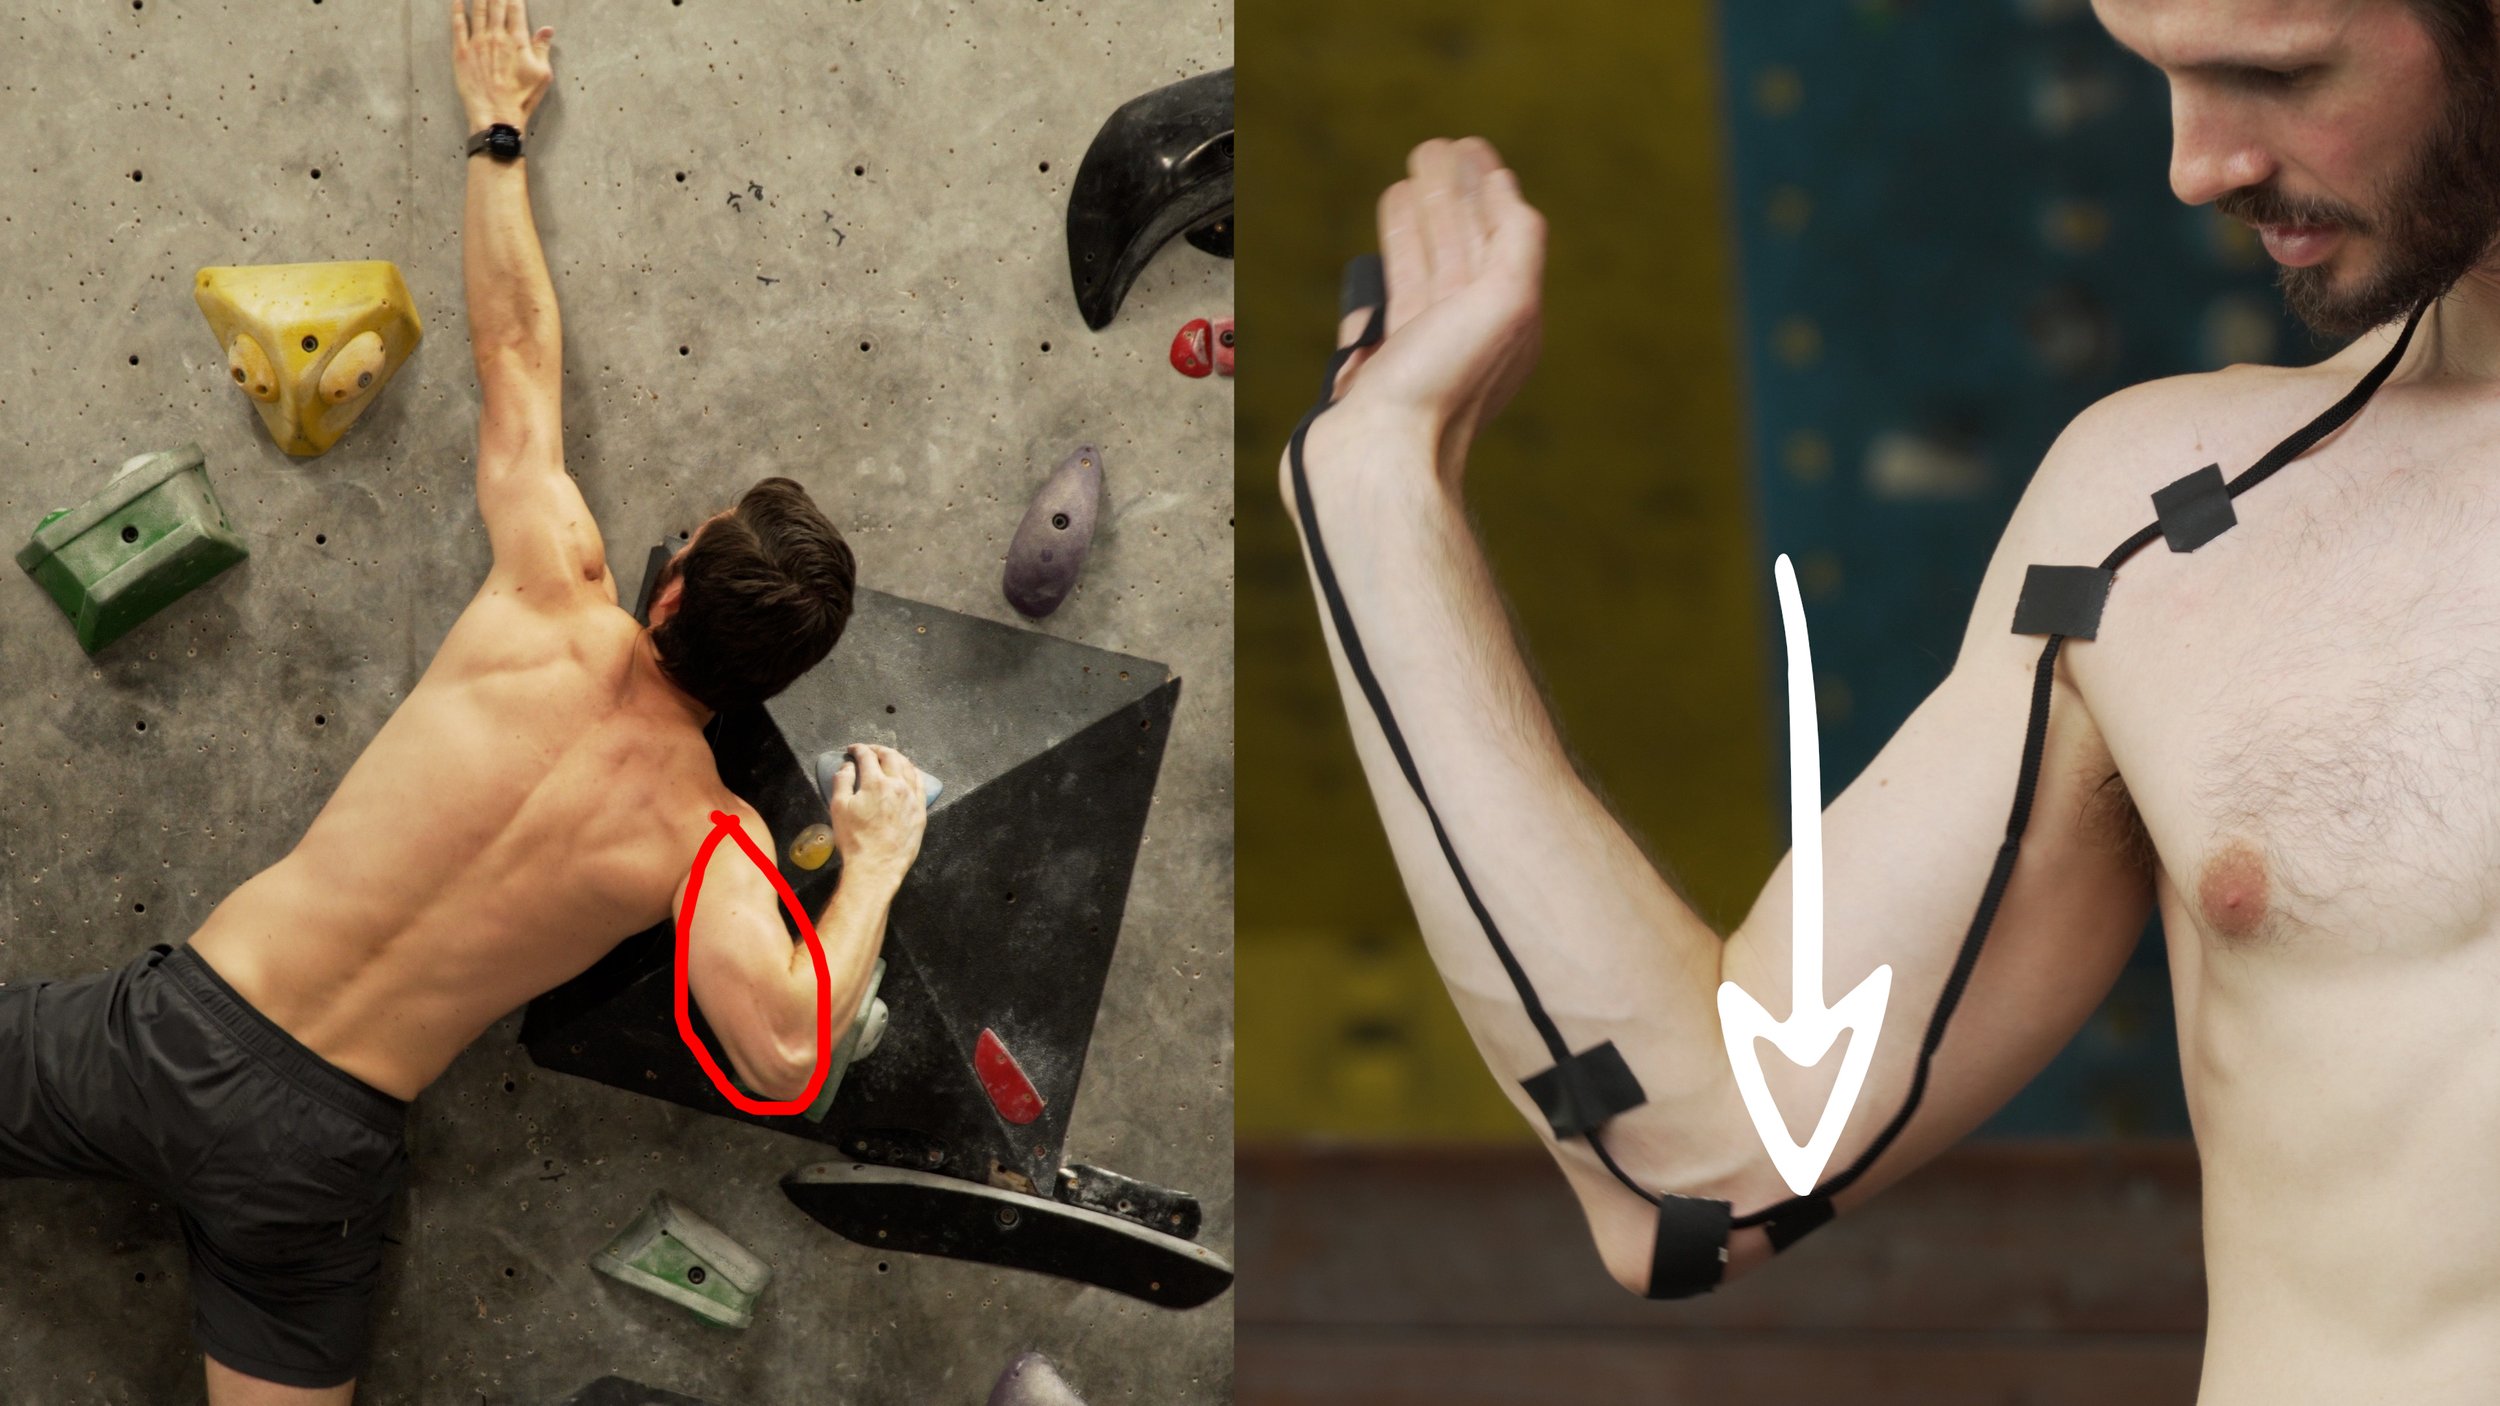
Meanwhile, your finger and wrist flexors are maximally engaged on that micro-crystal on the sloper, with your FDP, FDS, and FCU muscles working hard to make that happen. Since the ulnar nerve is sandwiched between the FDP and FDS and travels under the FCU, it gets compressed during heavy engagement. [2]
Compression Sites
Cubital Tunnel (elbow)
Between the FDP and FDS muscle bodies
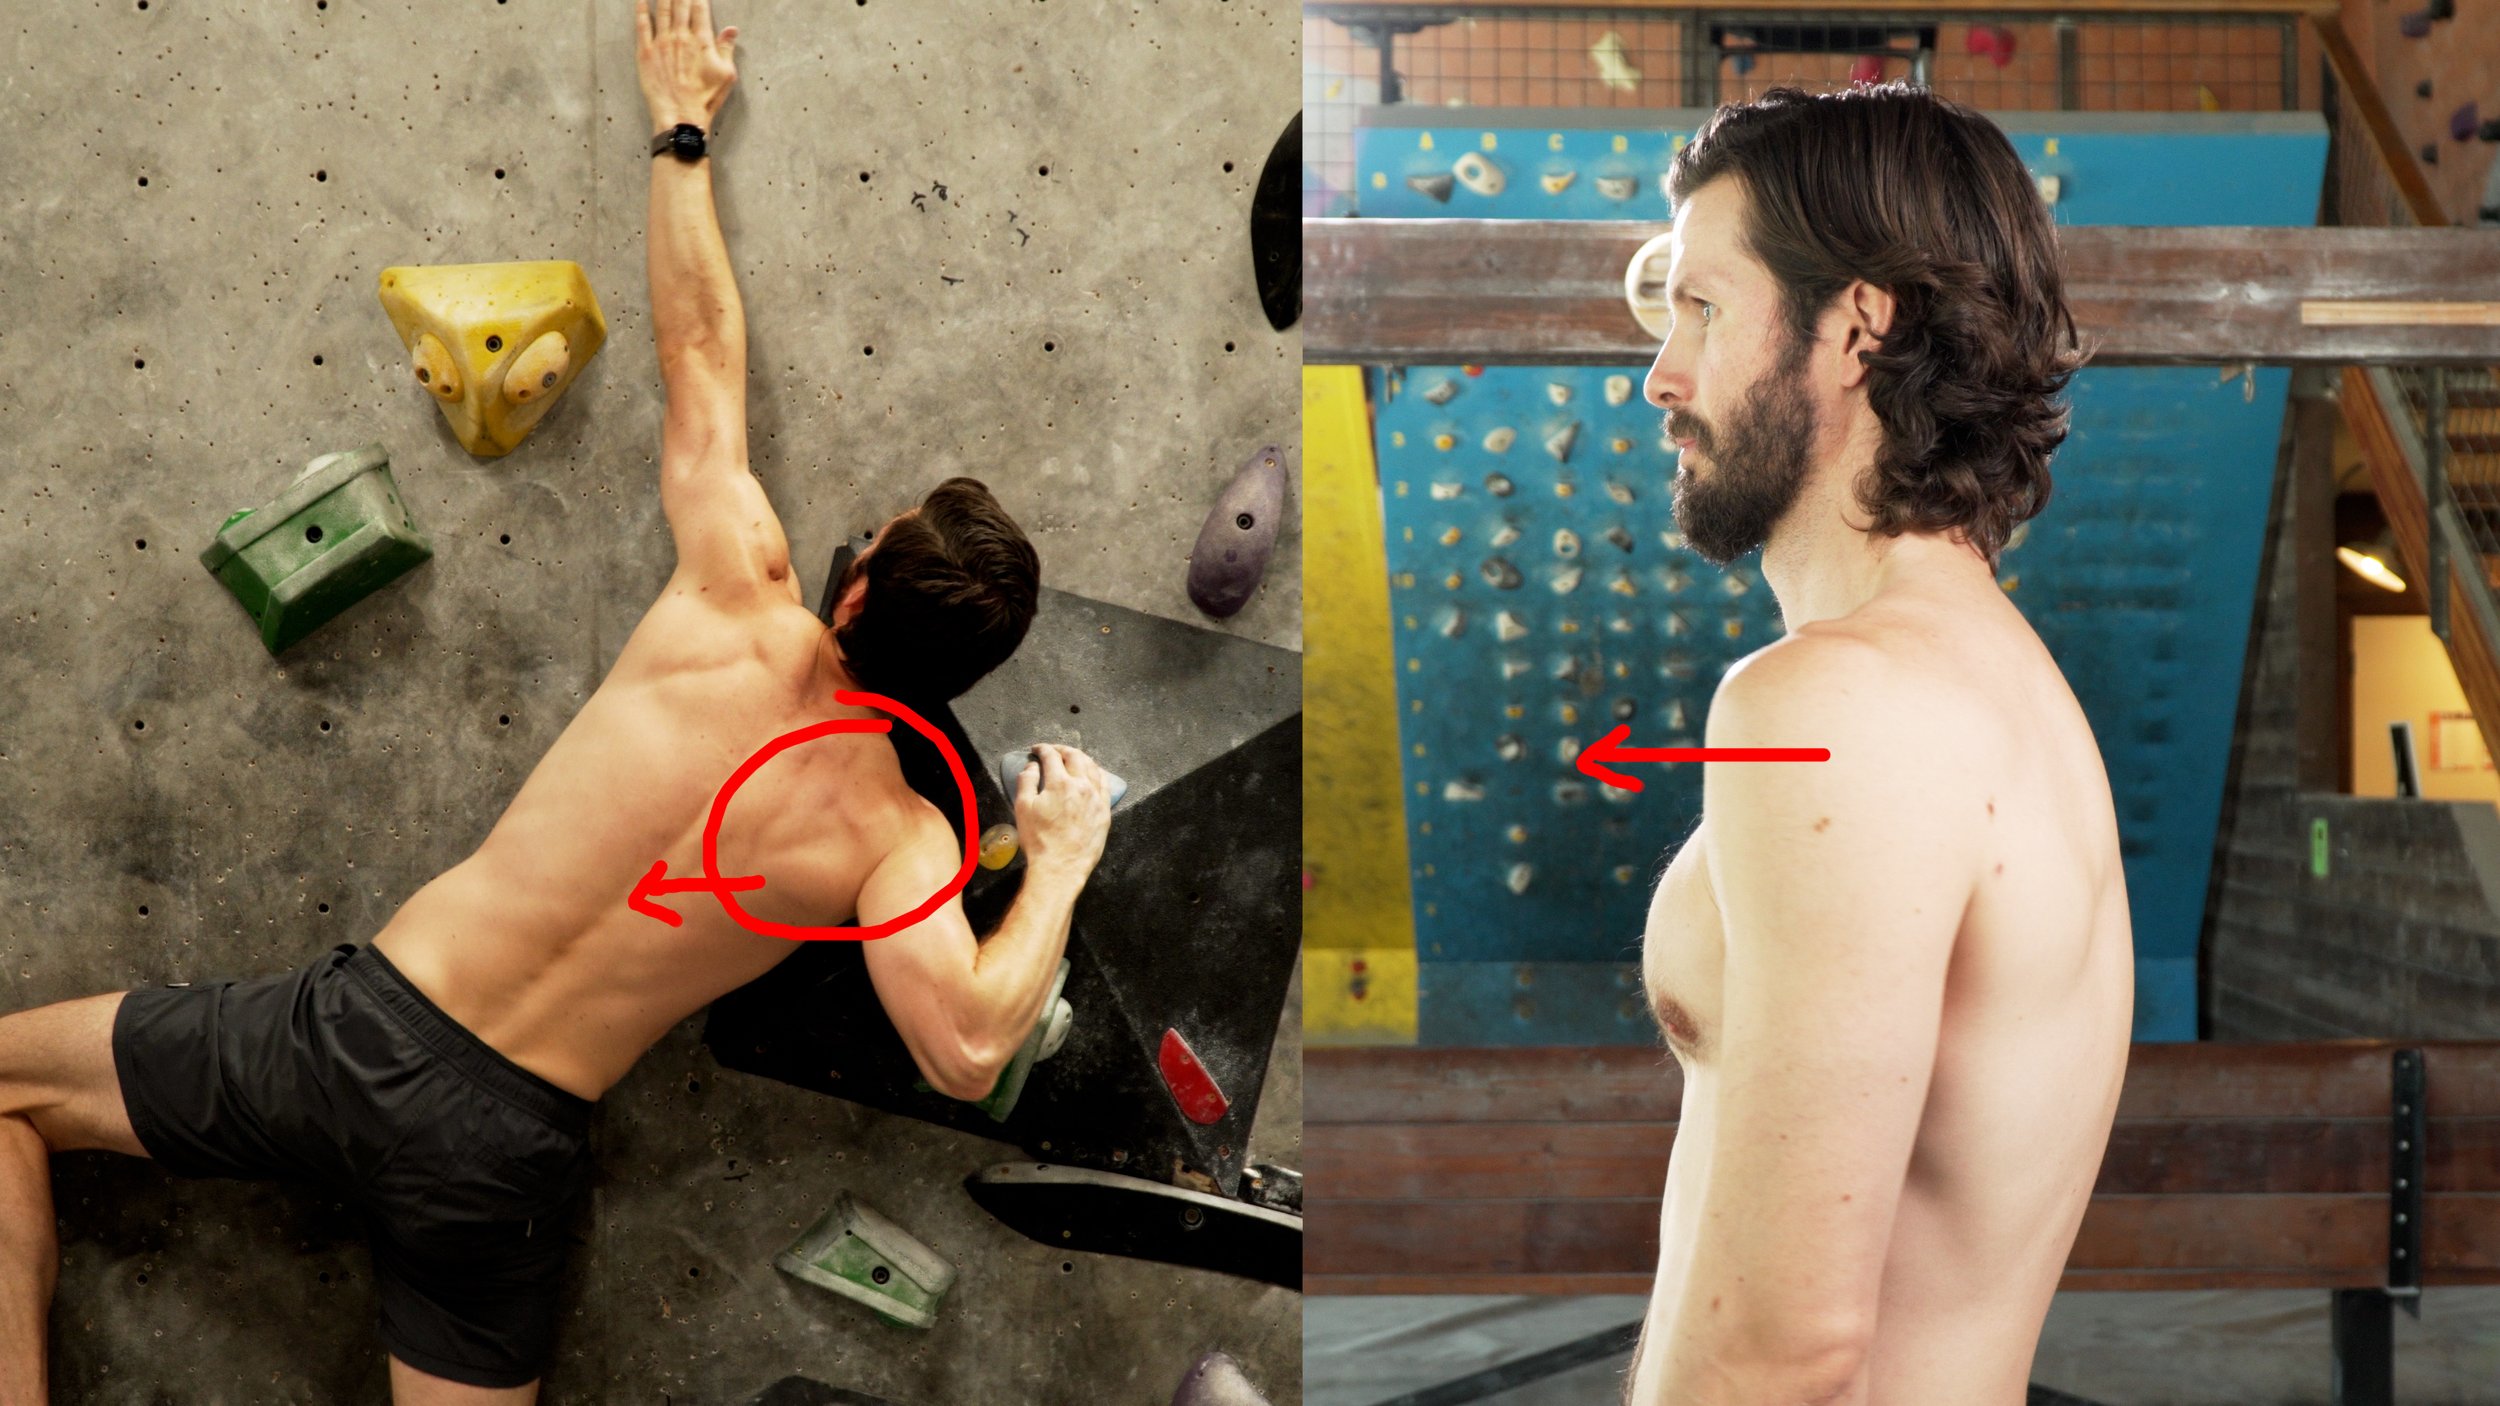
The upper extremity (shoulder and scap) is also engaged, with the shoulder pulling down and back. Without good shoulder stability and training, the humerus may shift slightly forward or anterior, which may add a bit of compression to the ulnar nerve at the brachial plexus.
Compression Sites
Cubital Tunnel (elbow)
Between the FDP and FDS muscle bodies
Brachial Plexus (shoulder)
Don’t forget, you’re also looking up to spot your next hold, which happens to be off in the other direction, causing you to turn your head away from the lock-off. This creates tensioning of the ulnar nerve from the neck, similar to pulling a string tight from one end.
Compression Sites
Cubital Tunnel (elbow)
Between the FDP and FDS muscle bodies
Brachial Plexus (shoulder)
Cervical Spine (neck)

Coincidentally, you’ve also watched our video on climber’s hunch and know that you have poor posture but never bothered to fix it. Now the subsequent shortening of your pec minor is coming back to bite you as it puts pressure on your ulnar nerve.
Compression Sites
Cubital Tunnel (elbow)
Between the FDP and FDS muscle bodies
Brachial Plexus (shoulder)
Cervical Spine (neck)
Thoracic outlet (pec minor)


And finally, to top it all off, you know from our video on the biomechanics of pull-ups that at the top of a pull-up, or in this case a lock off, your tricep is activated to become a push muscle. Helpful, except that the medial tricep covers the ulnar nerve and can compress it.
Compression Sites
Cubital Tunnel (elbow)
Between the FDP and FDS muscle bodies
Brachial Plexus (shoulder)
Cervical Spine (neck)
Thoracic outlet (pec minor)
Posterior medial elbow (triceps)
See how multifaceted that is?! It doesn’t mean you are guaranteed to have problematic ulnar nerve compression with a lock off, but this is a good example of how tricky ulnar nerve issues can be. With so many potential entrapment sites, all these structures may increase the ulnar nerve compression in the elbow, ultimately resulting in elbow pain.
So, how do we determine if we truly have an ulnar nerve issue?
Don’t mind me butting in here to say that you’re interested in joining us on this journey to create the largest online library of free training and rehab content for climbers, you can show your support by purchasing an official Hooper’s Beta t-shirt! We’ve got various designs and styles available right below this video or with the link in the description.
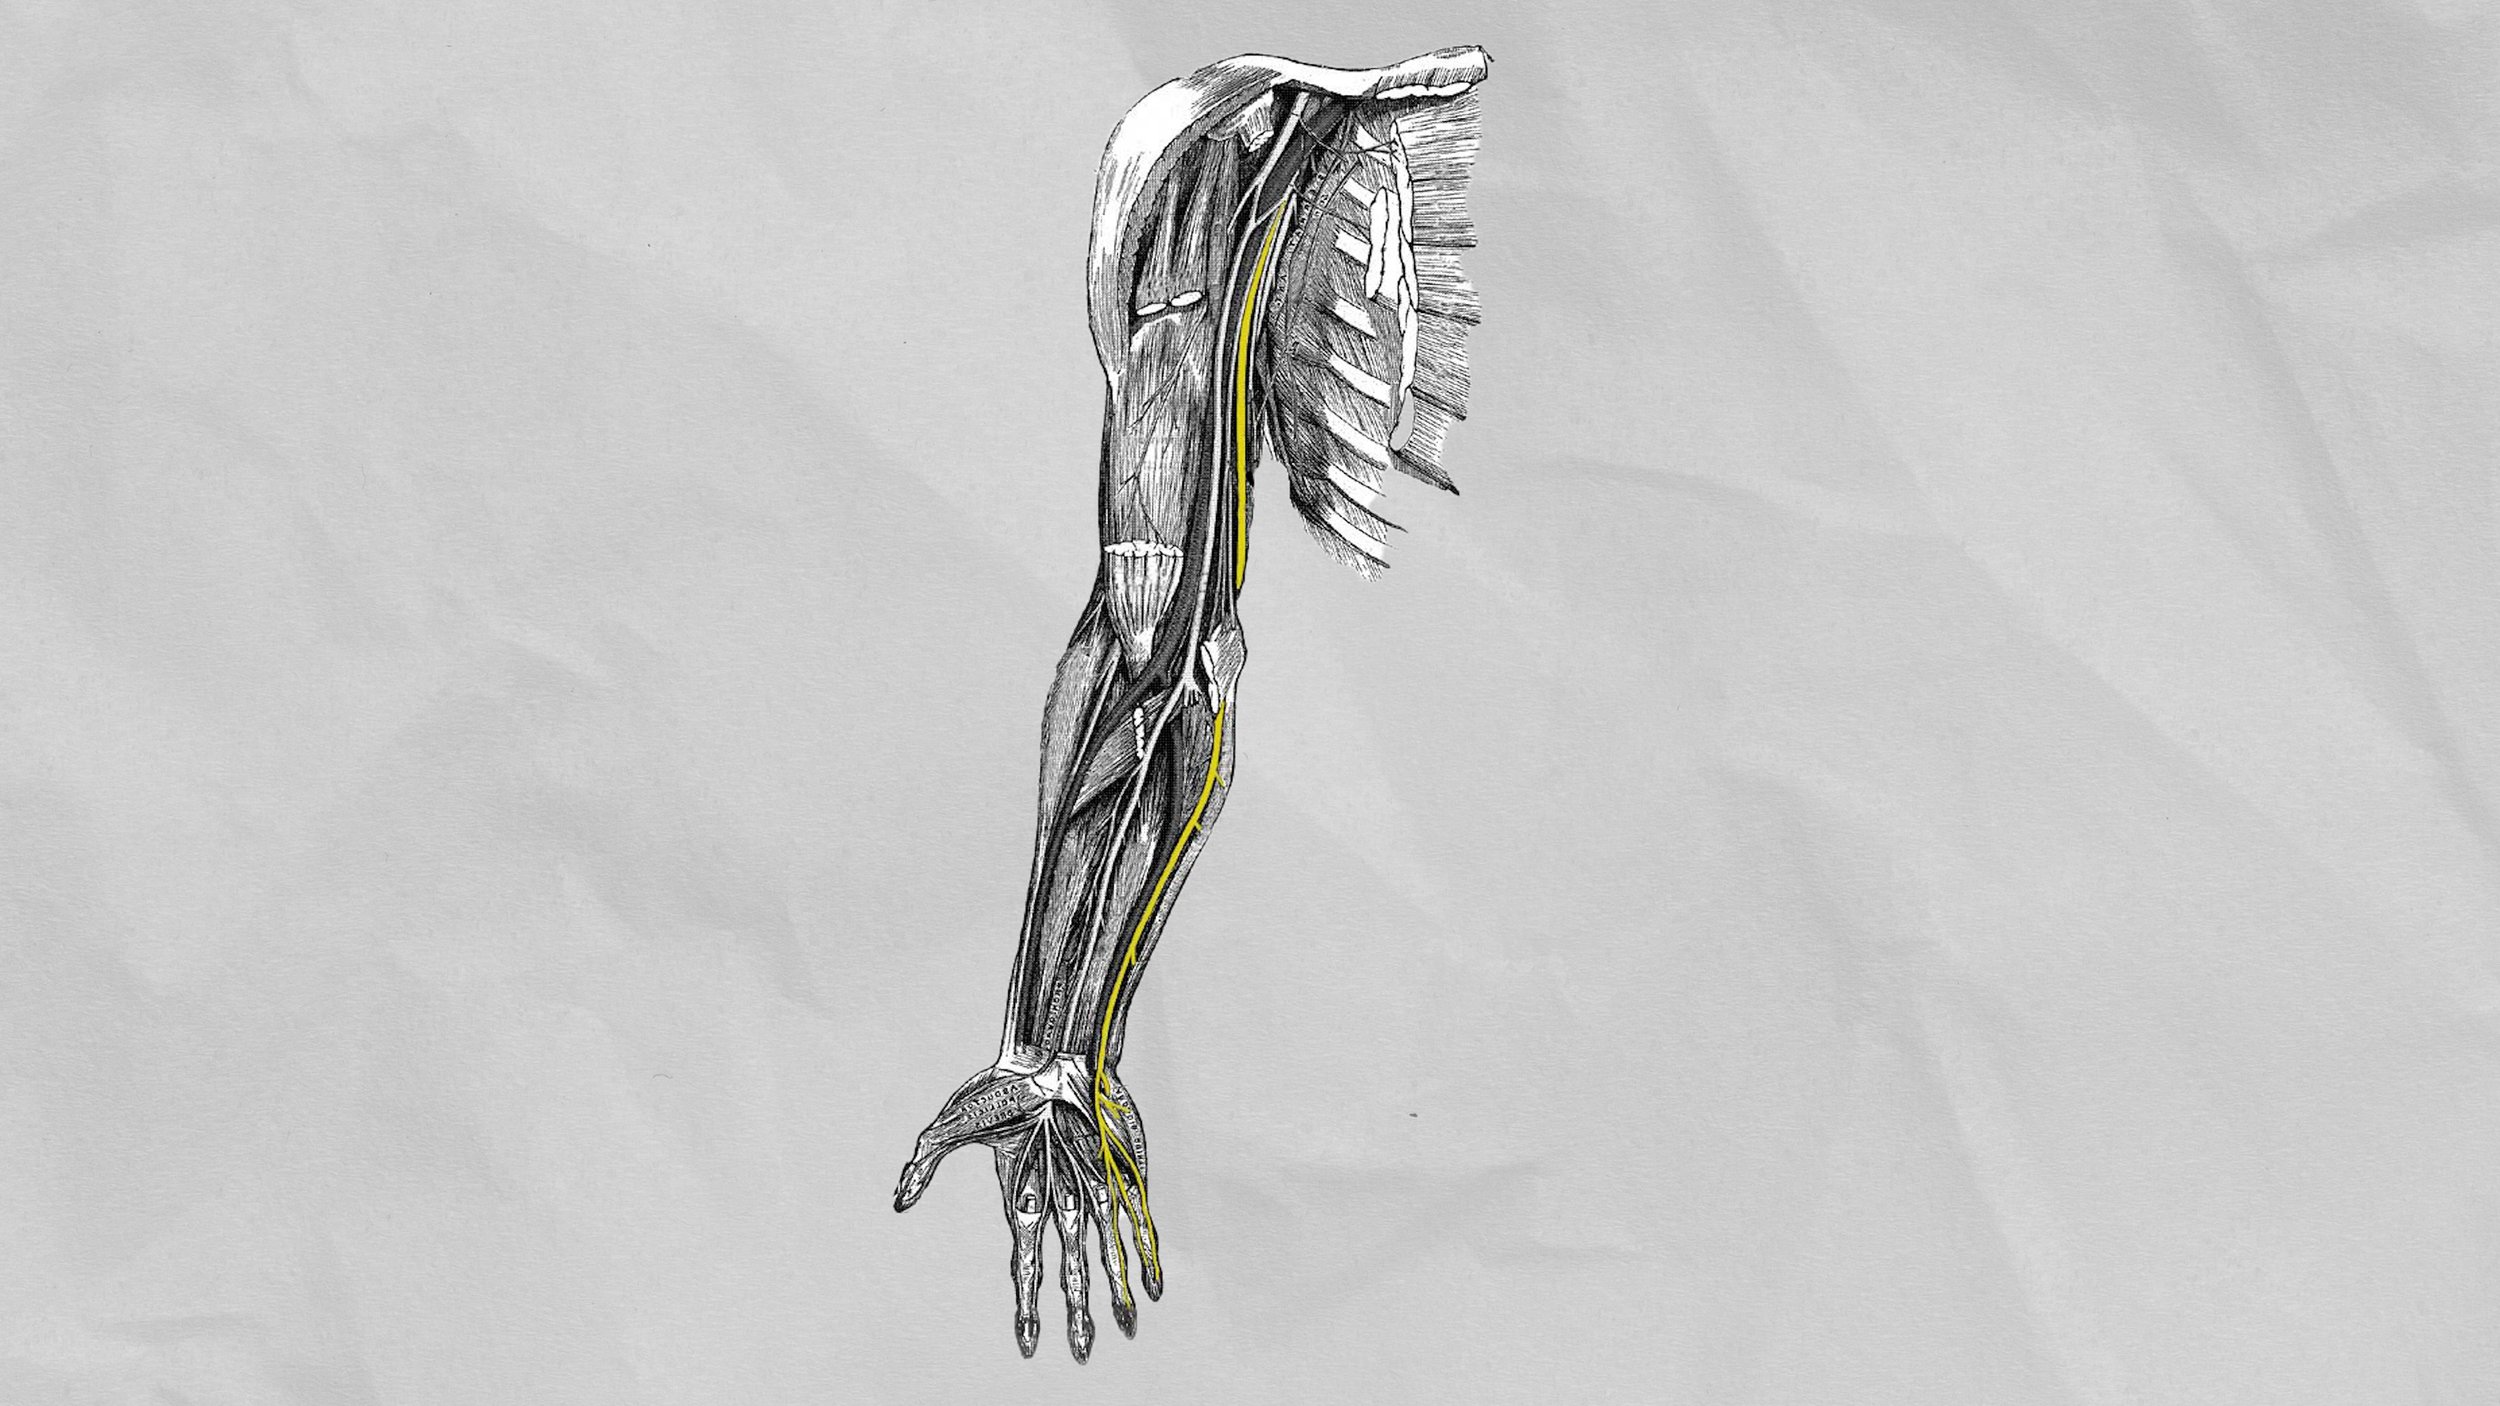
ULNAR NERVE ANATOMY
The Ulnar nerve only has branches from C8 and T1. It runs down the medial or inside of the humerus until it enters the posterior aspect as it nears the elbow. It lies anterior and medial to the triceps muscle. The ulnar nerve passes posterior to the medial epicondyle of the humerus in the cubital tunnel. The cubital tunnel is a fibro-osseous channel formed by the olecranon process laterally, the posterior cortex of the medial epicondyle medially, the elbow joint capsule and posterior bundle of the medial collateral ligament anteriorly, and the ligament of Osborne (the cubital retinaculum) posteriorly (Fig. 1). Within the tunnel, the ulnar nerve is normally surrounded by fat. The nerve exits the distal aspect of the cubital tunnel to enter the medial aspect of the forearm between the superficial and deep heads of the flexor carpi ulnaris muscle. It runs down into the hand and innervates part of the 4th and most/all of the 5th digit. [1]
ULNAR NERVE TESTS
We’re going to do three tests for ulnar nerve irritation in order of intensity. To get the most accurate results, you should do all three in order as long as they don’t cause you significant pain. However, if you are very obviously positive for the first test, you may not need to do #2 and #3.
Test 1: Elbow Flexion Test (most gentle)

Perhaps the simplest test, the elbow flexion test.
Maximally flex your elbow
Extend your wrist
Hold this position for 30-60 seconds.
Note and pain or tingling sensations
The faster the symptoms come on, the more significant the ulnar entrapment may be (15 seconds is significant, 2 minutes is probably no big deal).
Test 2: Ulnar Nerve Test (aka upper limb neurodynamic test for ulnar nerve) (medium intensity)

To perform the standard ulnar nerve test:
Shoulder girdle depression
Shoulder abduction
Shoulder external rotation
Wrist and Finger extension
Elbow flexion
Cervical side flexion/rotation
Note and pain or tingling sensations
Test 3: Prayer Stretch Test (more aggressive)

To perform the prayer stretch test:
Place the palms of your hands together with the fingertips lined up and your thumbs gently touching your chest
Your forearms should be parallel to each other
Slowly slide your hands towards one side, aiming for your armpit
Pause for 4-5 seconds and assess your symptoms, noting any pain or tingling
Return to the start position and perform on the other side, comparing symptoms
If any of these tests create pain or tingling in your elbow, ulnar side of your forearm, or 4th and 5th fingers, that’s an indication that you may have an ulnar nerve issue. If that’s the case, you’ll want to continue to the next section of the video, where we finalize your self-diagnosis before moving onto rehab.
ADDITIONAL TESTS / SIGNS
So we know that ulnar nerve irritation can be tricky because of all the potential entrapment sites and because it often feels like fleeting elbow tendinitis. But now that you’ve tested positive for at least one of the ulnar nerve tests, there are a few signs you can look for to help confirm your suspicions.
Truck Driver’s Elbow

“Truck driver’s elbow” is a name I just totally made up, but it’s related to ulnar nerve screening. Often ulnar nerve issues are irritated by sustained pressure directly over the nerve, such as resting your arm on the door of your car, or just while you’re bored studying or working on the computer.
If you notice that your elbow pain is worse after resting your elbow on a surface for a long period of time, this is another sign that it is more likely an ulnar nerve issue rather than climber’s elbow.
Posture

Pay attention to your lifestyle and posture. Do you notice your symptoms are worse after you have been sedentary for a while? Well, the forward head and rounded shoulder position may be causing shortening of certain muscles which further entrap the ulnar nerve.
Time For Bed But I’d Rather Watch Emil Abrahamsson Vids

Another classic, the “Time For Bed But I’d Rather Watch Emil Abrahamsson Vids” syndrome (which is totally real, didn’t make that up at all….) is when you lay in bed, on your back, and hold your phone up with your elbows bent for a long period of time. If you notice that you get numbness and tingling quickly it’s likely due to compression of the ulnar nerve in the elbow with the sustained flexed position.
Tricep Length
If your triceps are particularly tight or shortened they can compress the ulnar nerve. This is something you’ll want to assess because it will help guide your rehab. You can test your tricep length with a few simple steps:
Make a fist with your thumb tucked under the other fingers.
Reach that hand to your neck, resting the hand on the spine.
Reach the hand down the spine as far as you comfortably can.
Repeat on the other side and compare.
If you notice a tricep limitation on the same side that you are experiencing symptoms, limited tricep length may be adding to your entrapment.
Self-Diagnosis Conclusion
So, If you were positive to the ulnar nerve tests, have limited tricep length, a sedentary job, and random symptoms you can’t explain… wellllll you just might have an ulnar nerve issue and not a tendinopathy.
(Keep in mind, you *could* have both! You could have created a tendinopathy at the same time as an ulnar nerve issue.)
So, how do we fix it?
REHAB
Rehabbing an ulnar nerve issue involves treatment of all of the possible issues that are causing symptoms. That means potentially improving ulnar nerve mobility, but also addressing entrapment sites. It can be broken down into three categories: nerve mobility, stretching, and strengthening.
Exactly how important each category will be for you will depend on your specific issue and needs. For a specific, guided program I would recommend reaching out to a skilled professional like myself or any other climbing-oriented practitioner. Otherwise, here are your options, and remember all of this information will be in the show notes (link in description) where I’ve also included this handy chart as a quick reference.
Ulnar Nerve Mobility


To increase ulnar nerve mobility, you can do nerve flossing and/or nerve tensioning.
Some people will tell you flossing is the safe way to go, while others will swear that tensioning reduces their symptoms best.How do you know which one to do? Well, they act on the nervous system in mechanically different ways. Tensioning is more aggressive and tractions the nerve, while flossing is more conservative and just mobilizes it.
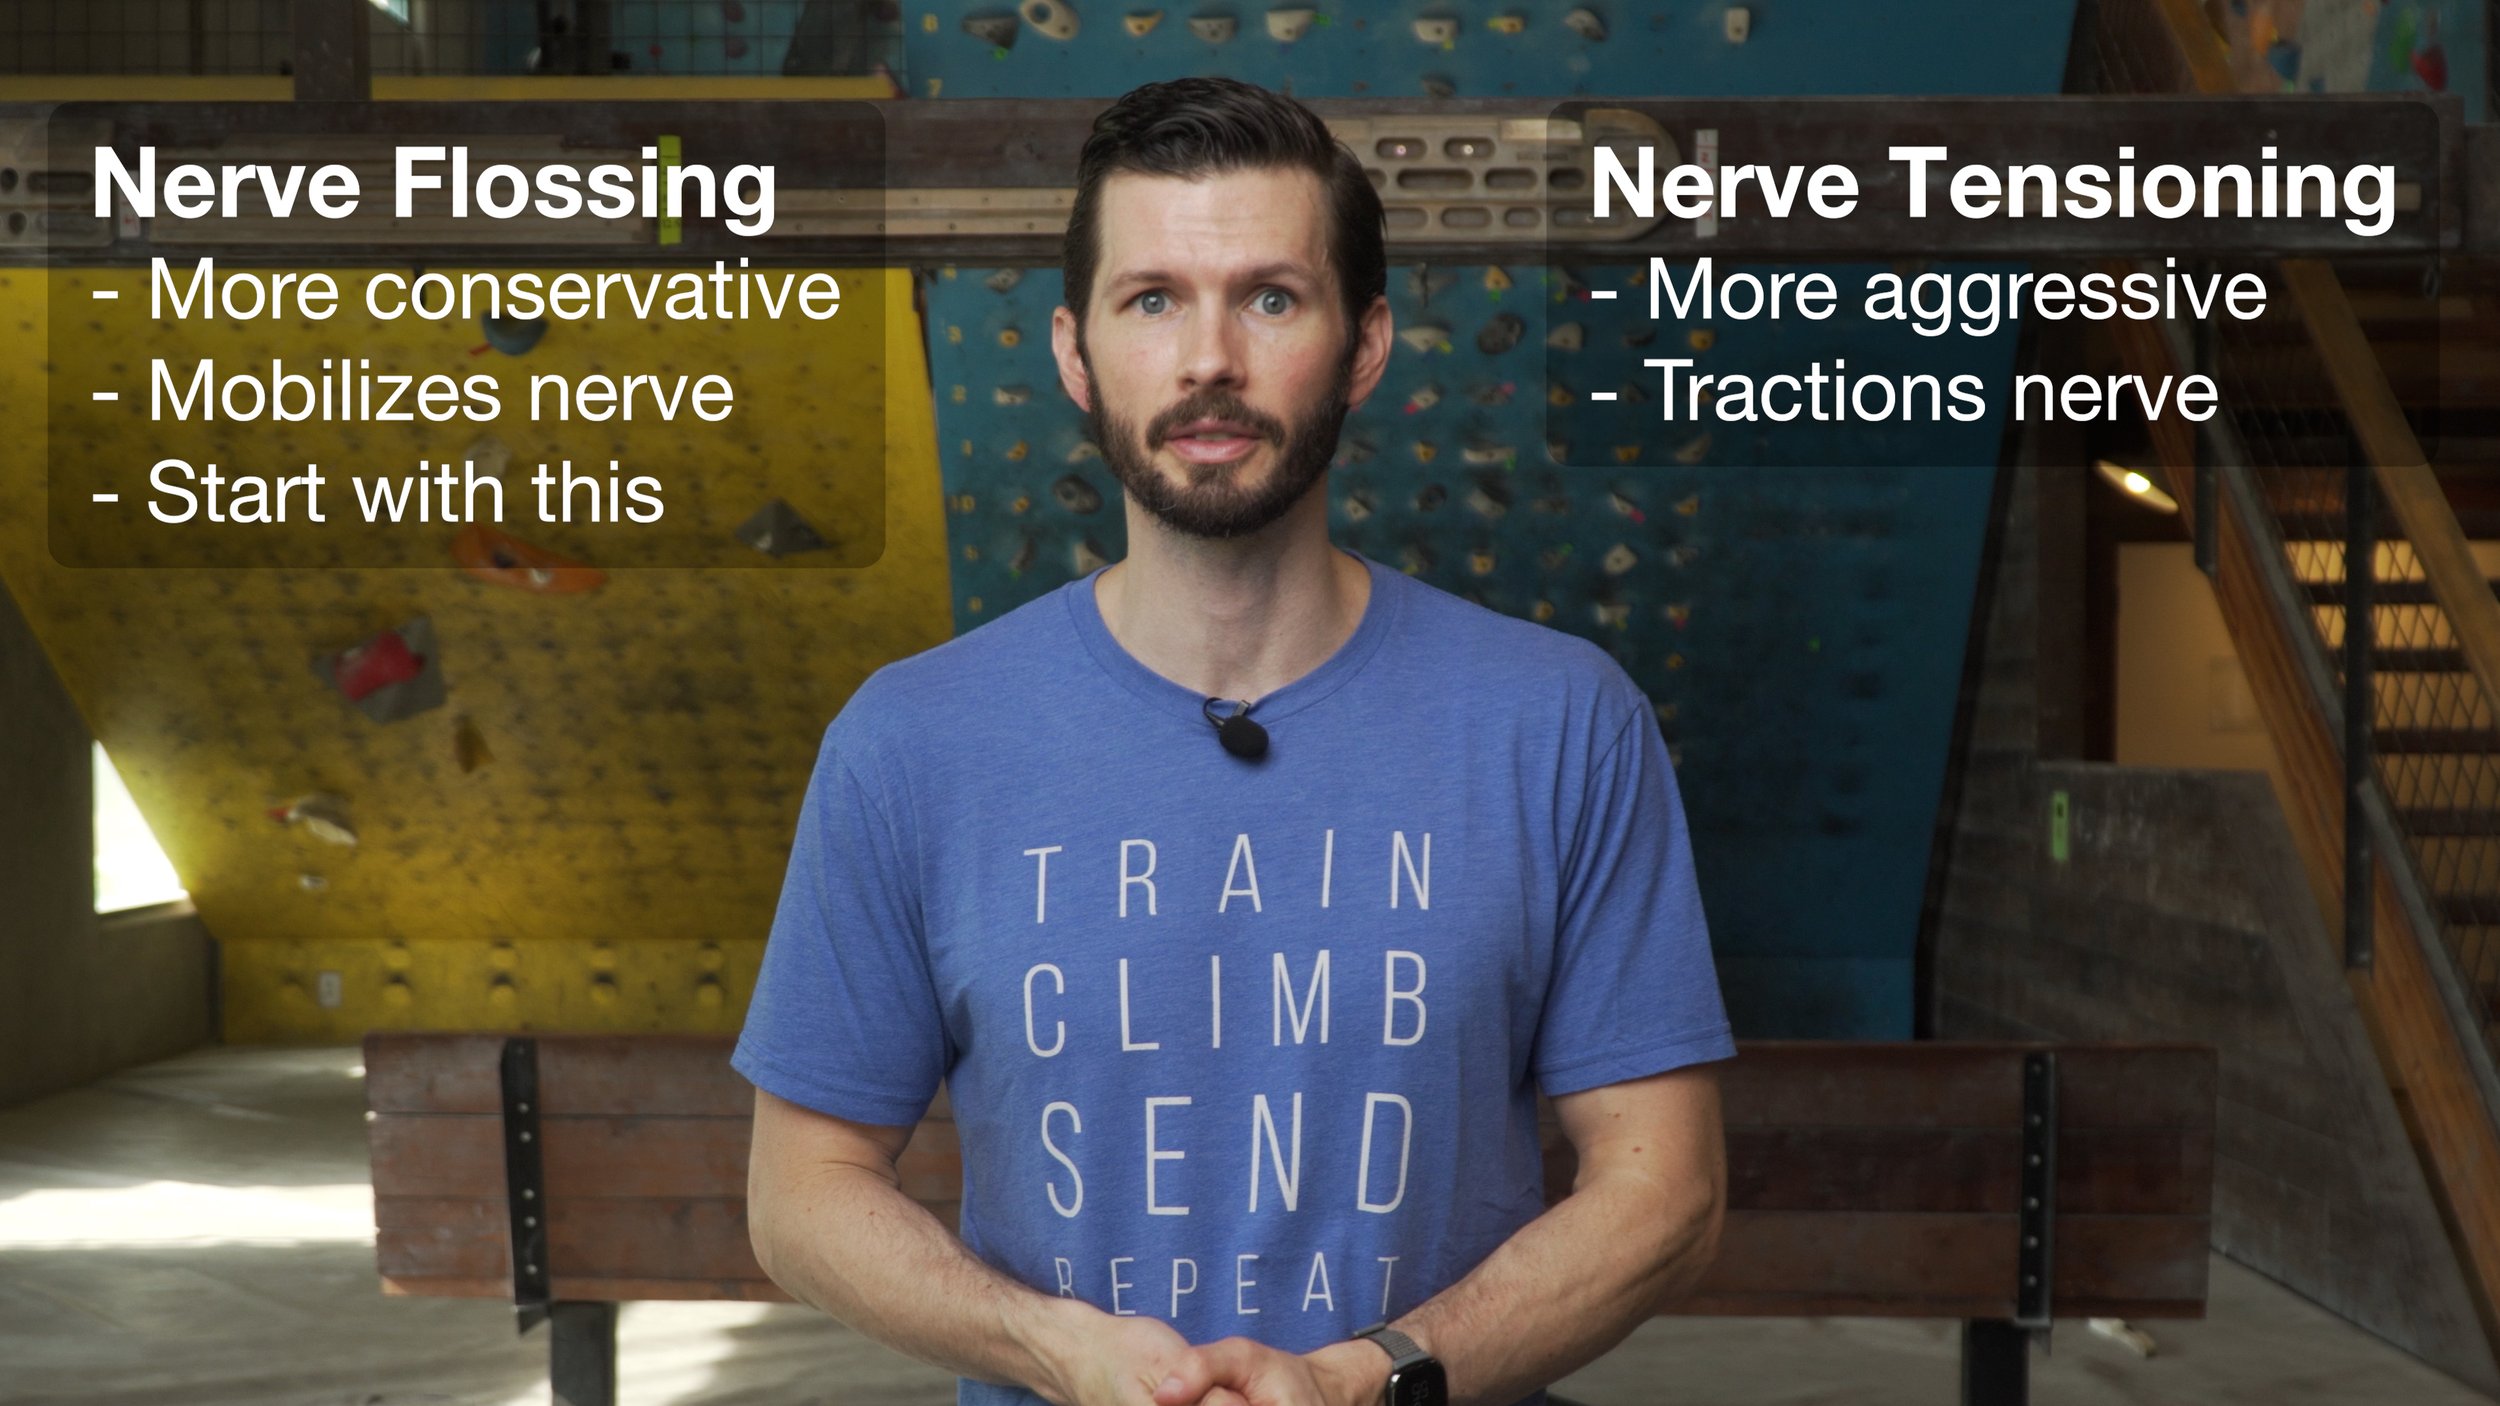
I always recommend starting with flossing and only moving on to tensioning if flossing is ineffective. If tensioning aggravates your symptoms, do not continue. If it provides you significant relief, continue at a moderate frequency.
To perform Nerve Flossing:
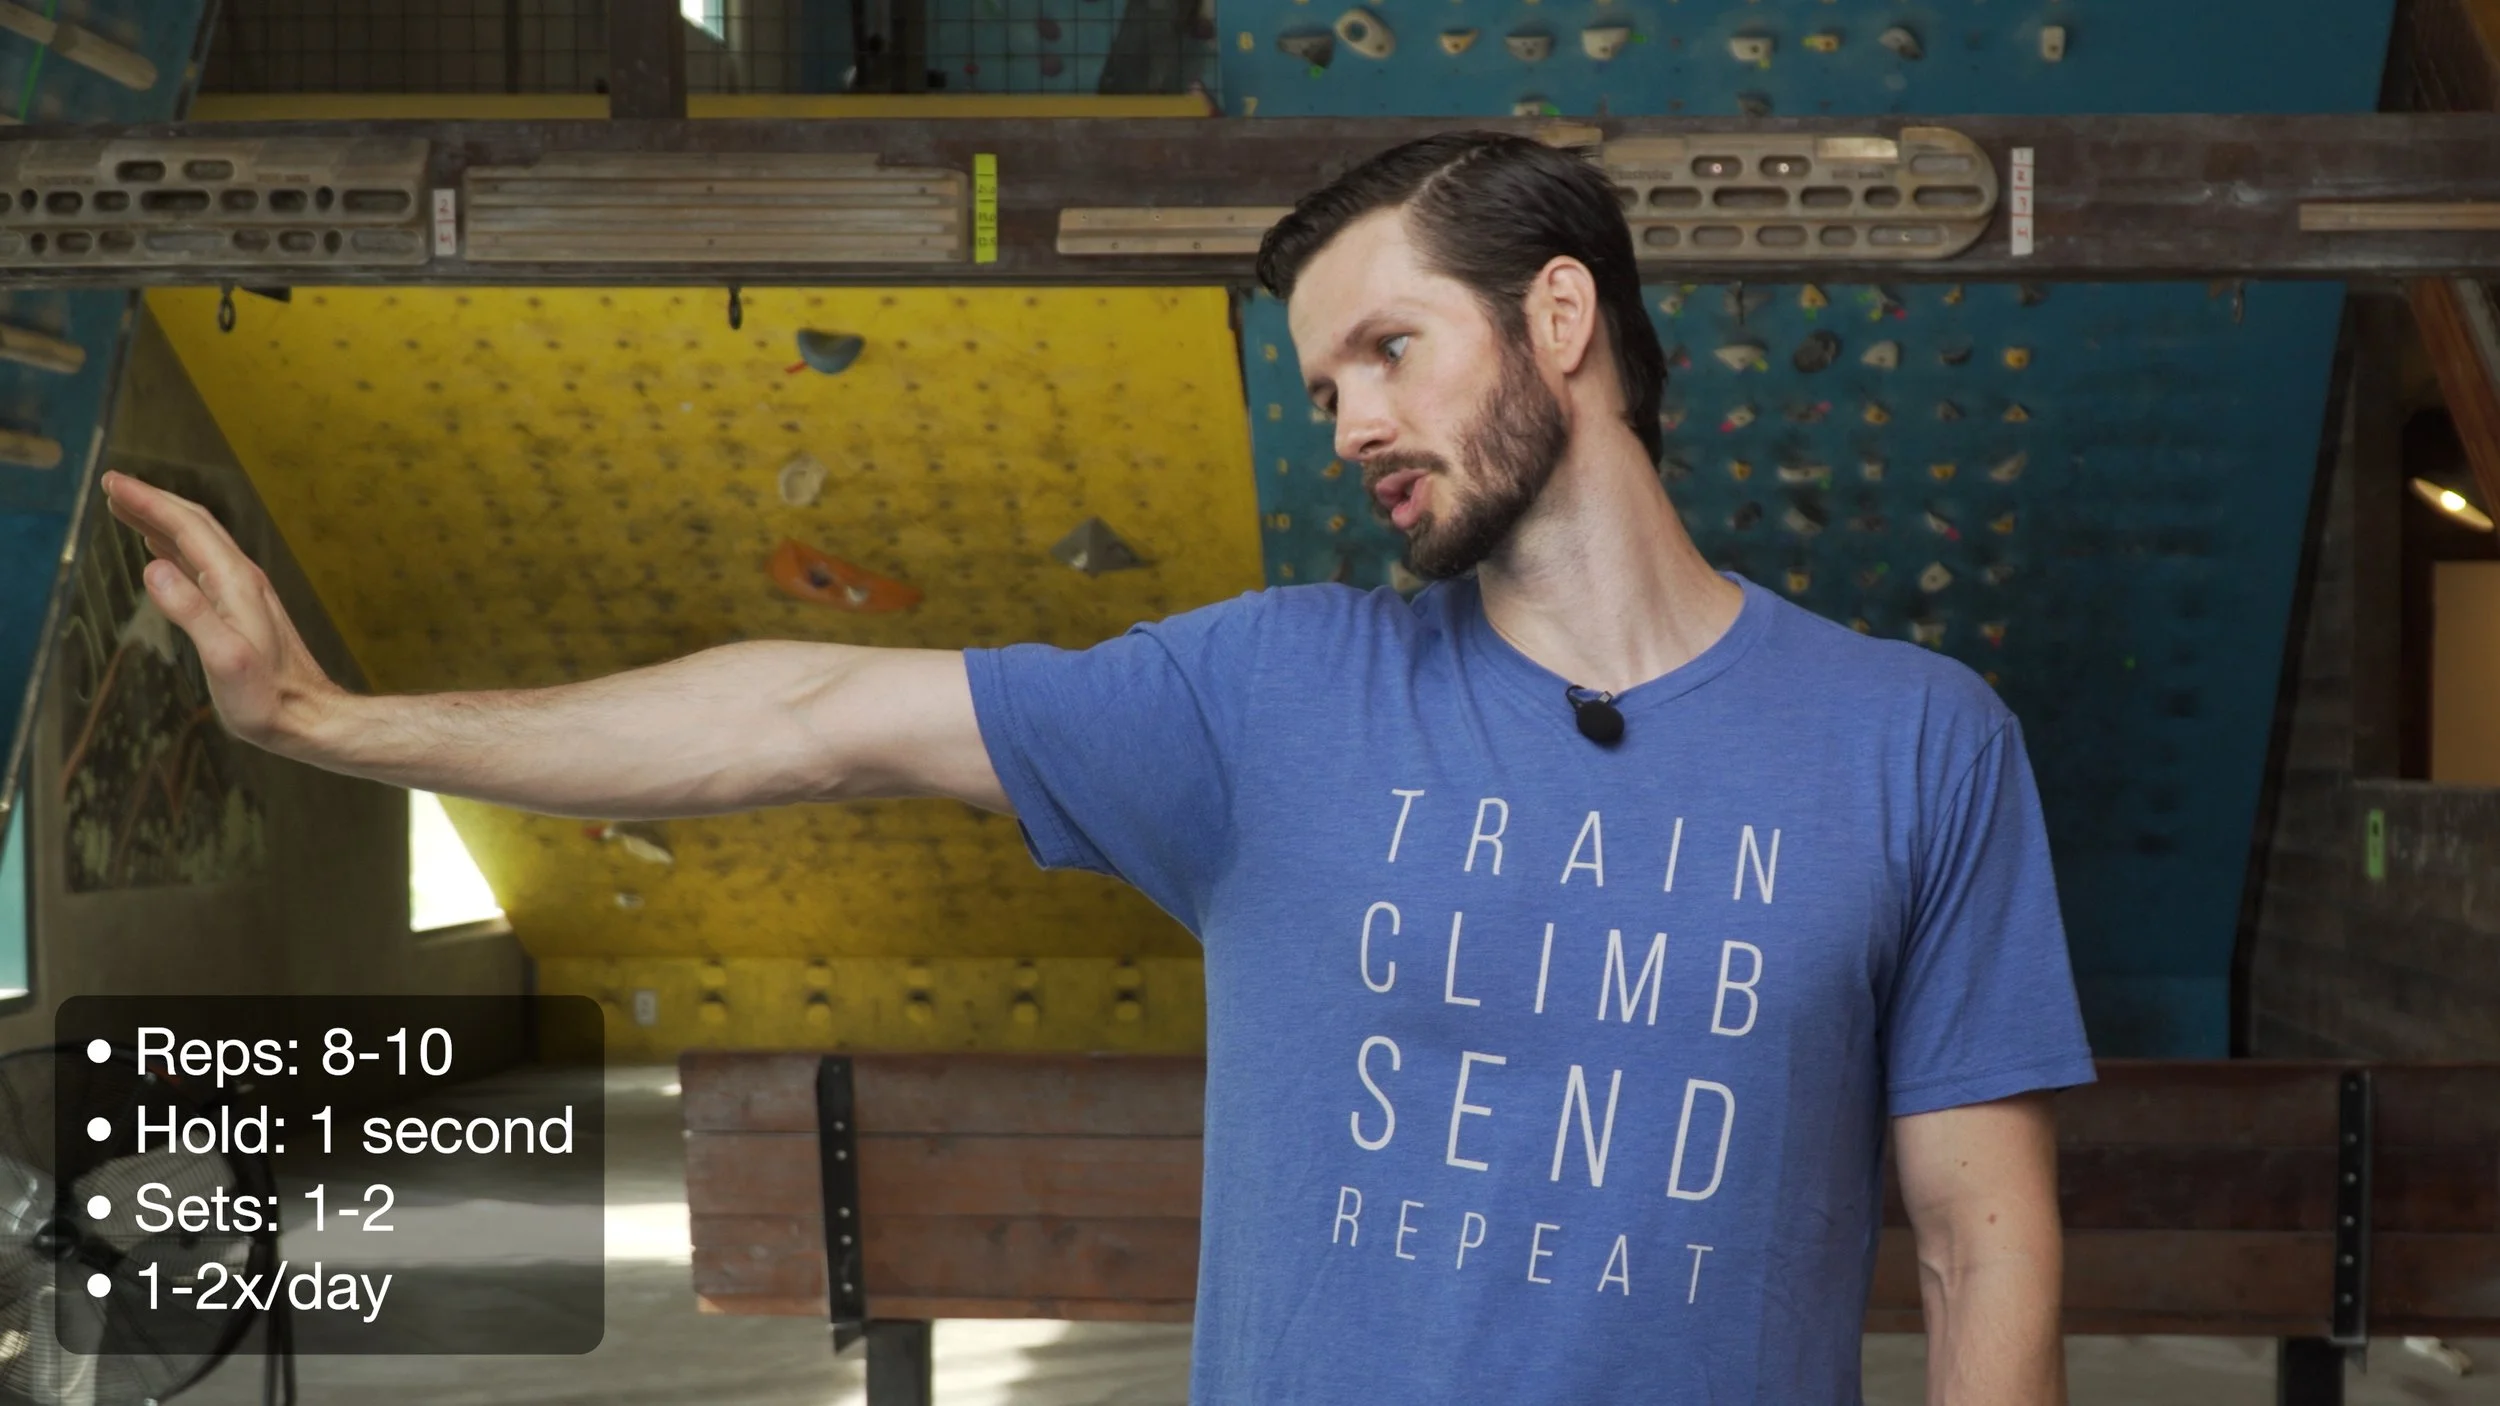
Start with your elbow flexed, wrist flexed (but relaxed), fingers flexed (but relaxed), and arm elevated (abducted) at your side. Your fingers should be pointing directly away from your body.
Straighten your elbow as you begin to extend your fingers and wrist.
Hold only for ~1 second, then return to the start.
*Because nerve flossing is less aggressive, it’s OK to perform this at a higher frequency *
For a bonus, you can move your neck with the movement. In the starting position angle your head/neck to the opposite side, and as you straighten your elbow bring your head towards that same side. For a double bonus on efficiency, perform what I call the “cleo” and perform with both hands at the same time.
To perform Nerve Tensioning:
Place the palms of both hands together with fingertips aligned and pointing up. Your thumbs should be gently resting on your chest.
Maintaining contact with the thumbs on the chest, start to slide your hands to the one side as if trying to get your hands into your armpit
Note: many of you won’t be able to get that far and may feel a stretch or sensation as you cross over your chest/pec muscle. That’s OK! Stop when you feel a decent stretch.
Hold for 3-5 seconds, then return back to the starting point and repeat on the other side.
*because nerve tensioning is more aggressive, I typically recommend to do it less frequently, unless you have a significantly positive relief of symptoms every time you perform it*
Stretching
Next, we also need to increase the mobility of certain muscles that may be compressing the nerve. Keep in mind that you won’t necessarily need to perform all of these if you figure out which muscle is causing your entrapment.
(Note: We’ll use the right arm as the affected arm in these examples.)
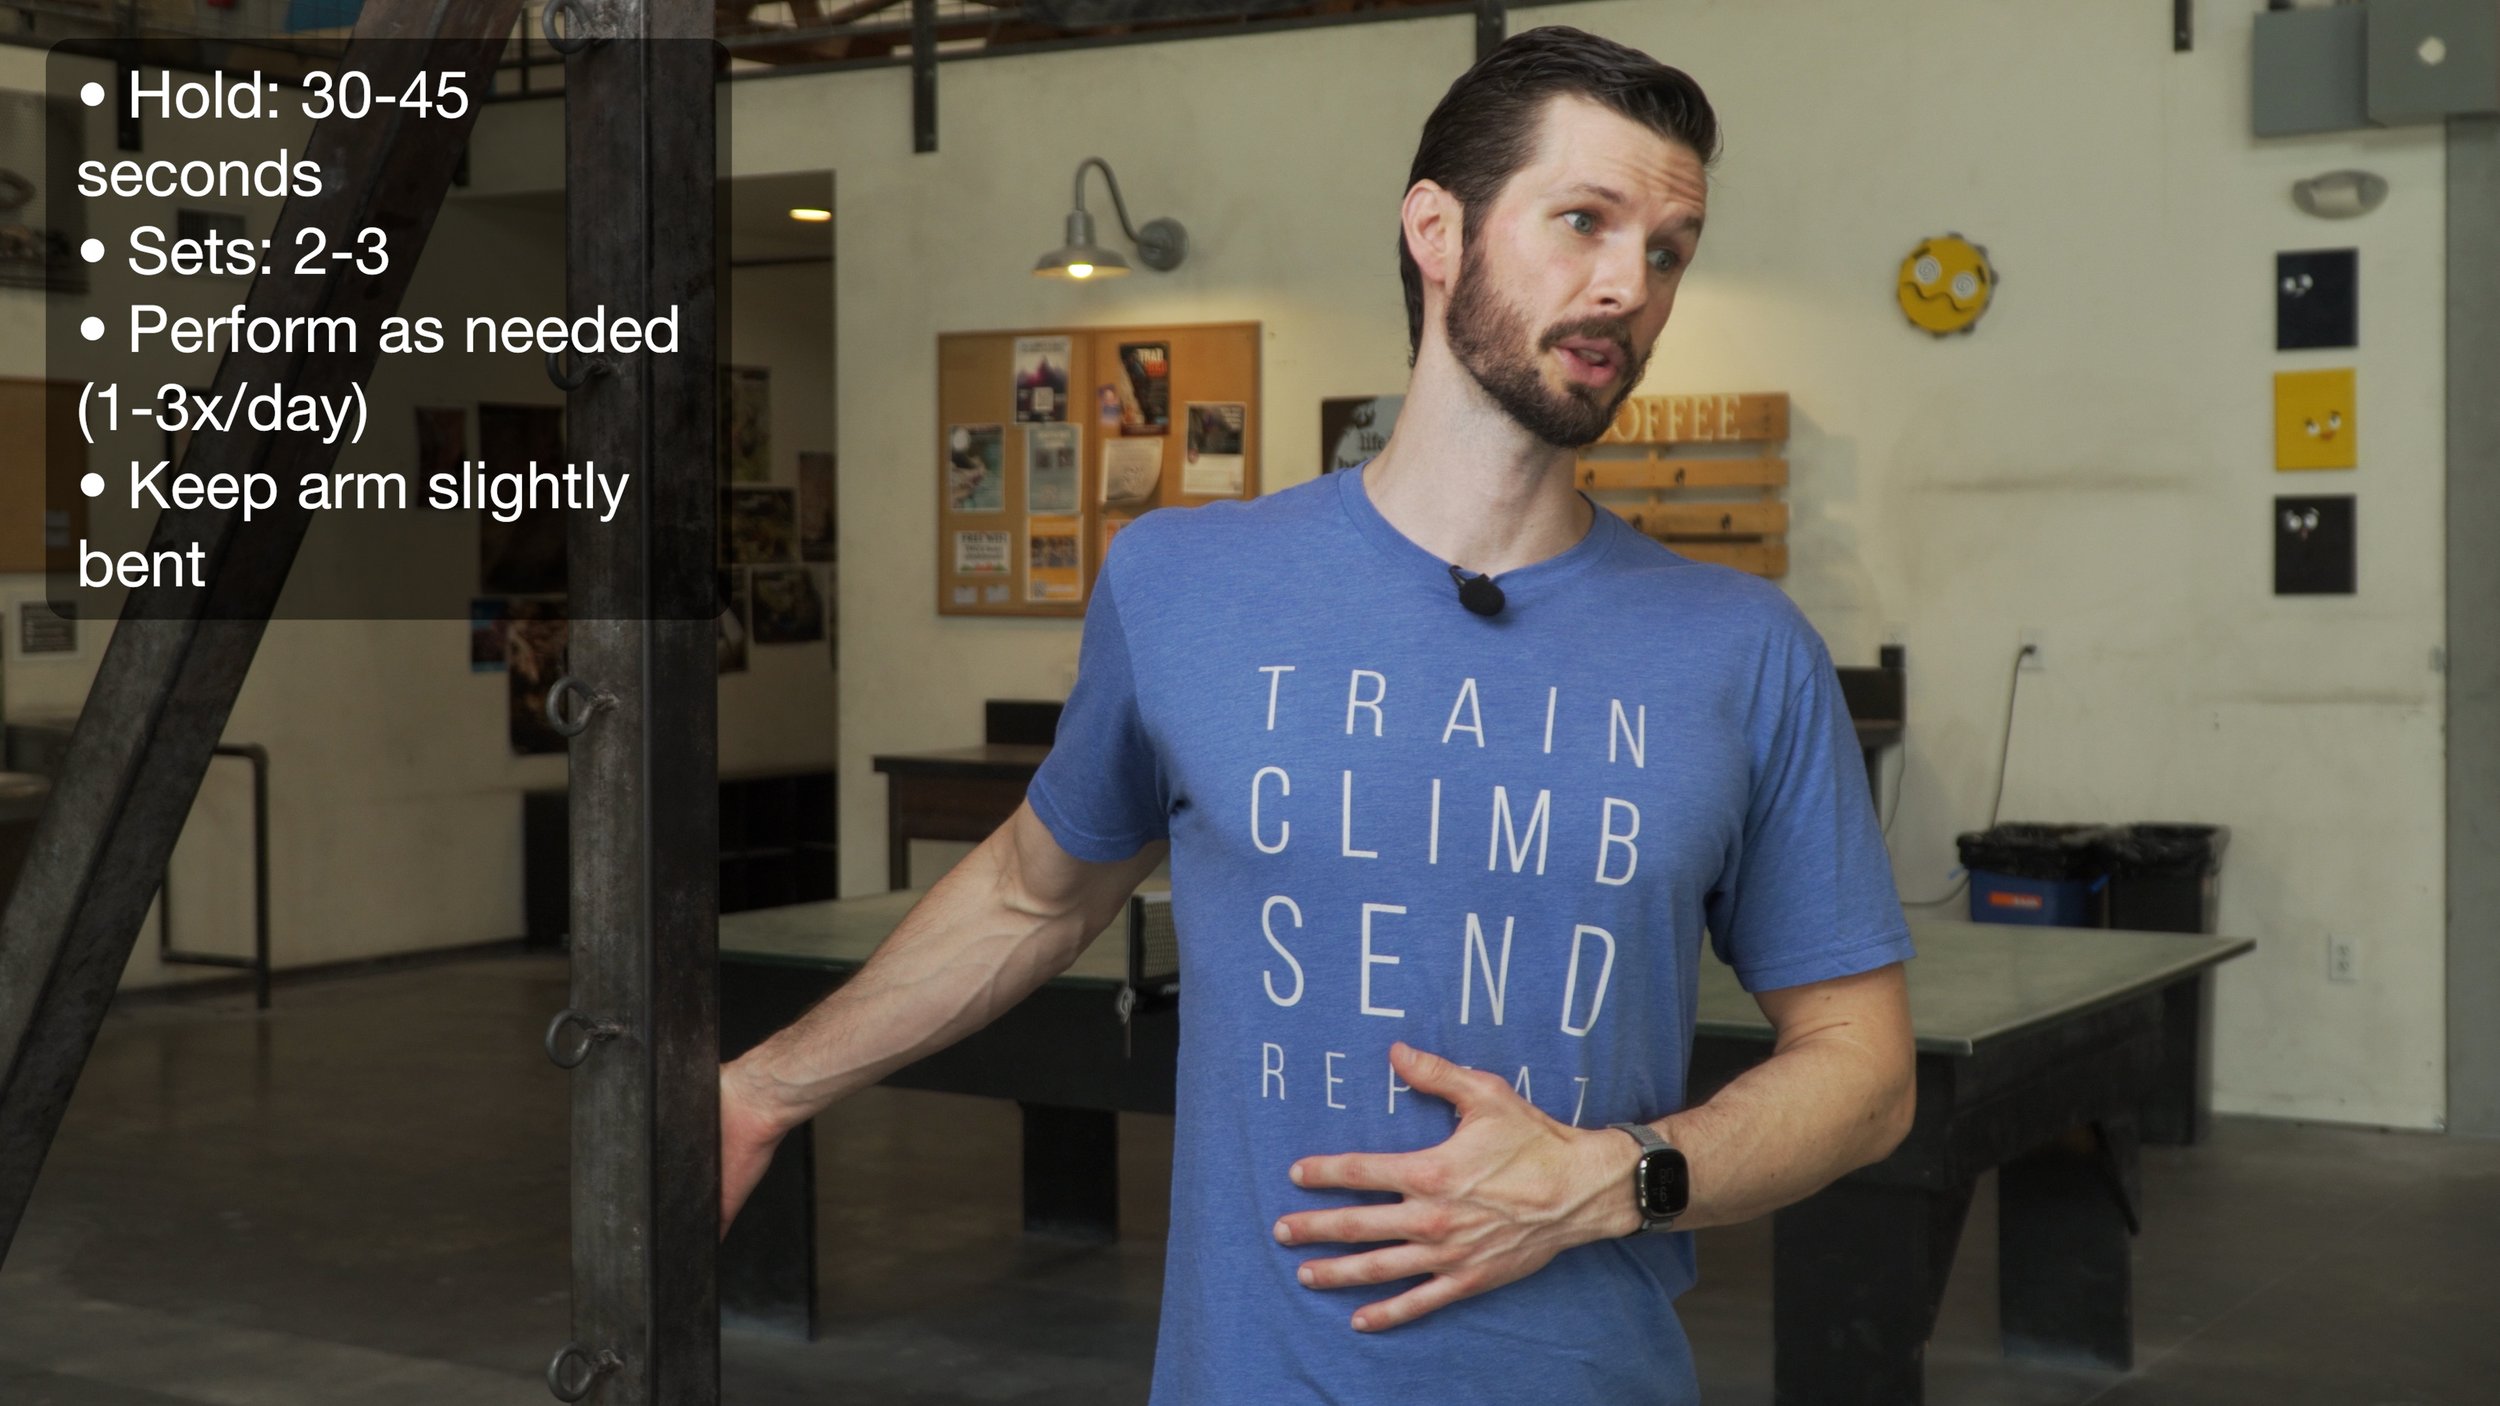
Overhead Tricep Stretch: Reach your affected arm up and pretend as if you are trying to scratch your upper back. Use your other arm, grabbing at the elbow, to help pull the right arm further until you feel a good stretch. Stop if you feel pinching in the right arm. It is helpful to keep the right hand close to the mid back to sustain the stretch.

Pec Minor Stretch: A doorway stretch is great for this. Start with the right arm low, about 30 degrees away from the body with the palm forward. Gentle step forward and rotate your body to the left to feel the stretch in the right arm. After spending 30 seconds in the position, I recommend moving the arm up the door frame achieving multiple stretches. They may feel different and may have differing levels of contribution from the pec major, that’s OK. Perform all that feel tight/restricted.
FDP Stretch: With the right elbow bent, use the left hand to pull the fingers and wrist back into extension. Hold for 30 seconds, relax and repeat.

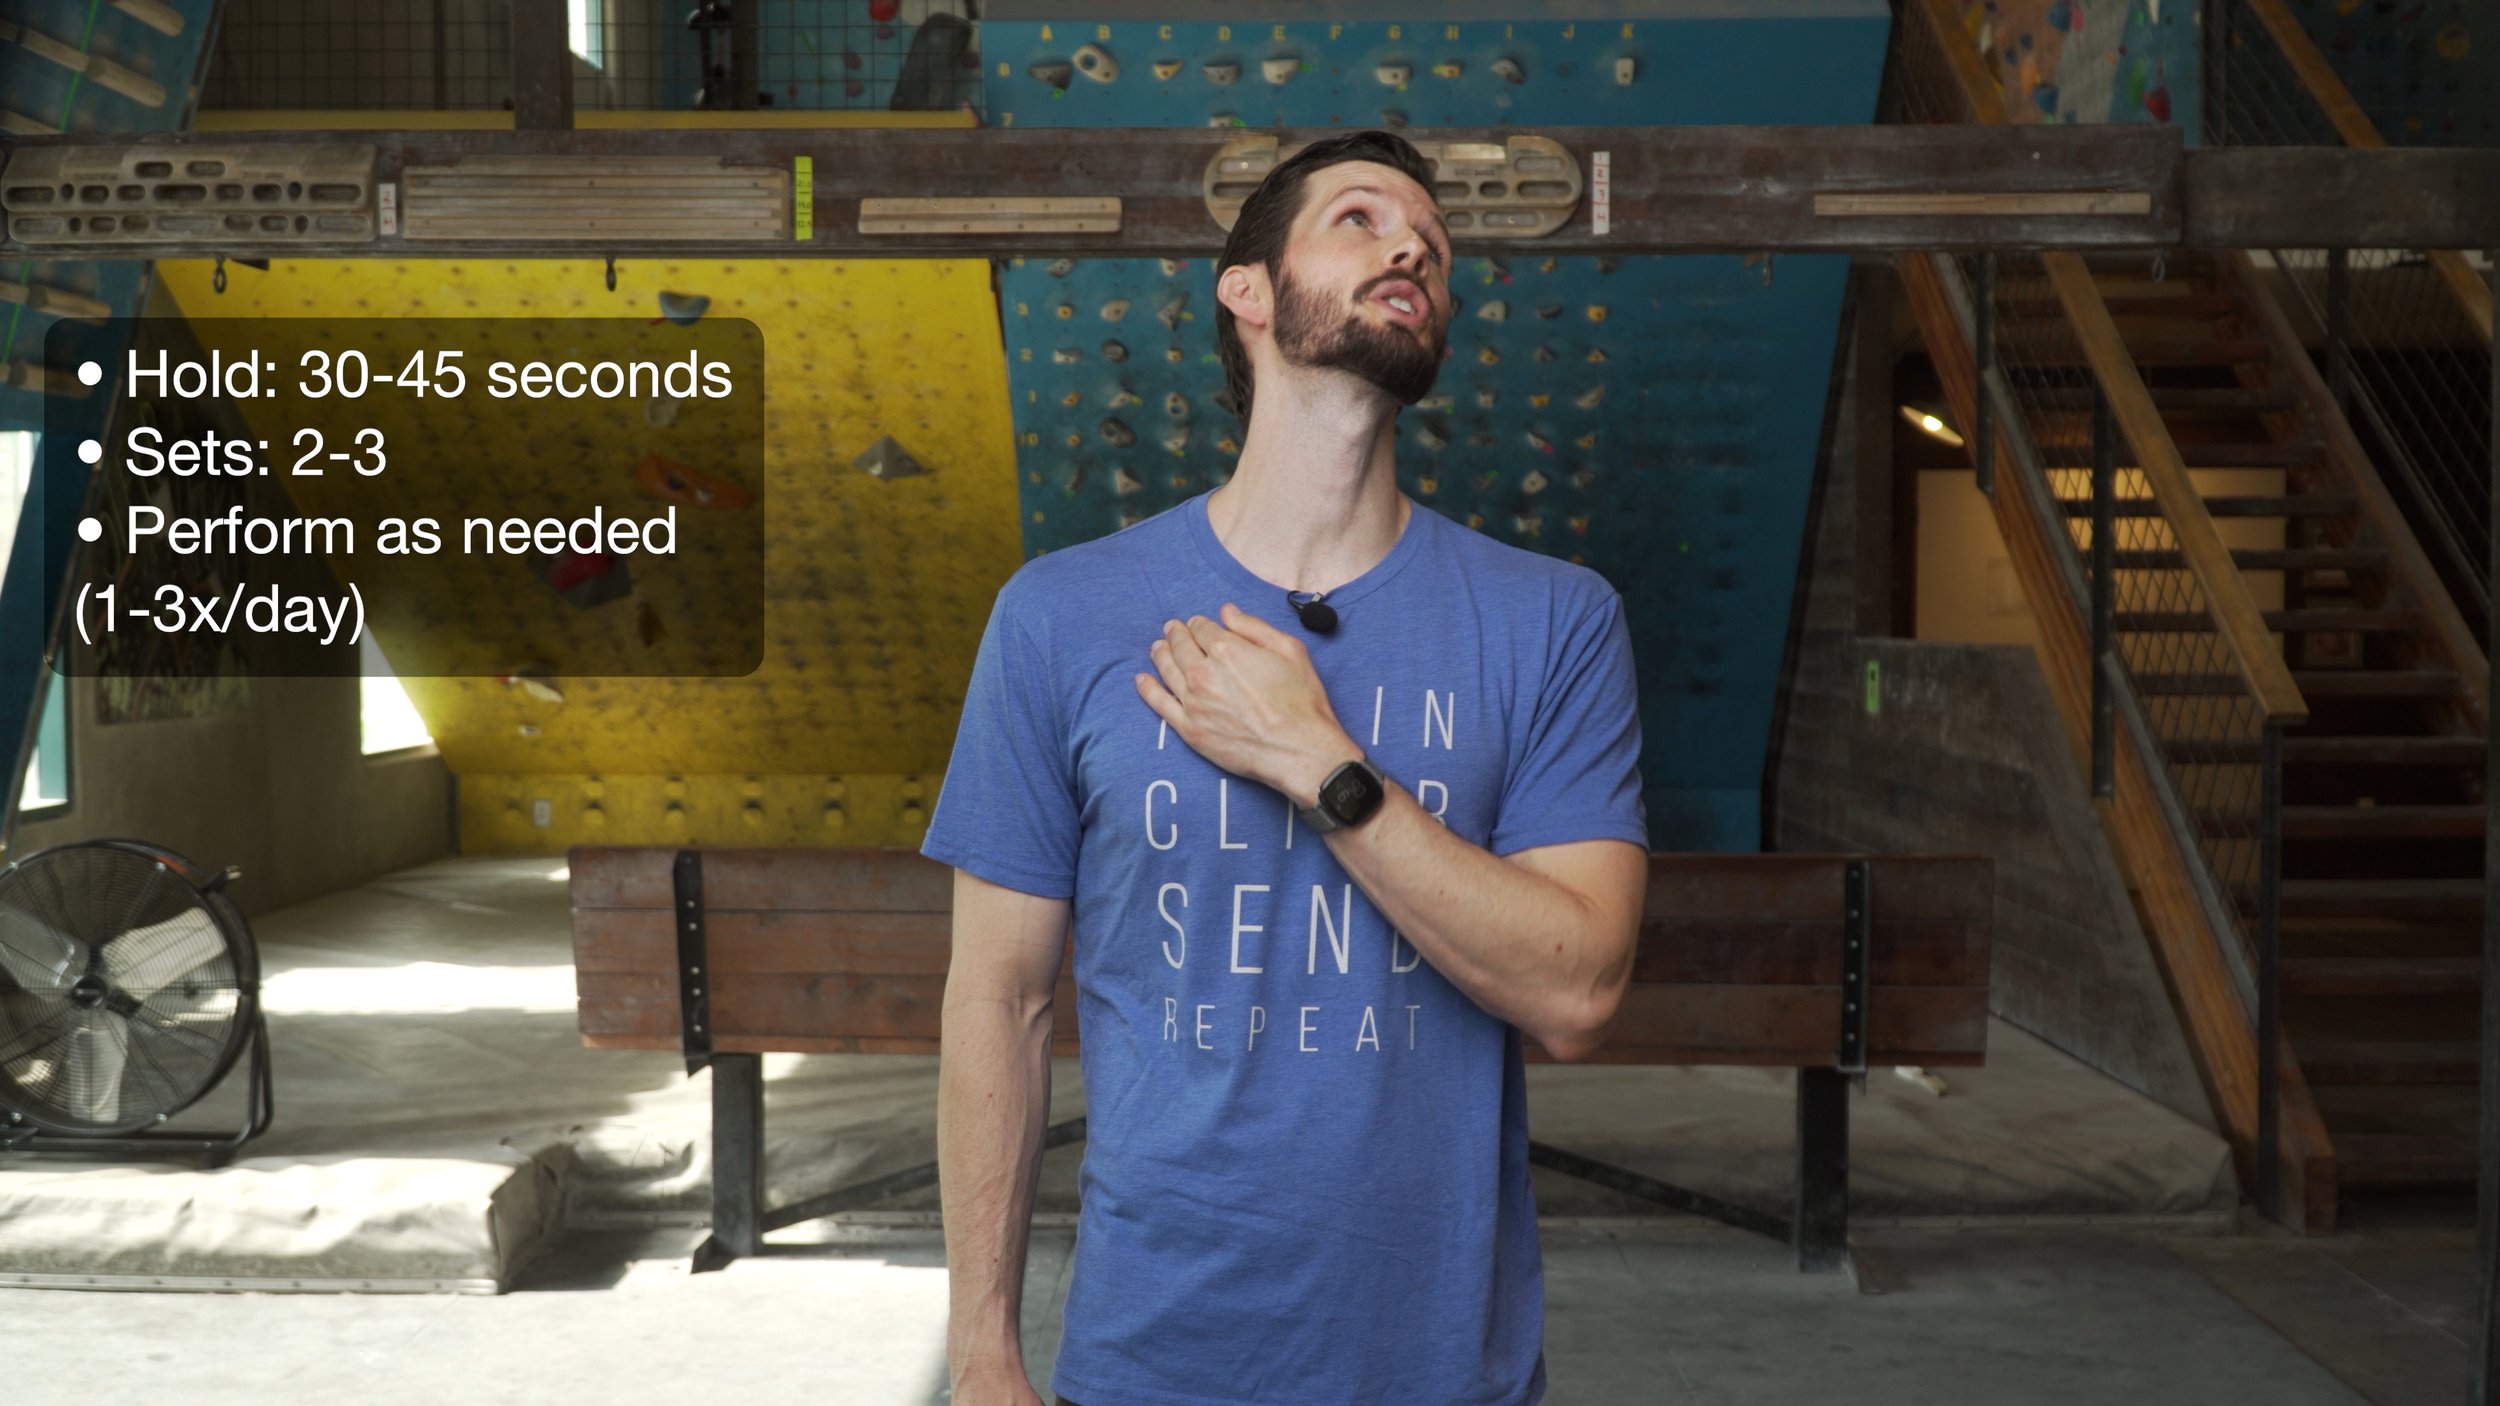
Neck/Thoracic Stretch: Use the left hand to grab just under the clavicle or collarbone on the right. Push in and gently down with the left hand. Keep the right shoulder down, don’t shrug it up. Look up and away to the left as if looking at a plane flying overhead. You should feel a gentle stretch in the front right of the neck.
Other Treatment Options
Avoiding sustained pressure to the ulnar nerve area (such as resting the elbow on an arm rest or window while driving)
Avoiding sustained flexed positions of the elbow such as laying in bed and scrolling on IG
Reduce training to triceps to reduce irritation
In extreme cases where function is significantly impaired (whether sensory or muscle) surgical intervention may be warranted, which is outside the scope of this video
NOTE: Once you have completed one set of each activity, you might be able to feel which ones are more appropriate for you and which ones aren’t doing much. In that case, it’s okay to stick to the ones that feel most effective.
Frequency: all of these are OK to do daily or multiple times per day, but you may want to perform the tensioning exercise less frequently if it causes you any irritation.

OUTRO
If you found this information helpful please consider giving this video a thumbs up and/or buying a t-shirt to support the channel! And if you have a nagging injury that you’d like us to make a video about, let us know down in the comments. Until next time, train, climb, send, repeat!
DISCLAIMER
As always, exercises are to be performed assuming your own risk and should not be done if you feel you are at risk for injury. See a medical professional if you have concerns before starting new exercises.
Written and Presented by Jason Hooper, PT, DPT, OCS, SCS, CAFS
IG: @hoopersbetaofficial
Filming and Editing by Emile Modesitt
www.emilemodesitt.com