How to Fix Ankle Pain for Climbers (Ankle Sprain, Twisted Ankle, Ankle Injury)
Hooper’s Beta Ep. 95
INTRODUCTION
To all the struggling ankles out there: you didn’t deserve to land on the edge of that giant pad stack, you couldn’t have known that rock on the trail was loose, and you can’t be blamed for forgetting how to walk correctly when loaded down with climbing gear. My dearest ankles: this one’s for you!
Lower extremity injuries account for ~25% of all injuries reported by climbers, and ankle injuries make up nearly 50% of those reported! So you could say this video is a bit overdue. For that reason we’re going to cover some common causes of lateral and medial ankle injuries for climbers, a bit of testing to determine how severe an injury is, and finally how to get those ankles strong again!
Note: we will not be covering a syndesmotic aka high ankle sprain in this video.
WHY ANKLE INJURIES NEED REHAB
When we suffer an ankle injury we typically lose proprioception, muscular strength AND ligamentous stability! These are things that don’t always just magically heal; we need to do specific rehab activities to get back to full function. So let’s break down those terms real quick.
Proprioception is the awareness of the position or movement of the body. Research has shown that proprioception is decreased in those suffering instability after an ankle sprain. The ankle is a complicated joint and must move through many extremes while climbing. Losing awareness can lead to decreased function and performance of that unit while climbing.
A reduction in strength after an ankle injury is also shown in research and is related to prolonged feelings of instability. This strength reduction may be related to being immobilized (such as with casting or bracing), from purely resting the injured ankle, or simply from injuring the muscle with the initial injury.
Finally, when you sprain your ankle, you’re typically injuring one or more ligaments by overstretching them. That injured ligament is now not as strong and taut, meaning it has excessive mobility which will create excess mobility of the joint it supports. When an injured ligament starts to repair itself, it replaces strong, dense type I collagen with looser type III collagen. Without proper retraining, the ligament will retain that higher percentage of type III collagen, meaning the ligament will remain looser and the joint will remain hypermobile. This may set you up for a future repeat injury if you don’t properly retrain the tissue.
Overall, the function of your ankle, especially for climbing, becomes significantly limited. So, what actually happens to your ankle anatomy when you get injured?
PART 1: ANATOMY AND MECHANISM OF INJURY
There are three ligaments and three muscles that bear the brunt of most ankle injuries.
The most important ankle ligaments, in order from most commonly to least commonly injured, are the anterior talofibular ligament (or ATFL), the calcaneofibular ligament (or CFL), and the deltoid ligament
Ligaments:
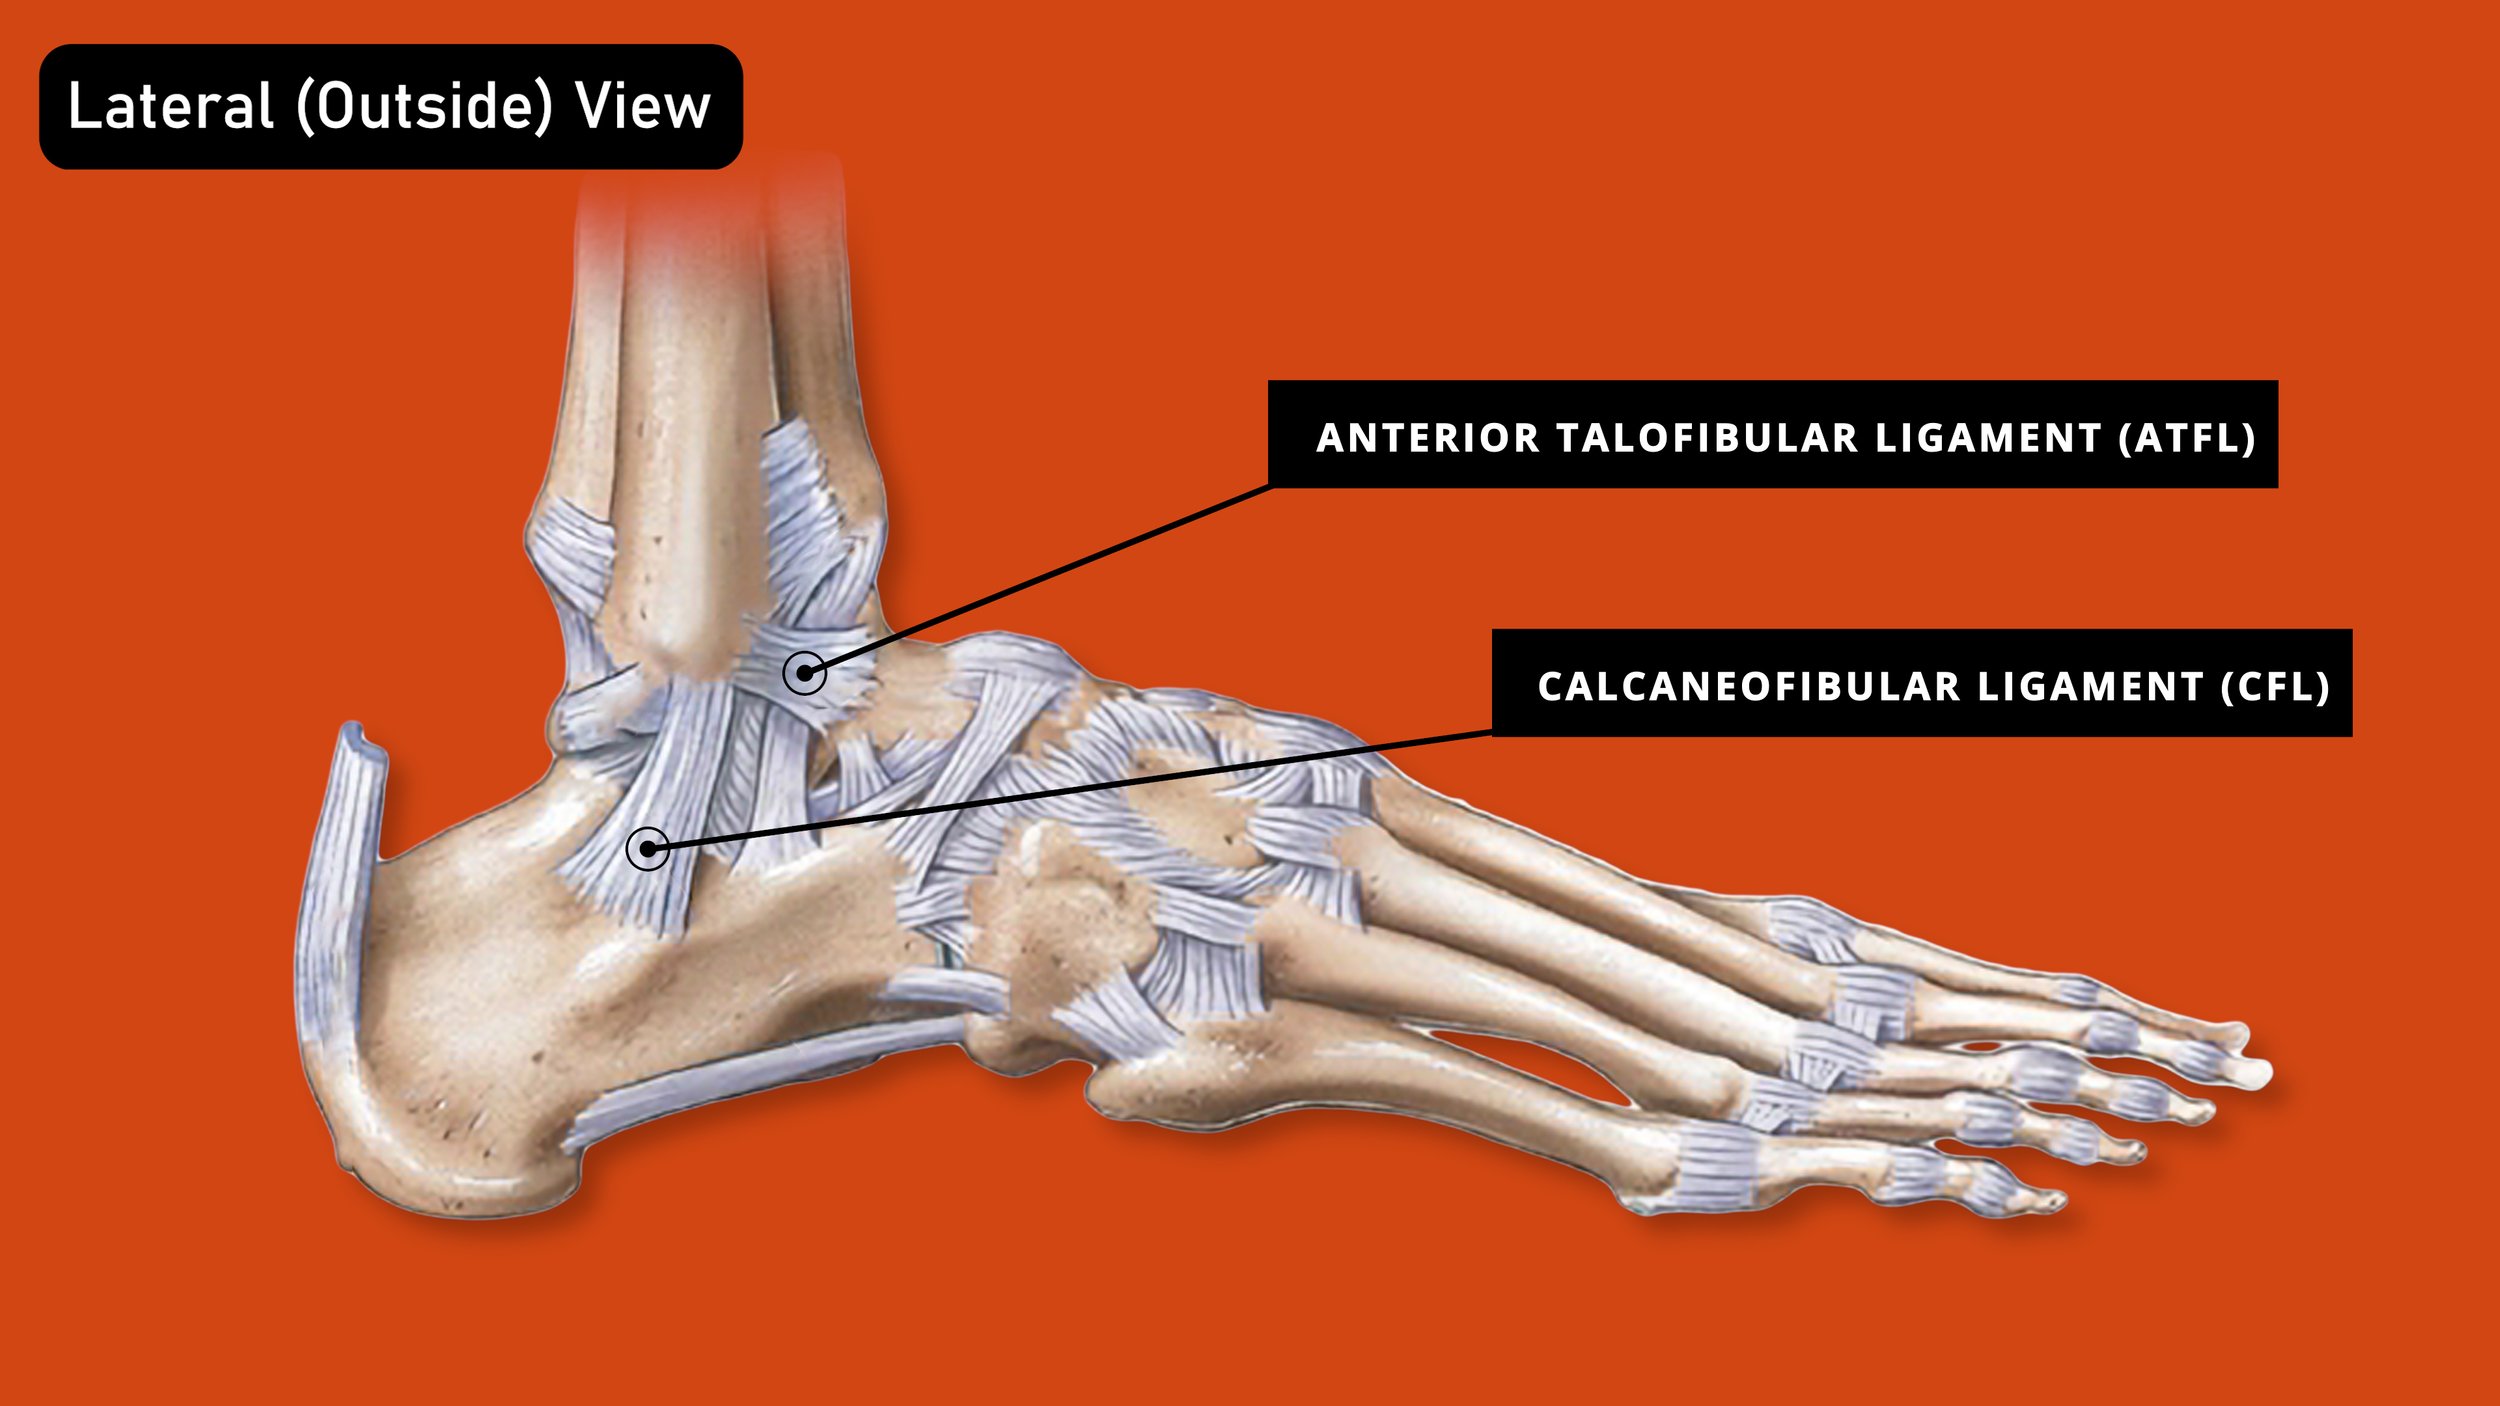
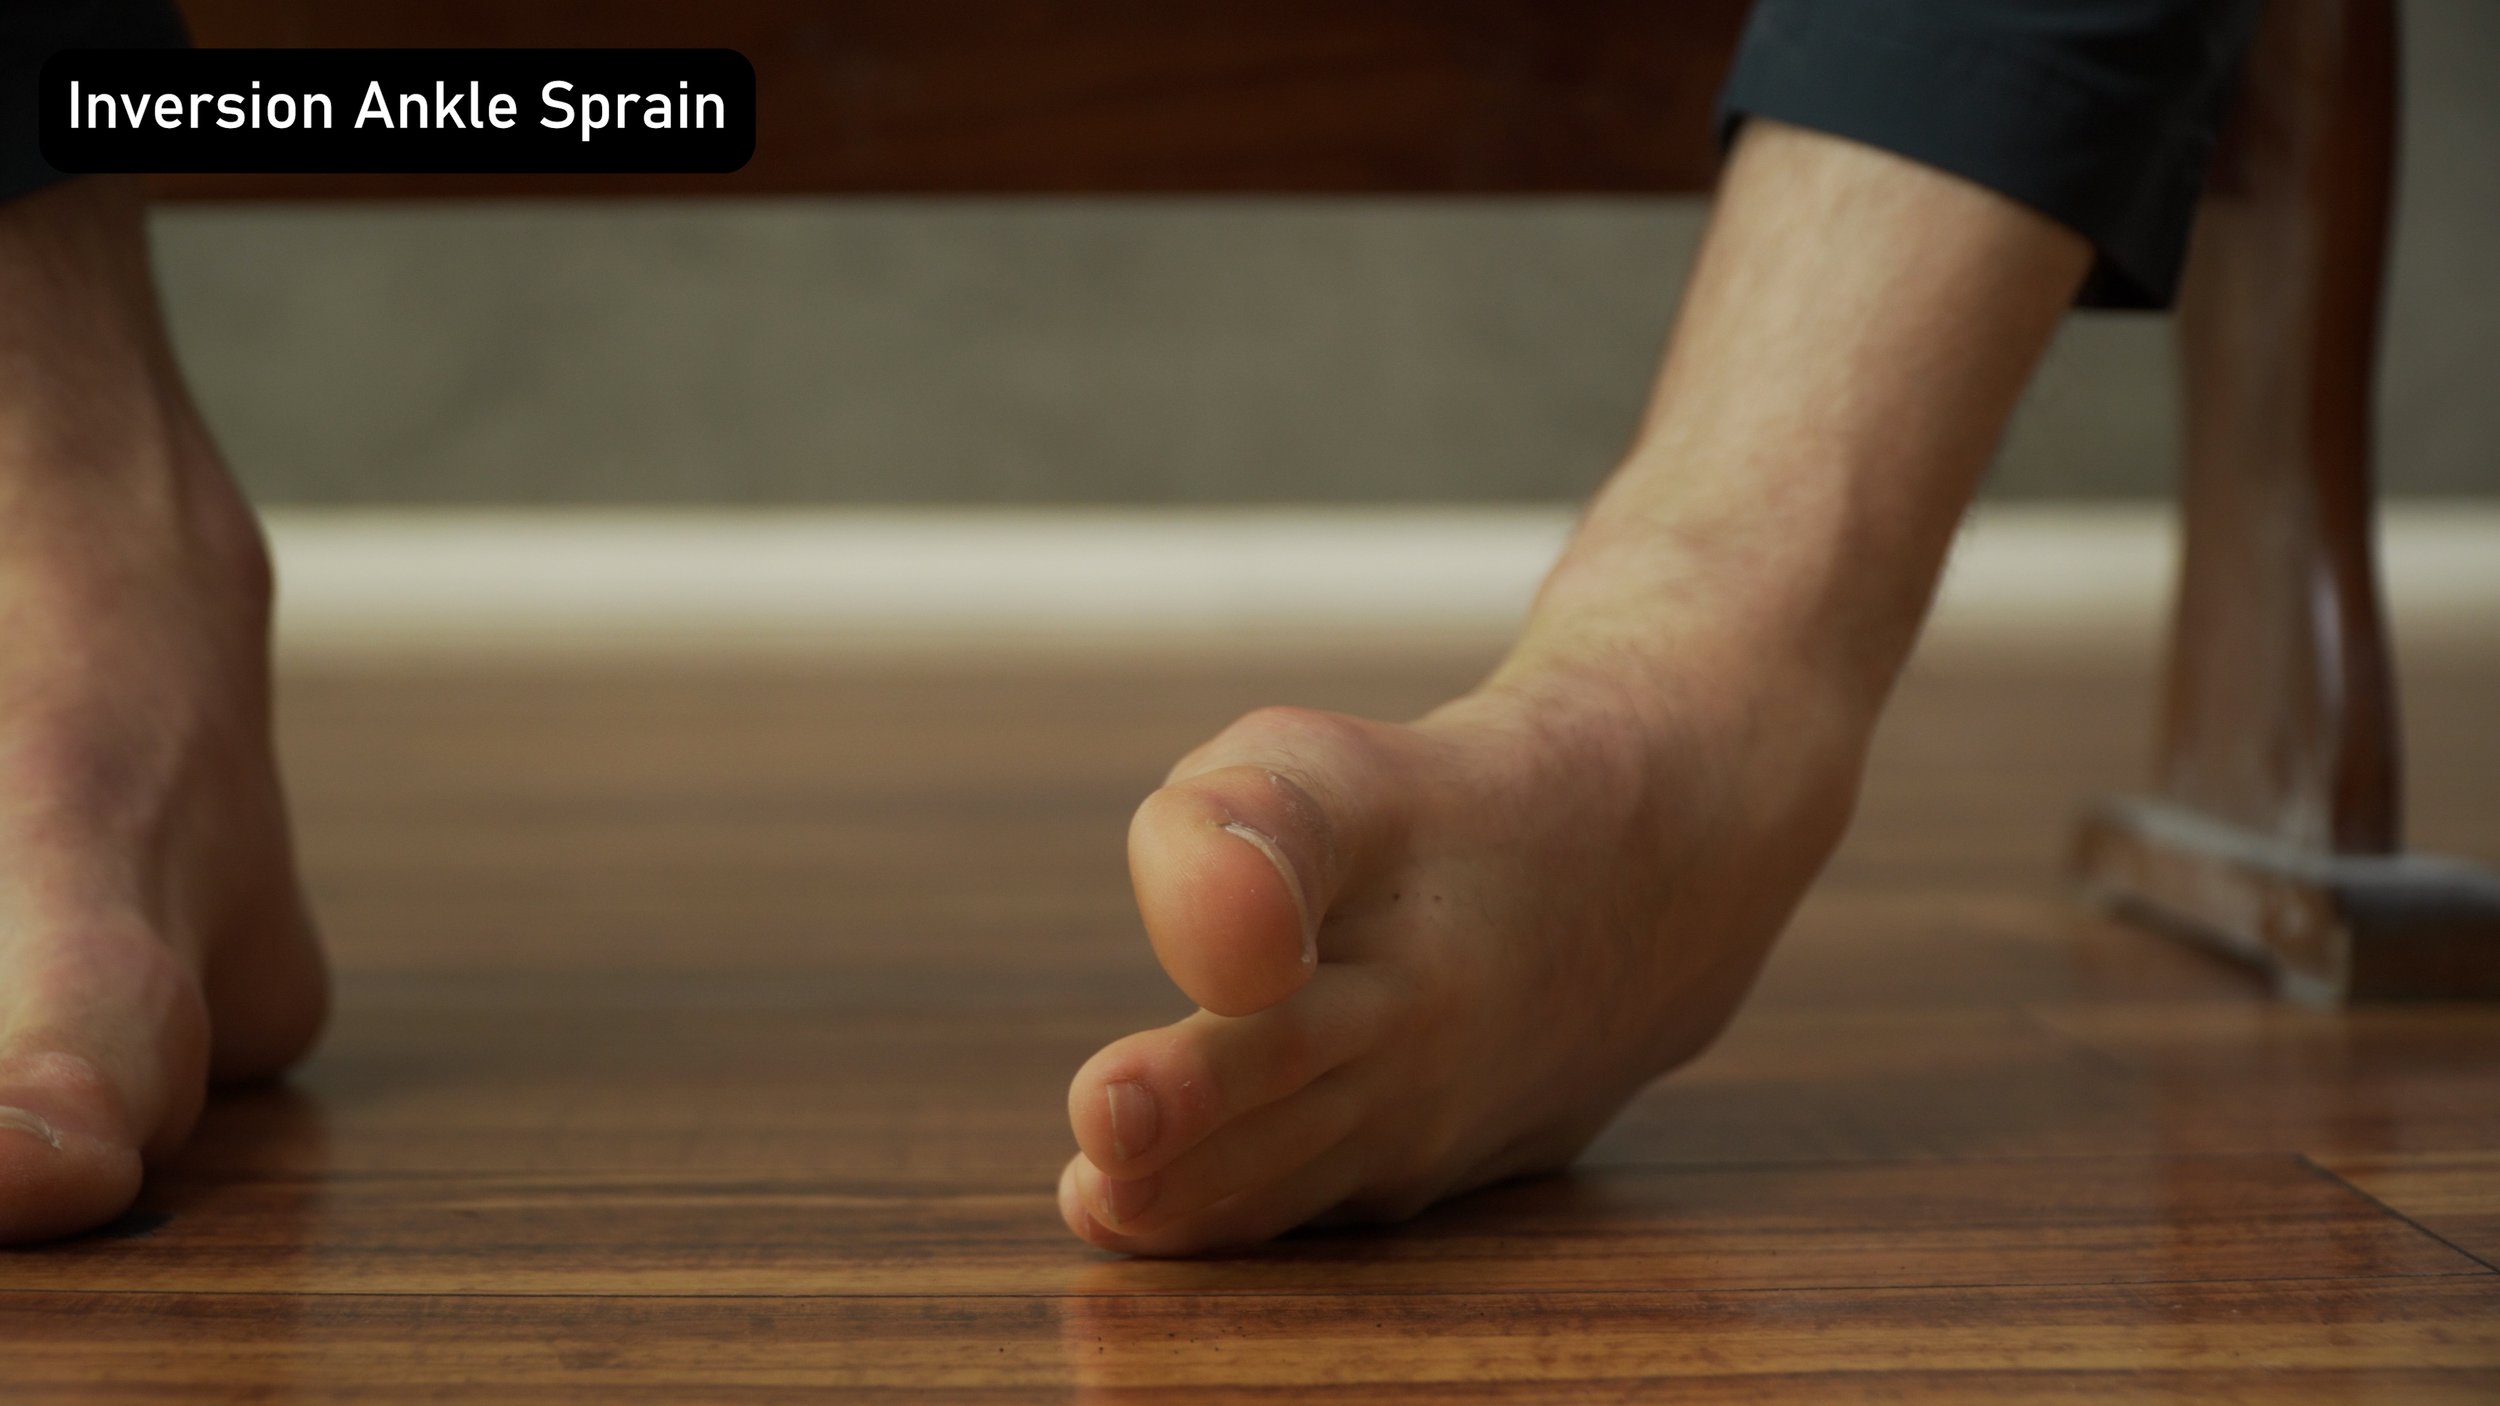
The ATFL and the CFL are found on the lateral aspect, or the outside, of the ankle and are involved in an inversion ankle sprain. An inversion ankle sprain is caused by rapid, uncontrolled, excessive inward and possibly downward (pointing of the toes) movement of the ankle. This will overstretch the ligaments and produce injury. The ATFL and CFL are more commonly injured because your inward and downward mobility of the ankle is far greater than your outward (and upward) mobility.
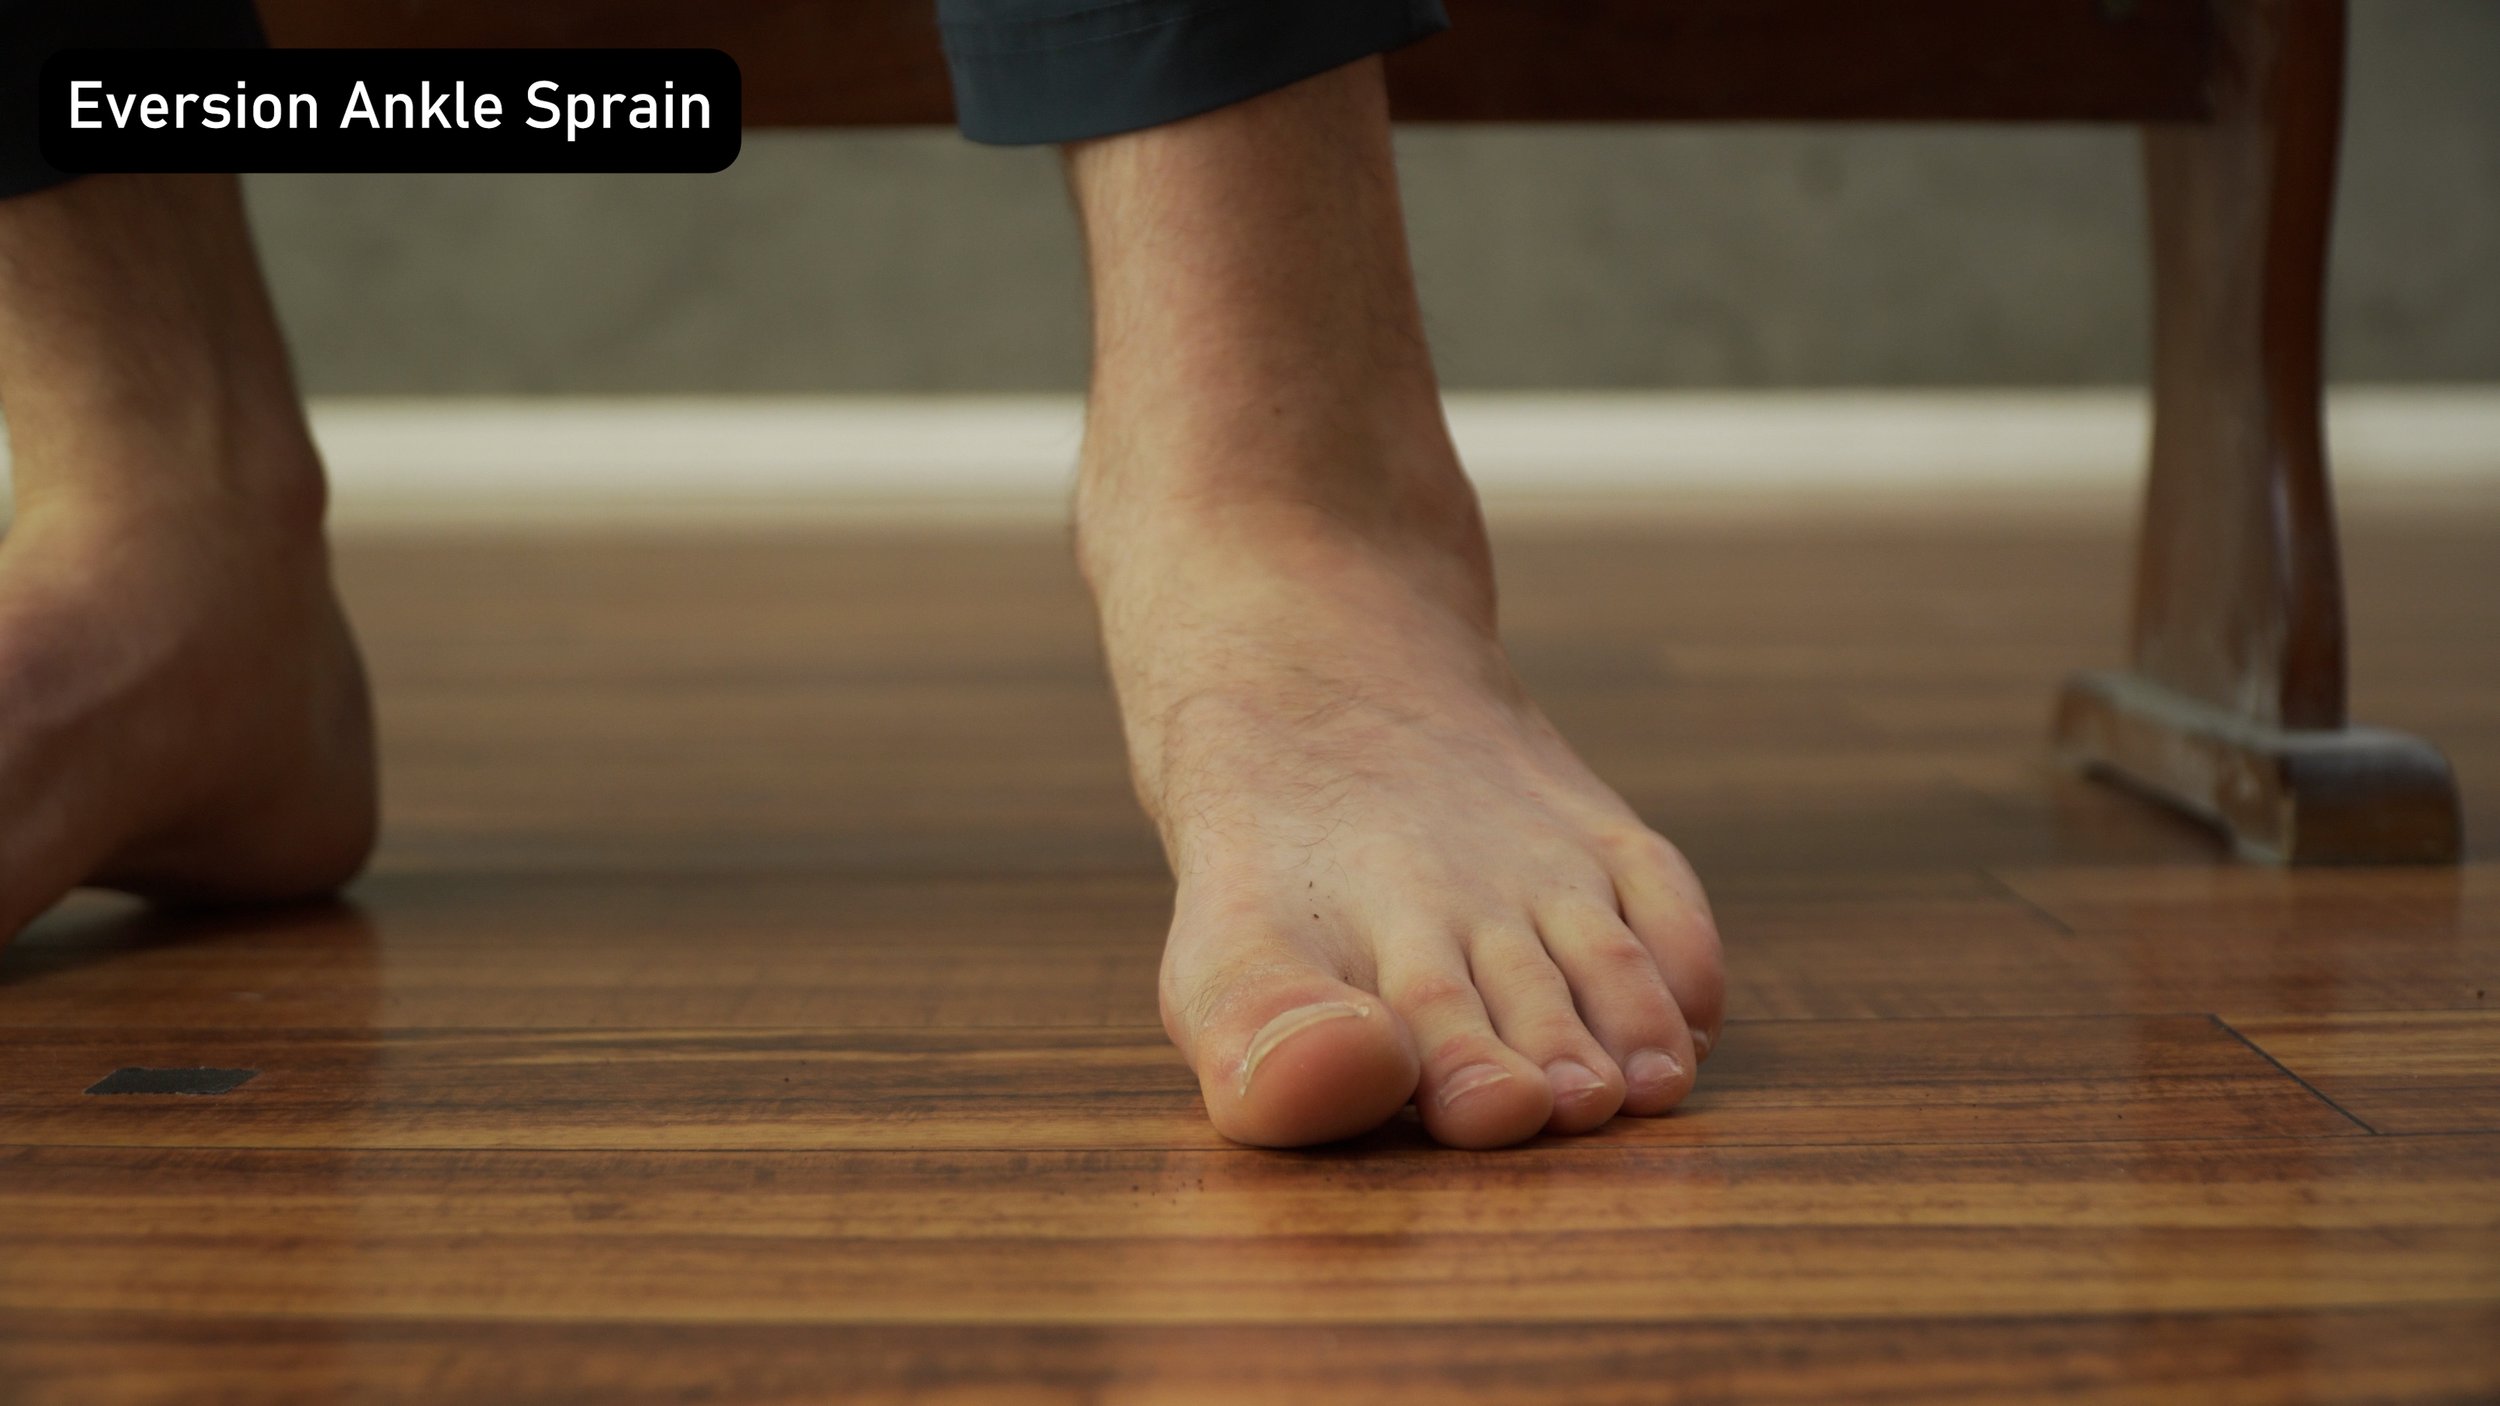
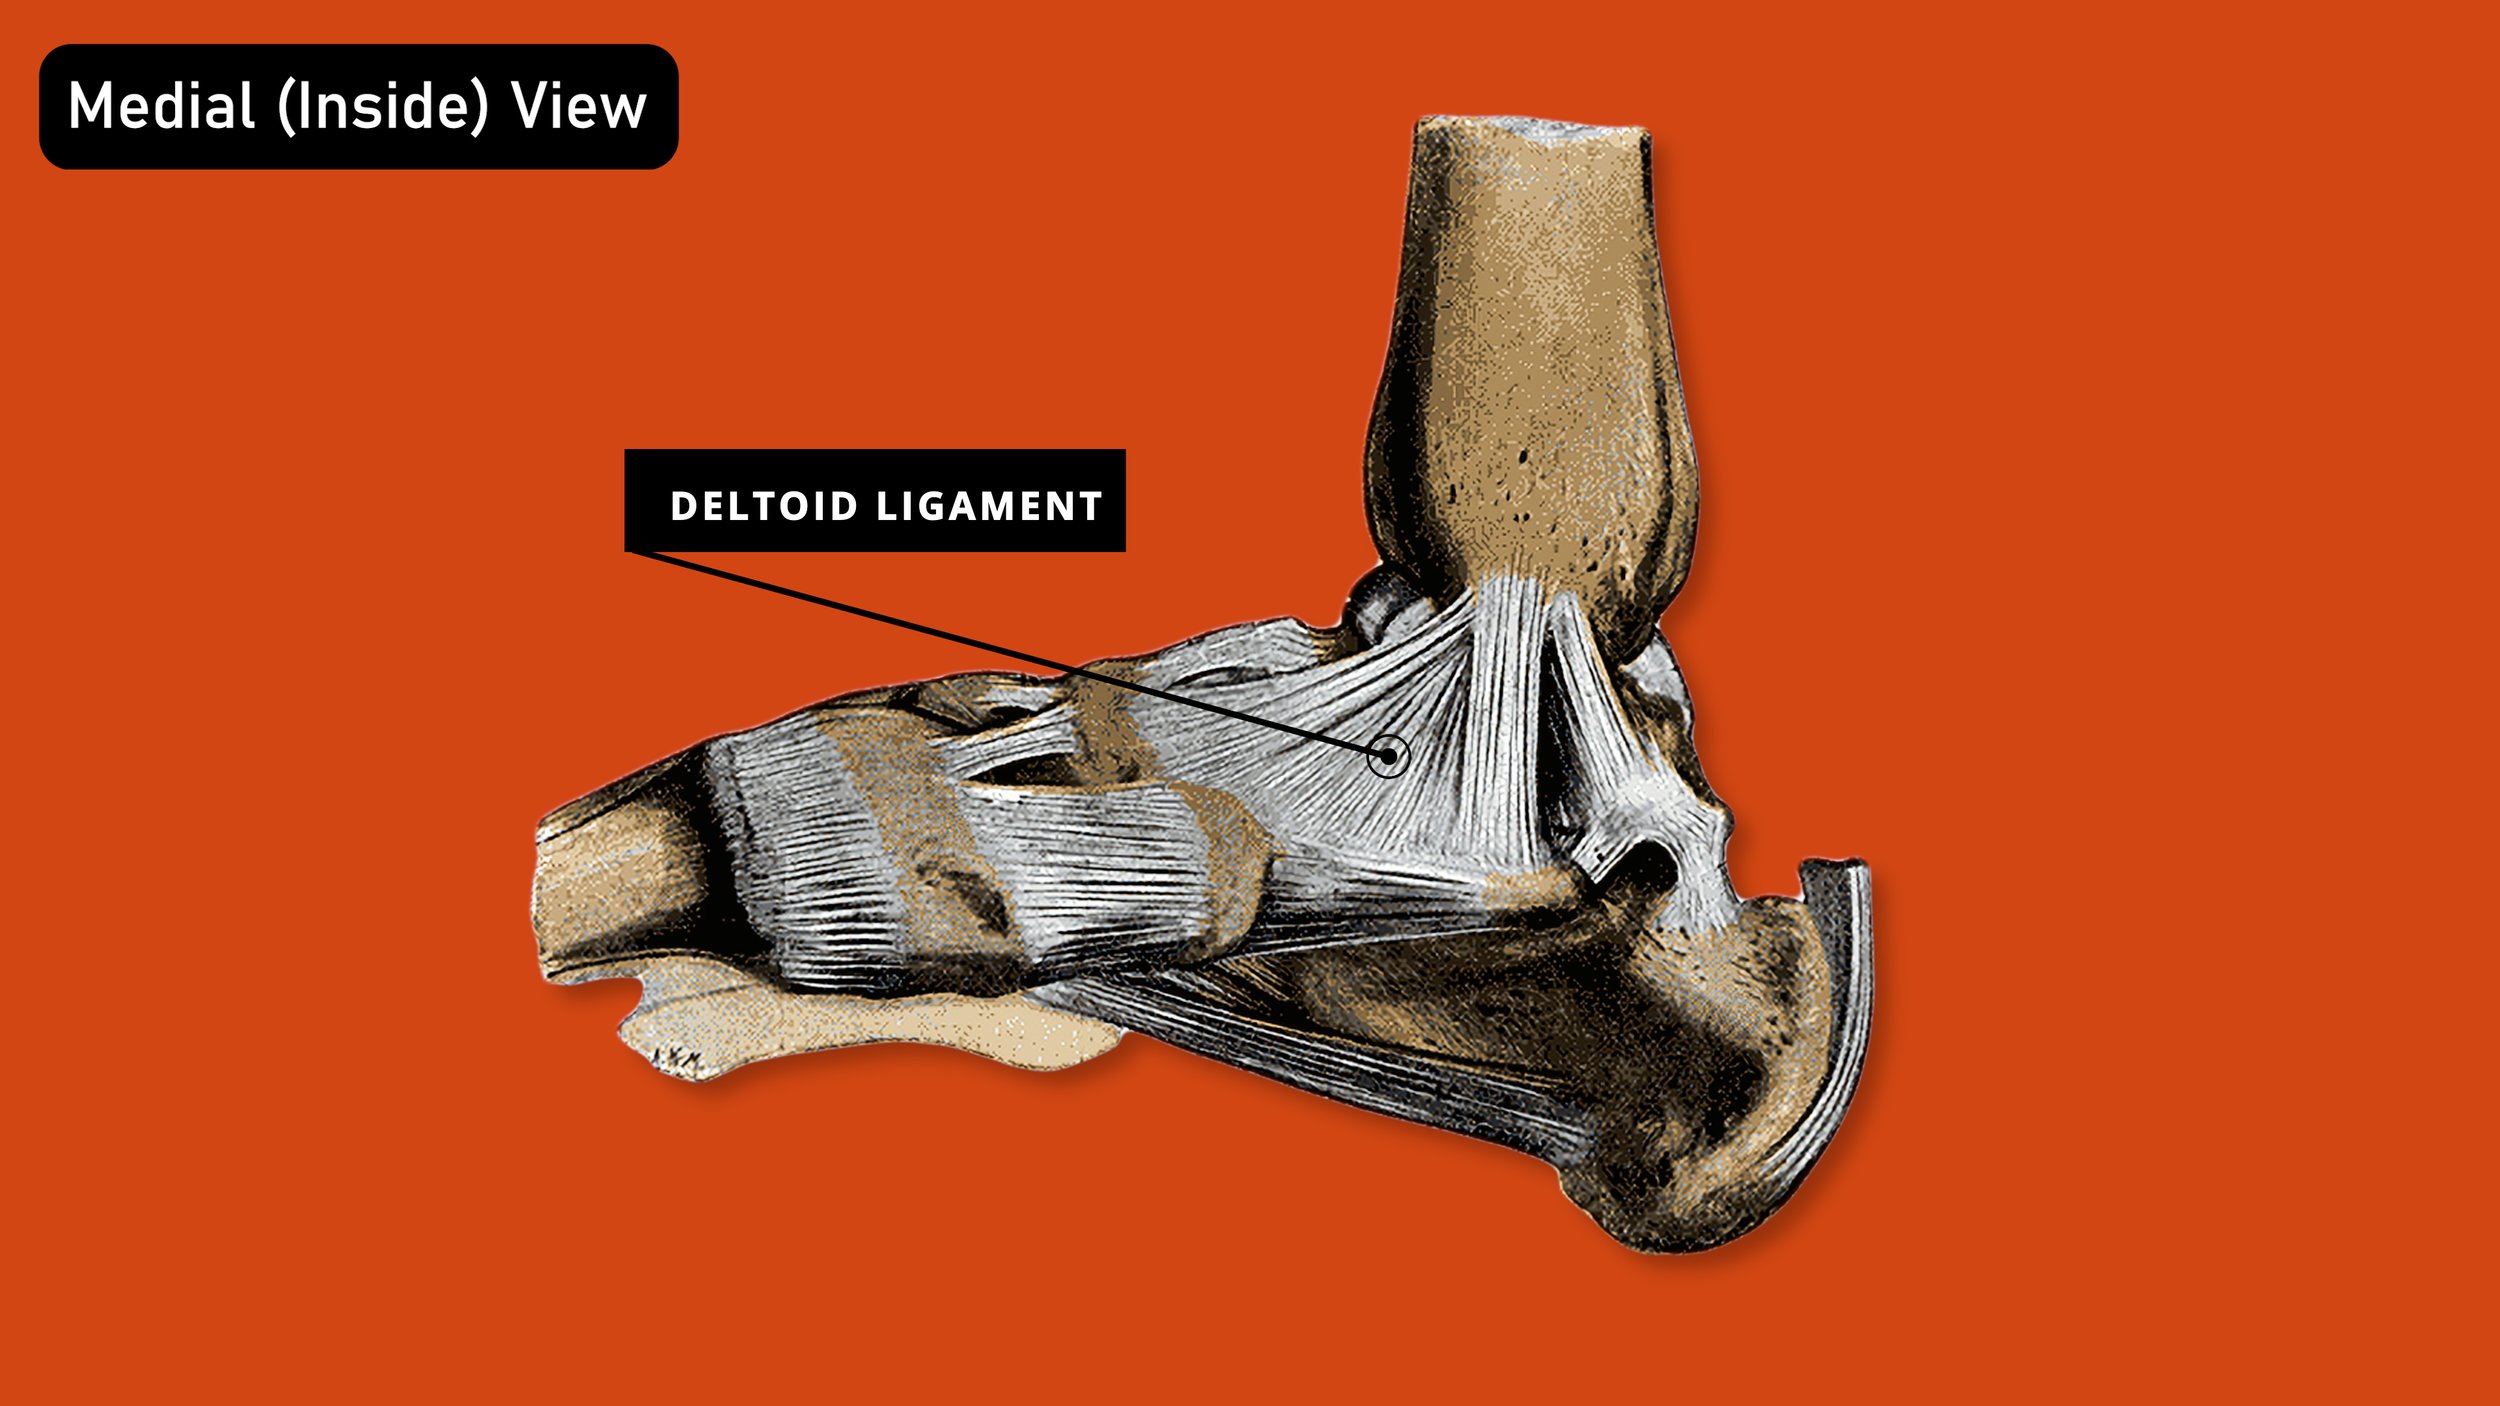
The deltoid ligament is made up of 4 ligaments and is found on the inside of the ankle. It is involved with an eversion ankle sprain. An eversion ankle sprain is caused by rapid, uncontrolled, excessive outward motion of the ankle while usually in a more neutral position regarding the foot pointing up or downward.
Muscles:
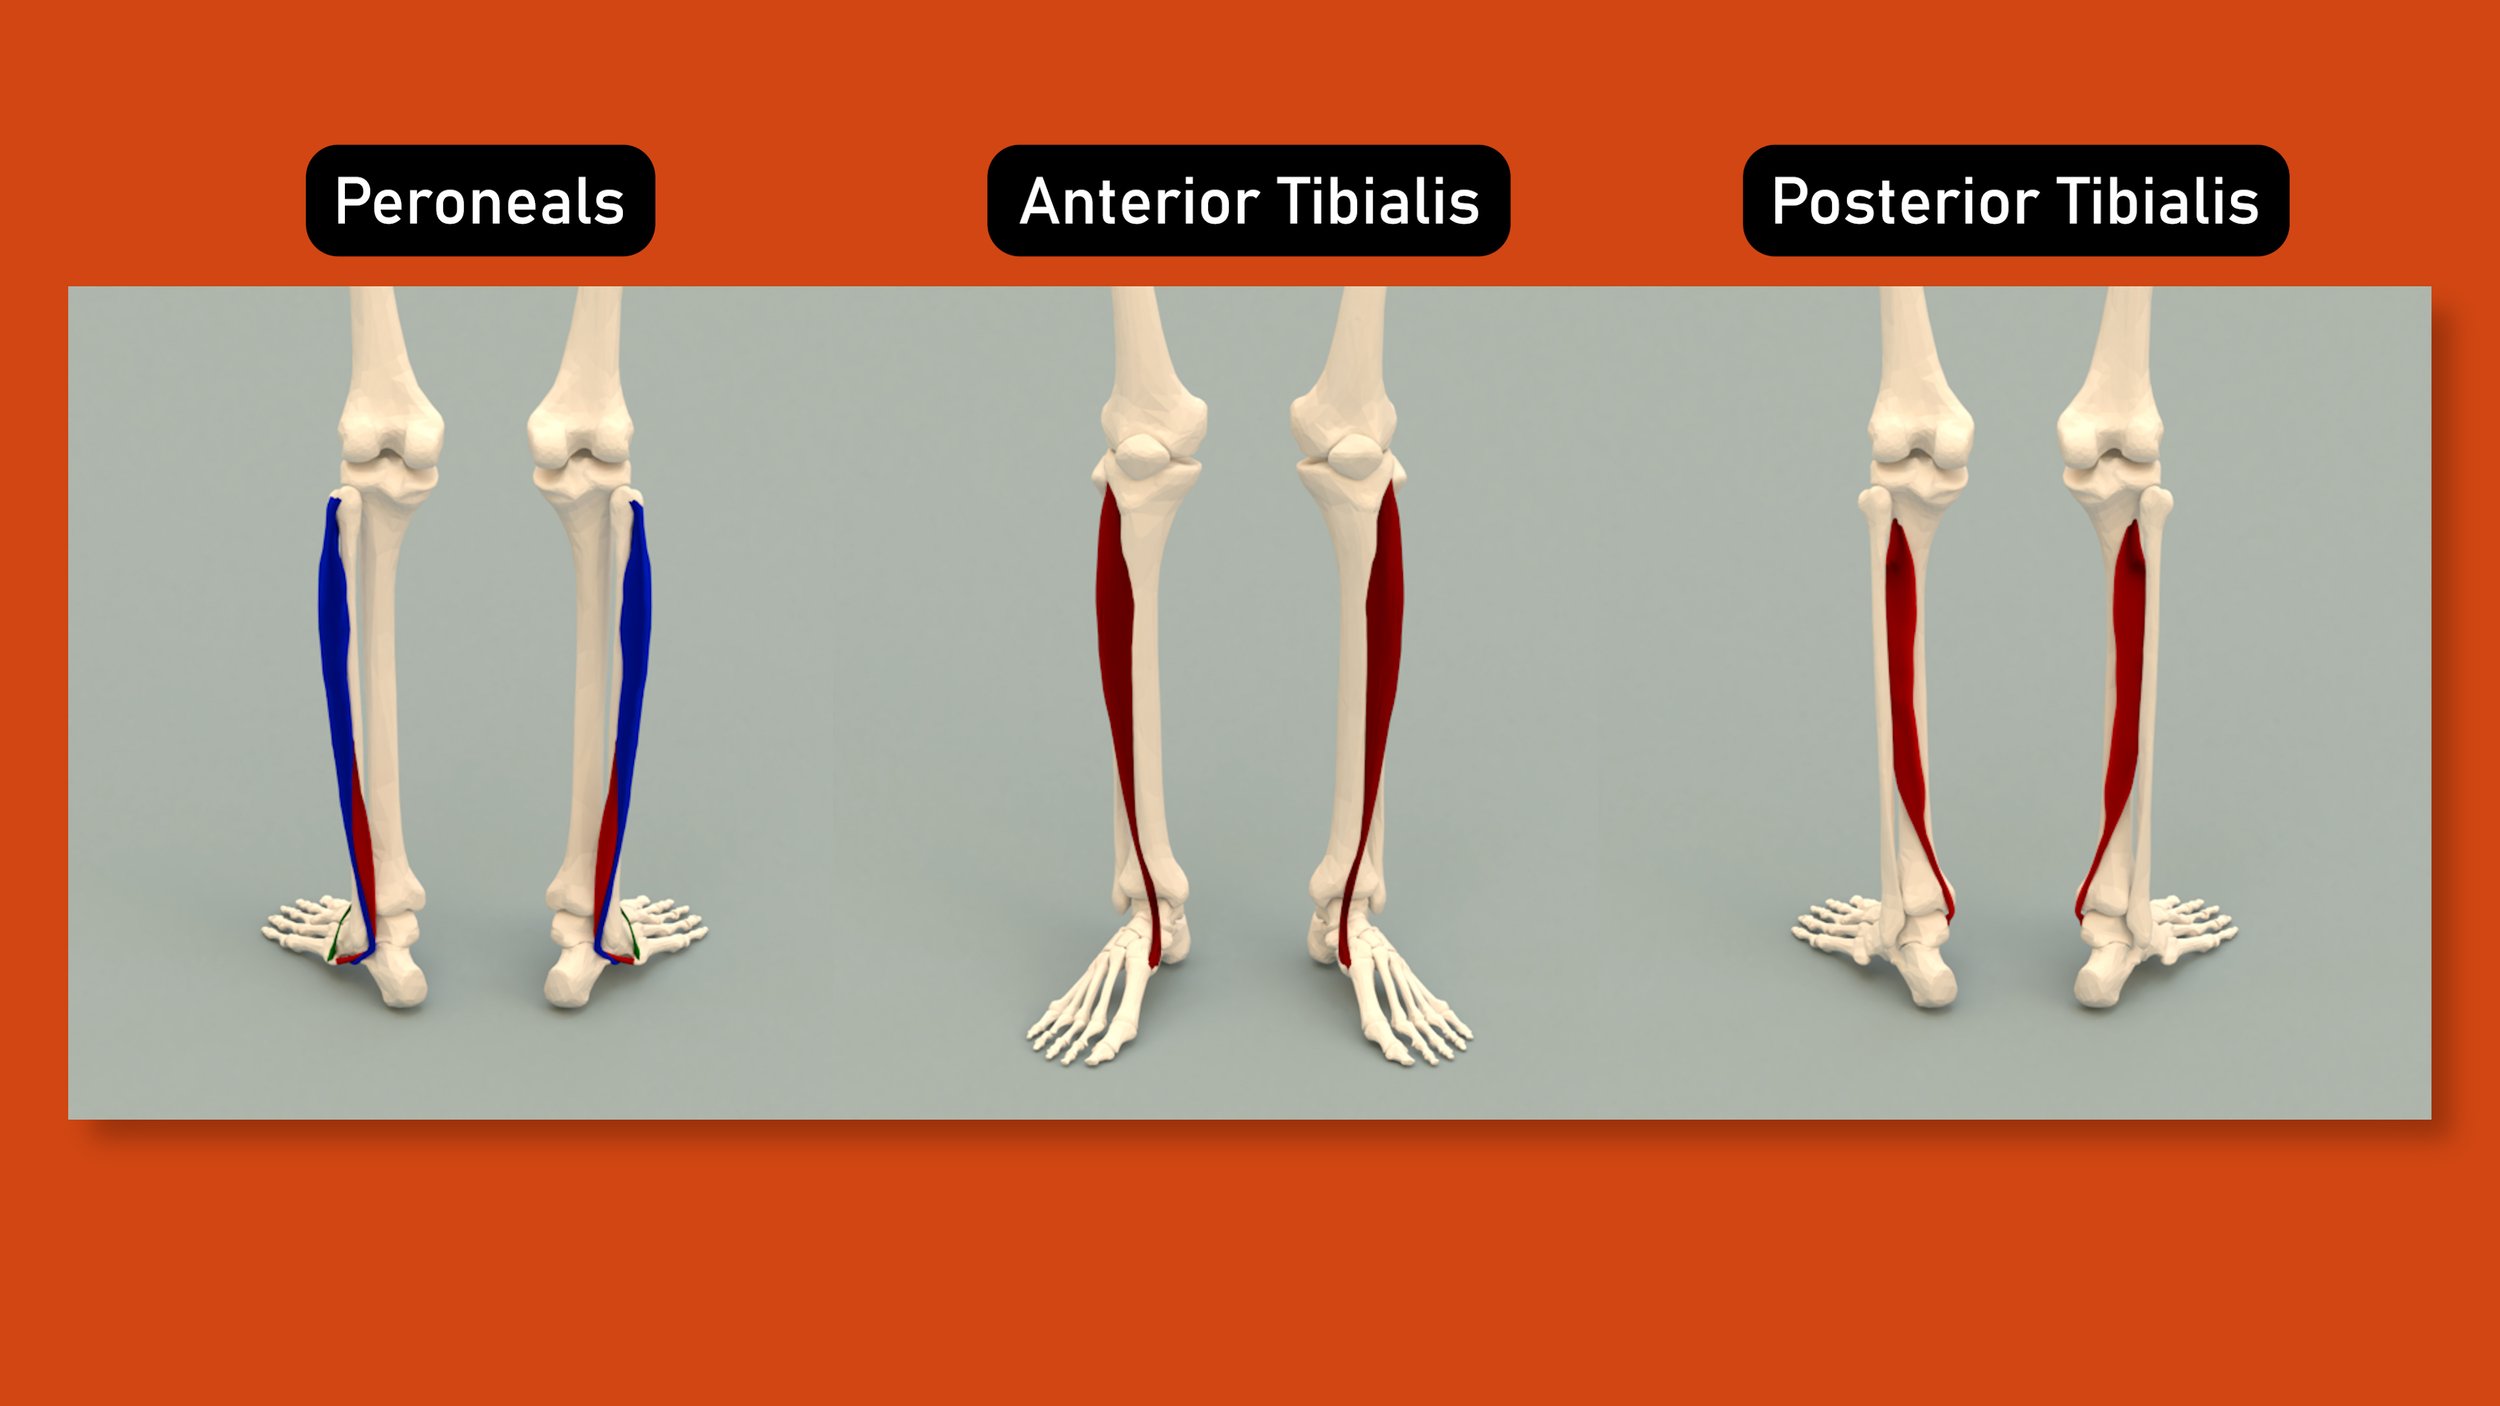
As for muscles, the ones to be aware of are the peroneals, the anterior tibialis, and the posterior tibialis. These are also the muscles that we will want to work on to restore function after an injury.
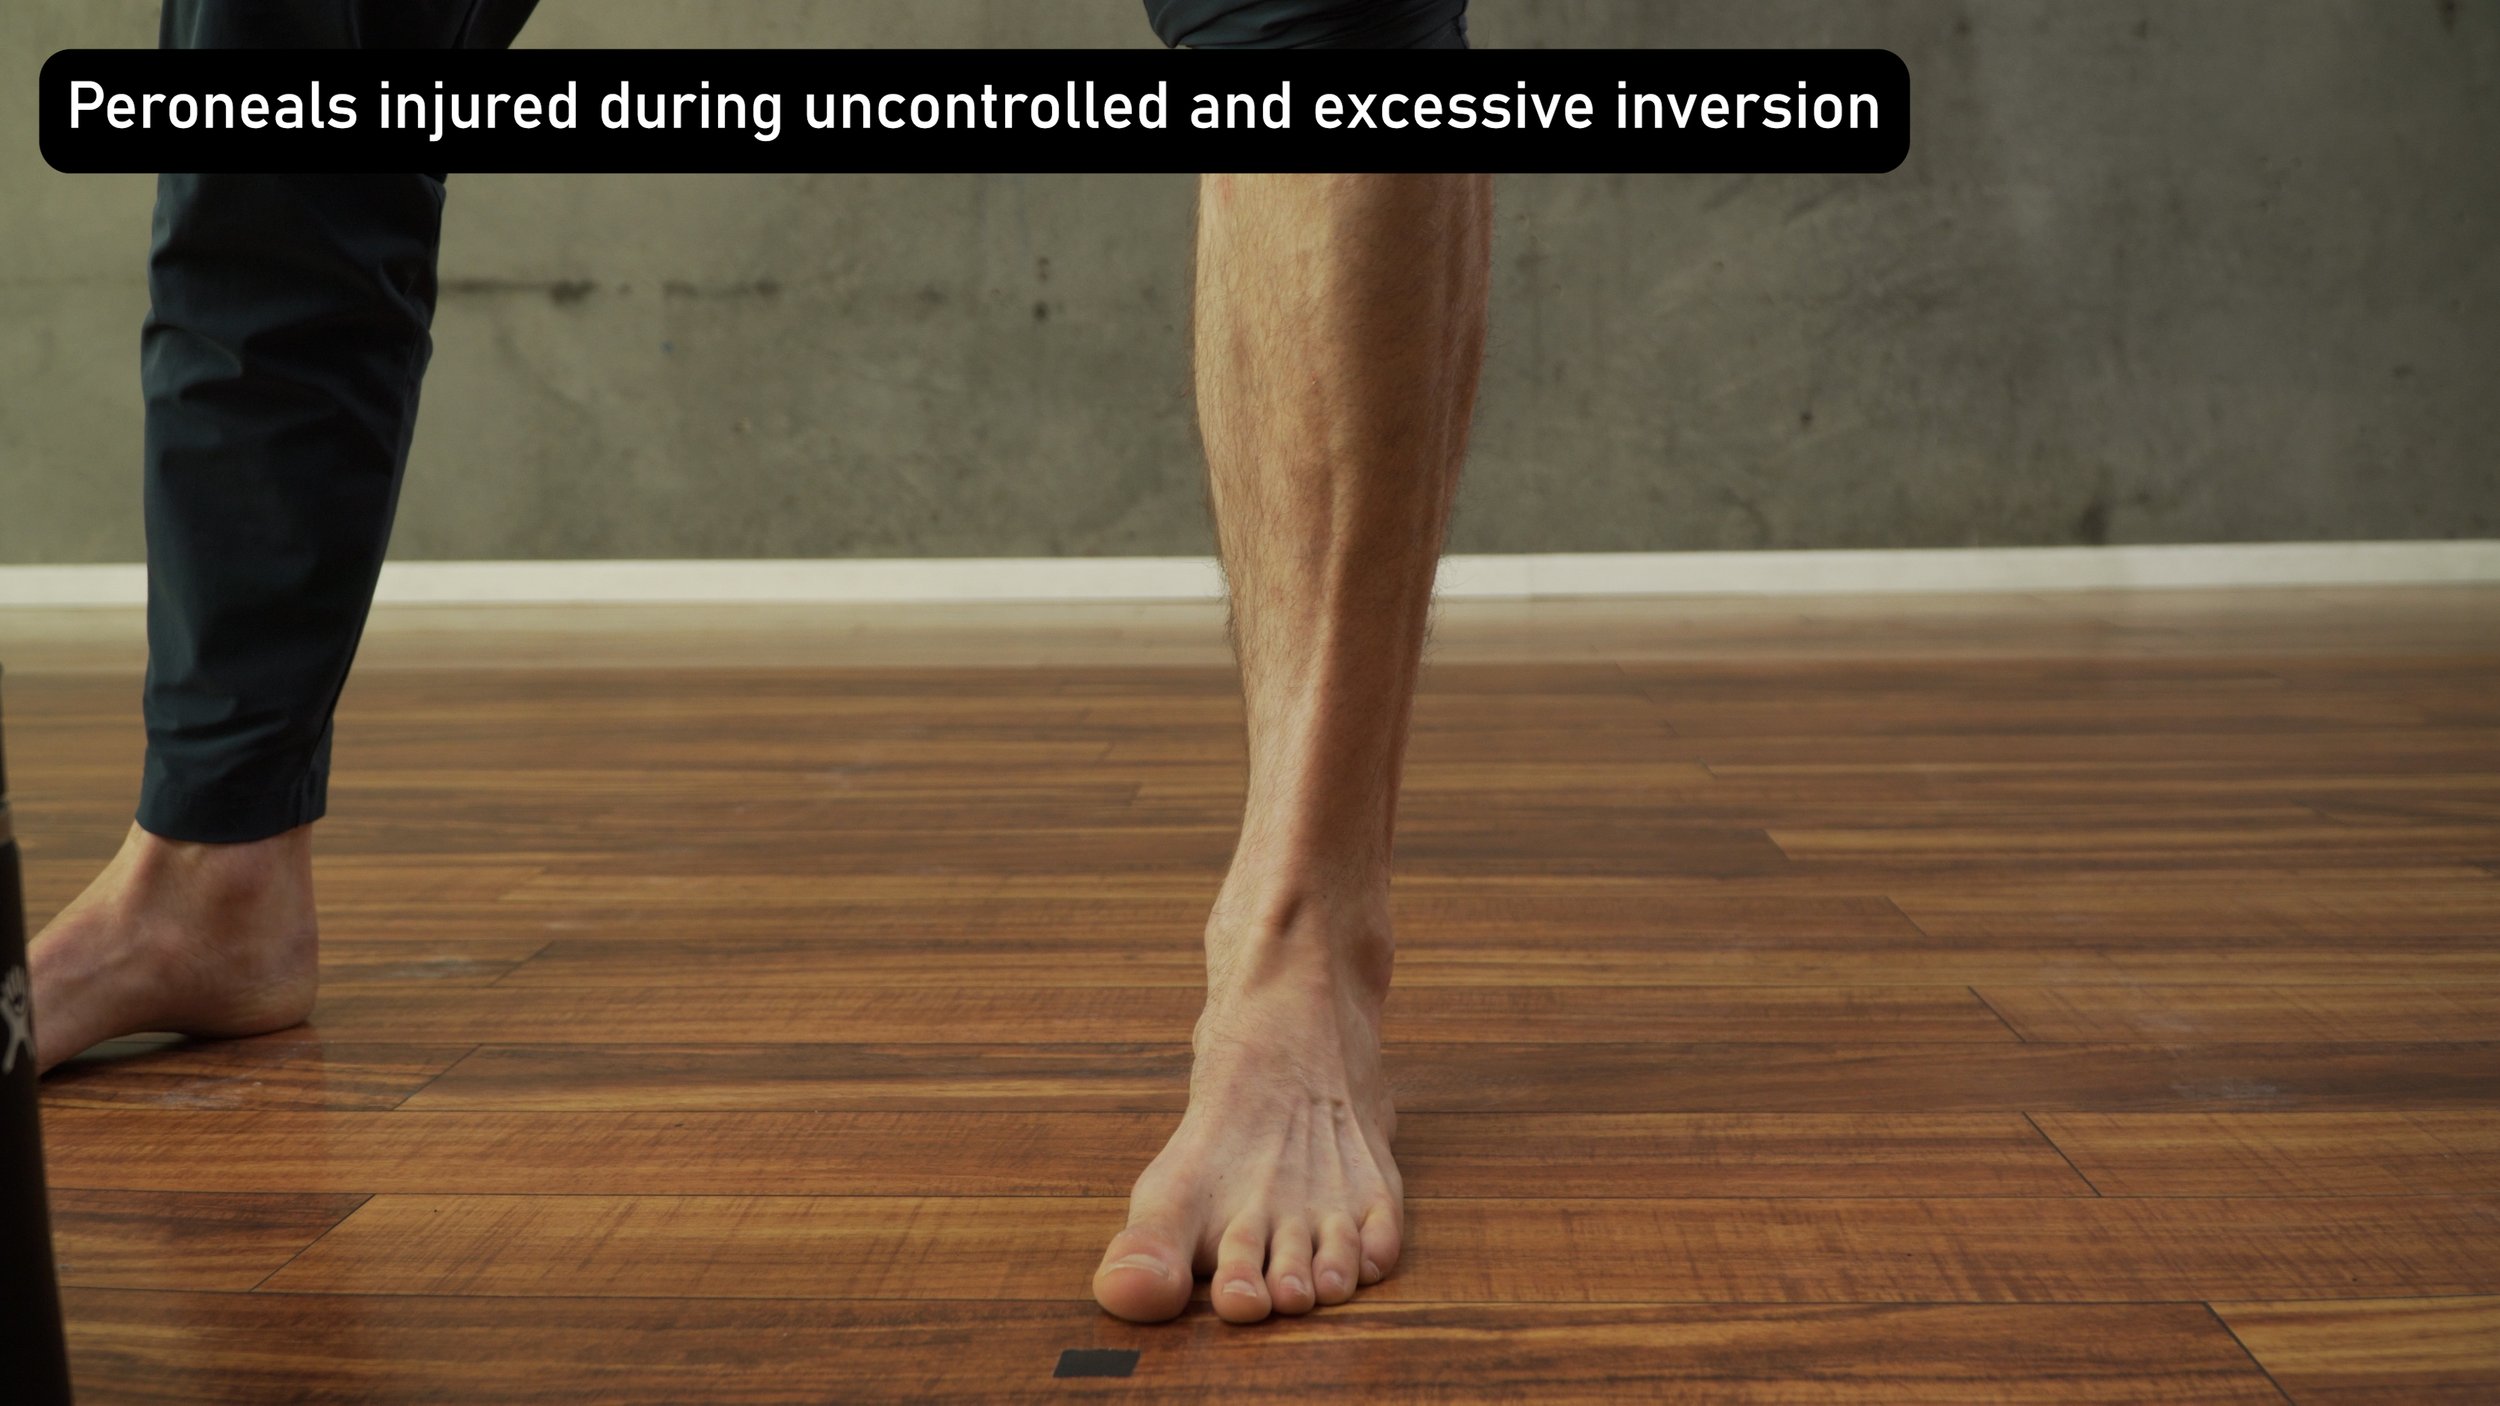
The peroneals are the most commonly injured with an inversion ankle sprain simply because they try to resist inversion. Meaning, as you’re “going down” and about to suffer that fated ankle sprain, your body tries to activate the peroneals to stop it from happening. This can damage the muscle tissue if the external force is too great for the peroneals to handle.
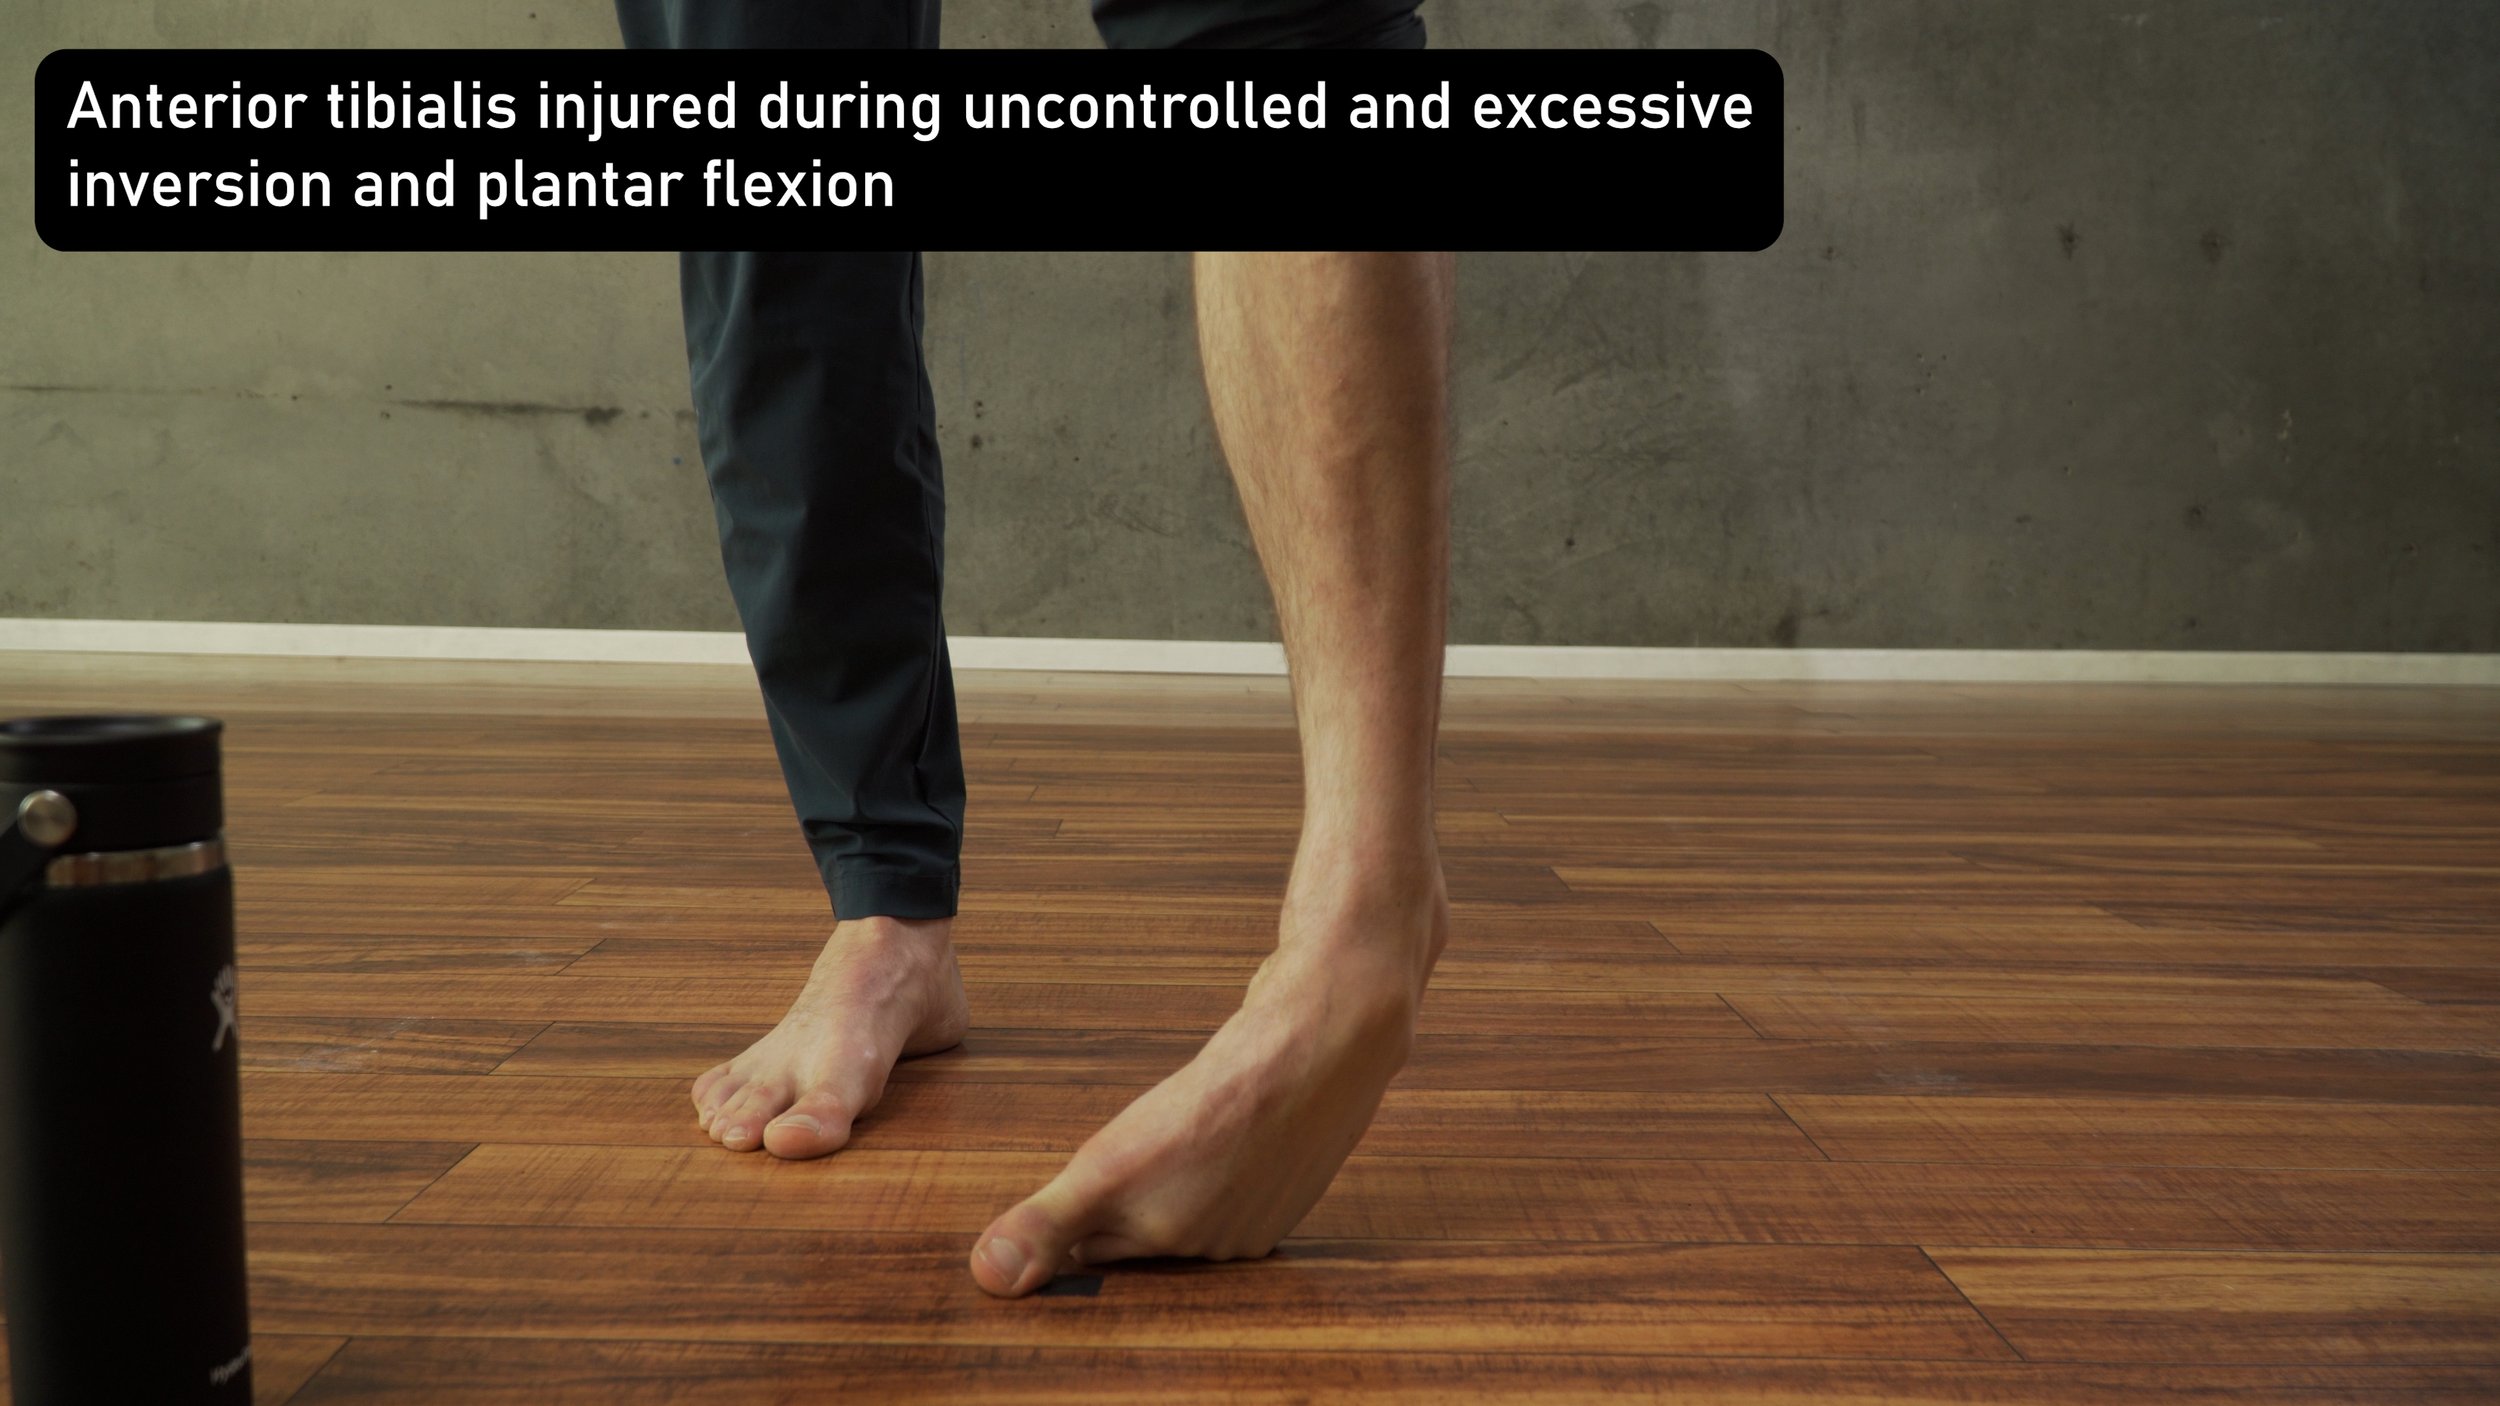
The anterior tibialis is injured in a similar fashion. It’s role is dorsiflexion and eversion (lifting the foot up and out to the side). So if your ankle injury involves an inversion and plantar flexion based injury (your ankle rolls inward and your foot/toes point down), the anterior tibialis could be damaged.
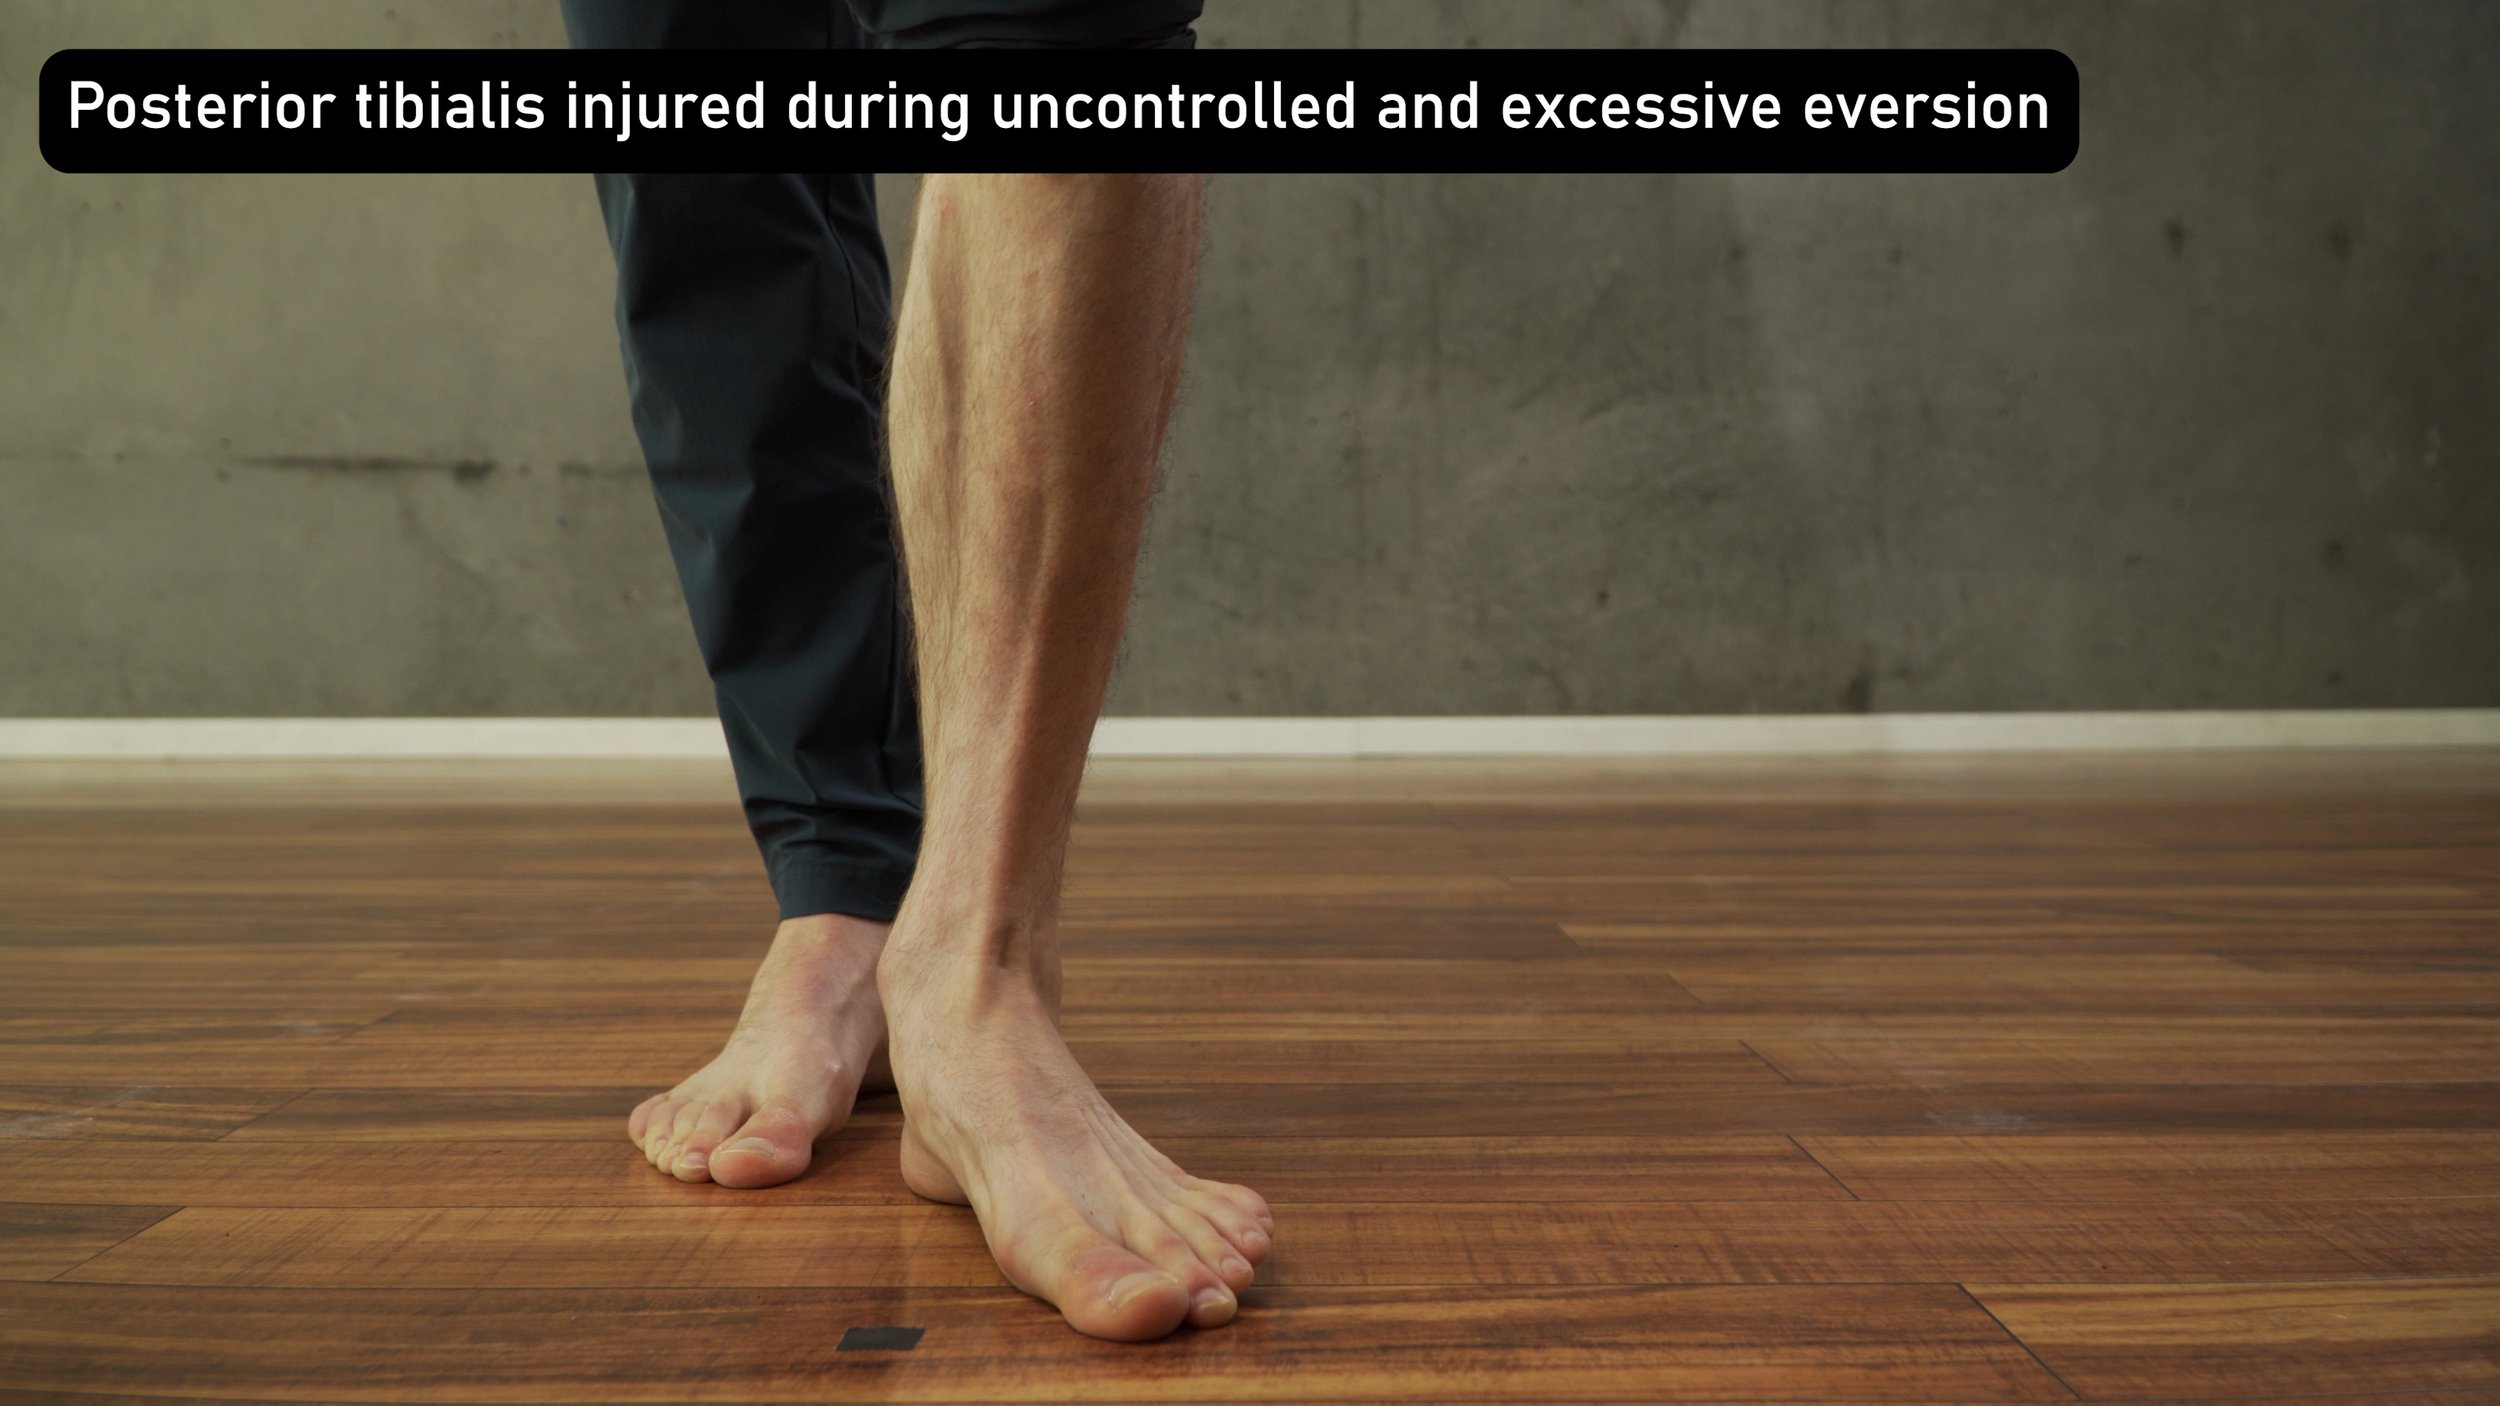
Finally, the posterior tibialis is one of the main muscles that holds up the “arch” of the foot. It’s role is plantar flexion and inversion (aka, pointing the toes and turning the foot in). If we suffer an eversion or medial ankle sprain, the posterior tib may try and resist this and get damaged in the process. .
I’ve put together a little chart to help put all that information into one, nice little box.

PART 2: RISK FACTORS AKA WHY DO I ALWAYS SPRAIN MY ANKLE?!
Before we learn about how to test and treat an ankle injury, we should be aware of some of the reasons you may have gotten injured in the first place. In other words, why do some people always seem to hurt their ankles while others never have a problem?
Prior History
When we injure our ankles, a few very important things happen. 1) We lose proprioception in the joint, meaning our body’s ability to sense the position and movement of our ankle becomes limited. 2) The muscles supporting the ankle become damaged or weakened, decreasing the natural muscular support system of the ankle. And 3) one or more ligaments in the ankle get damaged and do not heal back to 100% without intervention. These three issues, if not addressed through rehab, will significantly increase your risk of re-injury.
Generalized Weakness
General weakness of the foot/ankle and hips may also contribute to an ankle injury. Our muscles can be the defenders of our ligaments. They can protect the body from moving through the excessive ranges which would cause damage to the ligaments. Weakness in those muscles reduces their ability to function in that role, increasing the risk of suffering an injury.
Poor Balance
Poor balance is a sign of poor proprioception. If you have poor proprioception, that means that your brain and body may not be communicating effectively. You may notice more oscillatory movements, while attempting to balance. This is the brain and body trying to communicate to determine optimal joint position and muscle contractility in order to maintain a better center of gravity. The better this communication, and more matter of fact, the quicker this communication can occur, the more capable the brain is at correcting any potential errors in the body, the less likely you are to suffer an ankle injury.
Note: there are other factors that may affect your proprioception such as a vestibular disorder. If you feel you have a more complicated history with your balance, please see a skilled provider.
Not Paying Attention to Crashpad Placement
This is actually a HUGE risk factor for climbers and something that needs to be particularly emphasized to newer climbers. Proper pad placement is crucial in protecting your ankles, so take note from experienced climbers on how they line up pads, avoid gaps and stacks, and use active spotting.
Not Sending the Project
Nothing is worse than punting off the top of the project. To top that off, you injure your ankle while landing awkwardly? Talk about injury on top of insult! So, protect those ankles. Finish all your projects and stop punting.
PART 3: DIFFERENTIAL DIAGNOSIS
If you’ve experienced an acute ankle injury, one of the most important first steps is determining if you just have a sprain or if you need further imaging to assess a potential fracture or avulsion injury (where a small part of the bone pulls off from the rest of the bone. The ligament / tendon remains intact). For this, we use the Ottawa Ankle Rules.
Rule #1 - You gotta walk yo
You must be able to take 4 UNASSISTED steps.
A limp is OK, but you may not use couches, friends, crutches, countertops, or climbing walls for assistance.
Rule #2 - Your pain isn’t welcome here!
That is, it isn’t welcome in very specific regions, which I’ll list in a minute. Have a friend poke and prod these 4 areas to test for pain. Have them start with light pressure, stopping if there is pain, and then advancing to moderate or even heavy pressure if each stage is painless.
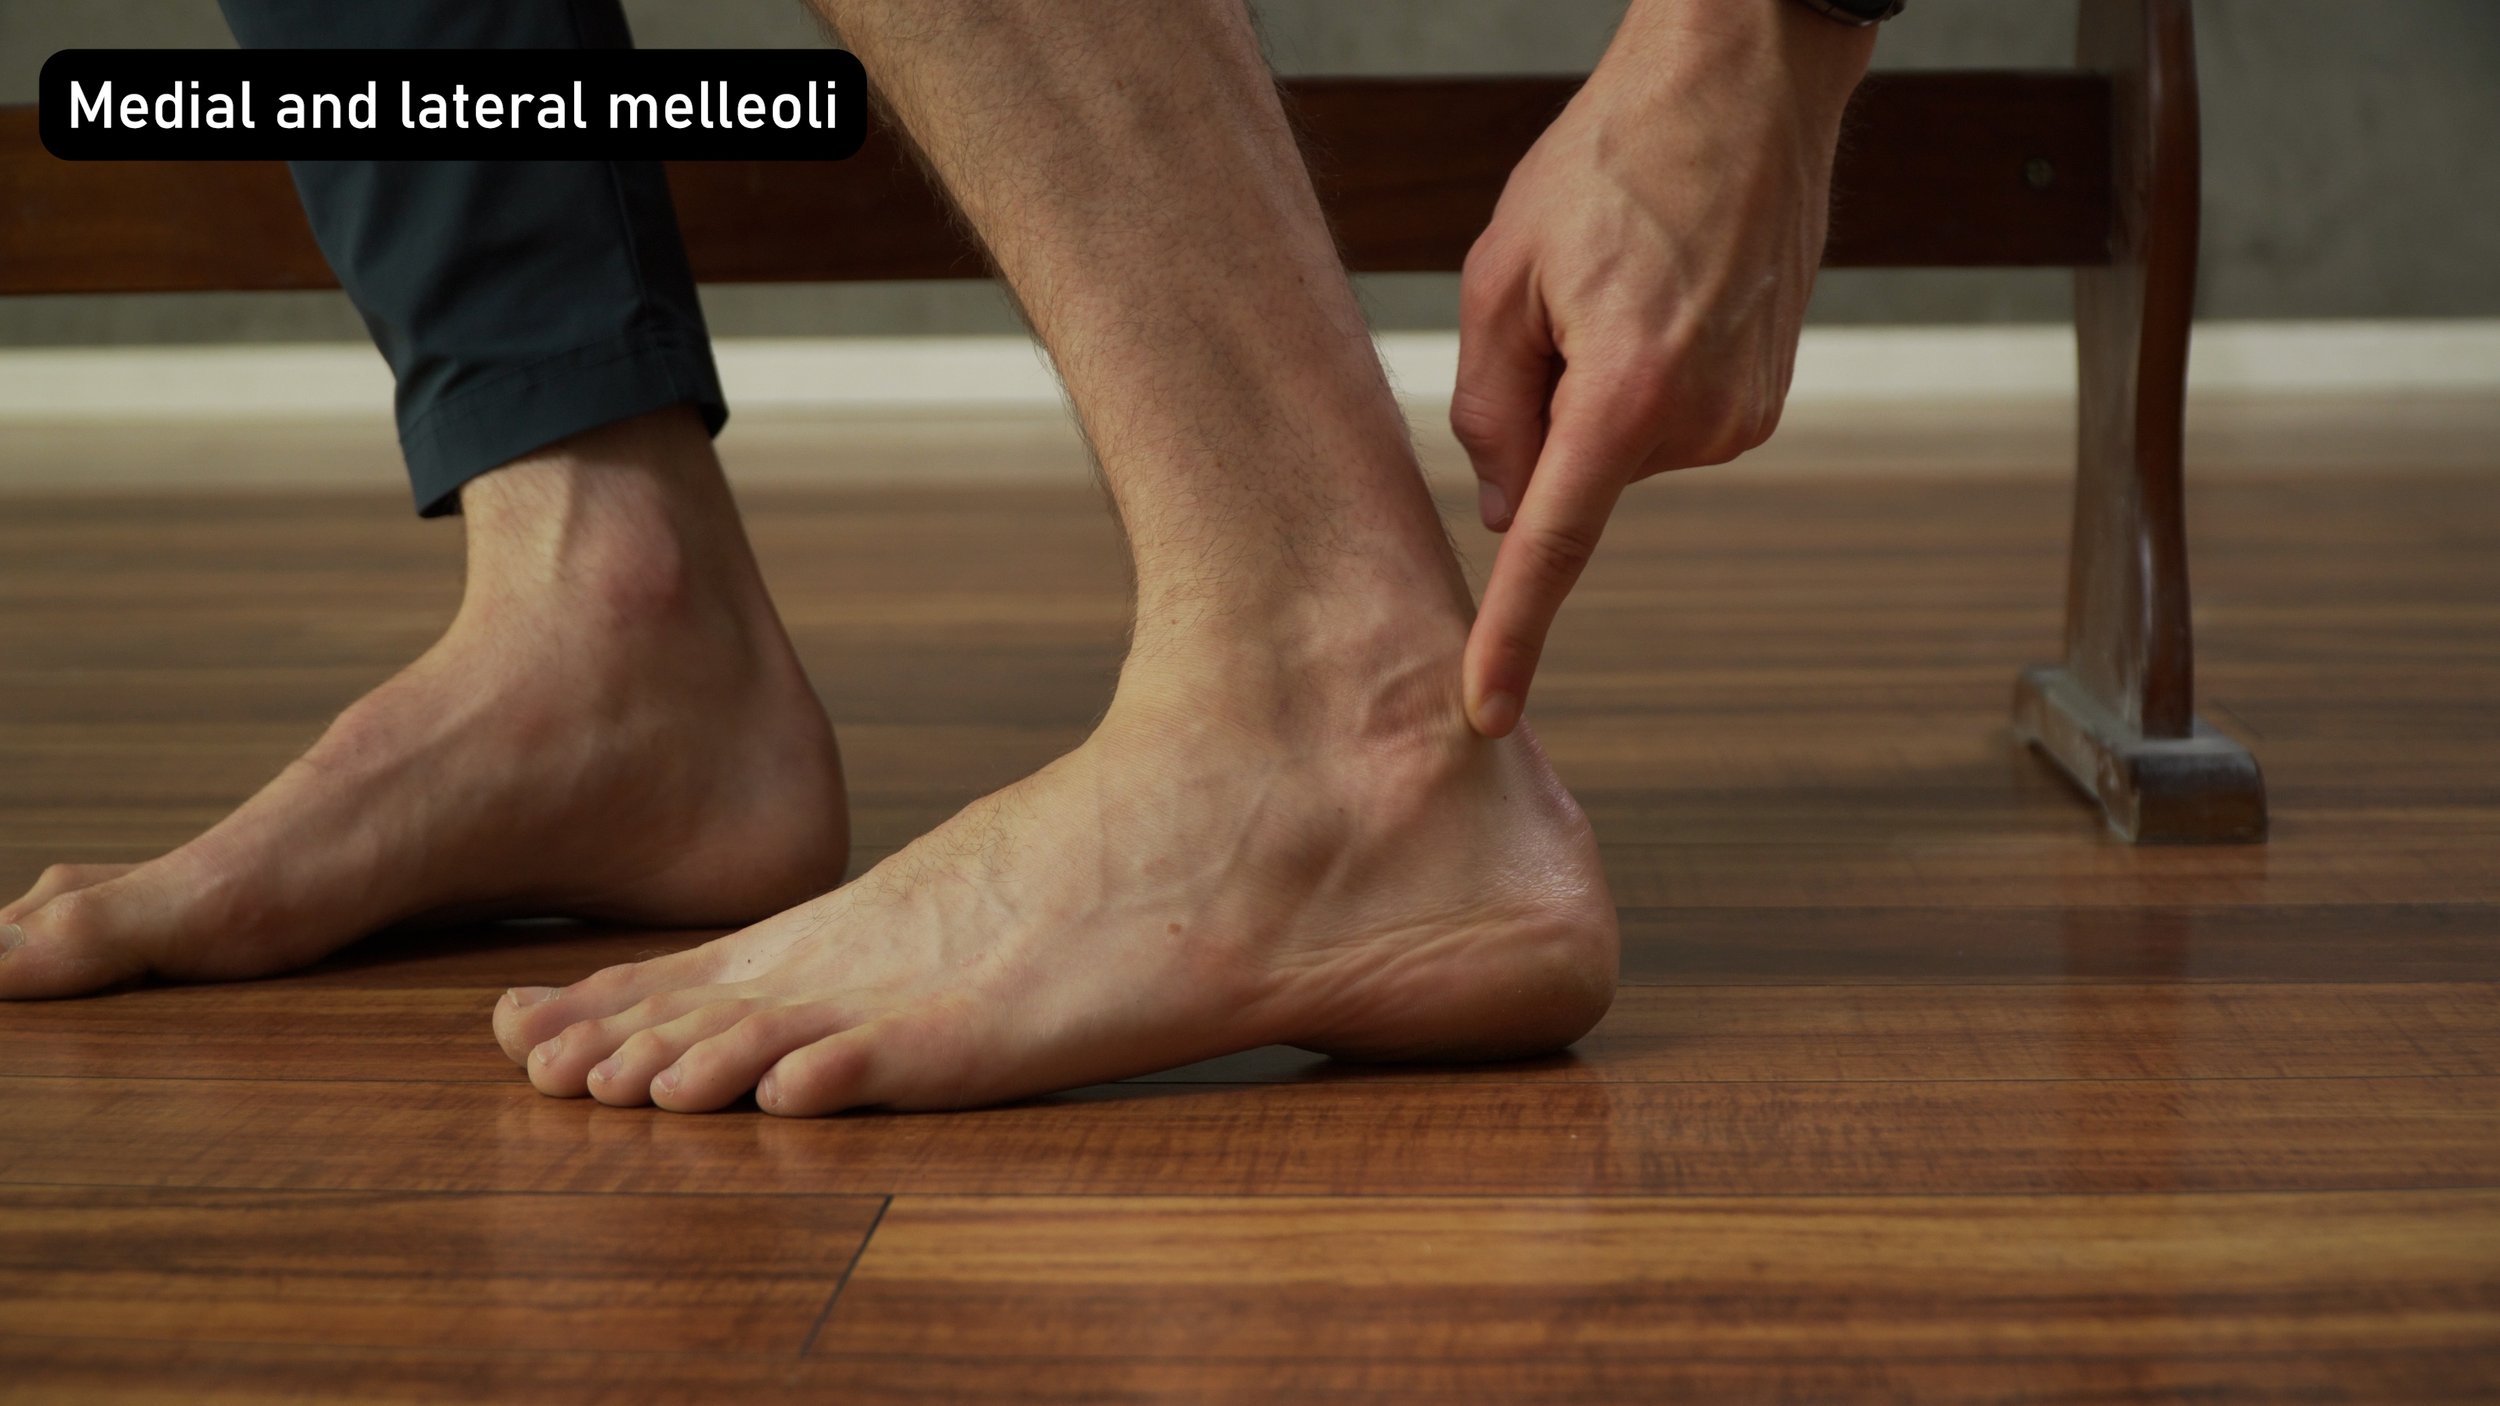
The first two locations are the distal posterior aspects of the medial and lateral malleolus. Basically, think of the two big bones that protrude from the inside and outside of your ankles. Go to the point on the inside and outside where the stick out the most, then go just a centimeter or so towards the back (closer to the Achilles), then push.
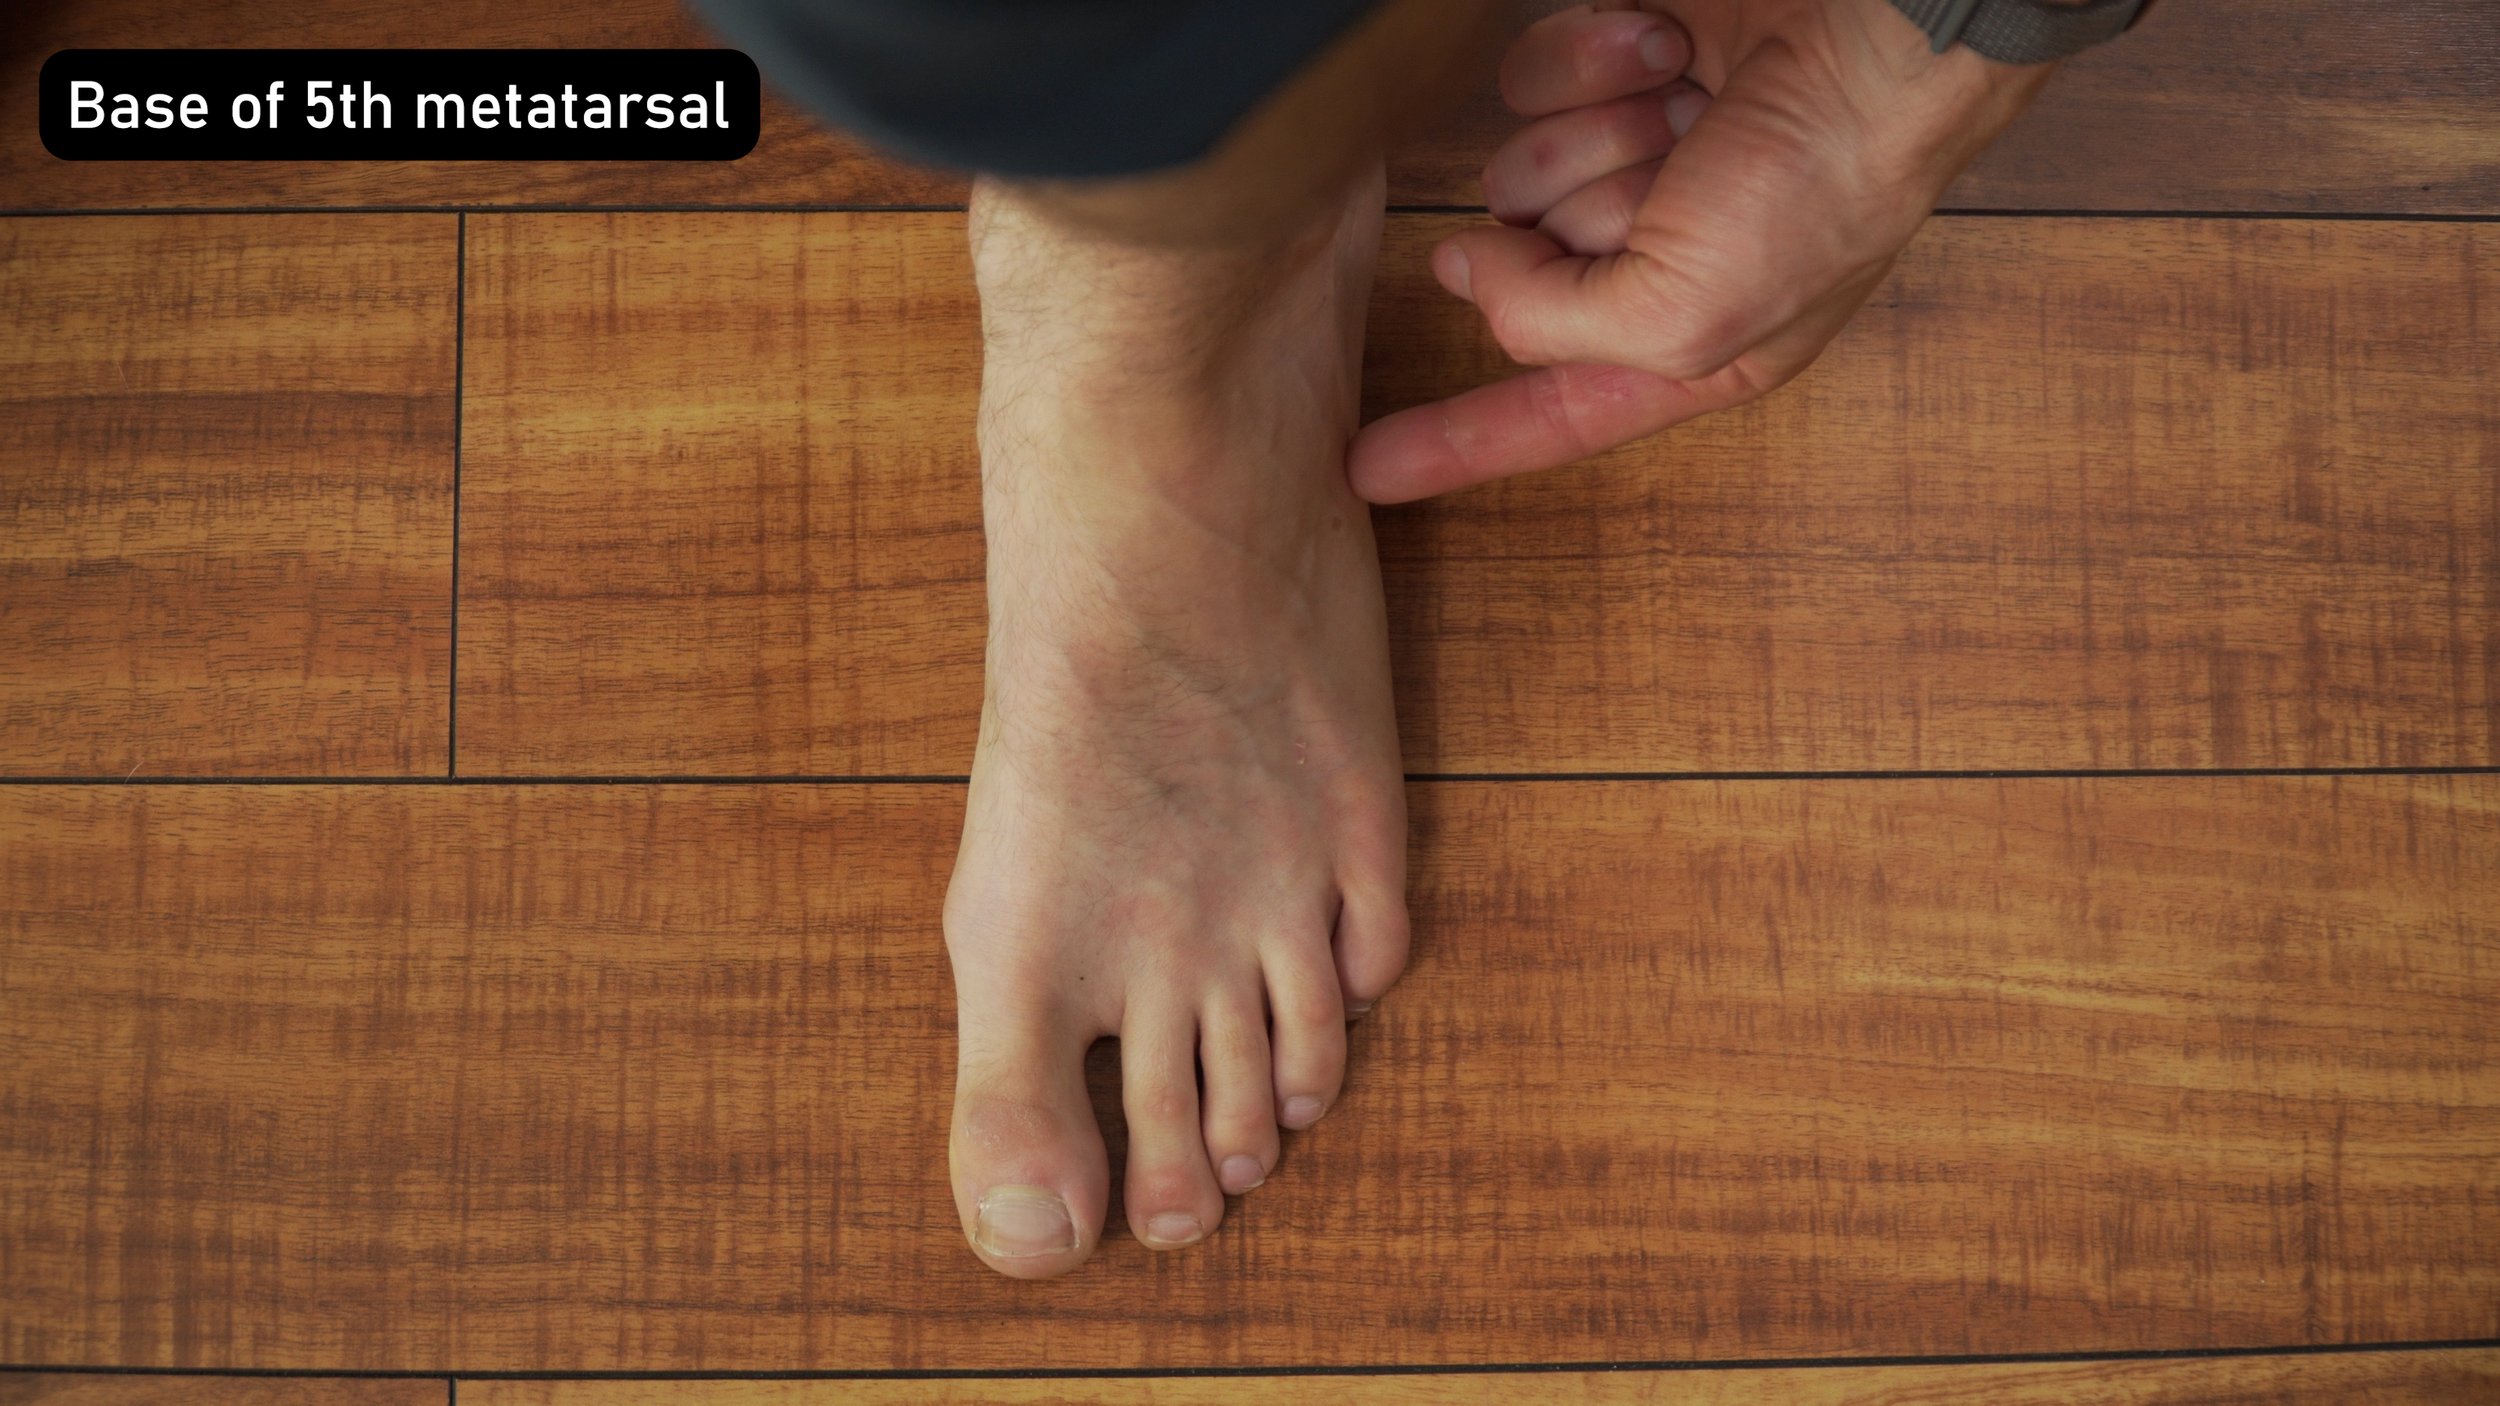
The 3rd location is the base of the 5th metatarsal. This is found on the outside of the foot (towards the pinky toe). Start at the midfoot region on the outside of the foot. Slide your finger back until the foot gets to its widest point, just before it drops off and narrows again. This widest point is the base of your 5th metatarsal.
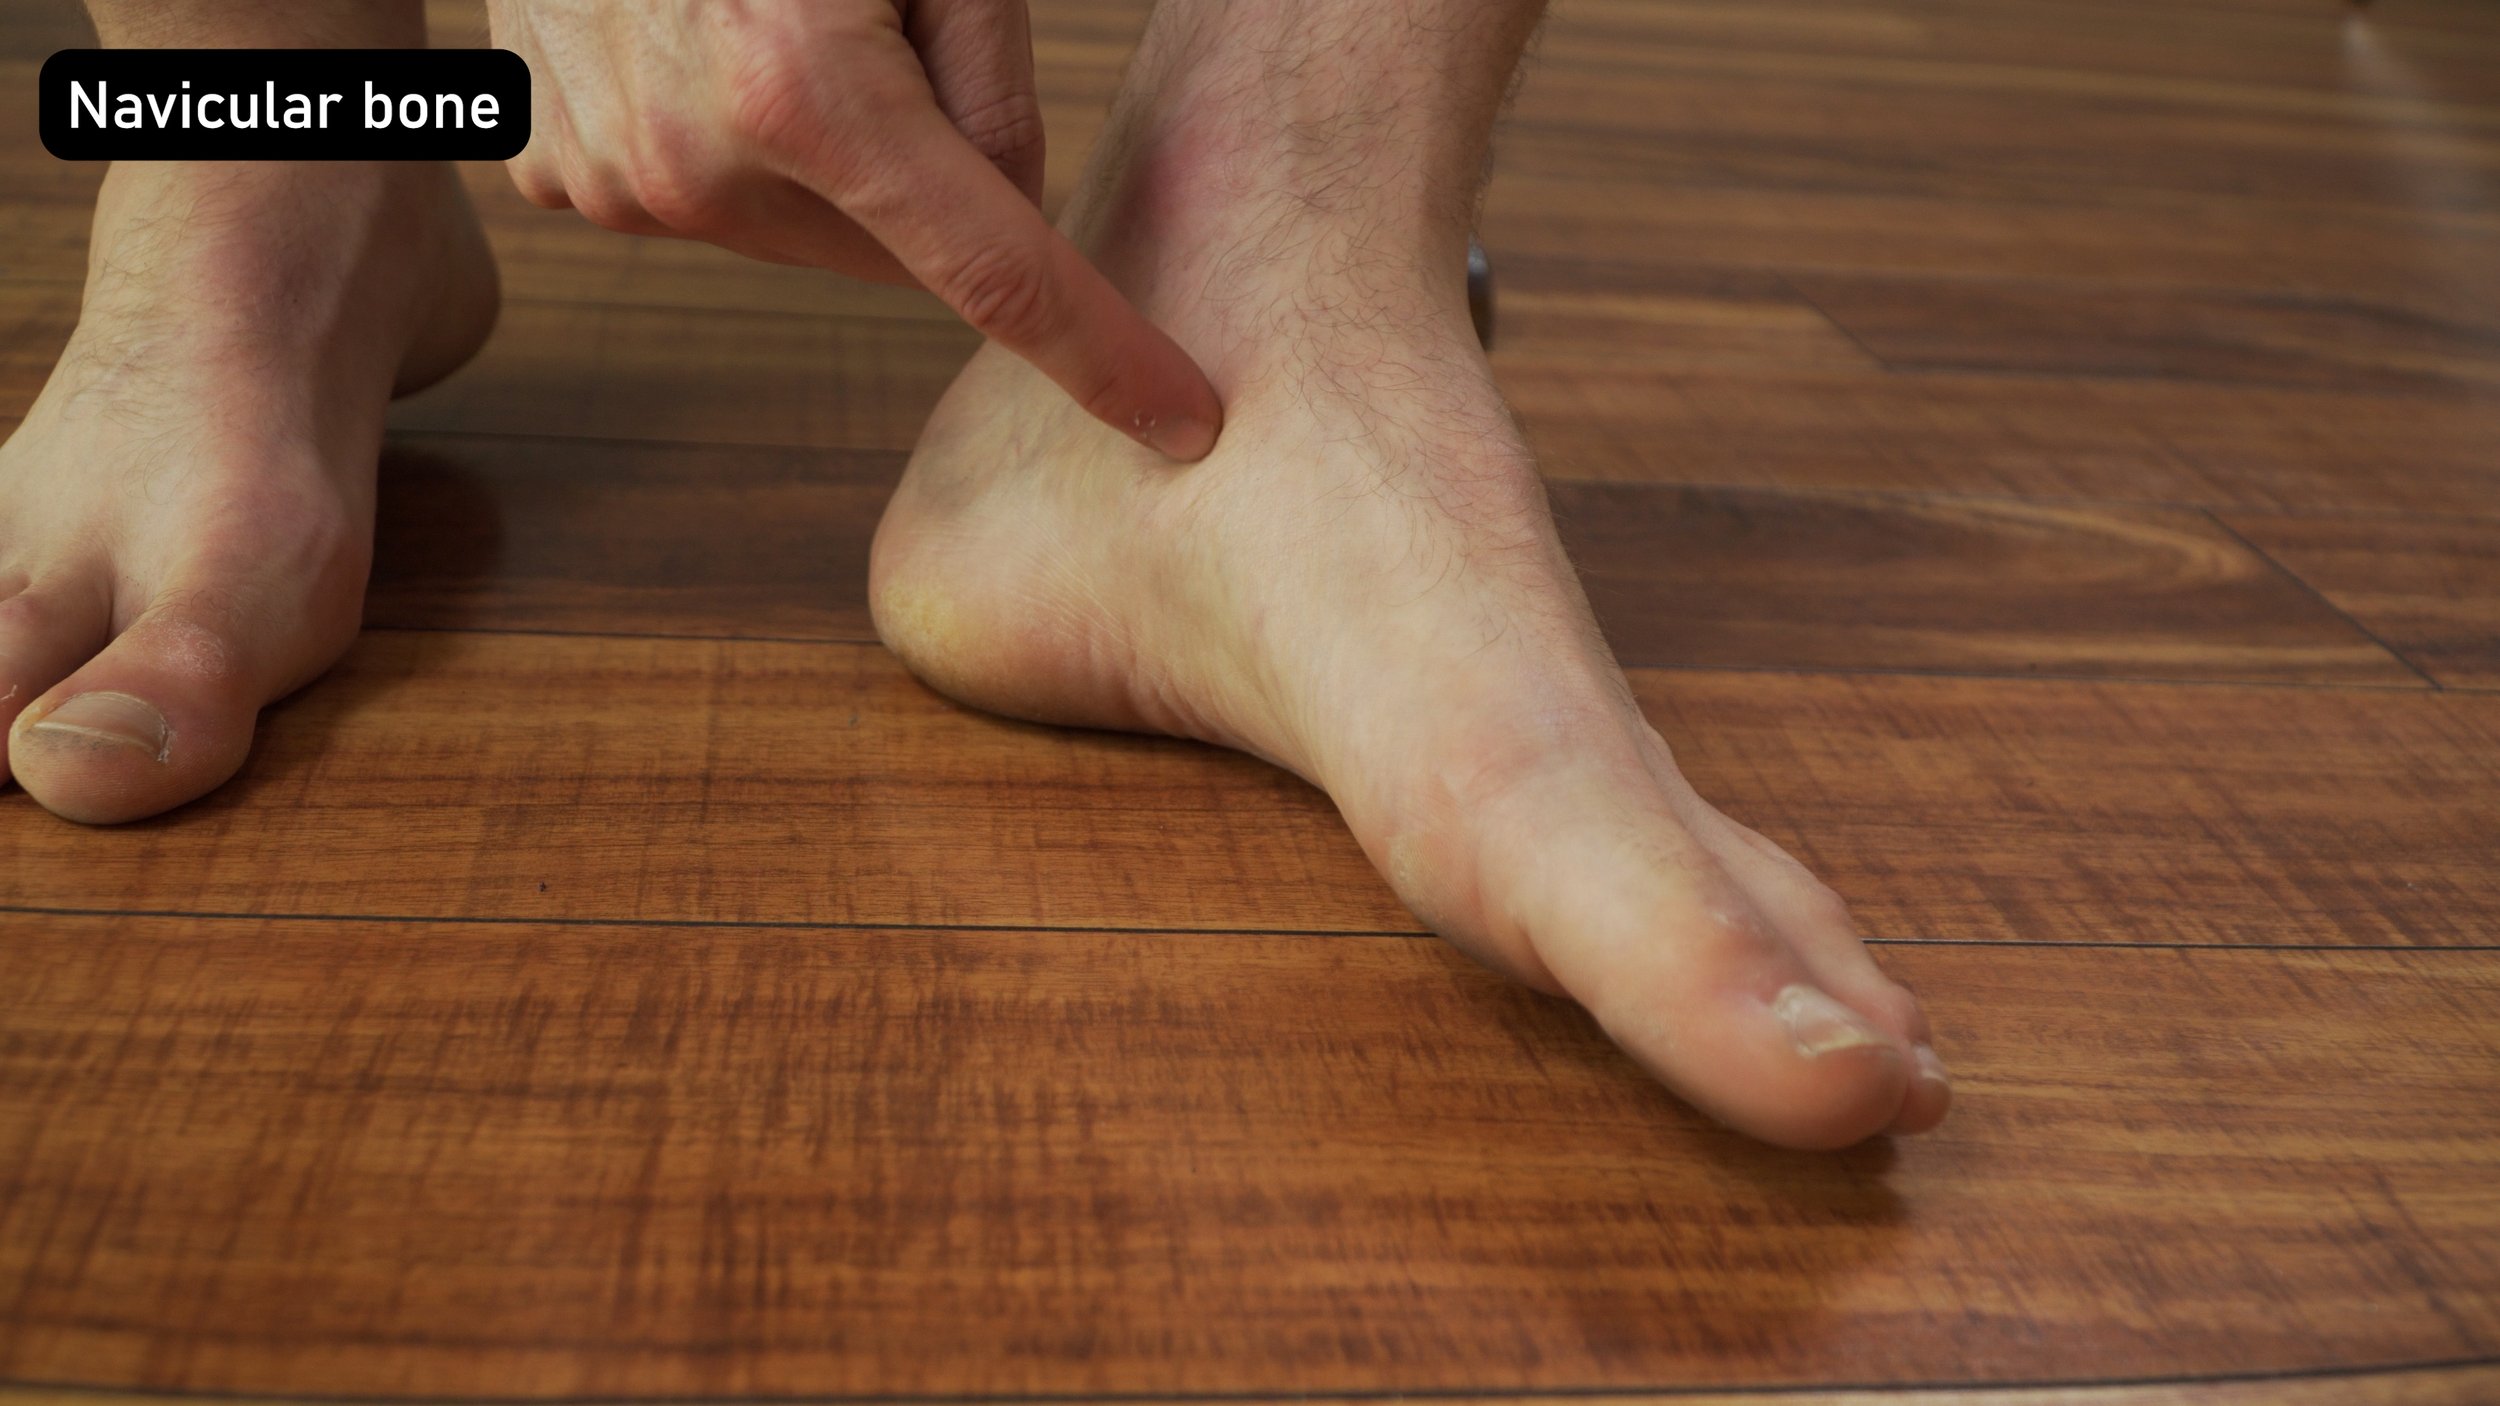
The 4th location is over the navicular bone, which is on the inside of your foot. Start with your finger on the calcaneus (heel bone). Slide it slightly forward towards your toes as it goes into the arch of your foot. Slide your finger straight up until you hit a bony prominence. It should be the largest protrusion on the medial side of the ankle.
Results
If you could walk 4 unassisted steps and didn’t have pain in any of those areas, you passed the tests and can be quite certain you don’t have an avulsion injury. If you failed either of those tests, you cannot rule out an avulsion fracture and you should consider seeing a skilled practitioner who can order you an x-ray.
PART 4: TESTING
If you don’t have an avulsion injury, and you want to know how severe your ankle sprain is, then you’re in luck, because next we will discuss testing for severity of an ankle sprain.
We’re going to do 6 simple tests and then compare our results to this super cool chart so you can see how significant your injury is. Be sure to note what you feel and observe during each test as well as the location and intensity of pain (none, mild, moderate, or severe). You don’t actually want to do anything that causes you more than mild pain, but you should be able to infer the intensity by how much or how little force is required to evoke symptoms. You should also compare your results to your opposite leg to see if it is your normal or if it is in fact a symptom.
Test 1: Observation

The first is simply observation. This is your no-risk, no-pain test. We are looking for swelling or discoloration here. The most likely location for swelling would be around the lateral or medial (outside or inside) aspects of the ankle. More specifically, centered around the medial and lateral malleoli (the big bony protrusions on either side of your ankle).
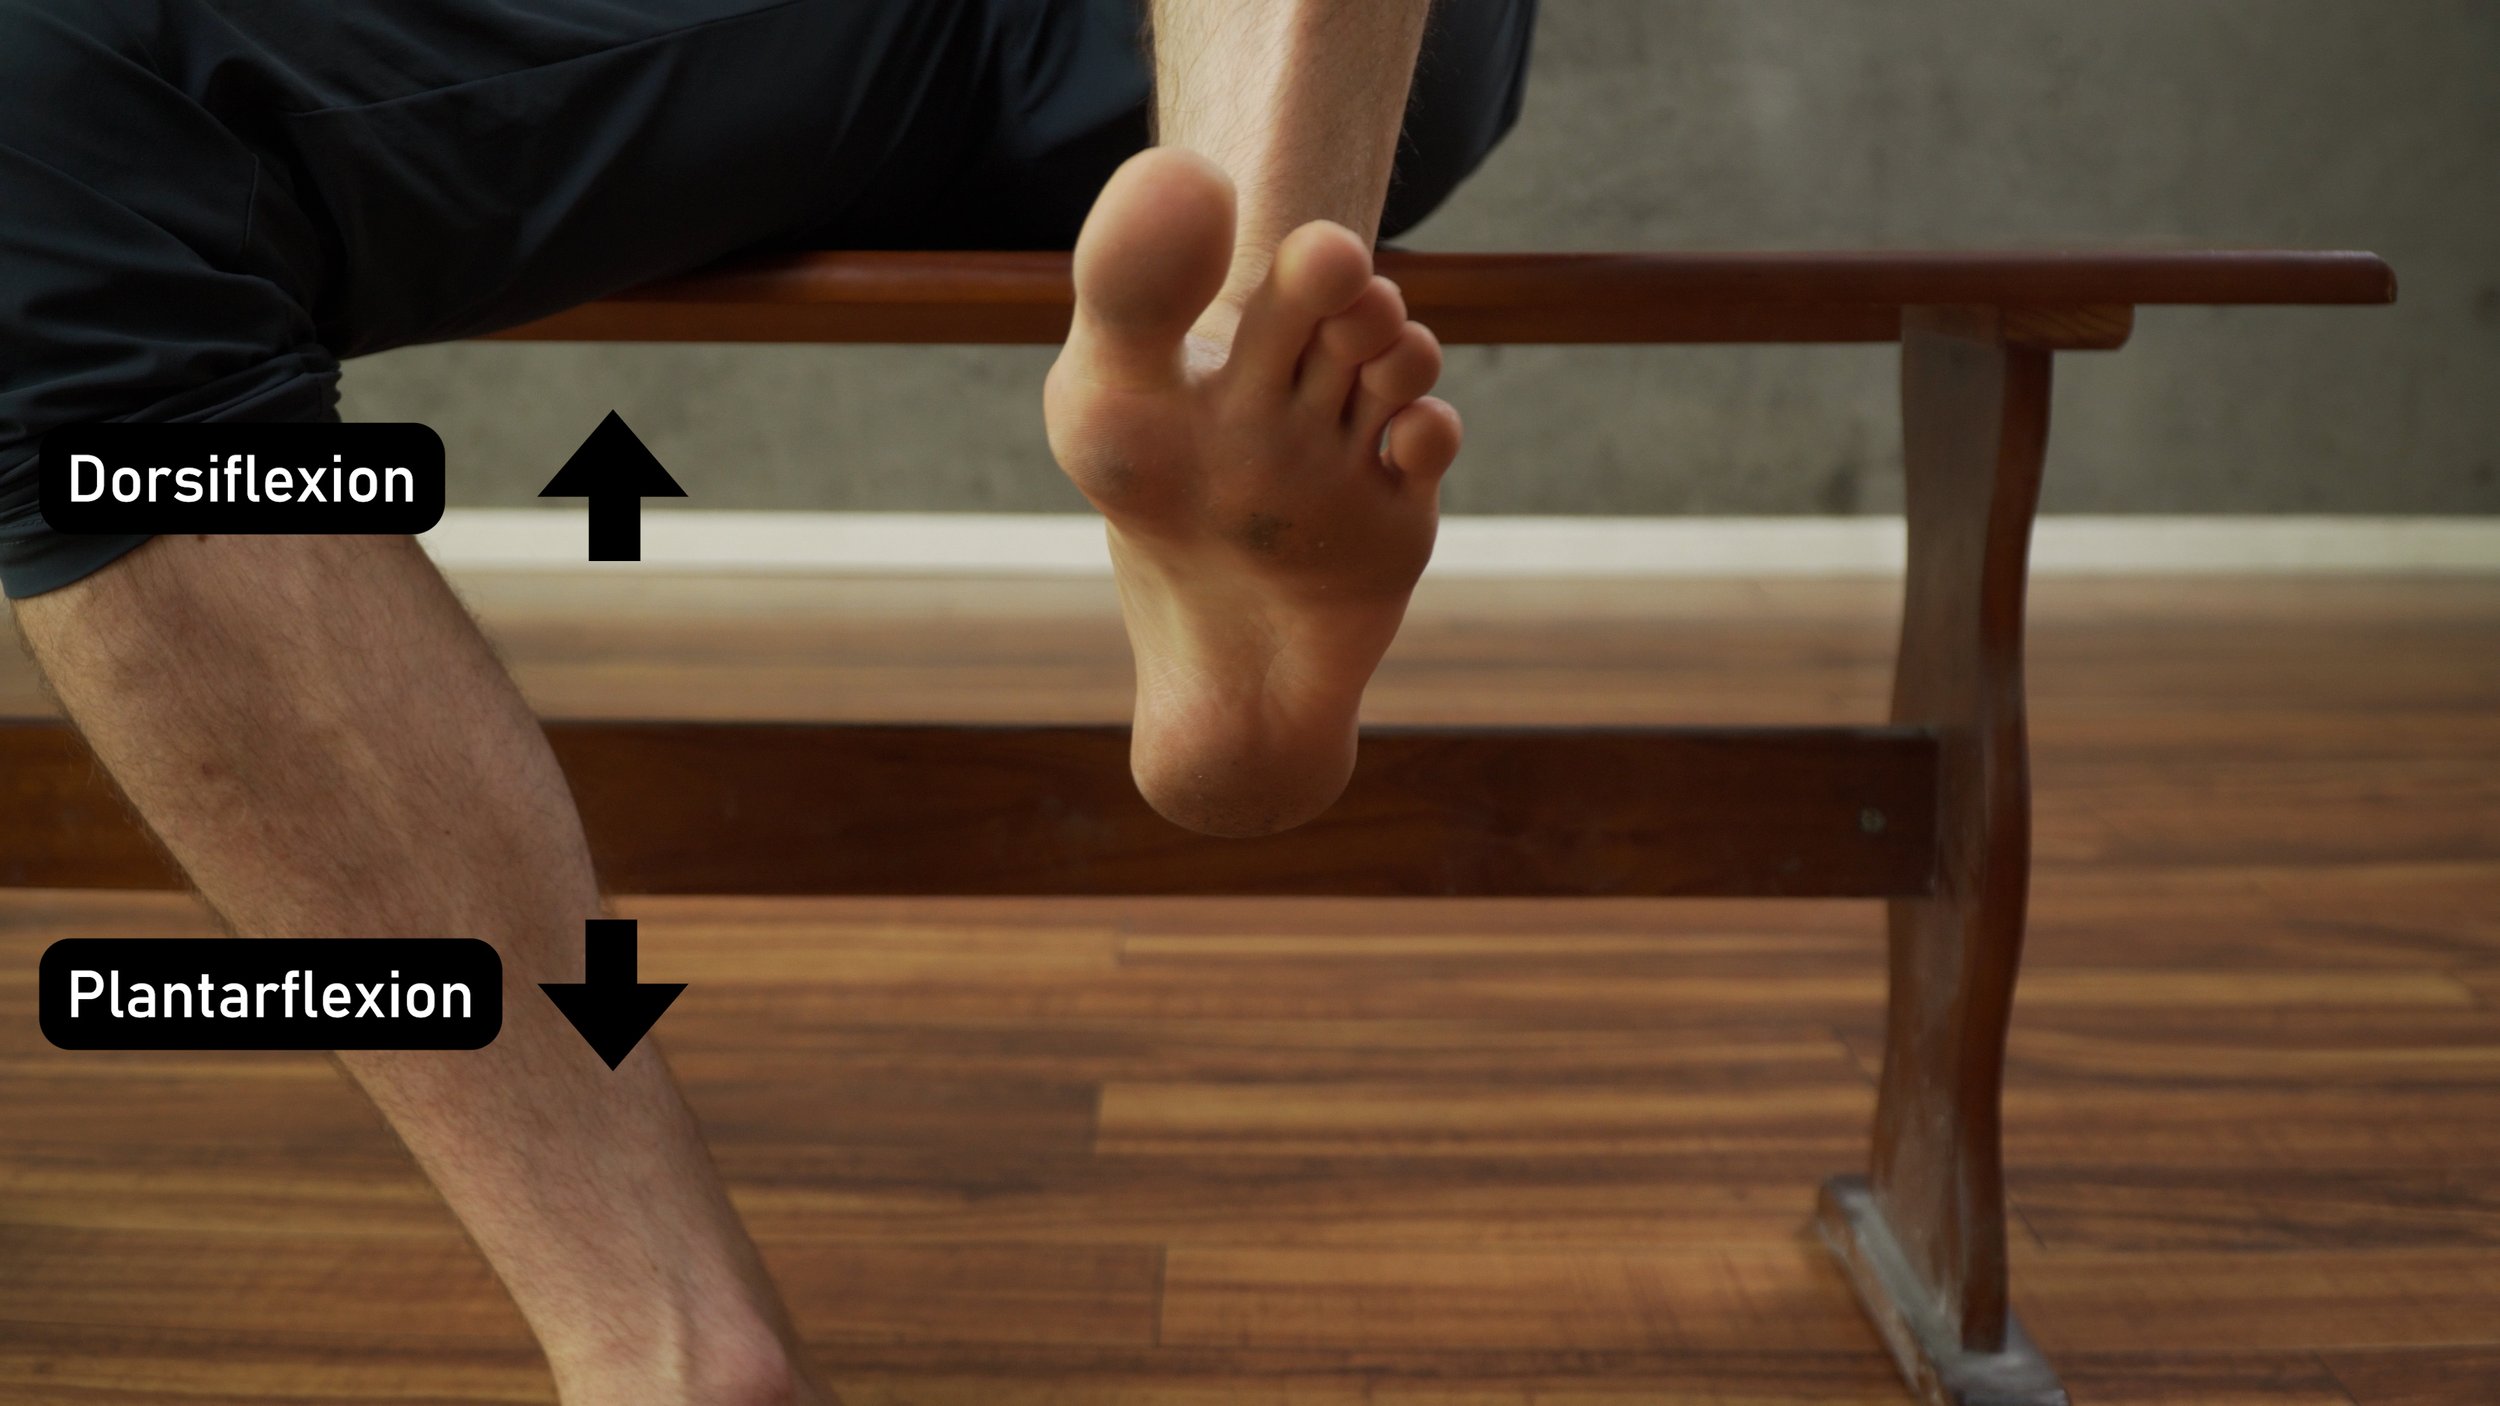
Test 2: Active Range of Motion: Dorsiflexion and Plantarflexion
The next stage is active range of motion. This will involve moving the affected (injured) ankle through active dorsiflexion (pulling the foot/toes up towards the shin) and plantarflexion (pointing the foot/toes down like a beautiful ballerina).
Note: if you have pain on the outside of your ankle with plantarflexion, use caution with the next test.
Also, if you have pinching in the front of the ankle with dorsiflexion, make note of this and monitor for improvements overtime. If it does not improve and you have limited mobility as a result, see a specialist.
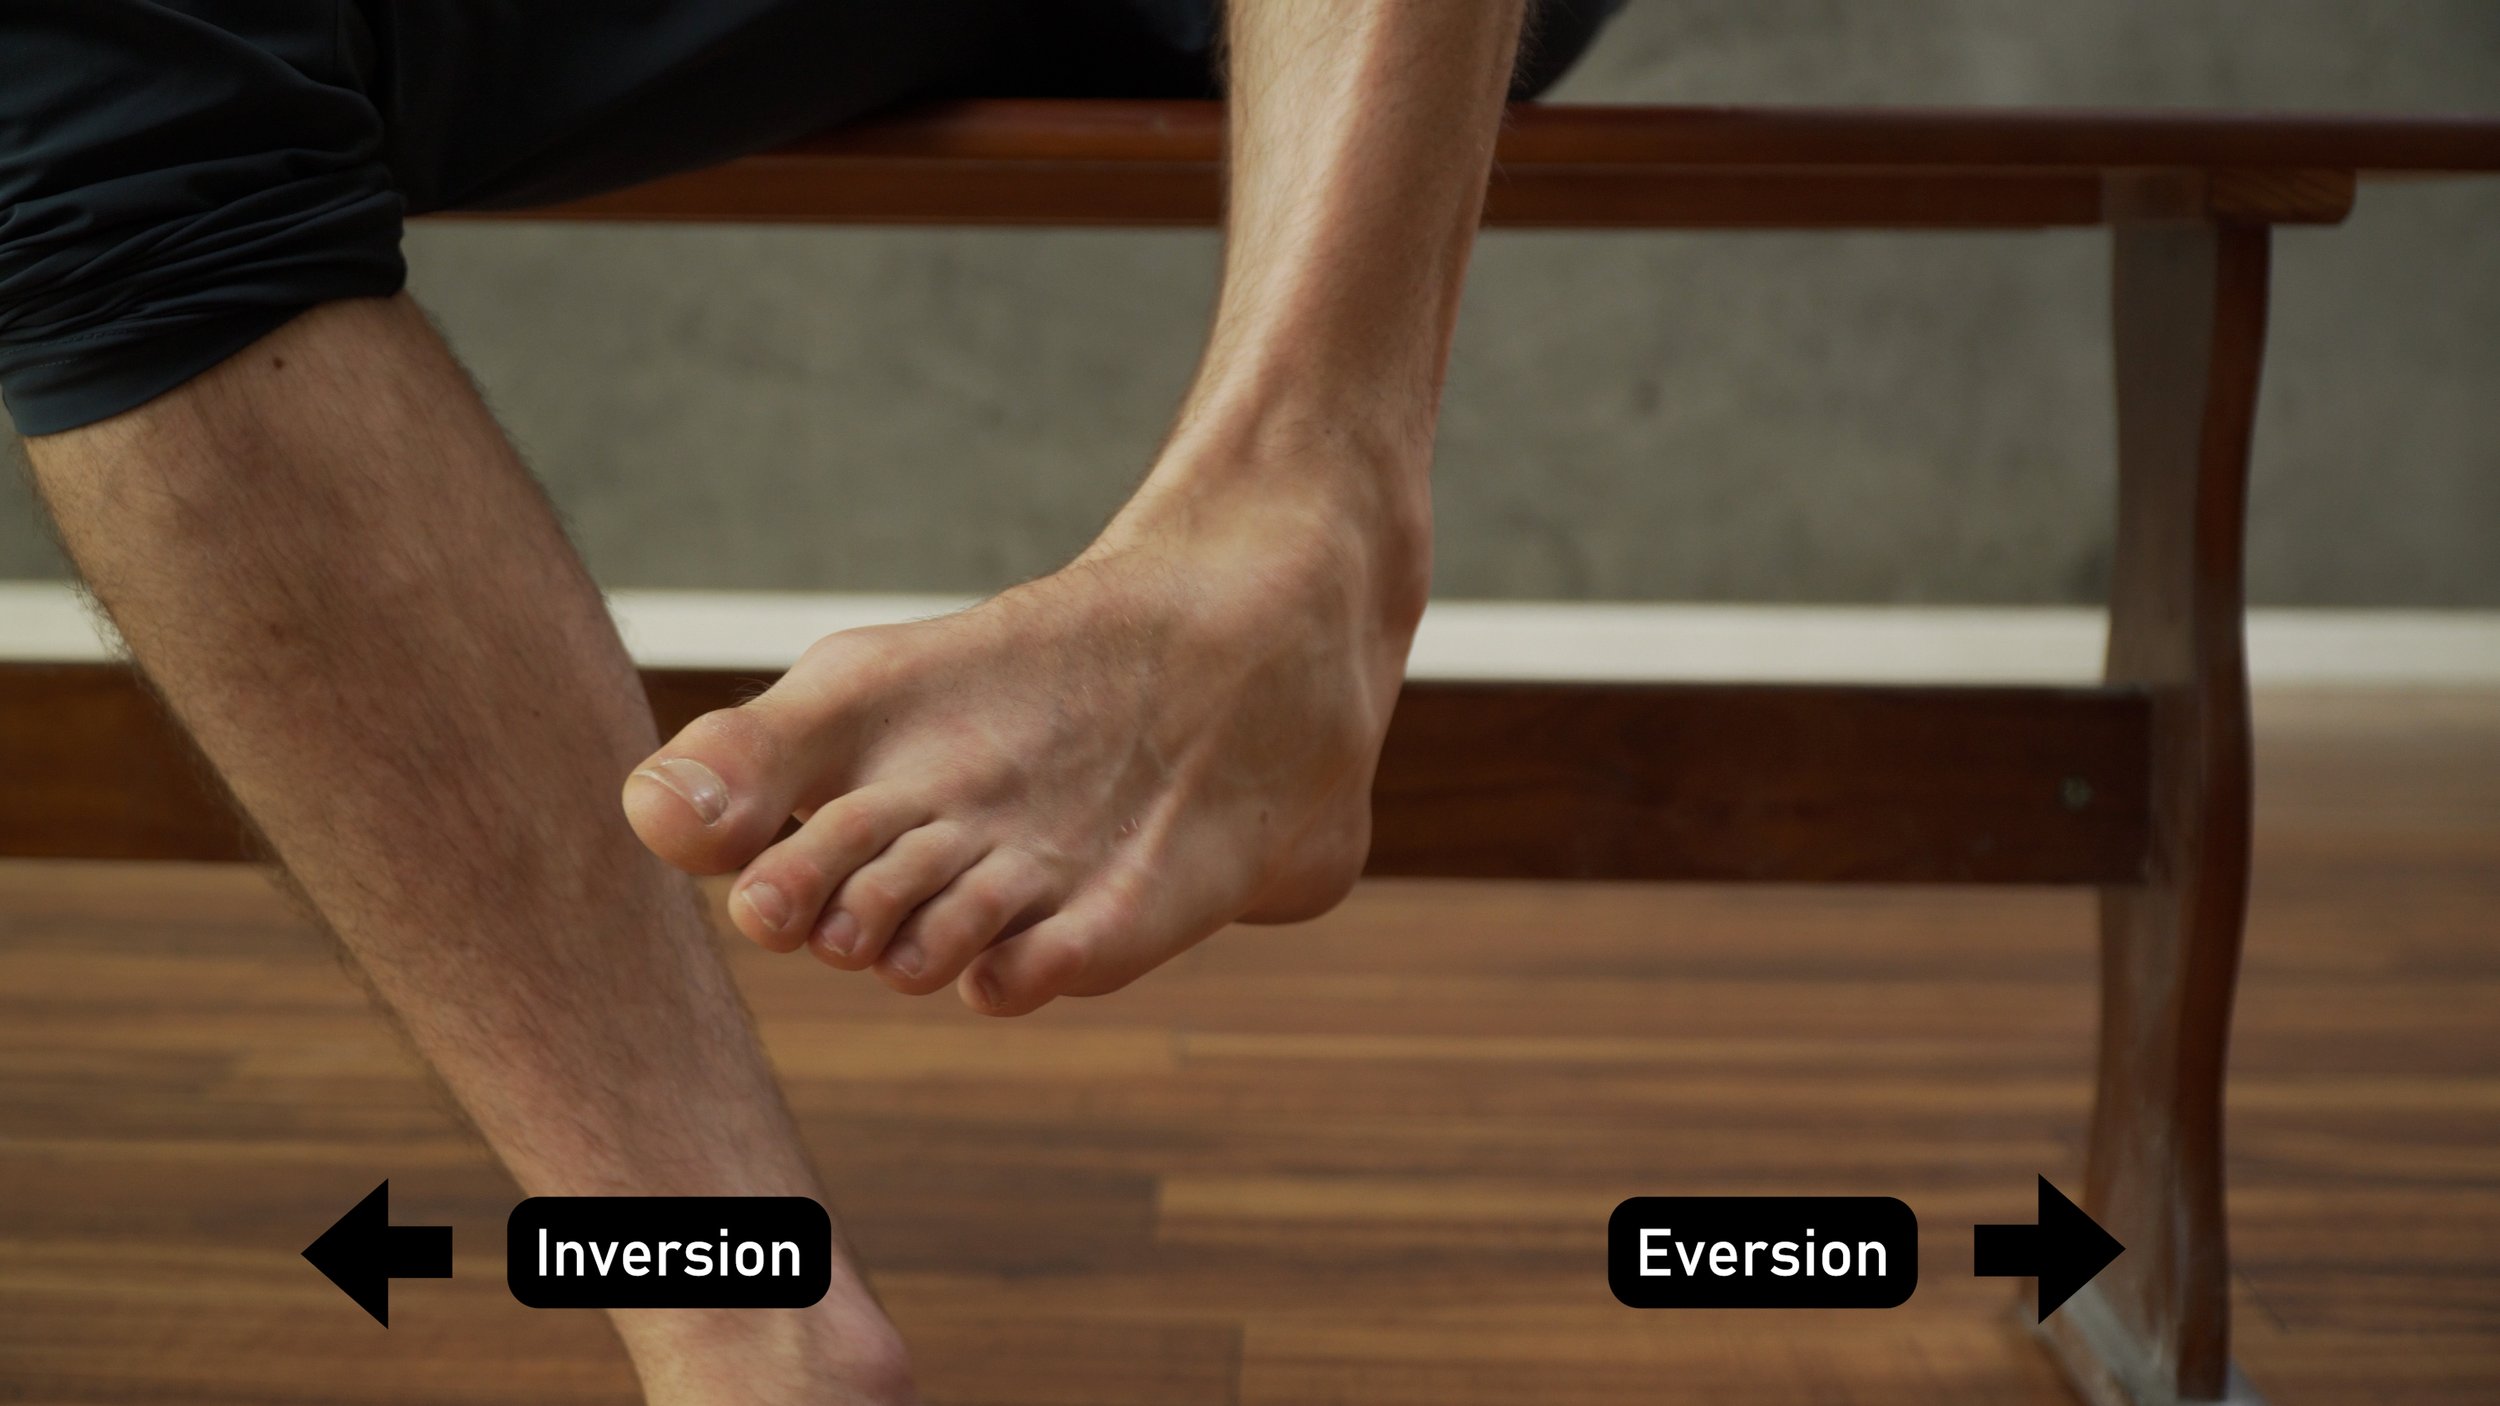
Test 3: Active Range of Motion: Inversion and Eversion
This second phase of range of motion is much more specific. Meaning, it will much more likely place strain and/or stress on potential injured structures. With that in mind, move slowly, move with caution, and stop when you feel an onset of discomfort. For the inversion active range of motion, simply try to turn your foot in and “up”. Imagine trying to make a cup or bowl with your foot. For the eversion active range, move in the opposite direction. This range will likely feel much more limited (which is normal).
Note: the eversion test will cause pain on the inside of the ankle with an eversion ankle sprain: a sprain of the deltoid ligament. The inversion test will cause pain on the outside of the ankle with an inversion ankle sprain which may involve the ATFL or CFL ligaments.
Test 4: Overall Function
Now that we have stared deeply into our ankles soul, and tested it’s range of motion, let’s see how it’s functioning overall? How is walking? Stairs? Up or downhill? Standing on one leg? Depending on the grade of sprain you are experiencing, you will experience a varying level of loss of function.
Test 5: The Talar Tilt Test
The Talar tilt test is going to help reveal if you have a mild, moderate, or severe lateral ankle sprain. To do this to yourself, cross your affected leg over the unaffected with the outside of the calf resting on the top of your thigh. Grab the heel (calcaneus) and then lift it straight up. Stop if this causes any pain. If this does not cause pain, continue to pull. You should eventually feel the tissue stop this mobility. Compare your findings to the unaffected side.
Special Note: with a grade III injury, it is possible that you have completely disrupted (torn) the ligament. This may produce a pain free range of motion that is now excessive. To be sure, test and compare it to your other, unaffected side.
Test 6: Palpation

While palpation won’t likely cause the injury to actually worsen, it may cause some discomfort which may affect the other tests. Hence, we do this last. Palpation is most important in the locations we just noted in the aforementioned differential diagnosis. Focus on the medial and lateral malleoli (the bony prominence on the inside and outside of your ankle), particularly at the distal aspects (aka the bottom).
Test 7: Anterior Drawer Test
The anterior drawer test is a very common test done for ankle sprains to determine severity. Unfortunately, you can’t actually do it yourself. It has to be done by a skilled practitioner. I'm only including it so you're aware that it exists and so this video is as comprehensive as possible

PART 5: BASIC REHAB
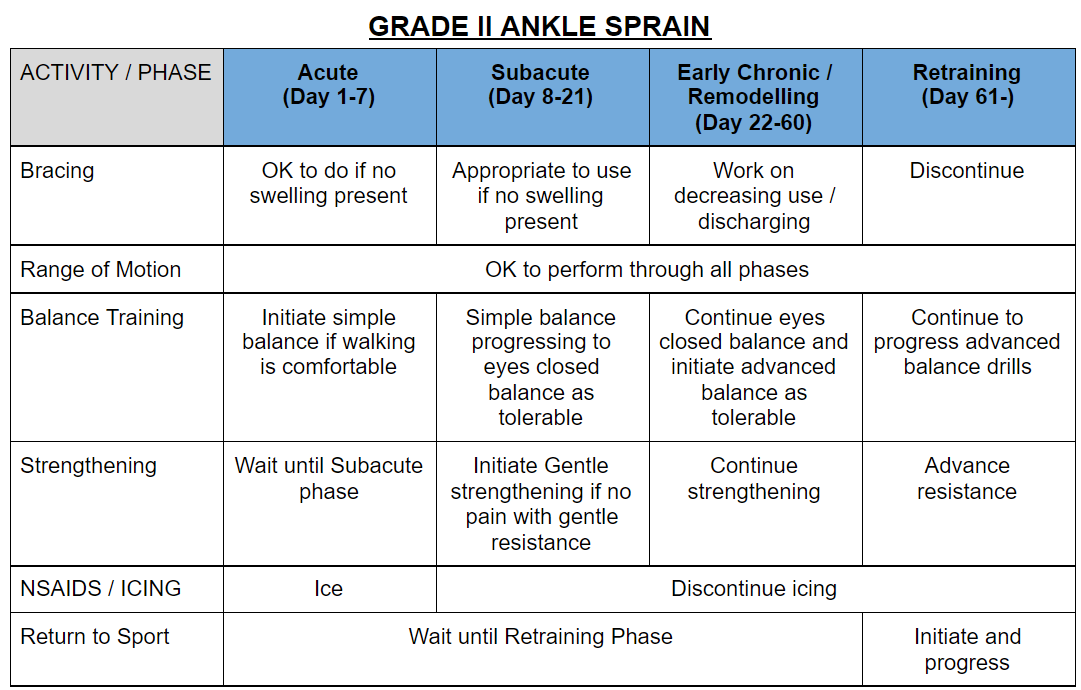
In this section I’ll show you a variety of techniques and exercises you can use to heal from an ankle injury. For information on when to perform these and how to organize a rehab schedule, reference the charts at the end of Part 8 or just check the show notes.
Bracing
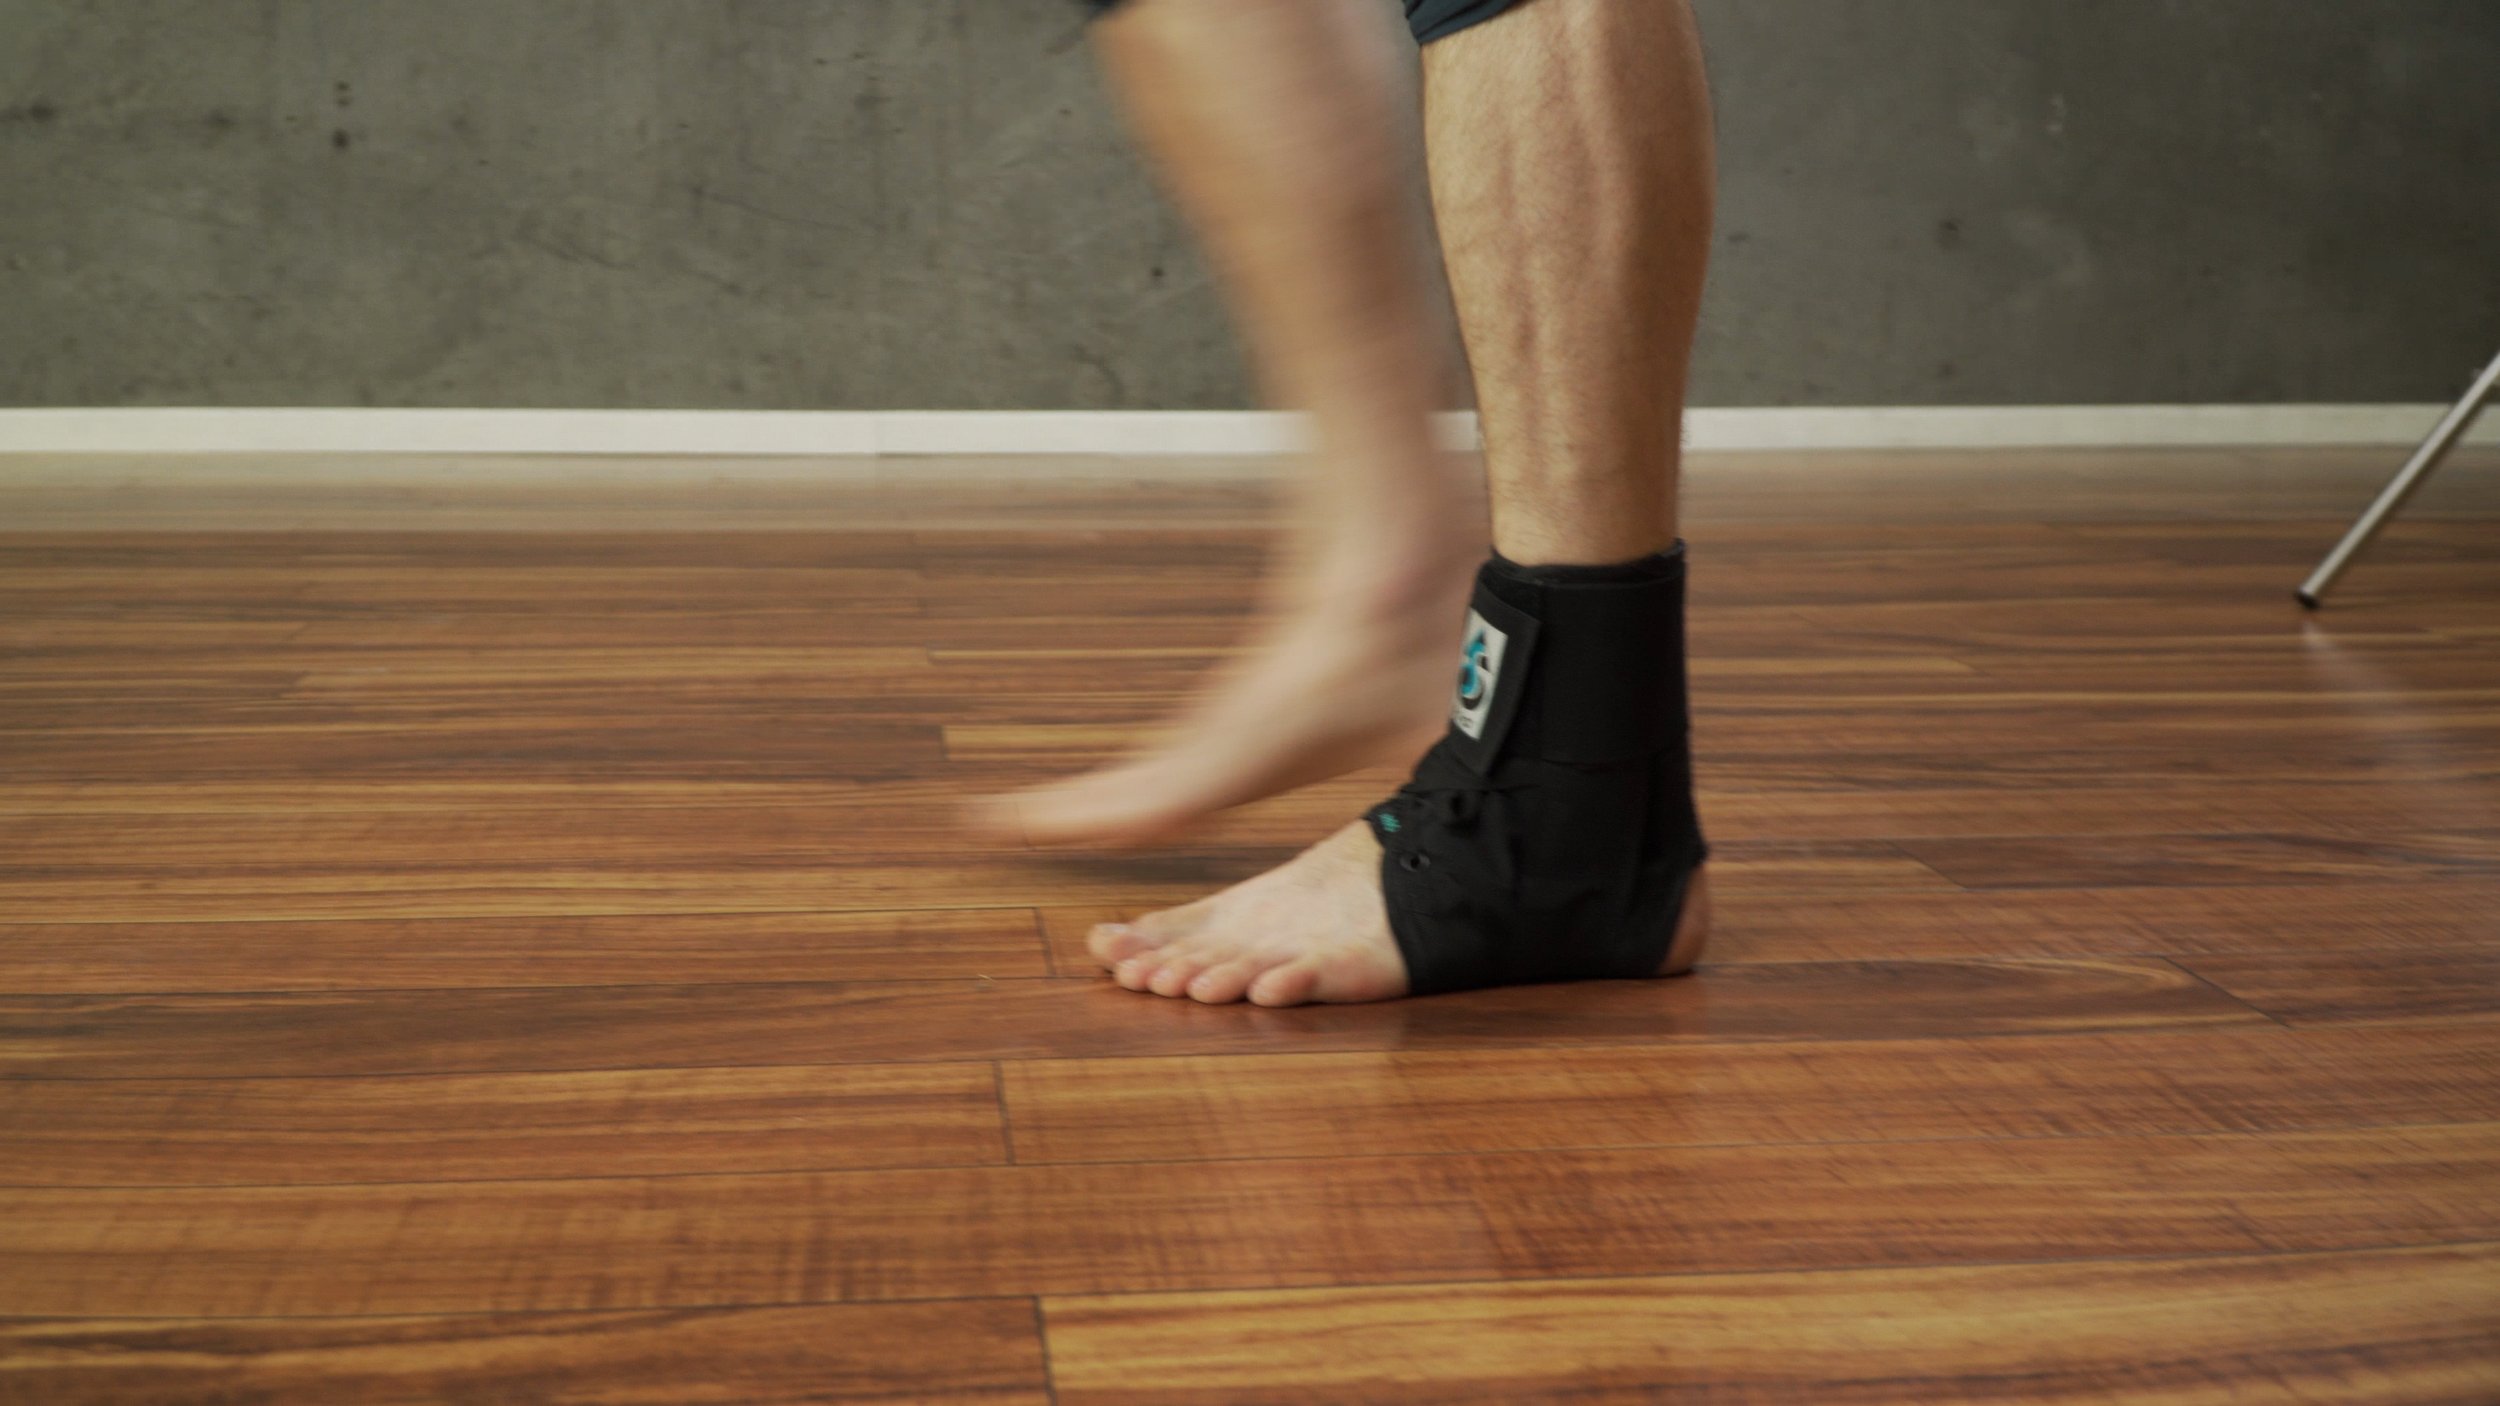
Bracing, or taping, can be an important part of your recovery. Typically bracing is done in the early stages of your recovery to help protect the injured tissue. Bracing of the ankles is one body part that doesn’t seem to have the negative long term effects that bracing other body parts can have. But, even if you are bracing, you should continually move the ankle as we will discuss in the next component.
Range of Motion
Research supports that range of motion even in the early stages is important to promote healing. You want to stay active and move through multiple ranges of motion. Do not push through pain, though. If you have injured tissue, you do not want to stretch it further. Stay moving, just don’t push too hard.
Sets, reps, frequency: Perform 1 set of 10-20 repetitions multiple times a day, 7 days a week.
NSAIDs / Icing

Unless you have a high grade ankle injury with a large amount of swelling, I do not recommend NSAIDs or icing. The inflammation you may experience is normal and part of the healing process, so don’t slow it down.
Note: I am not your physician, so you can do as you please. I am not telling you to stop taking your NSAIDs if this is prescribed.
PART 6: BALANCE REHAB

Balance training will be one of the most important factors to restore your confidence and function. It will also be one with the greatest amount of variety and creativity.
Balance training can be static or dynamic. Static balance refers to attempting to balance without, or with minimal, movement. Dynamic balance would be the opposite: attempting to balance while creating movement.
Balance training can also be performed with eyes open or eyes closed. Eyes closed can be particularly helpful for improving proprioception, as it will force your brain to become more dependent on the feedback it receives from the muscles and joints rather than just depending on your vision.
To prevent overcomplicating this topic, we are going to break up balance into Basic and Advanced Balance training.
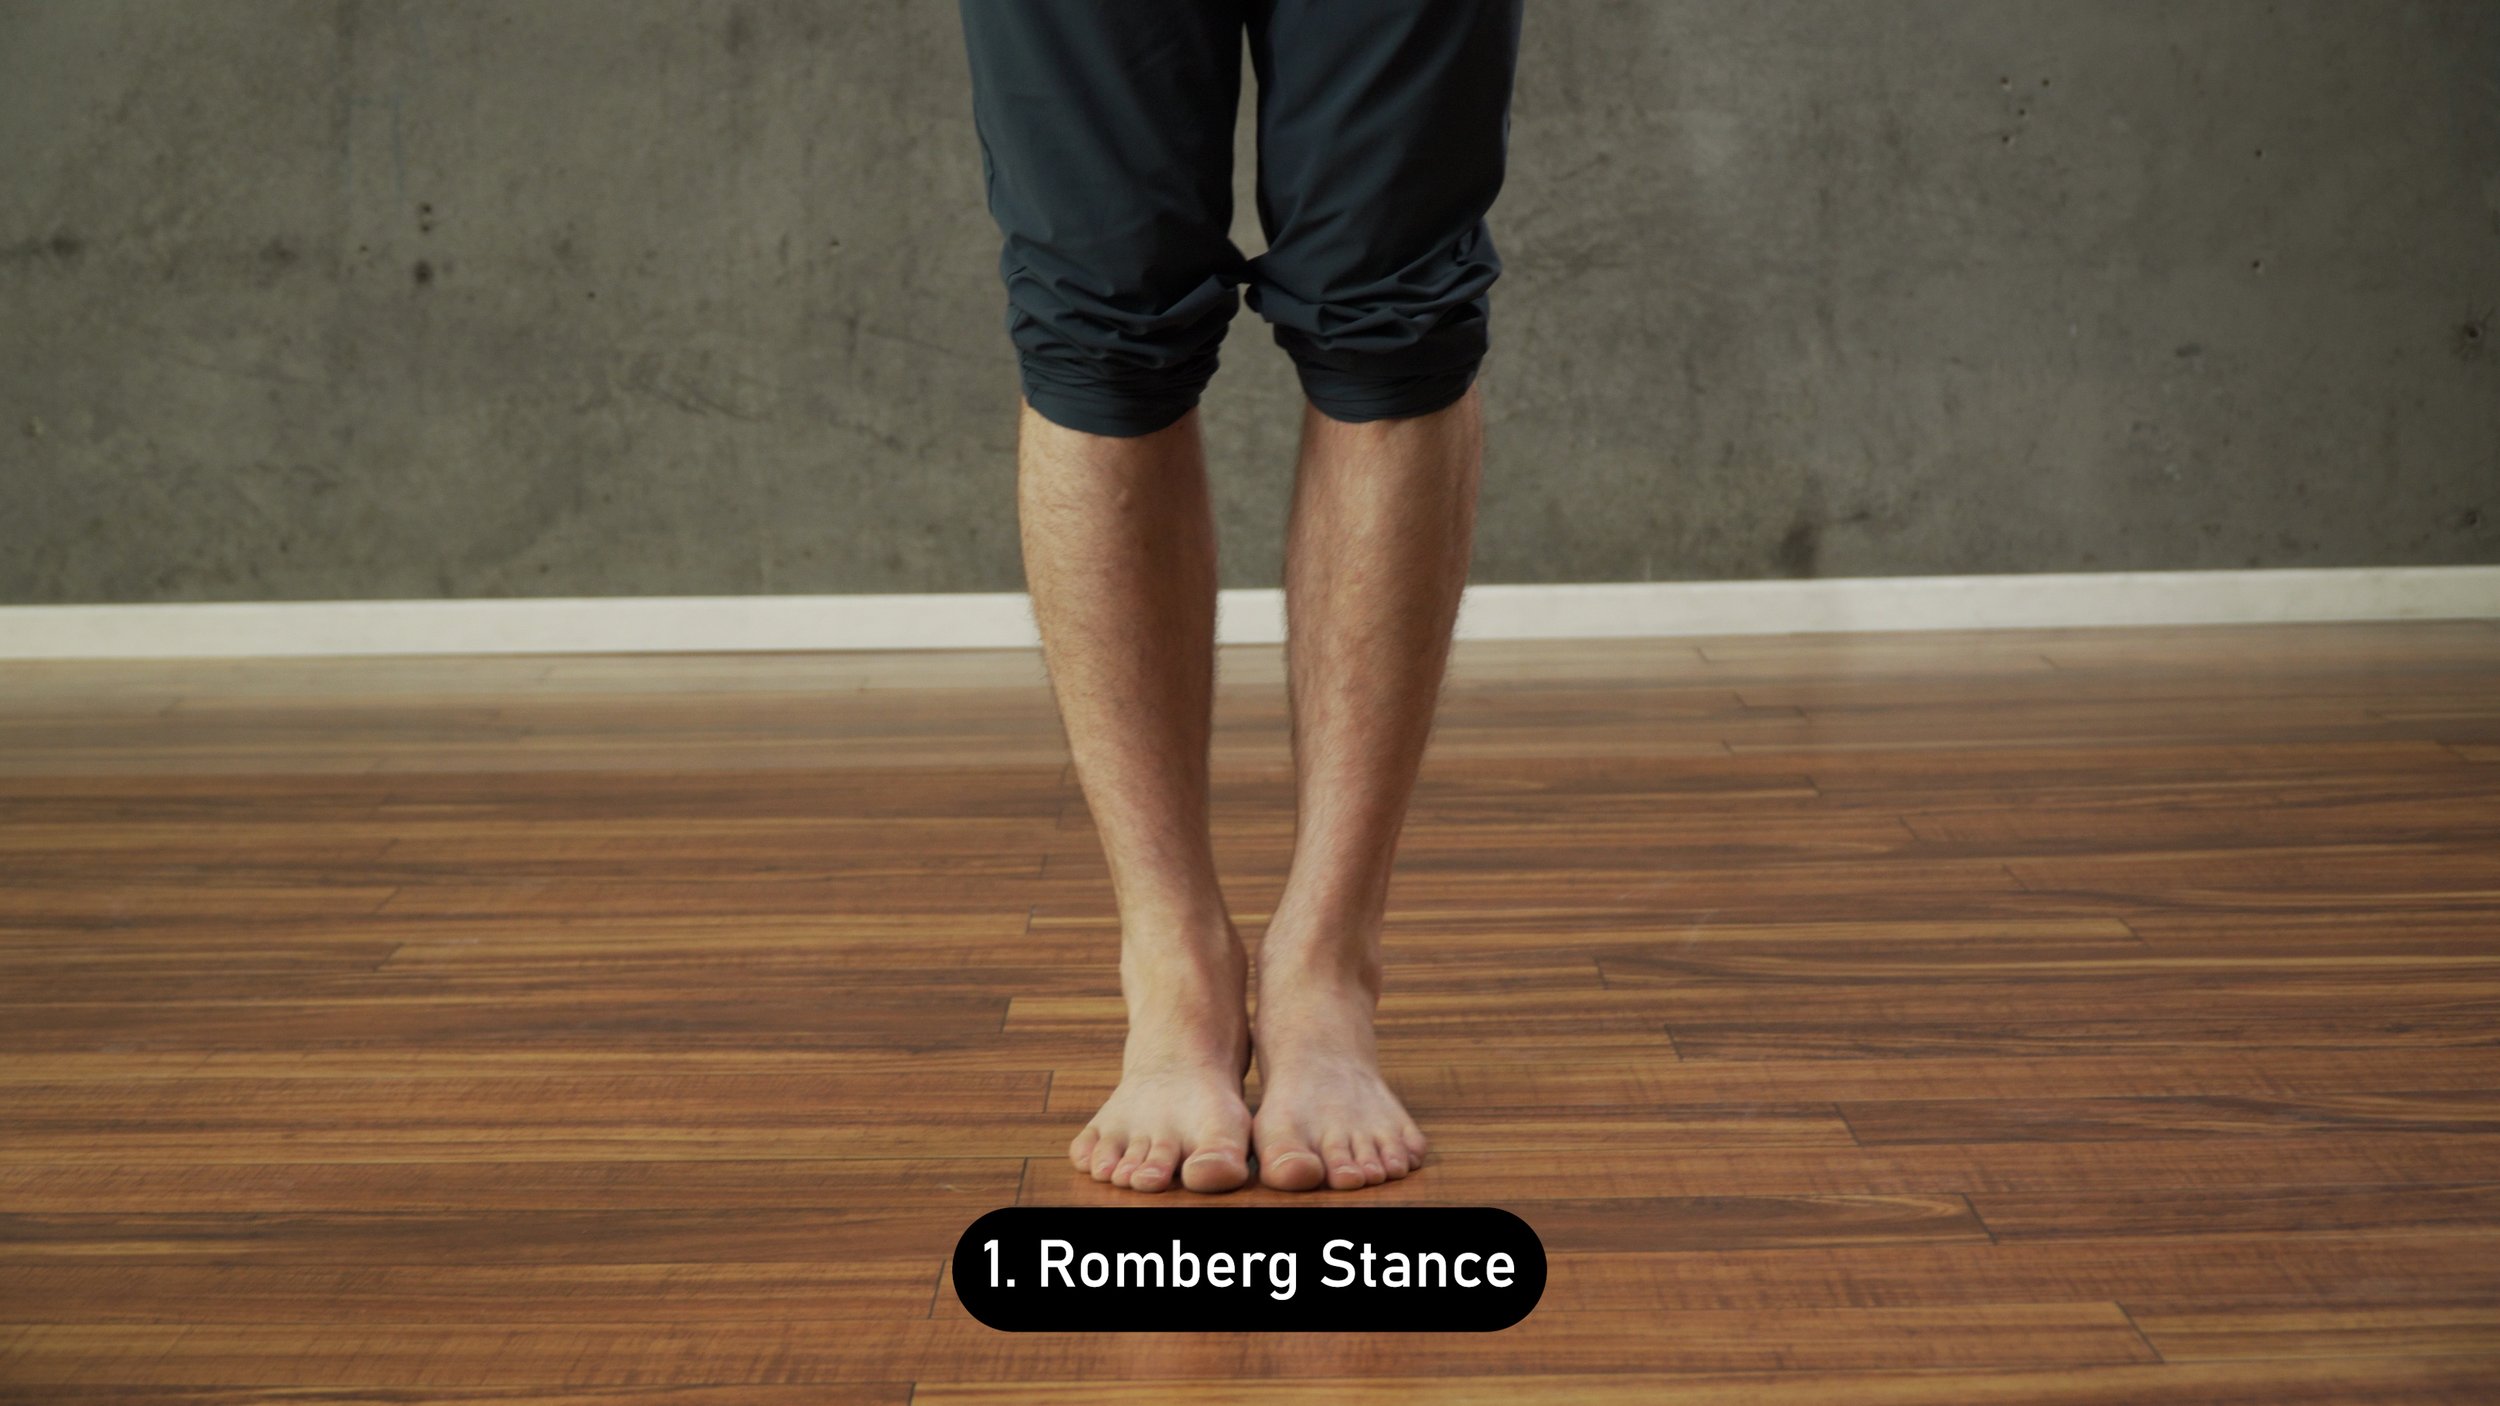
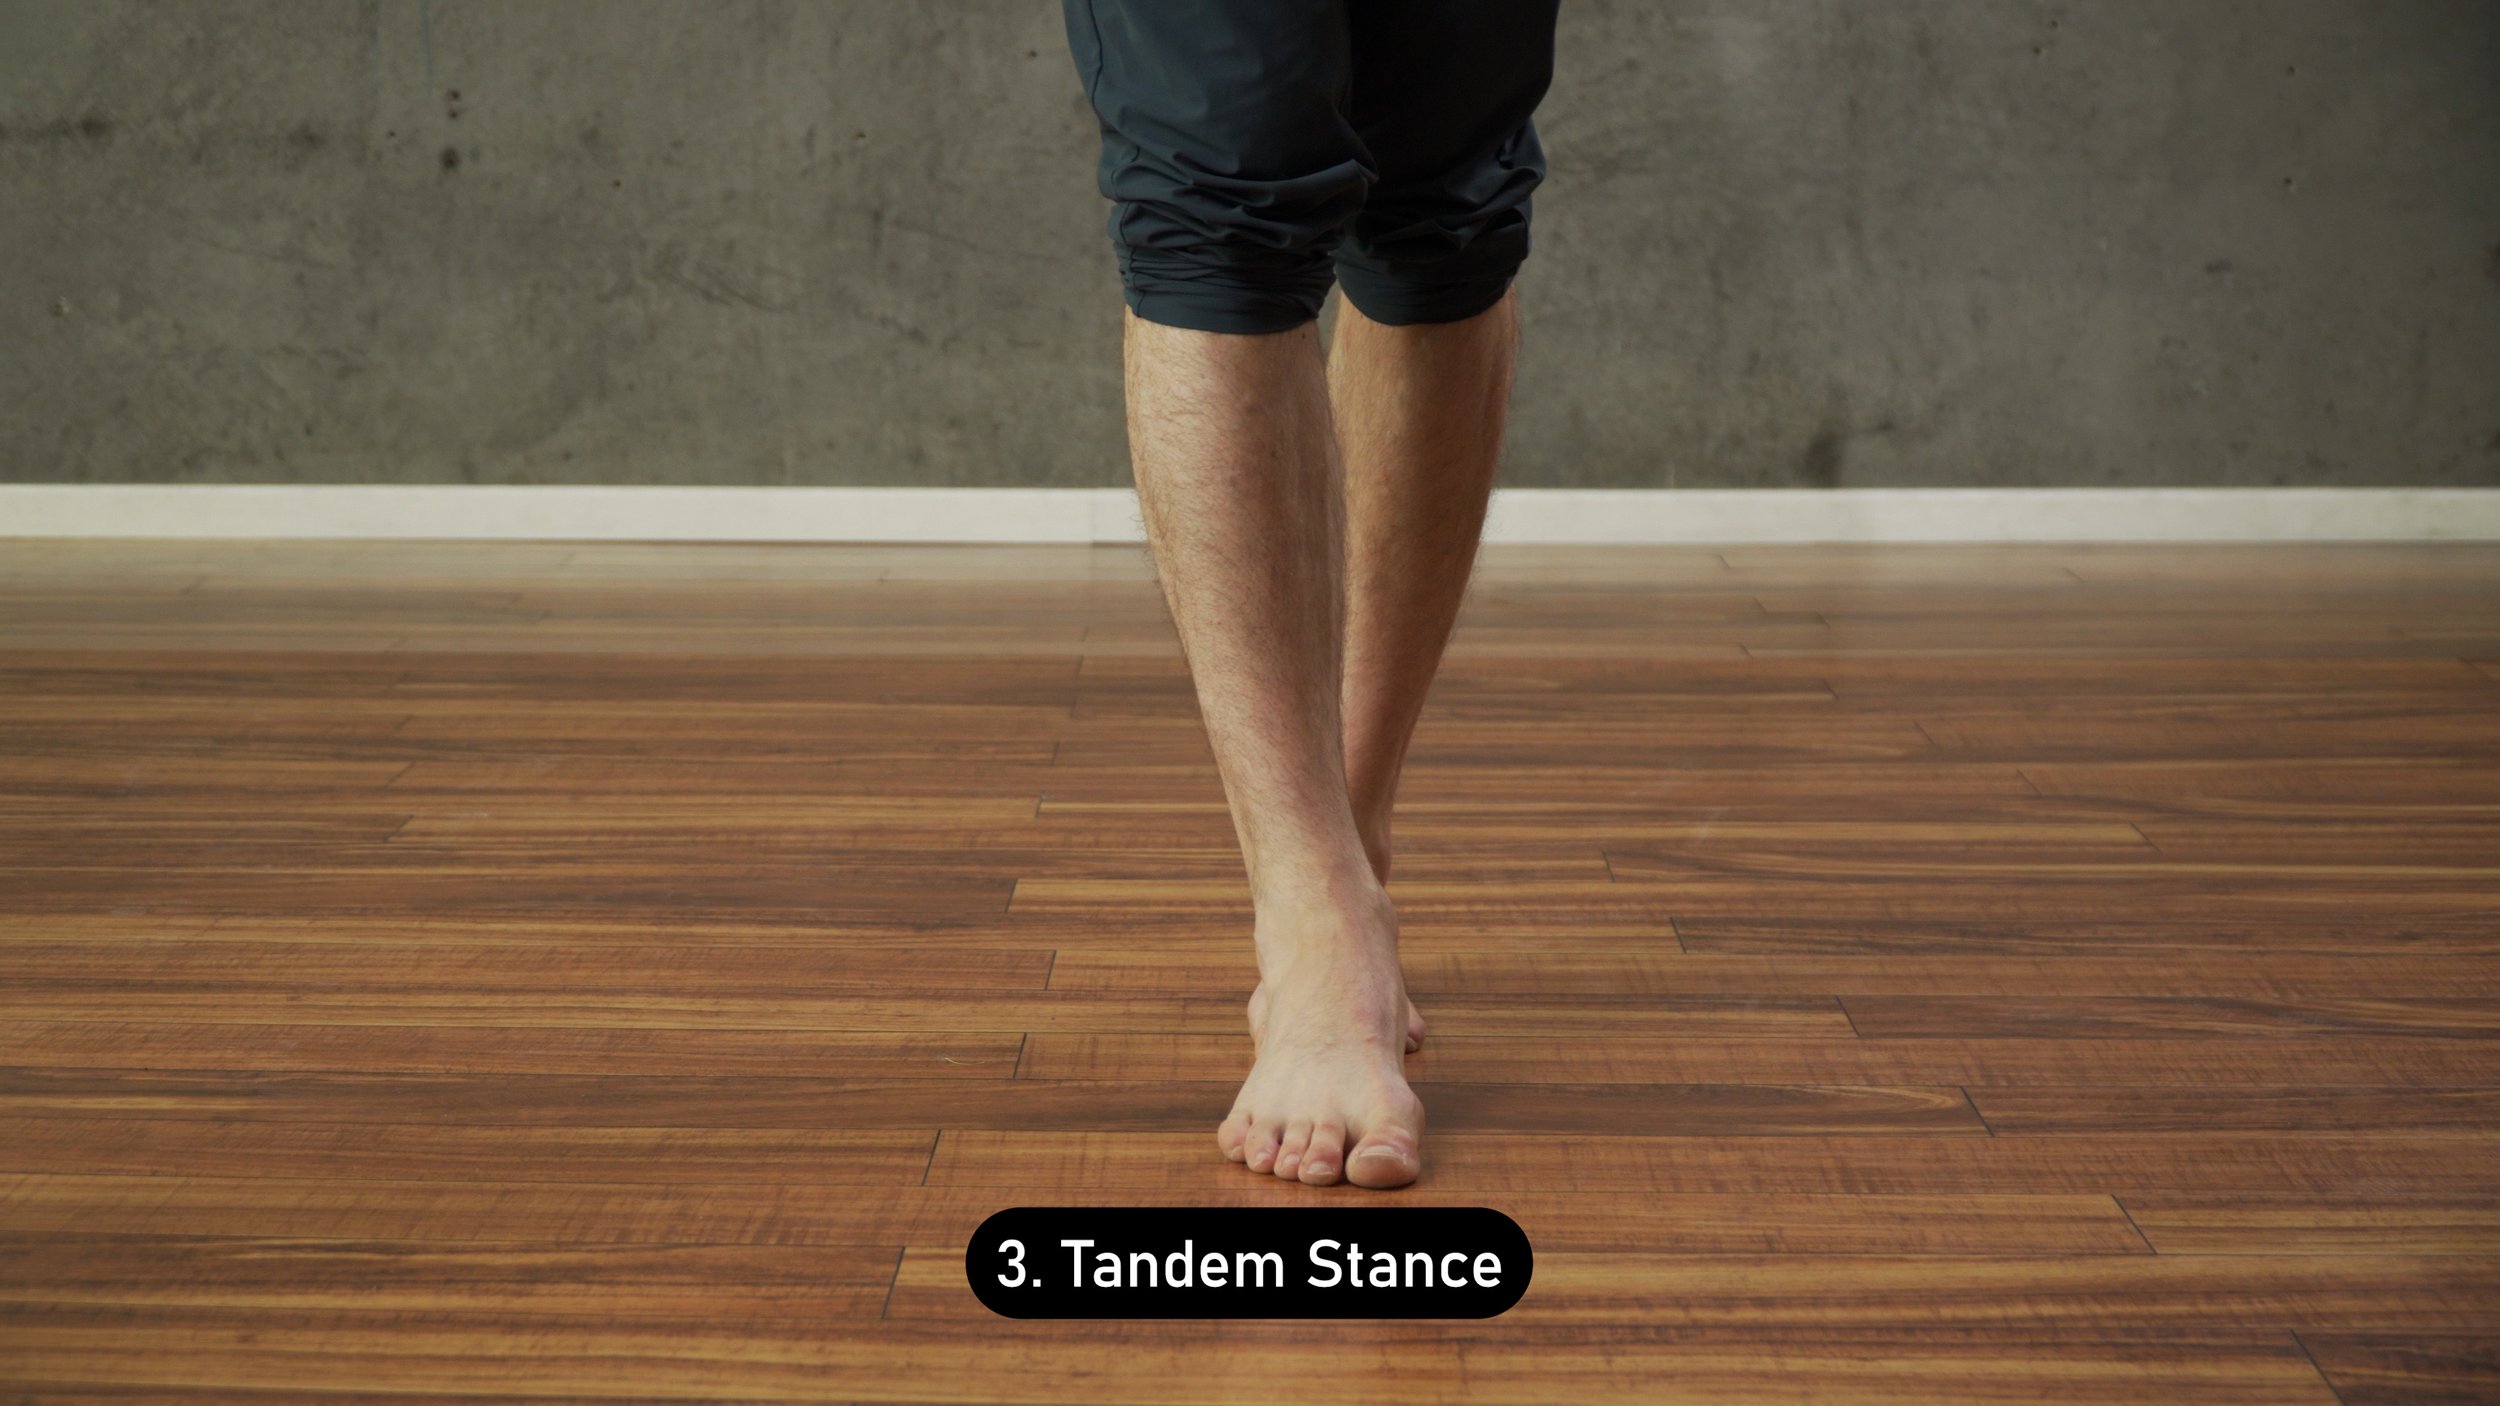
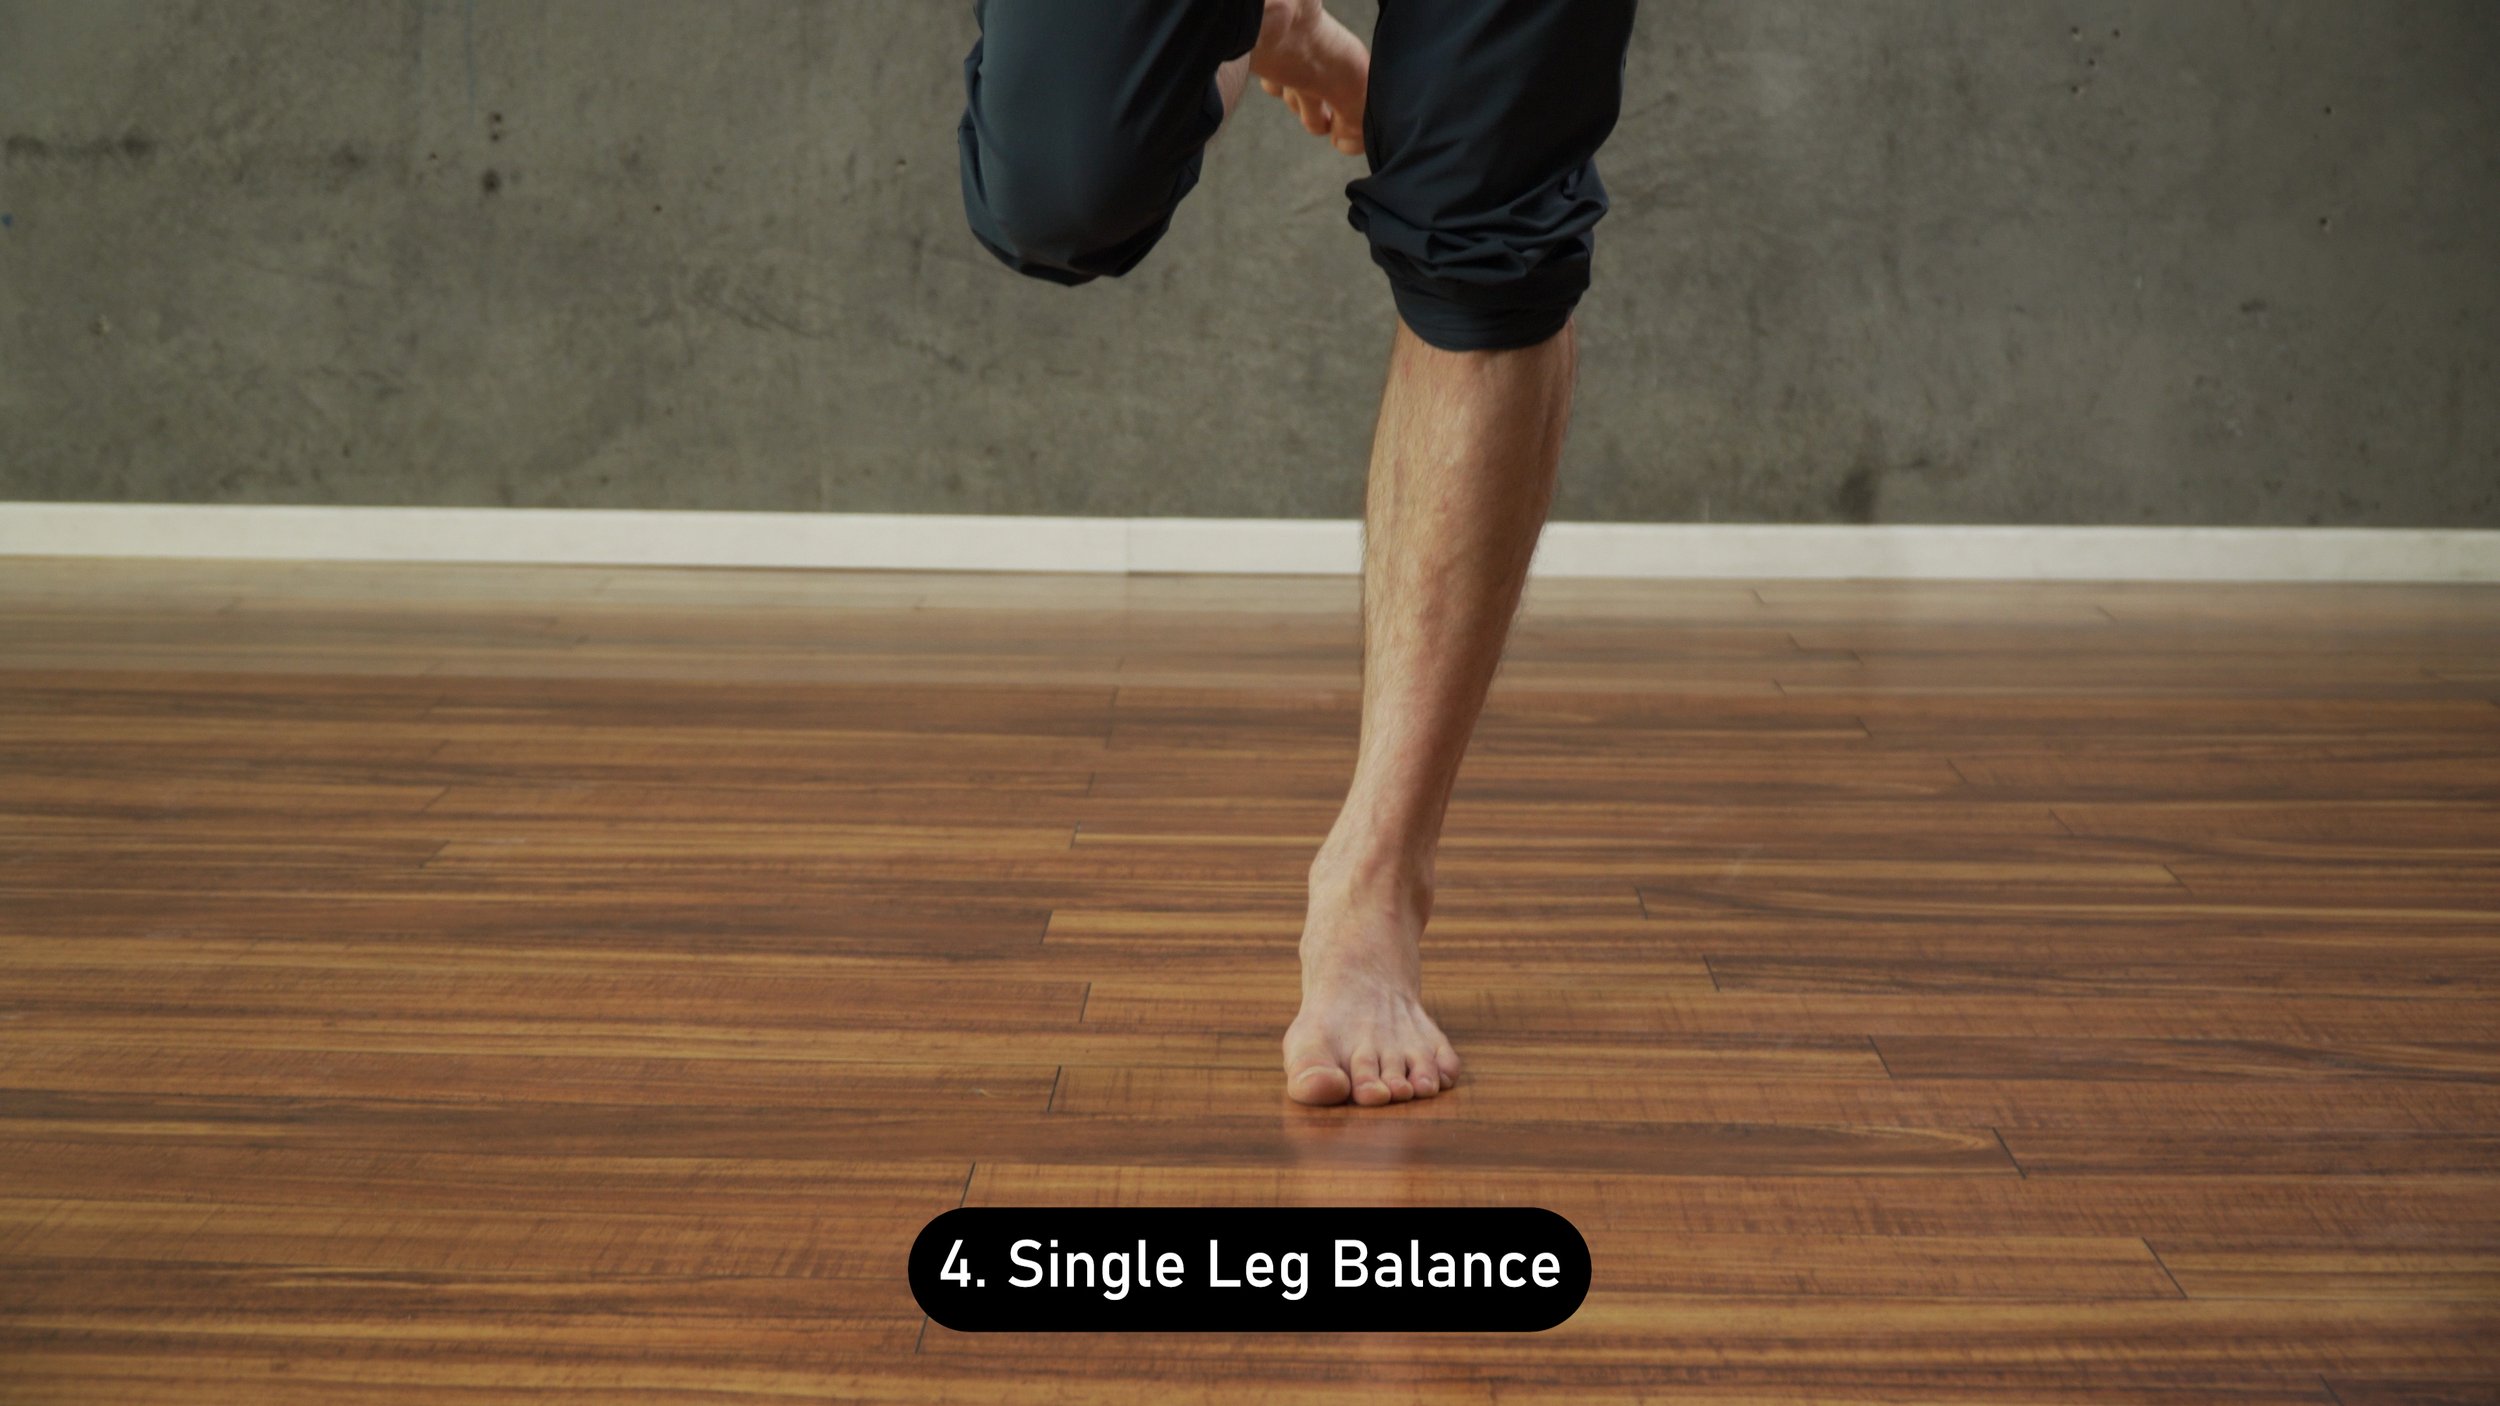
Basic Balance Training
Basic balance is going to focus on static balance but will use eyes open and eyes closed balance. A simple progression would be moving from Romberg balance (feet together), modified tandem, tandem, and finally single leg balance. You’ll want to be able to master each stage with your eyes open and then with your eyes closed.
Sets, reps, frequency: Perform your balance training at least once a day. 2x a day will produce faster results. This is OK to perform daily.
Advanced Balance Training
Now, for advanced balance training, we are going to get a little crazier. We are going to incorporate aspects of strength and balance. Advanced balance training will be mostly dynamic. It will promote movement in multiple directions or planes of motions. It will also typically involve changing the surface you use such as with a foam pad, rolled up yoga mat, or BOSU ball to add an additional challenge. There are LOADS of examples for this. Have fun! Get creative! Again, to keep things simple I am just going to show two examples. One that is a wonderful all in one exercise for ankle sprains, and another just an idea of a fun exercise for bullet proof ankles.
Single leg balance on unstable surface with active hip abduction

Get a foam pad, folded up yoga mat, pillow, planky, or BOSU and place it on the ground.
Step on the unstable surface with a single leg
With the opposite leg, kick it out to the side
Keep the toes pointing straight forward on both legs
Don’t bring the moving leg forward. It should be slightly behind your stationary leg.
Sets, reps, frequency: Perform 3 sets of 10-15 repetitions of the single leg hip abduction on an unstable surface 1-3x/week
Single leg squat with multiplanar reaches on a BOSU

Place a BOSU dome down
Step on it with a single leg and gather your balance
Perform a single leg squat and reach the opposite leg behind you to touch the ground lightly.
Return to standing
Repeat but reach the leg forward, to the side, and curtsy across you.
Repeat as needed.
Sets, reps, frequency: Perform 3 sets of 8-12 repetitions (total, not 8x4 = 32) of the single leg squat on BOSU. Perform 1-3x/week
PART 7: STRENGTH REHAB
Increasing your ankle strength independently from the balance training will also be helpful. This will help support the ankle and restore function. Recall, the peroneals and the posterior tibialis are two of the more important muscles needed to restore function. Hence, let’s get a great exercise for each of those.
My top recommendations are
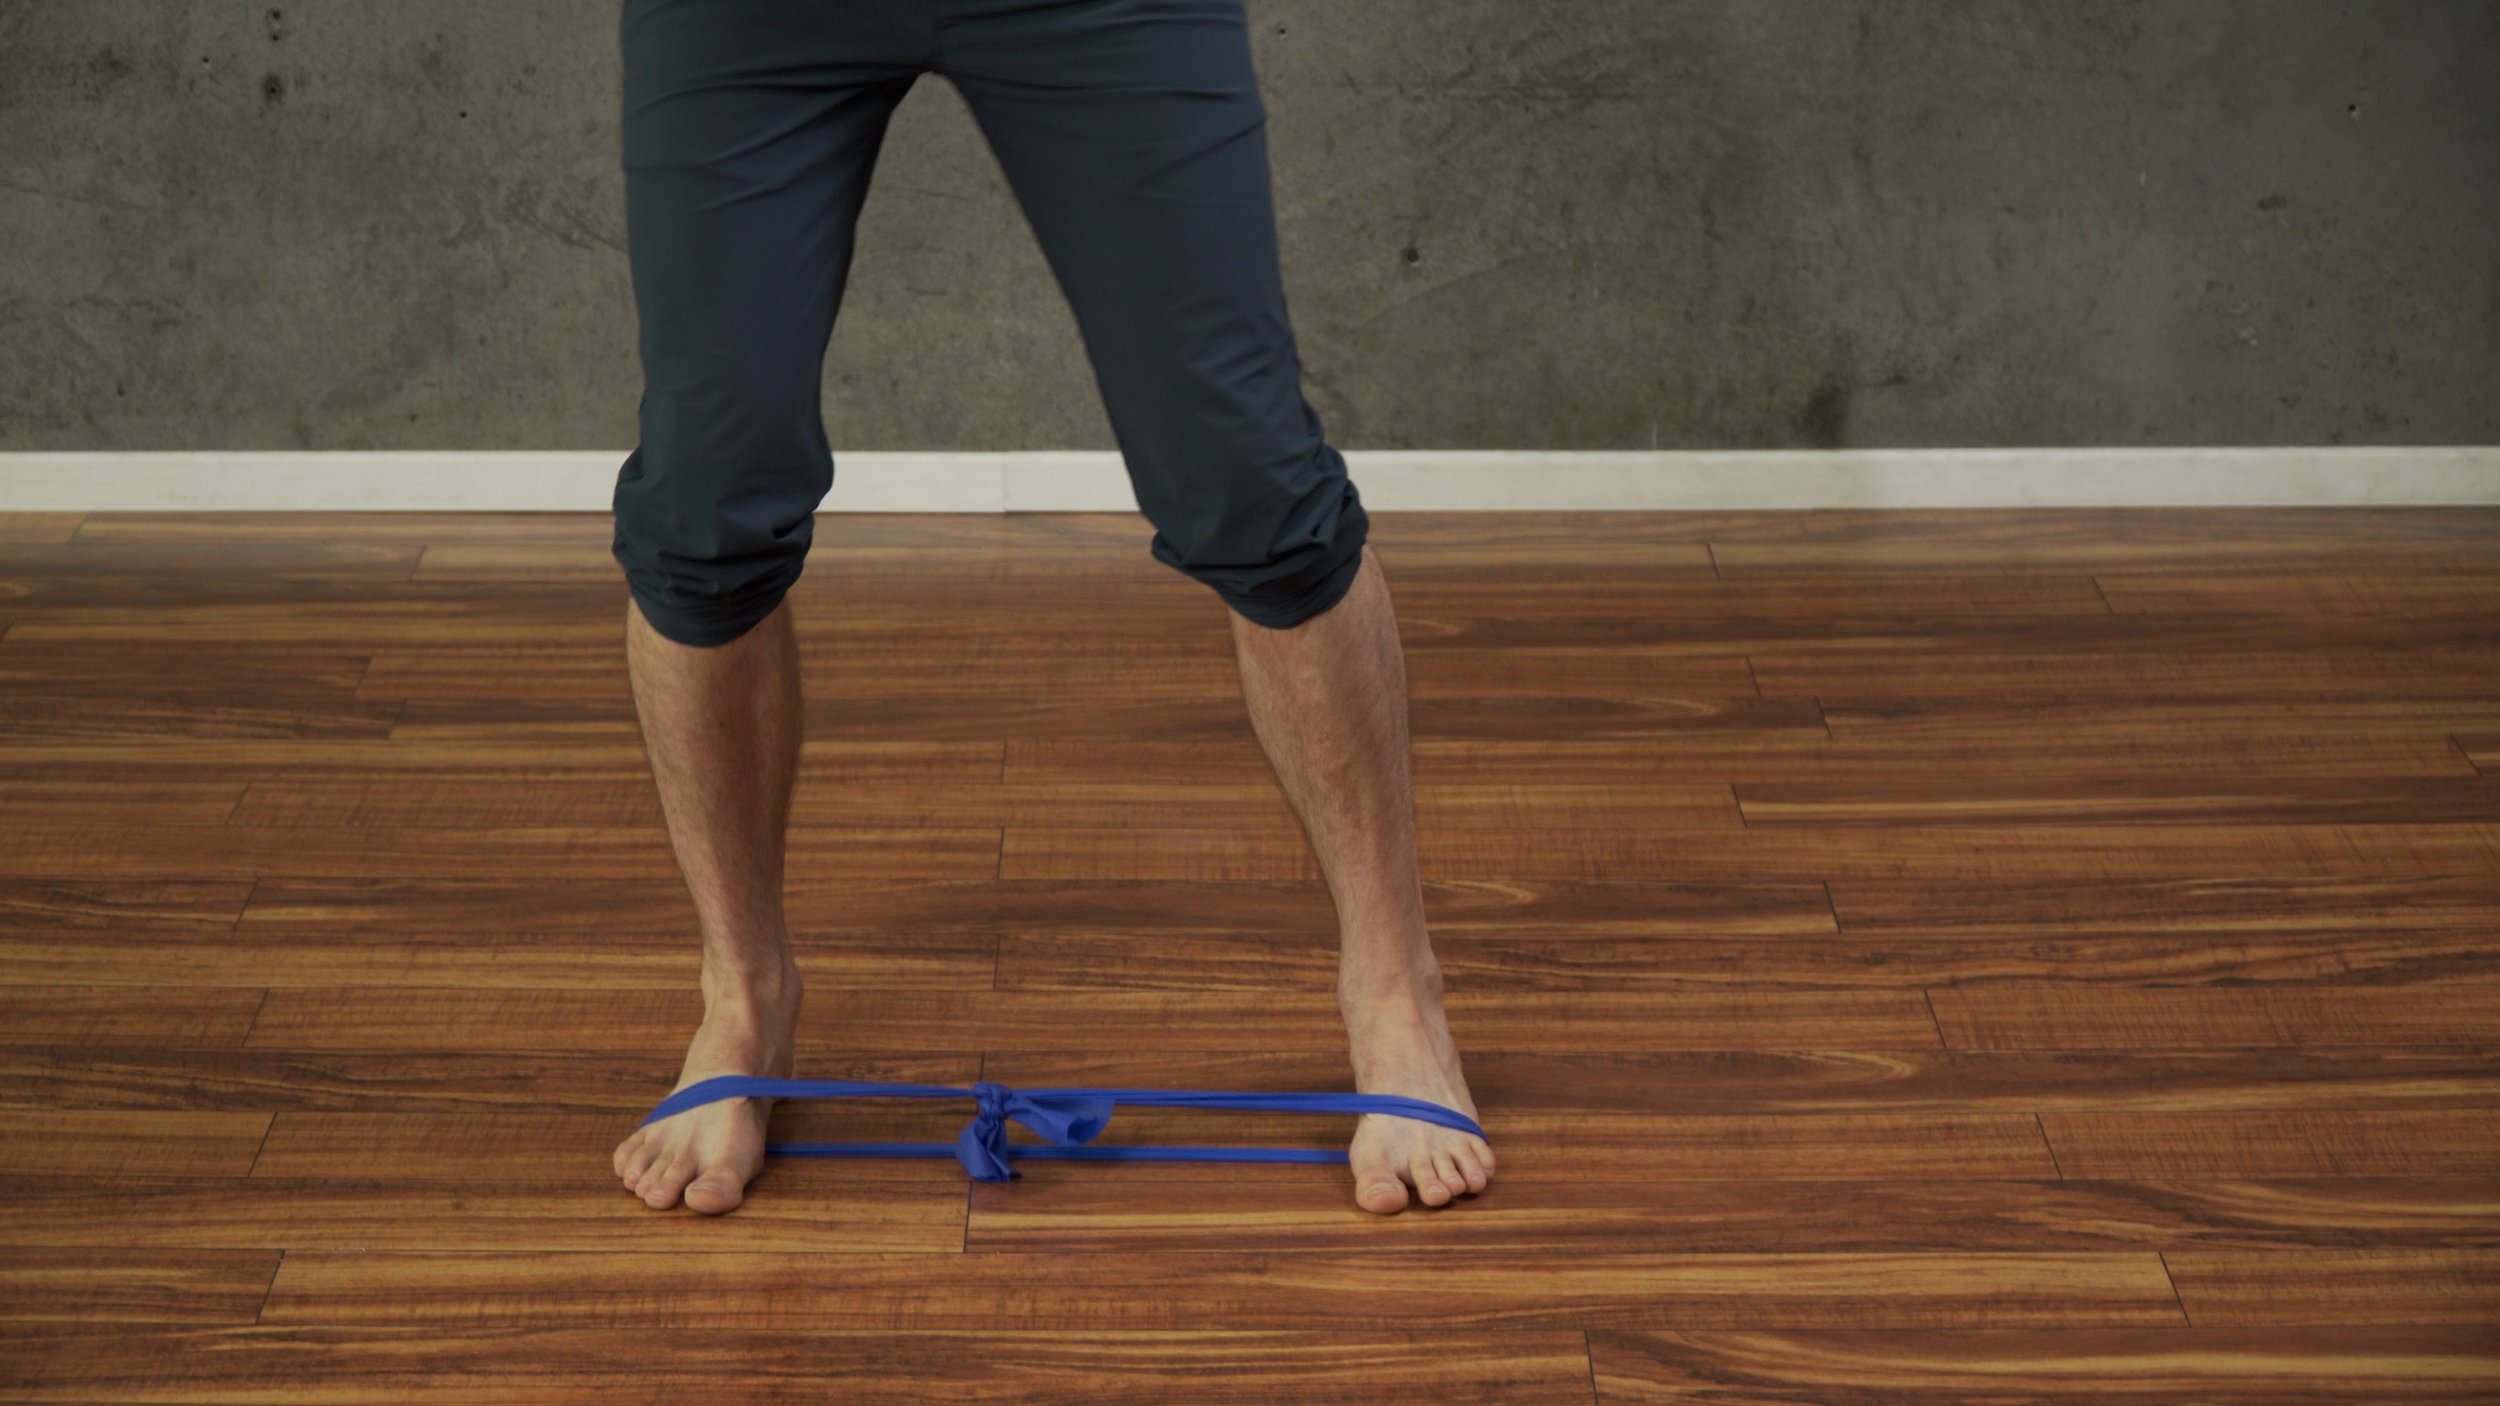
Side steps with a resistance band at your feet
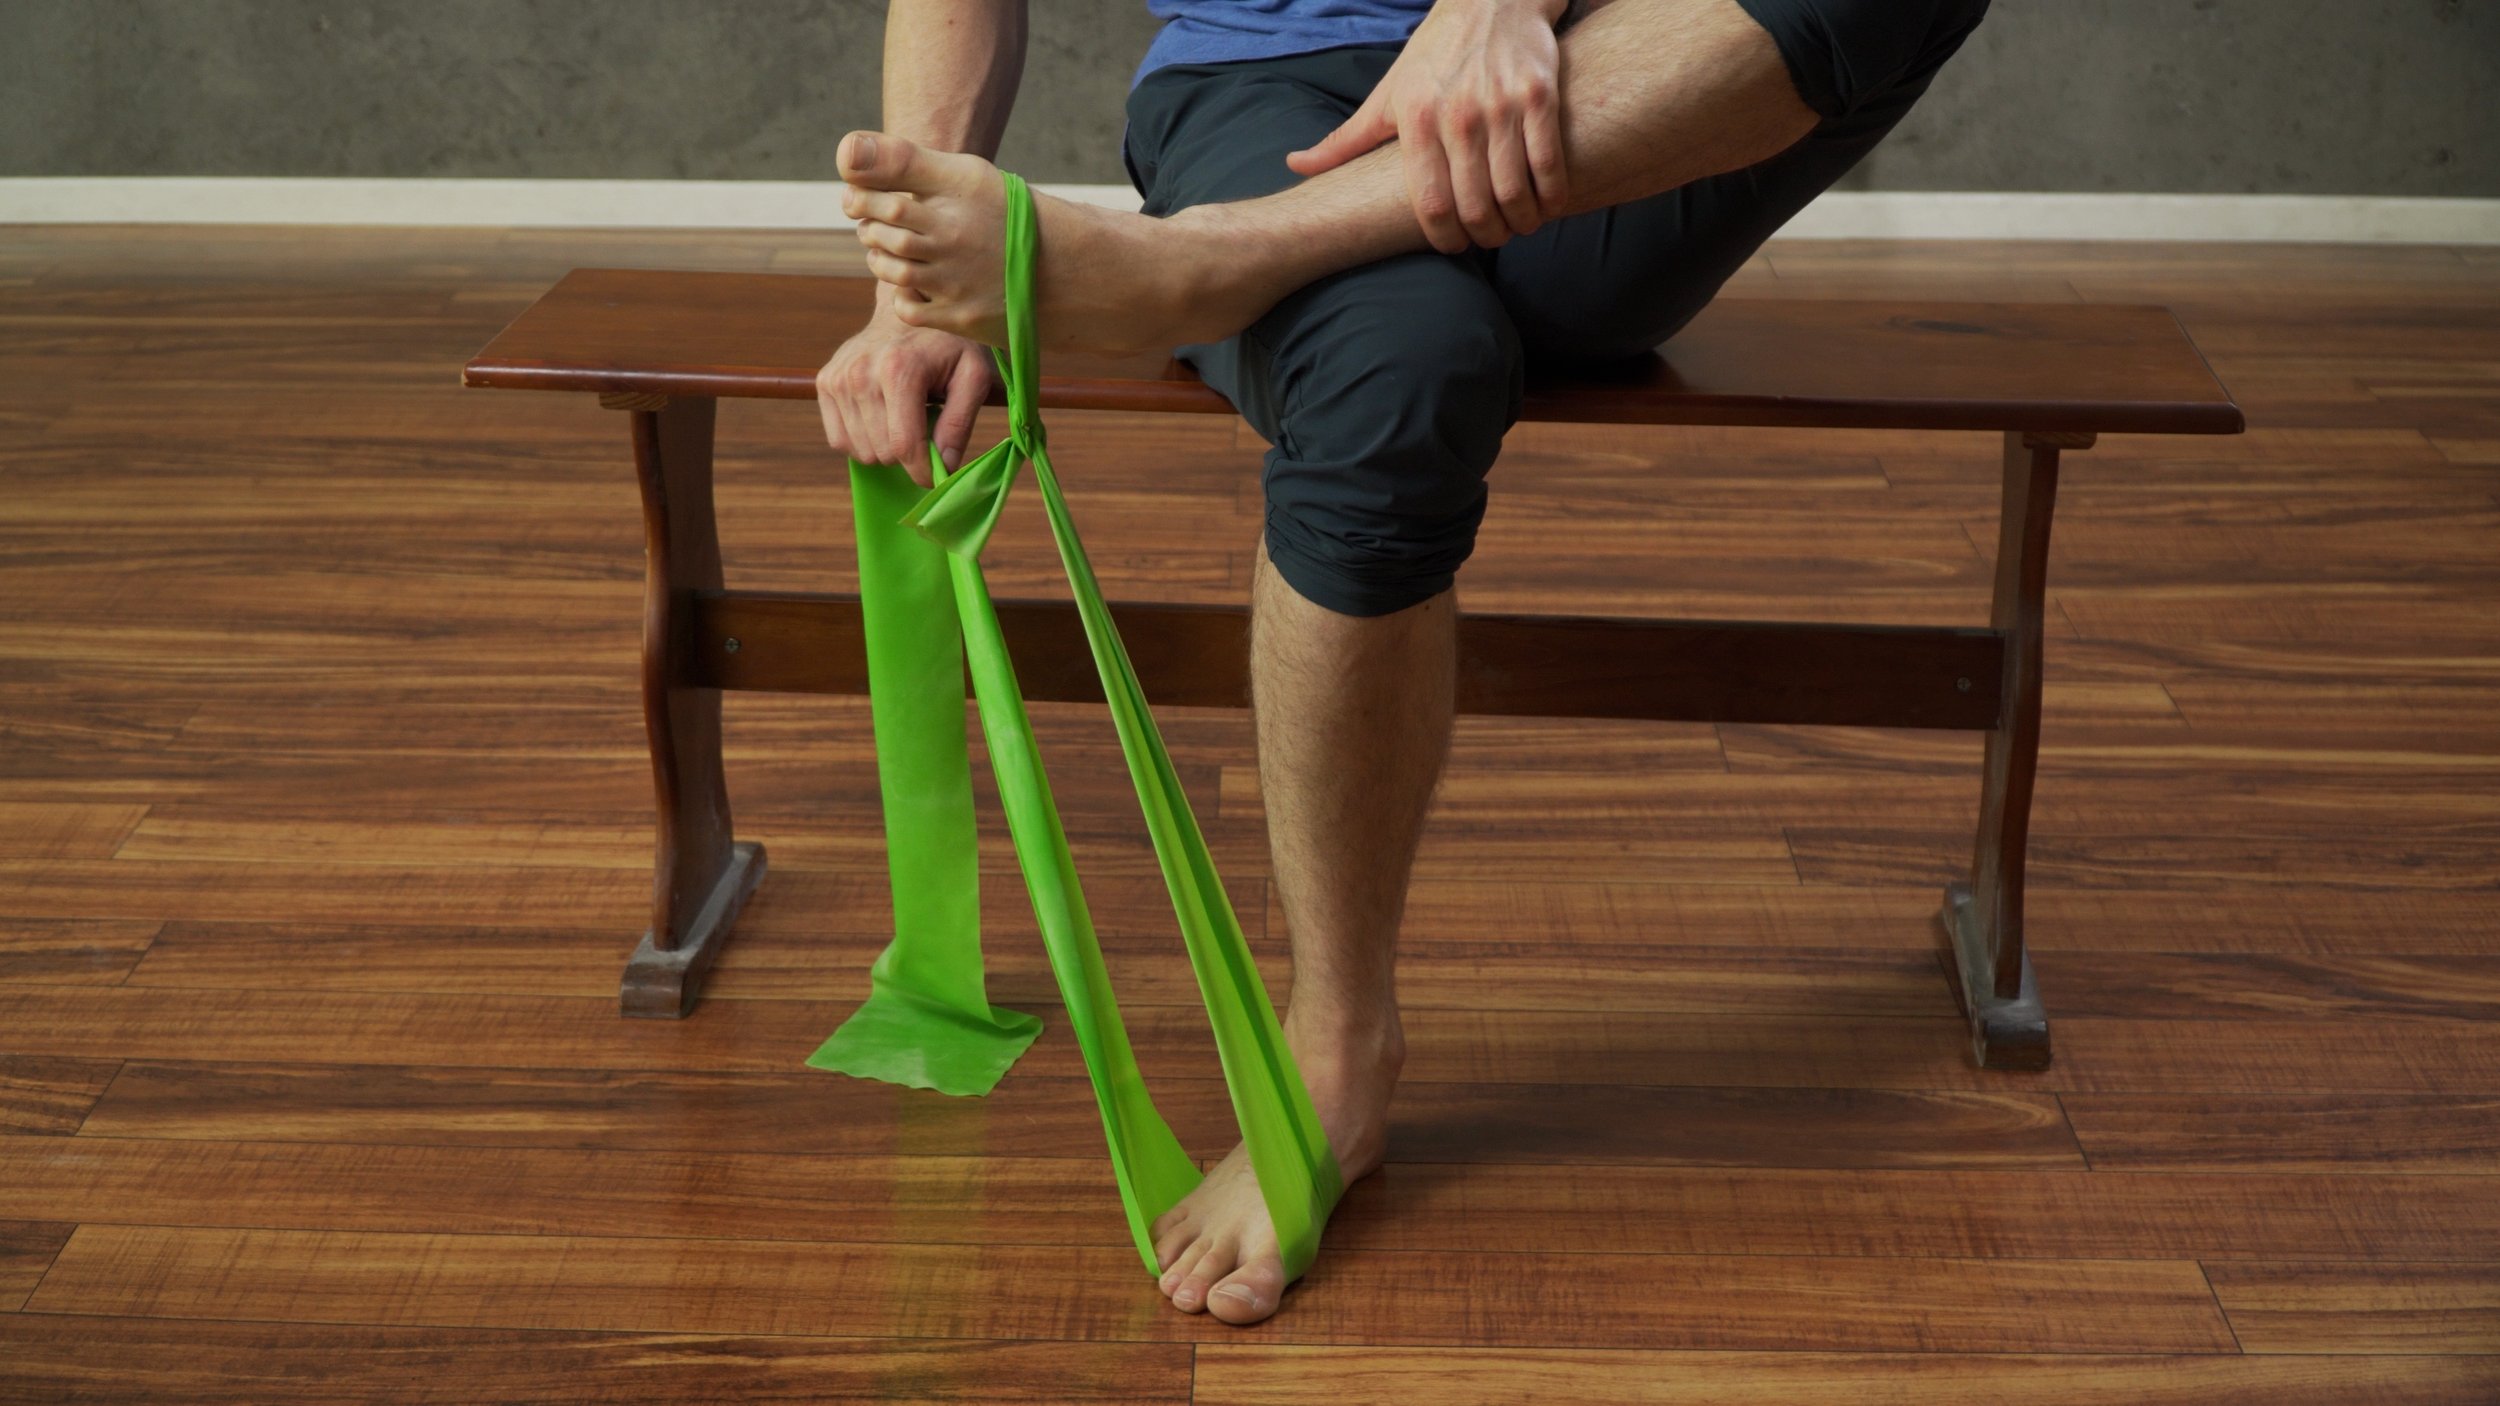
Resisted ankle inversion
To perform Side steps with a resistance band at your feet♦:
Tie a resistance band into a loop or just buy a looped band.
Place it around your feet near the ball of your foot.
Create tension in the band and go into a small squat
Take a step to the side
Lift the trail leg up and control it as the band tries to force you inward
Repeat x10 to one side and return to the next
Sets, reps, frequency: Perform 3 sets of 10-15 reps of the side steps, 1-3x/week.
To perform Resisted Ankle Inversion
Tie a loop at the end of a resistance band
Place this loop around your foot
Step on the band with the unaffected leg
Lift the affect leg up and across placing the outside of your lower shin on top of the unaffected thigh
The band should now be pulling your foot down towards the ground
Fight the band pulling your foot up towards the sky while also turning your foot up as if you are trying to look at the bottom of your foot
Slowly allow the foot to lower back down
Repeat x15
Sets, reps, frequency: Perform 3 sets of 10-15 reps of the resisted ankle inversions, 1-3x/week.
PART 8: RETURN TO SPORT TRAINING

The final stage of your training should involve advanced drills applicable to your sport. In this case, climbing. This is mostly going to focus on jumping and landing. So, we have to practice just that!
My recommendation is to perform a single leg backwards jump.
To perform a single leg backwards jump
Start on flat ground standing on one leg.
Jump backwards, landing on the same leg.
Use a mirror or record yourself to make sure you maintain good shoulder, hip, knee, and ankle alignment
Repeat!
To progress (and make this more realistic and functional for climbing): stand on a step or a box and jump backwards off the object
Sets, reps, frequency: perform 2-3 sets of 4-6 jumps, 1-2x/week. Note, the higher or more intense you make this, the fewer repetitions you’ll want to perform.
NOTE: This is a challenging exercise and should be done assuming your own personal risk.
Note: the acute phase will be day 0-5-7. Subacute 7-21. And earlier chronic / remodelling day 22-60, approximately. Retraining will be 60+
Note: retraining can begin ~60 days after initial injury, depending on severity of the injury.


PART 9: PROGNOSIS
There’s great news when it comes to ankle injuries. You can absolutely return to your prior level of activity and function without major long term effects IF you follow an effective rehab plan.
A grade I injury may feel fine in just 2 weeks! A grade II injury may take 4-8 weeks to feel better, and a Grade III may take 3-6 months BUT it can take a full year to feel a full restoration of strength.
PART 10: CONCLUSIONS AND OUTRO
In my practice, I hear all the time how people are still suffering from their ankle injury a year or so later. But, when you ask them what they did for it, the answer is a solid shrug. If you are proactive in your rehab, you can definitely recover. So next time you unfortunately suffer an ankle injury, be sure to train that single leg balance with your eyes closed so you climb your slab project while chatting about current events and send the climb without even knowing it’s over because your eyes were closed. Repeat, but this time on one leg ;)
DISCLAIMER
As always, exercises are to be performed assuming your own risk and should not be done if you feel you are at risk for injury. See a medical professional if you have concerns before starting new exercises.
Written and Produced by Jason Hooper (PT, DPT, OCS, SCS, CAFS) and Emile Modesitt
IG: @hoopersbetaofficial
RESEARCH
Citation
James W. McDonald, A. Michael Henrie, Masaru Teramoto, Edward Medina, Stuart E. Willick, Descriptive Epidemiology, Medical Evaluation, and Outcomes of Rock Climbing Injuries, Wilderness & Environmental Medicine, Volume 28, Issue 3, 2017, Pages 185-196, ISSN 1080-6032, https://doi.org/10.1016/j.wem.2017.05.001.
Title
Ligament Healing: A Review of Some Current Clinical and Experimental Concepts
Citation
Frank C, Shrive N, Bray R. Ligament Healing: A Review of Some Current Clinical and Experimental Concepts. Iowa Orthop J. 1992;12:21-28.
Key Takeaways
Ligaments primarily function to provide stabilization of joints both at rest and during normal range of motion
Ligament injuries create disruptions in the balance between joint mobility and joint stability, which can lead to abnormal transmission of forces throughout the joint, resulting in damage to other structures in and around the joint.
This may be due to the dramatic physiological and structural changes that ligaments sustain as a result of injury, as well as the complex and dynamic cellular processes that occur during healing. These processes create alterations in the biology and biomechanics of the injured ligament, leading to inadequate healing and tissue formation that is inferior to the tissue it replaces.
The incomplete healing and persisting differences in the new ligament tissue result in ligament laxity, which predisposes the joint to further injury.
Ligament injury and subsequent laxity cause joint instability, which leads to chronic pain, diminished function, and ultimately osteoarthritis of the affected joint.
Ligaments prevent excessive motion of joints by providing passive stabilization and guiding joints through normal range of motion under tensile load. In doing so, ligaments transfer force to and from the skeleton while dynamically distributing the loads applied to them in order to perform specific movement patterns
When tension is applied, ligaments deform, or elongate, in a non-linear fashion through the recruitment of crimped collagen fibers. As the tension placed on the ligament increases, the collagen fibers progressively un-crimp, or elongate, until all fibers are nearly linear.
As the fibers become increasingly linear, the ligament structure becomes increasingly stiff.
Ligaments can lose their ability to retain their original shape when stretched or elongated past a certain point for a prolonged period of time. When this occurs, the ligament becomes lax and unable to properly support the joint, leading to instability, pain, and eventual osteoarthritis of the joint.
The acute inflammatory phase begins within minutes of injury and continues over the next 48-72 hours.
During this phase, blood collects at the site of injury and platelet cells interact with certain matrix components to change their shape and initiate clot formation. The platelet-rich fibriclot releases growth factors that are necessary for healing and provides a platform on which many cellular events occur.
The proliferative/repair phase begins when immune cells release various growth factors and cytokines, which initiate fibroblast proliferation to rebuild the ligament tissue matrix.
The tissue formed initially appears as disorganized scar tissue with more blood vessels, fat cells, fibroblastic and inflammatory cells than normal ligament tissue.
After a few weeks, the proliferative phase merges into the remodeling phase in which collagen maturation occurs for months to years after the initial injury.
With time, the tissue matrix starts to resemble normal ligament tissue, however, critical differences in matrix structure and function persist.
In fact, evidence suggests that the injured ligament structure is replaced with tissue that is grossly, histologically, biochemically, and biomechanically similar to scar tissue. As Frank et al. note, even fully 15, 19-21 remodeled scar tissue remains grossly, microscopically, and functionally different from normal tissues
The remodeling phase of ligament repair can continue for months to years
Because remodeled ligament tissue is morphologically and biomechanically inferior to normal ligament tissue, ligament laxity results, causing functional disability of the affected joint and predisposing other soft tissues in and around the joint to further damage.
Normal ligament tissue is primarily composed of type I collagen, which is responsible for the stiffness and strength of the tissue. After injury, fibroblast primarily synthesize type III collagen and to a much lesser extent Type I collagen. The densely packed 32, 33 cross-linked formation of type I collagen fibrils in normal ligaments accounts for stability, strength, and stiffness of the ligament. The abnormal collagen cross-linking and smaller collagen fibril sizes of the repaired ligament create weaknesses in tissue strength and stiffness which remain for months to years after initial injury
In addition, evidence suggest that remodeled collagen fibrils are not packed as densely as in normal ligaments and the remodeled tissue contains materials other than collagen, such as blood vessels, fat cells, and inflammatory cell pockets which contribute to weakness.
Several studies have documented that conservatively treated injured MCLs typically regain only 40% to 80% of their structural stiffness and strength compared to normal MCLs
In addition, remodeled MCLs are at risk for permanent elongation because after loading they do not appear to return to their original length as quickly or as completely as normal MCLs .22
Injured limbs are traditionally rested by splinting or casting. While immobilization of the affected joint has long been prescribed following ligament injury, it has since been discovered that healing ligaments are dramatically affected by the presence or absence of joint motion.
However, immobilizing a joint with a ligament injury can cause detrimental side effects, such as synovial adhesions,62 increasing collagen degradation with 62 decreasing collagen synthesis,7 and a greater percentage 7 of disorganized collagen fibril
Decreased loading of ligament tissue alters matrix turnover so that with time, matrix degradation exceeds formation and the newly synthesized matrix is less well organized, and the tissue stiffness and strength declines.
According to the most recent systematic reviews of research on soft tissue injuries in humans, there appears to be no controlled study that favors immobilization for the treatment of ligament injuries
Early controlled resumption of activity after injury, including repetitive loading on injured soft tissue structures such as ligaments and tendons has profoundly beneficial effects including enhanced cellular synthetic and proliferative effects, increased strength, size, matrix organization and collagen content of ligaments and tendons
Mobilization has been shown to benefit the injured ligament by causing it to form more connective tissue, resulting in tissue that is stronger and stiffer than an immobilized counterpart
Motion causes an increase of blood flow to the affected joint, providing the damaged ligament tissue with nutrients and metabolites necessary for tissue repair and healing.
Patients who treated their ligament injuries with motion, versus immobilization, were able to return to work quicker, return to sport quicker, and demonstrated less objective instability as tested by stress X-ray
new research has shown that NSAIDs are only mildly effective in relieving the symptoms of most muscle, ligament, and tendon injuries and are potentially deleterious to soft tissue healing
Title
The Role of Ankle Proprioception for Balance Control in relation to Sports Performance and Injury
Citation
Han J, Anson J, Waddington G, Adams R, Liu Y. The Role of Ankle Proprioception for Balance Control in relation to Sports Performance and Injury. Biomed Res Int. 2015;2015:842804. doi:10.1155/2015/842804
Key Takeaways
We suggest that a possible cause of recurrent sprains in the instability group is the combined action of diminished proprioception and evertor muscle weakness
If the ankle is inverted at the moment the foot touches the ground, due to the diminished proprioception, the result could be a varus thrust from an inversion lever through the subtalar axis. If the evertor muscles are not strong enough to counteract this motion, the tensile strength of the lateral ligaments may be exceeded, resulting in injury.
Our results affirm the importance of proprioception training and strength training of the peroneal muscles in the rehabilitation of ankle injuries. These exercises may effectively stabilize an unstable ankle and break the vicious cycle of recurrent sprains and subsequent loss of proprioception and muscle atrophy