How to Fix Ulnar Wrist Pain (TFCC Injury Recovery Guide)
Hooper’s Beta Ep. 157
Introduction
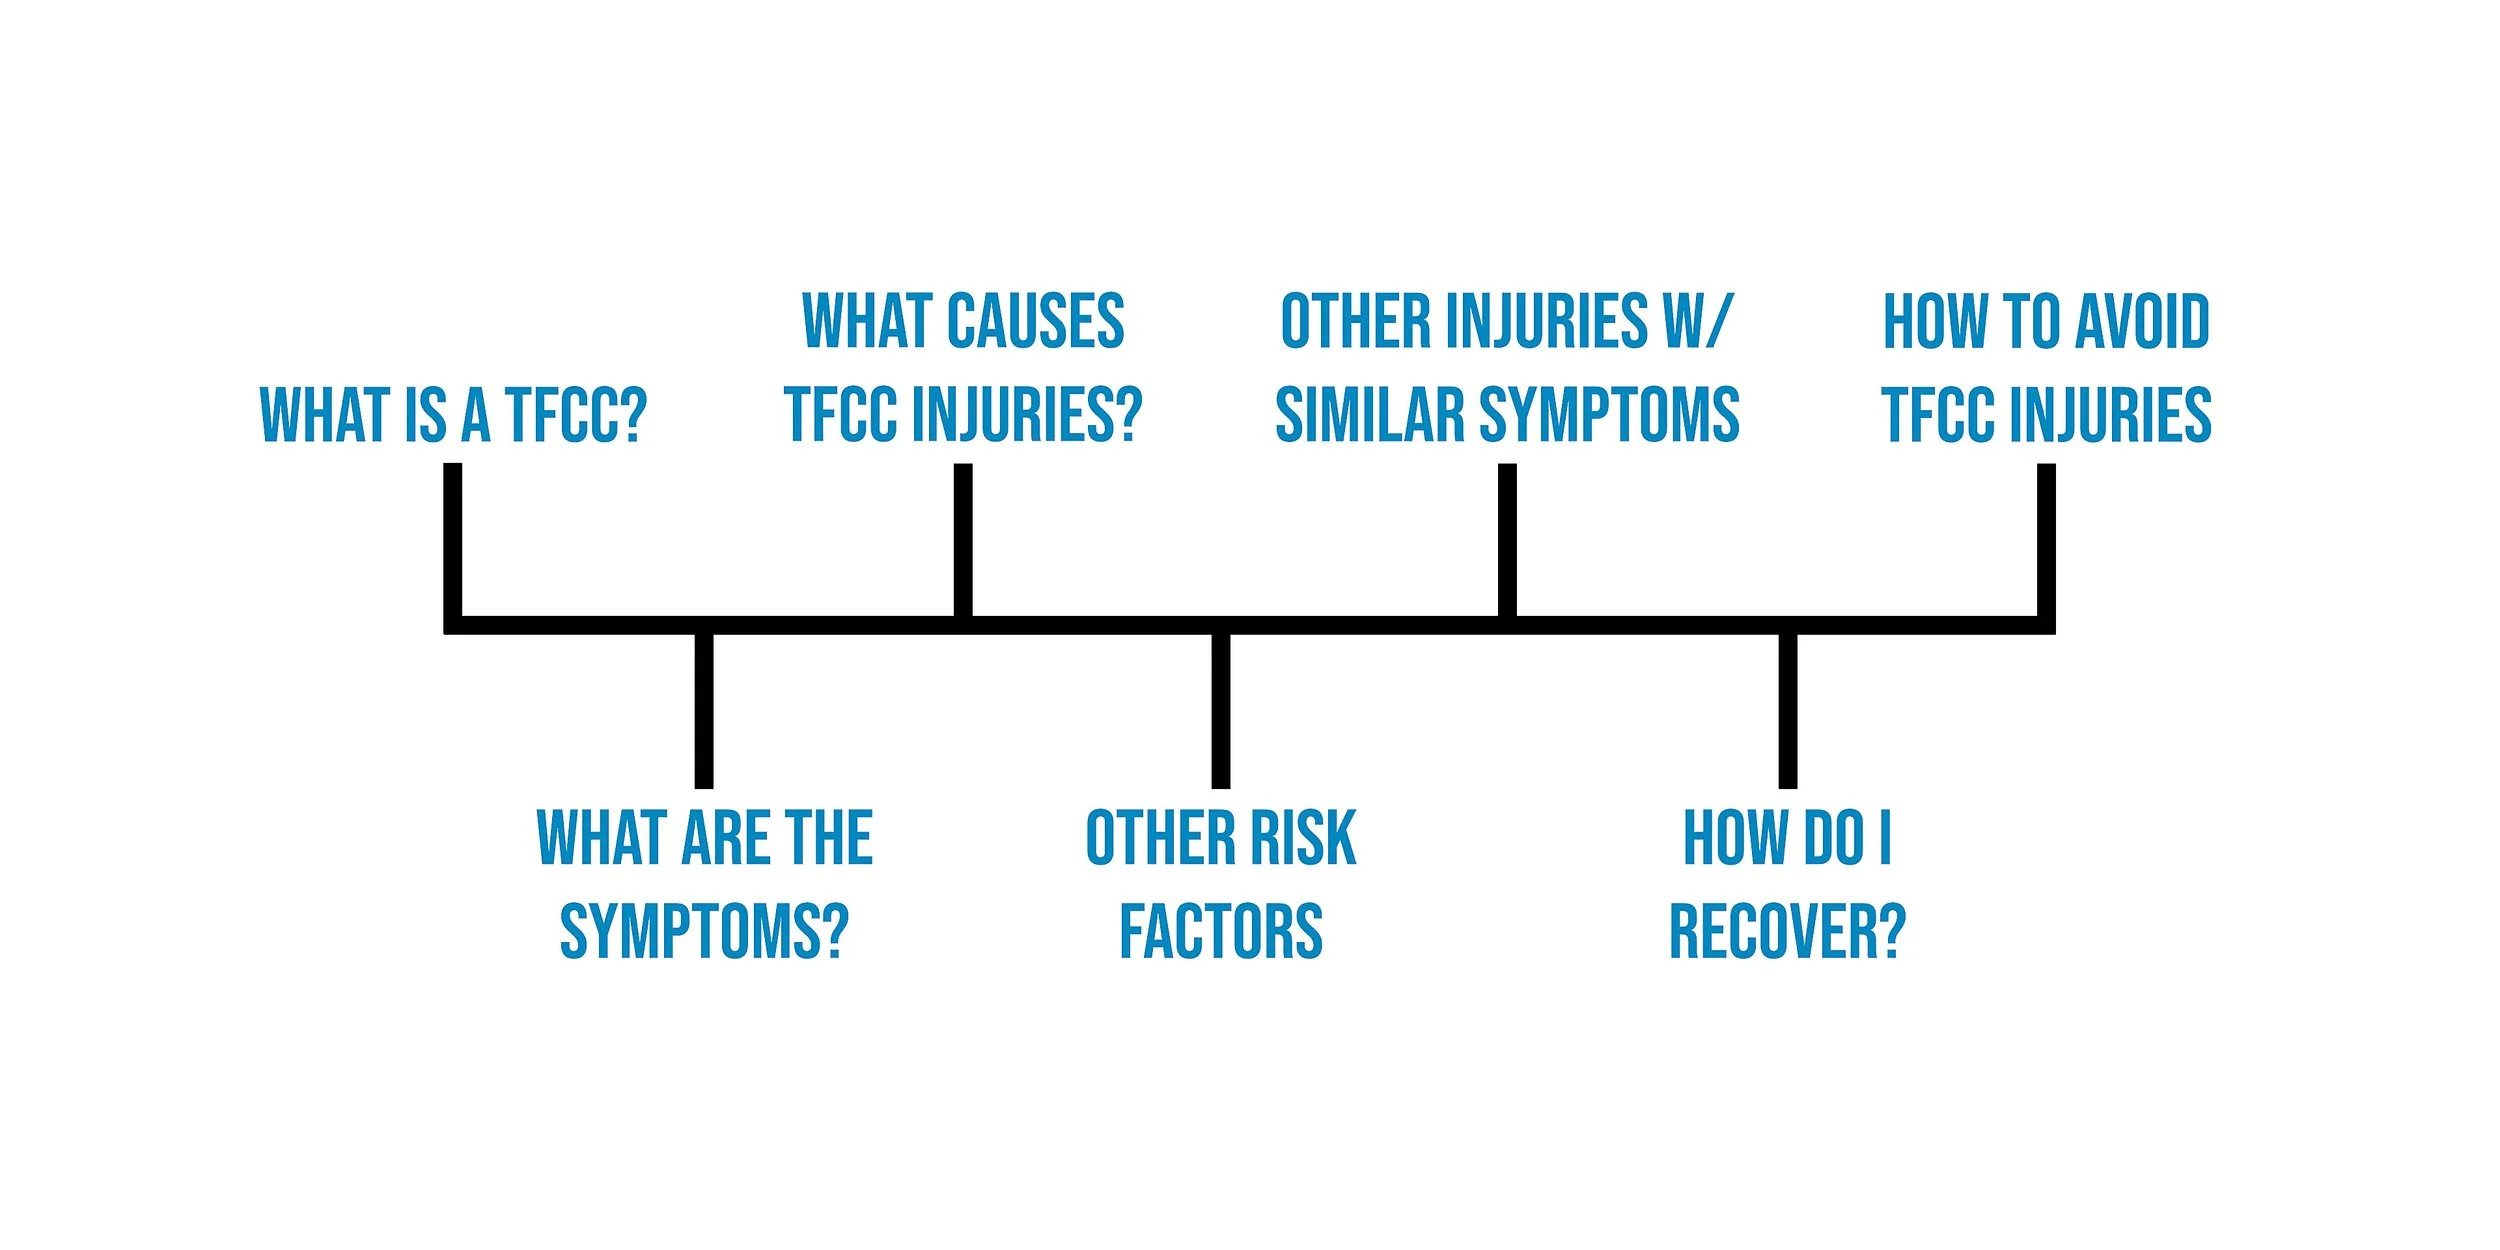
If you’ve got pain on the ulnar side of your wrist that’s plaguing your climbing, training, or heck, even just doing the dishes, then you’ve come to the right place. In this video we’ll teach you everything you need to know about recovering from TFCC injuries, including what the TFCC actually is, why injuries happen, what exercises to perform, and how long it’ll take until you’re back to 100%.
What is the TFCC?
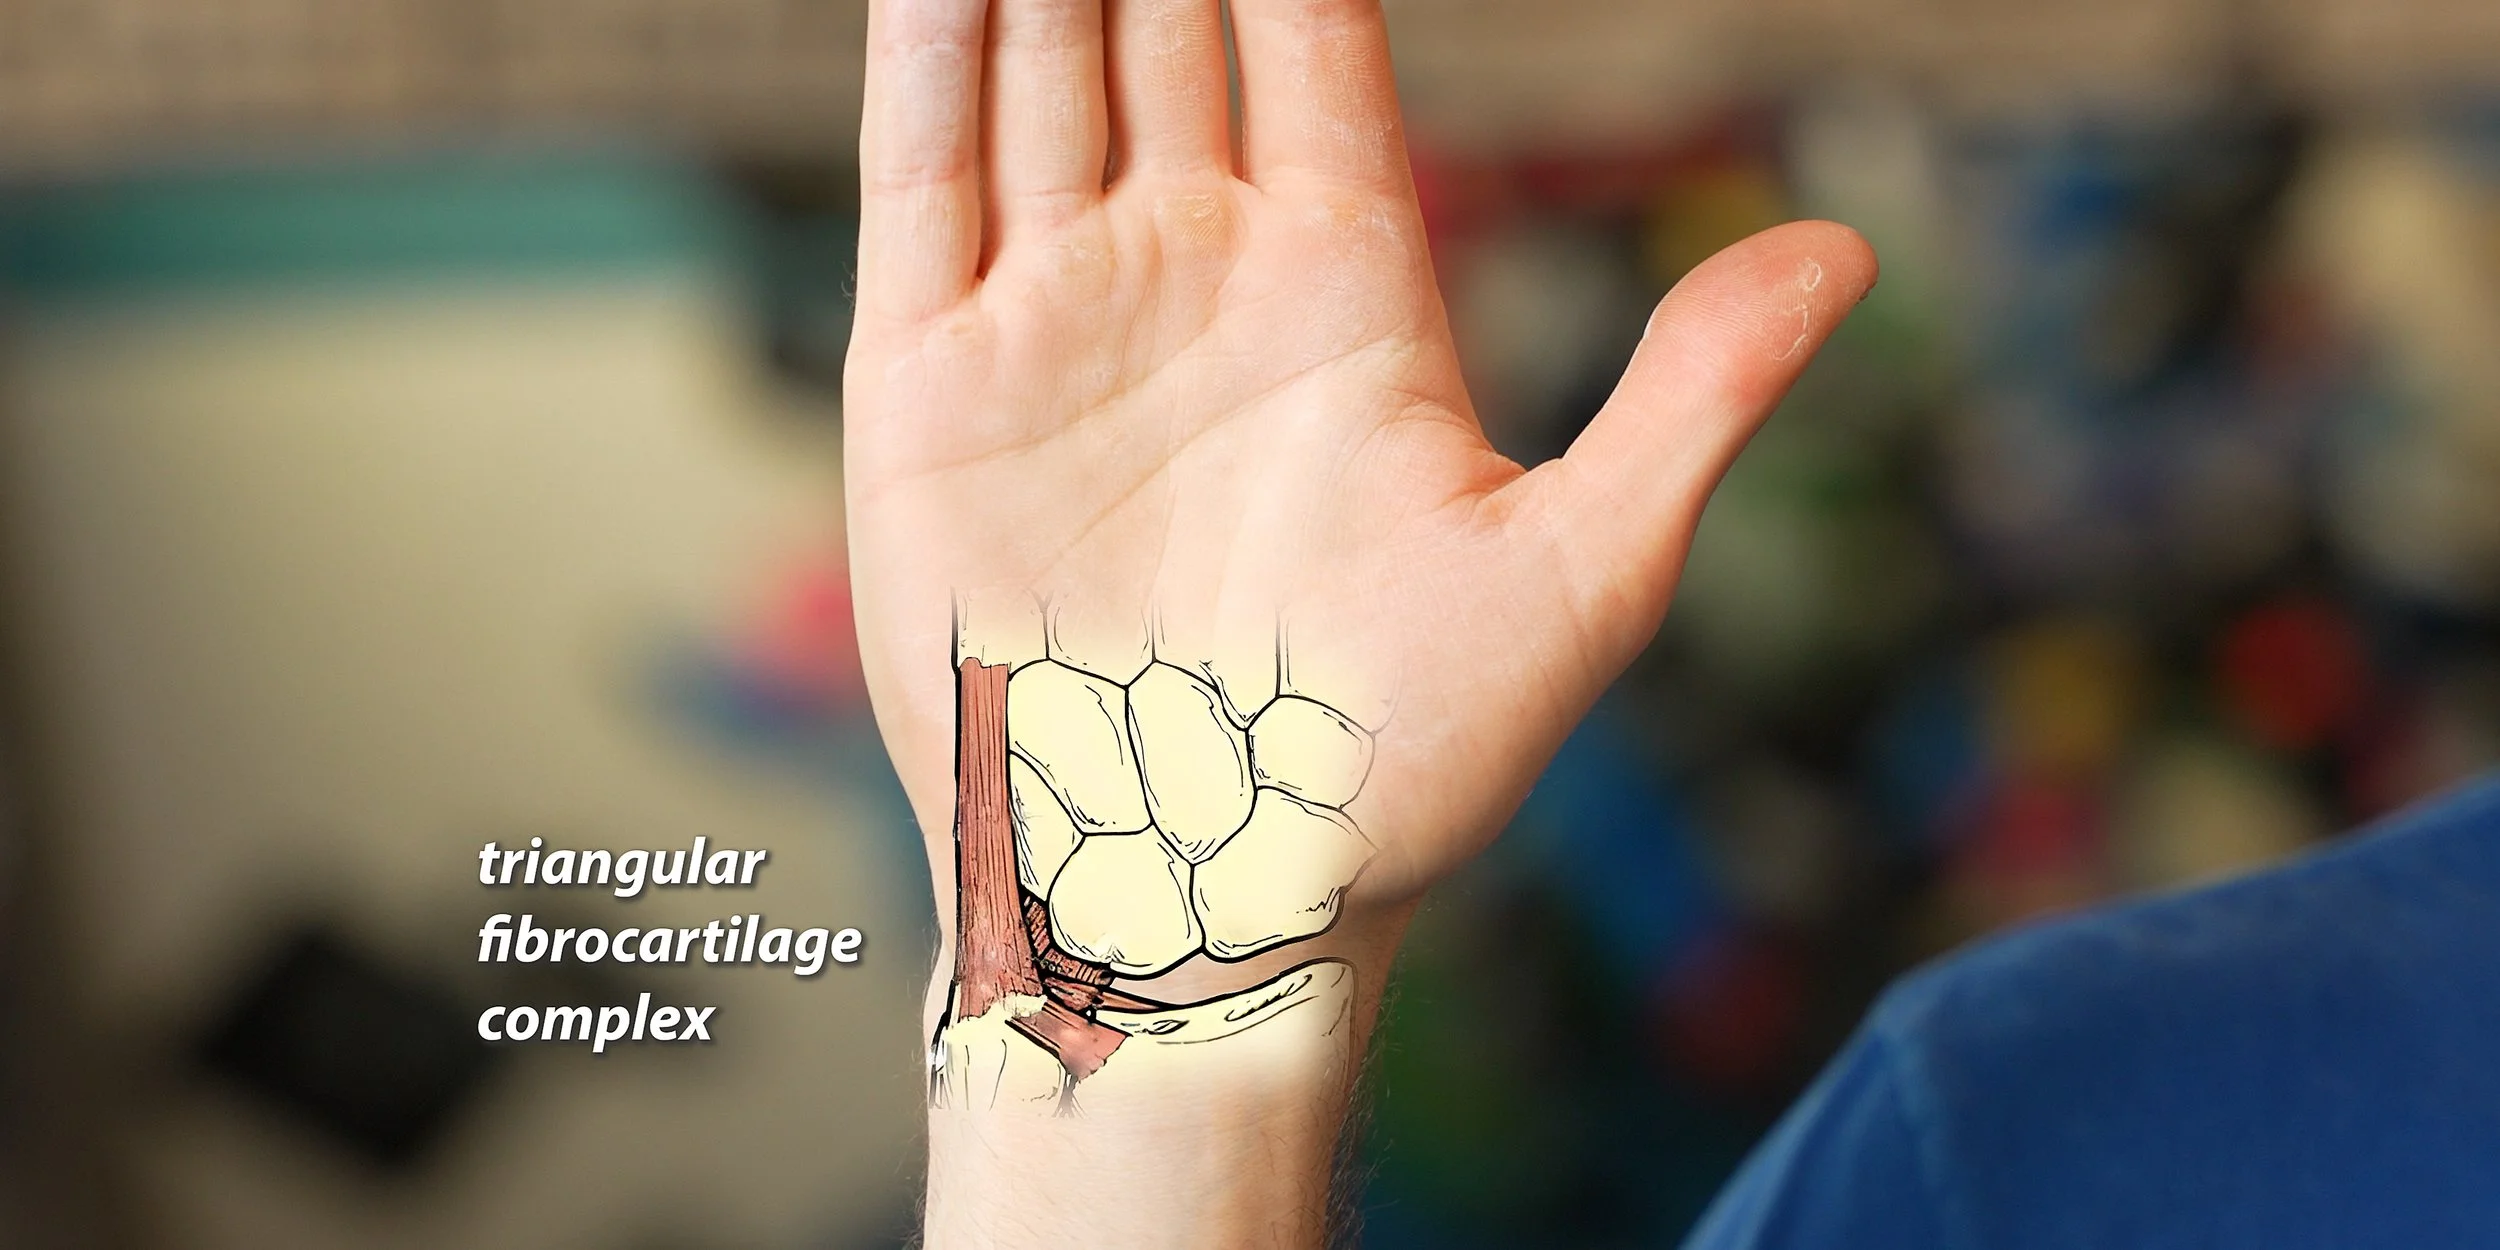
TFCC stands for Triangular Fibrocartilage Complex. It’s located on the ulnar side (or, “pinky side”) of the wrist, and as the name implies, it is not simply one structure, it is indeed… complex. In fact, it’s made up of so many structures that by the time I finished listing them 90% of you would skip this video. So instead, just pause the video if you care about that.

Triangular fibrocartilage (TFC): The central disc that cushions and stabilizes the distal radioulnar joint (DRUJ) and ulnar side of the wrist.
Dorsal and palmar radioulnar ligaments: Provide primary stability for the DRUJ during forearm rotation (pronation/supination).
Ulnolunate ligament: Connects the ulna to the lunate bone, helping stabilize the ulnocarpal joint.
Ulnotriquetral ligament: Connects the ulna to the triquetrum, assisting in ulnocarpal joint stability.
Meniscus homologue: A fibrous extension that blends with the ulnar collateral ligament and TFC, contributing to ulnar wrist support.
Sheath of the extensor carpi ulnaris (ECU): Stabilizes the ECU tendon and anchors it within the groove of the ulna, contributing to ulnar wrist stability.
Ulnar collateral ligament: Supports the ulnar side of the wrist by limiting excessive radial deviation and assisting with overall stability.
Now that you’ve got that completely memorized, here’s the simple version: the TFCC is made up of a cartilage disc that cushions the wrist bones, along with several strong ligaments that hold those bones together.
What are the symptoms?
Symptoms of a TFCC injury aren’t always limited to pain in the TFCC area; they can also be diffuse. A dull ache or sharp pain can present on the top or bottom of the wrist or even up into the forearm. Symptoms are often provoked by gripping, weight bearing activities, or simple wrist movement like rotation or tilting toward the ulnar side (ulnar deviation), which can ultimately limit your range of motion. This can be frustrating as the pain can linger and spill over into everyday life, turning things you normally wouldn’t think twice about into fear-inducing activities.
Other symptoms include swelling in or around the TFCC depending on the severity of the injury and the structures involved, though not all TFCC injuries will have swelling. An increase in clicking or popping may also occur. Just be aware, though, that even healthy wrists can have some clicking. It’s only an issue if you have *pain* with the clicking or if you notice an obvious change (like the clicks getting louder or more frequent or becoming a noticeable “clunk” feeling).
Symptom Overview:
Ulnar-side wrist pain (on the pinky side of the wrist)
Pain with gripping or weight-bearing (e.g., push-ups, lifting, or holding objects)
Clicking or popping sounds when moving the wrist
Swelling or tenderness along the ulnar side of the wrist
Limited range of motion, particularly in rotation
Pain with ulnar deviation (tilting the wrist toward the pinky side)
Increased pain during daily activities like twisting a doorknob, using tools, or certain climbing movements (e.g., underclings, slopers)
Note that unlike many of the other injuries we cover on this channel, there aren’t any specific “grades” of TFCC injury because they’re so complex.
What causes TFCC injuries?
A TFCC injury is typically a result of excessive compression or overstretching of the wrist. It can be caused by a single forceful event (which would be an acute injury) or it can develop over a longer period of time (which would be a chronic injury).
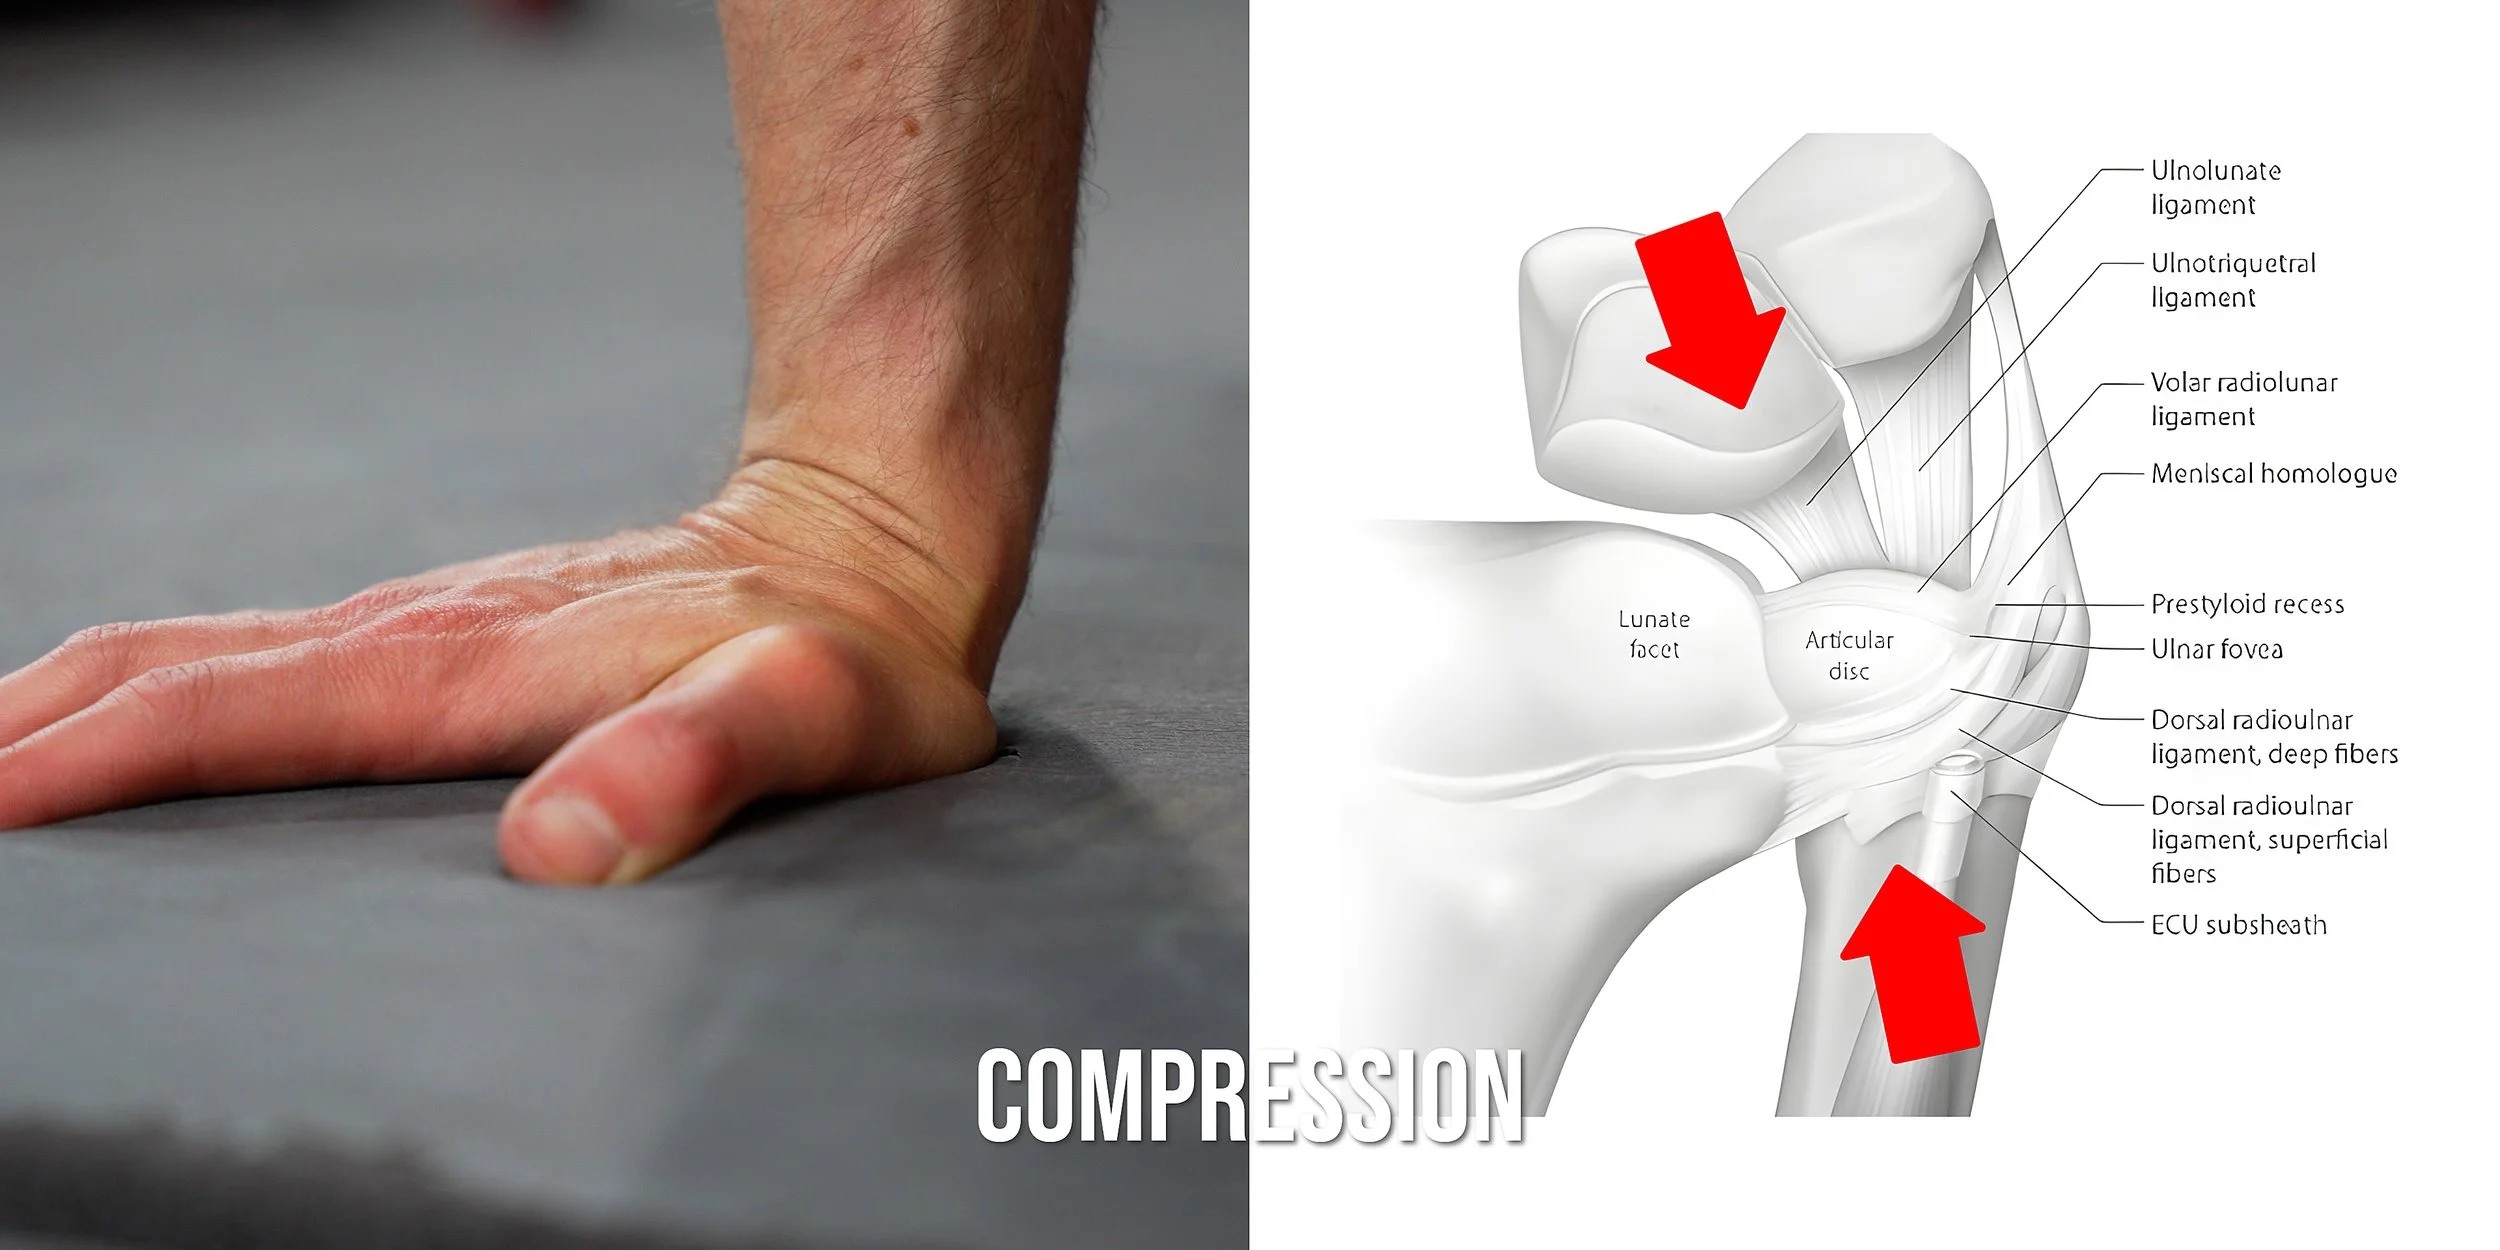
Compression injuries occur when the wrist (carpal) bones and the ulna are forced together, which most commonly affects the articular disc. Examples of compression include a fall on your wrist (acute) or repetitive mantling (chronic).
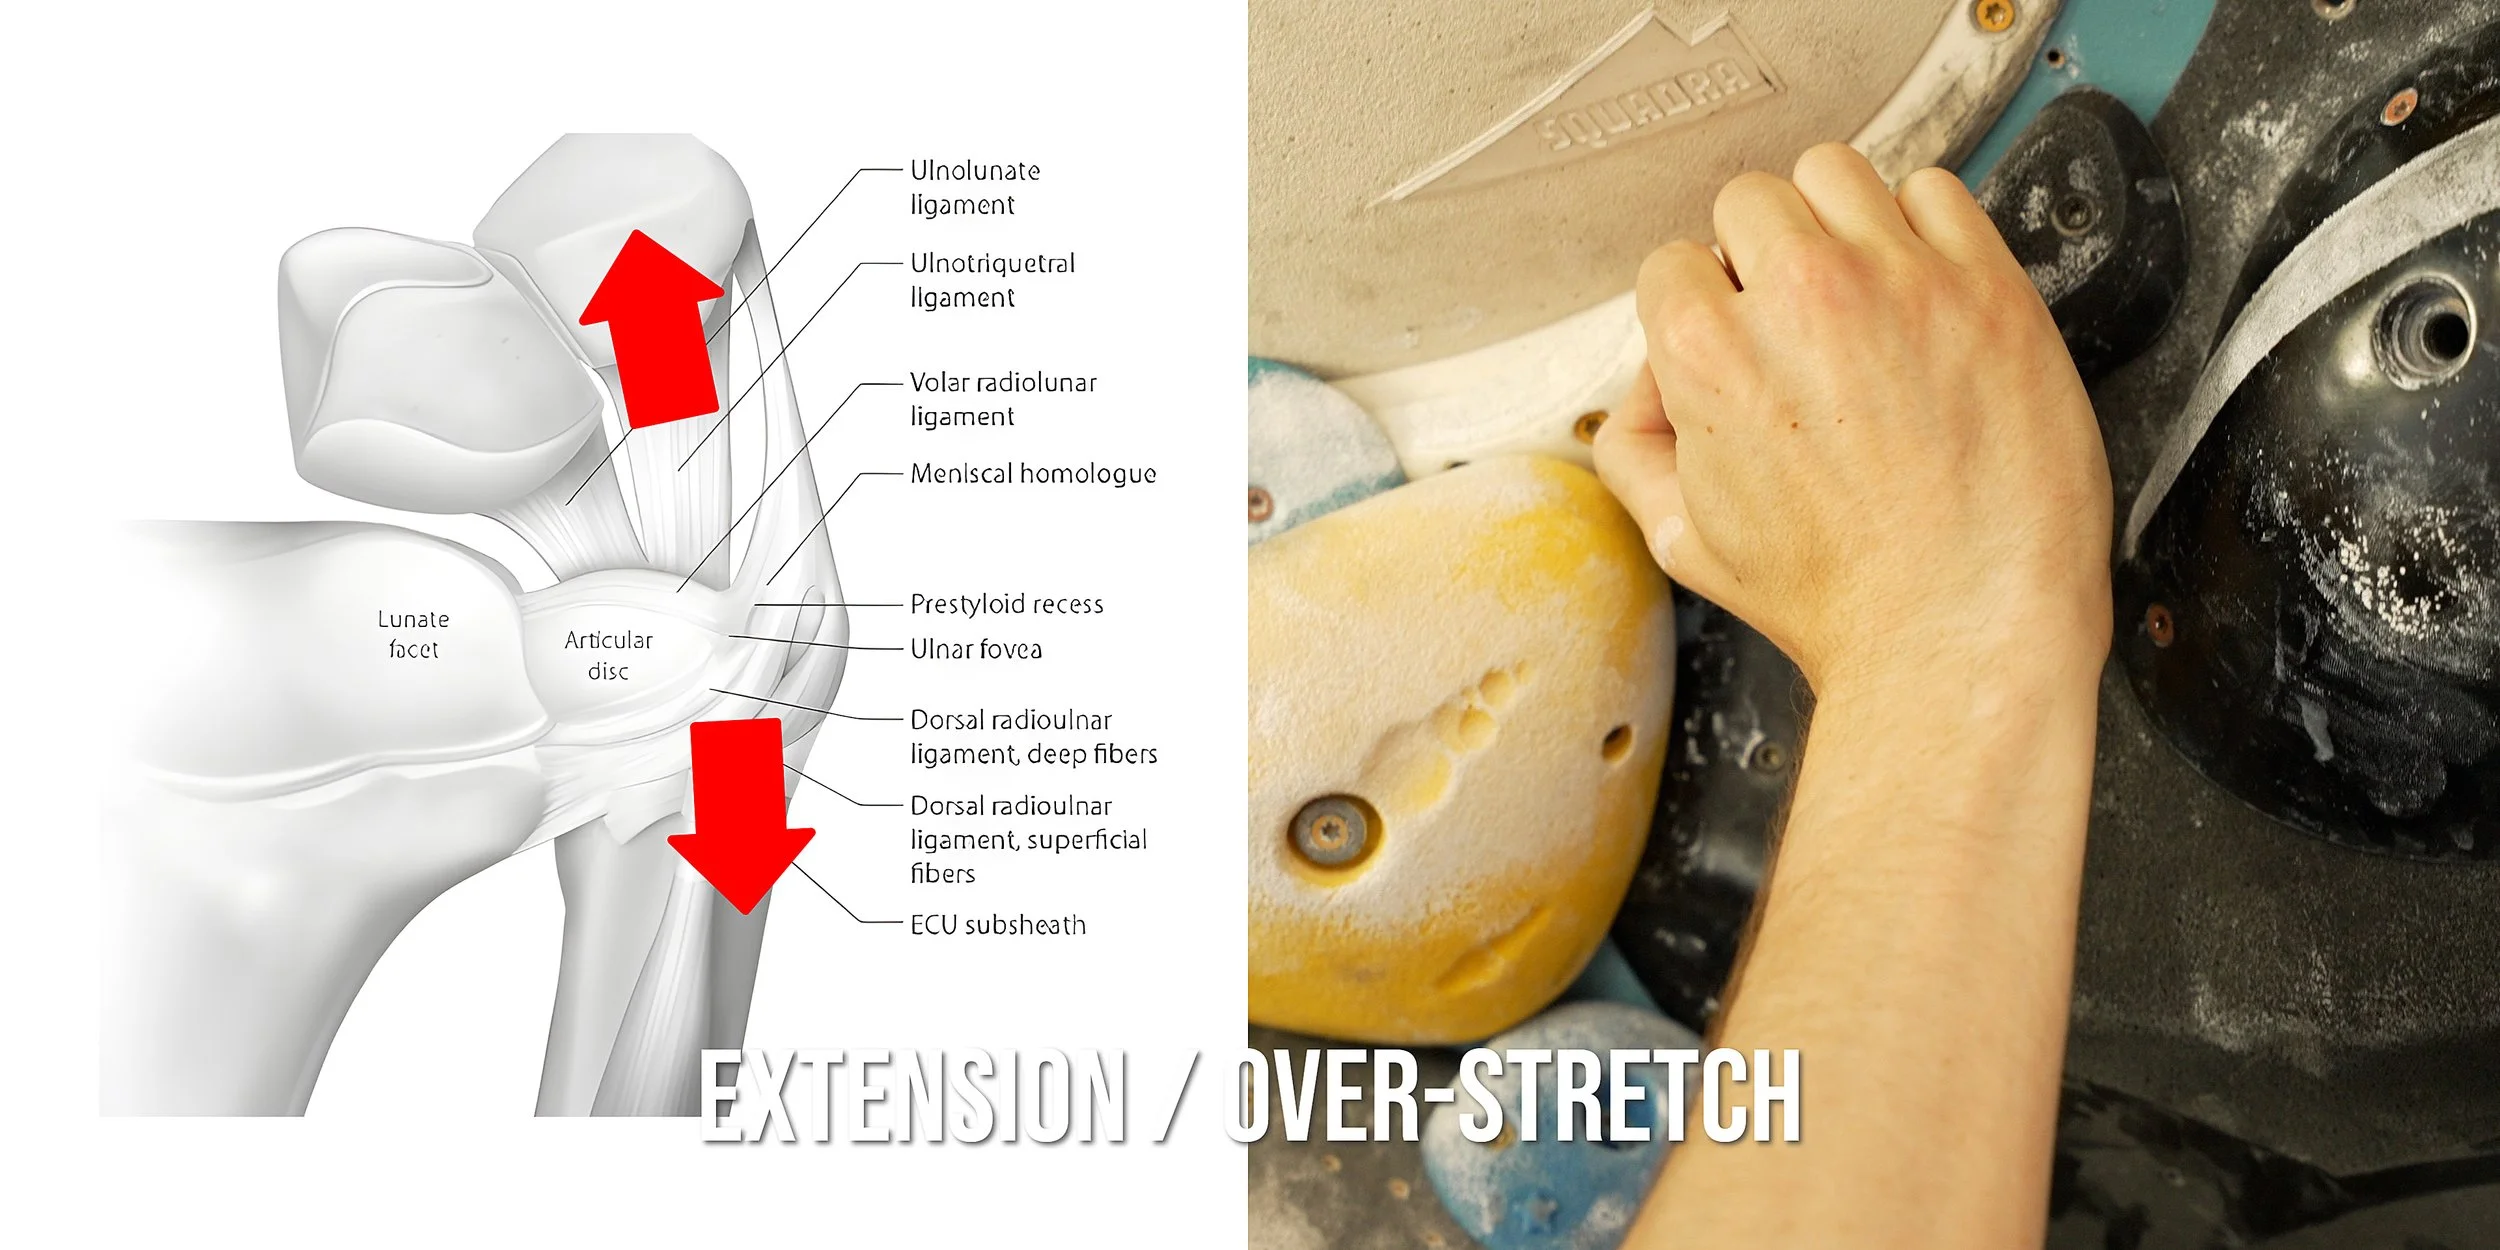
Overstretching injuries occur when the wrist ligaments are stretched beyond their normal range of motion. This can happen with holds that place your wrist into radial deviation, consequently stretching out the ulnar side of your wrist. Examples include an overhead gaston or a hold that is far away from the center of your body, forcing you to tilt your wrist while under load.

Less commonly, overstretching injuries also occur without significant radial deviation, but rather when the wrist is placed in a neutral or loose-pack position, where we are actually in a bit of *ulnar* deviation. Note that this is the opposite position of a normal overstretching issue! This loose-packed position is seen often on slopers and underclings. In the loose-pack position, the ligaments and other connective structures provide less support for the wrist than usual, meaning the wrist *extensor muscles* have to take up the slack. Unfortunately, some people’s extensors aren’t up to the task, so the carpal bones get pulled forward by the flexor muscles and the TFCC gets overstretched.
Do other factors increase likelihood of a TFCC injury?
There are two other factors that contribute to TFCC injuries: increased wrist mobility and ulnar variance.

Increased Mobility
Some people naturally have more joint mobility than others, meaning the bones can move a bit more before being stopped by the ligaments or capsule that hold them in place. This is seen in many areas of the body, including the shoulders, hips, and wrists. In most cases, this is benign. In fact, it can be countered simply by increasing the strength of the surrounding muscles. As long as those extra-mobile joints are not continuously stretched beyond their typical range of motion, they’re often fine. But, if you do have increased wrist mobility and you do not have good muscular strength to counter it, TFCC injury risk tends to increase.
Ulnar Variance


Another factor is an ulnar variance, which is when there’s a slight difference in length between the ulna and the radius bones where they meet the wrist.
A noticeable positive variance (where the ulna is longer than the radius) can decrease the space between the carpal bones and the ulna, causing the TFCC to encounter more force.
Keep in mind, many people’s wrists sit a little positive or negative and stay perfectly happy. Variance is just one piece of the puzzle. You may have been climbing just fine for years with a positive ulnar variance. It may not have been until those 15 consecutive mantle attempts that your TFCC got angry, so don’t immediately blame ulnar variance if there were other potential causes.
If you are concerned about an ulnar variance, you can get it diagnosed with an x-ray, but this is usually not necessary as even individuals with a slight variance can achieve a full recovery with patience and a good recovery program.
Other Injuries That Cause Similar Symptoms
If your symptoms and mechanism of injury line up with everything we’ve talked about thus far, a TFCC injury is the likely issue. However, there are a few other injuries you should be aware of that can cause similar symptoms.
Bone issues, including fractures and degenerative conditions
Tendon issues, including tendinopathies of the ECU (extensor carpi ulnaris) or FCU (flexor carpi ulnaris)
Ulnar nerve entrapment
Cysts in the TFCC area
If you suspect a bone fracture due to a fall, pre-existing medical condition, or repetitive micro-trauma to your wrists (such as jackhammering), you’ll need to consult with a physician.
As far as tendon issues, those can be tricky to differentiate from a TFCC injury without professional evaluation. Luckily, the exercises we cover later in this video should help solve most tendon-related wrist issues as well.
Finally, to rule out an ulnar nerve issue, there are some tests you can do. These are best done with professional guidance, but I’ll show you how to perform one of them in case it obviously reproduces your symptoms.


To perform the prayer test for the ulnar nerve, start by pressing both palms together while keeping the fingers straight. Make sure you are creating gentle pressure equally through all four fingers. Your forearms should be parallel to one another and your thumbs should be gently resting up against your chest. Now, this next step is very important: keep your shoulders down and gently back. Do not allow them to shrug up or roll forward during this test. Now, shift your hands toward the uninjured side as far as you comfortably can go, as if trying to place your hands into your armpit (but remember to keep those shoulders down!). Hold here for up to five seconds, return to the start position, and then shift both hands to the injured side. Hold here momentarily. If needed, you can shift your hands back to the uninjured side and then back to the injured side one more time to better evaluate your results.
If that test very obviously reproduces your wrist injury symptoms, you may have an ulnar nerve issue rather than a TFCC injury (or you could have both). In those cases you’ll need to see a professional for evaluation or just try treating both types of injury to see which treatment you respond to best.
How Do I Recover?

Finally, let’s get to the good stuff! This protocol covers all the major components required for a strong and stable TFCC. However, if you want to save yourself the time of DIYing your recovery and get a whole lot more guidance, you can get the insanely affordable TFCC program I’ve used to get tons of climbers back to 100%. It’s available on our website today as one of our Recovery Blueprints.
1. Reduce Aggravating Factors

As always, the first step toward recovery is to reduce aggravating factors. The severity of your symptoms will help determine how to do this. The stronger the symptoms, the more caution to use. If even just lifting your coffee mug causes a sharp pain, you probably shouldn’t be climbing. On the other hand, if you can throw back liters of delicious coffee, but just have pain on underclings, you should probably stop doing underlings for now, but it’s OK to keep climbing and training if those things aren’t painful.
WIth that being said, I do often encourage a bit of caution with TFCC injuries because they can certainly linger, so reducing or eliminating aggravating factors should be prioritized. If you’re not sure what your aggravating factors are, a good first step is to start paying attention to what causes your symptoms to spike. Or just eliminate several activities and then slowly add them back in to figure out what’s causing the pain.
In general, if the pain from an activity does not exceed 2/10 during and 24 hours after you do it, that activity is likely fine. For some activities, you may need to reduce the intensity, reduce the volume, or change the movement style to bring the pain down to the acceptable level.
2. Bracing
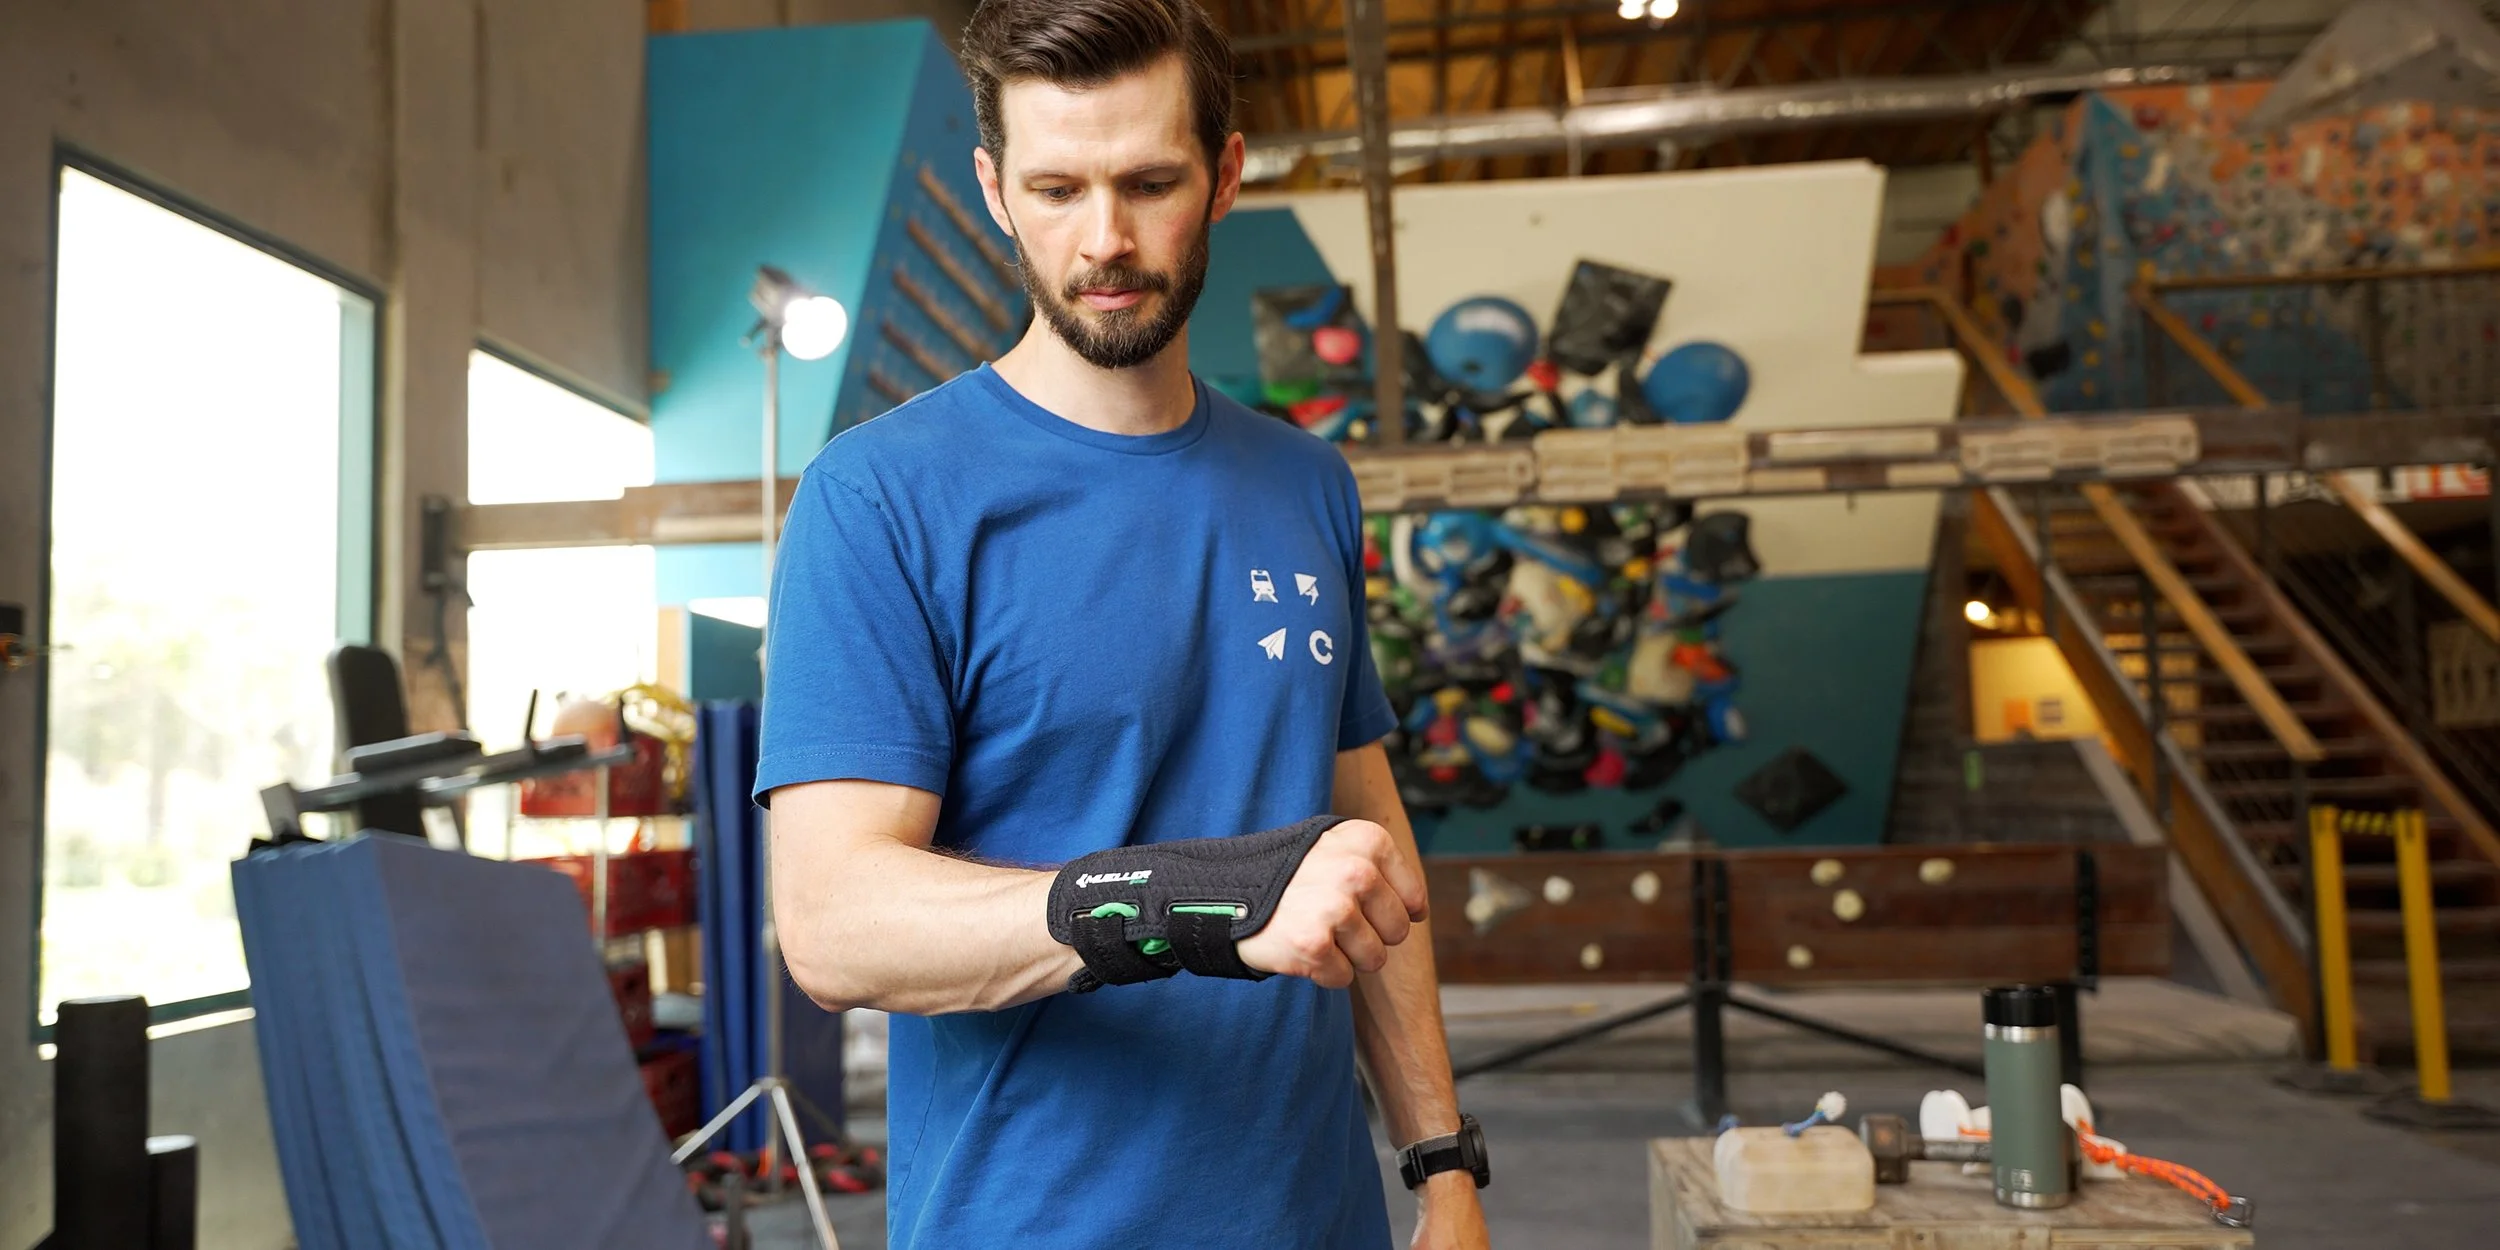
Speaking of reducing aggravating factors, wrist supports can make early TFCC recovery more comfortable and allow you to perform more exercises pain-free. Just keep in mind that braces are tools, not cures—you should taper off support as you regain function. There are 3 common wrist supports: soft brace, rigid or semi-rigid brace, and tape.
Soft Brace
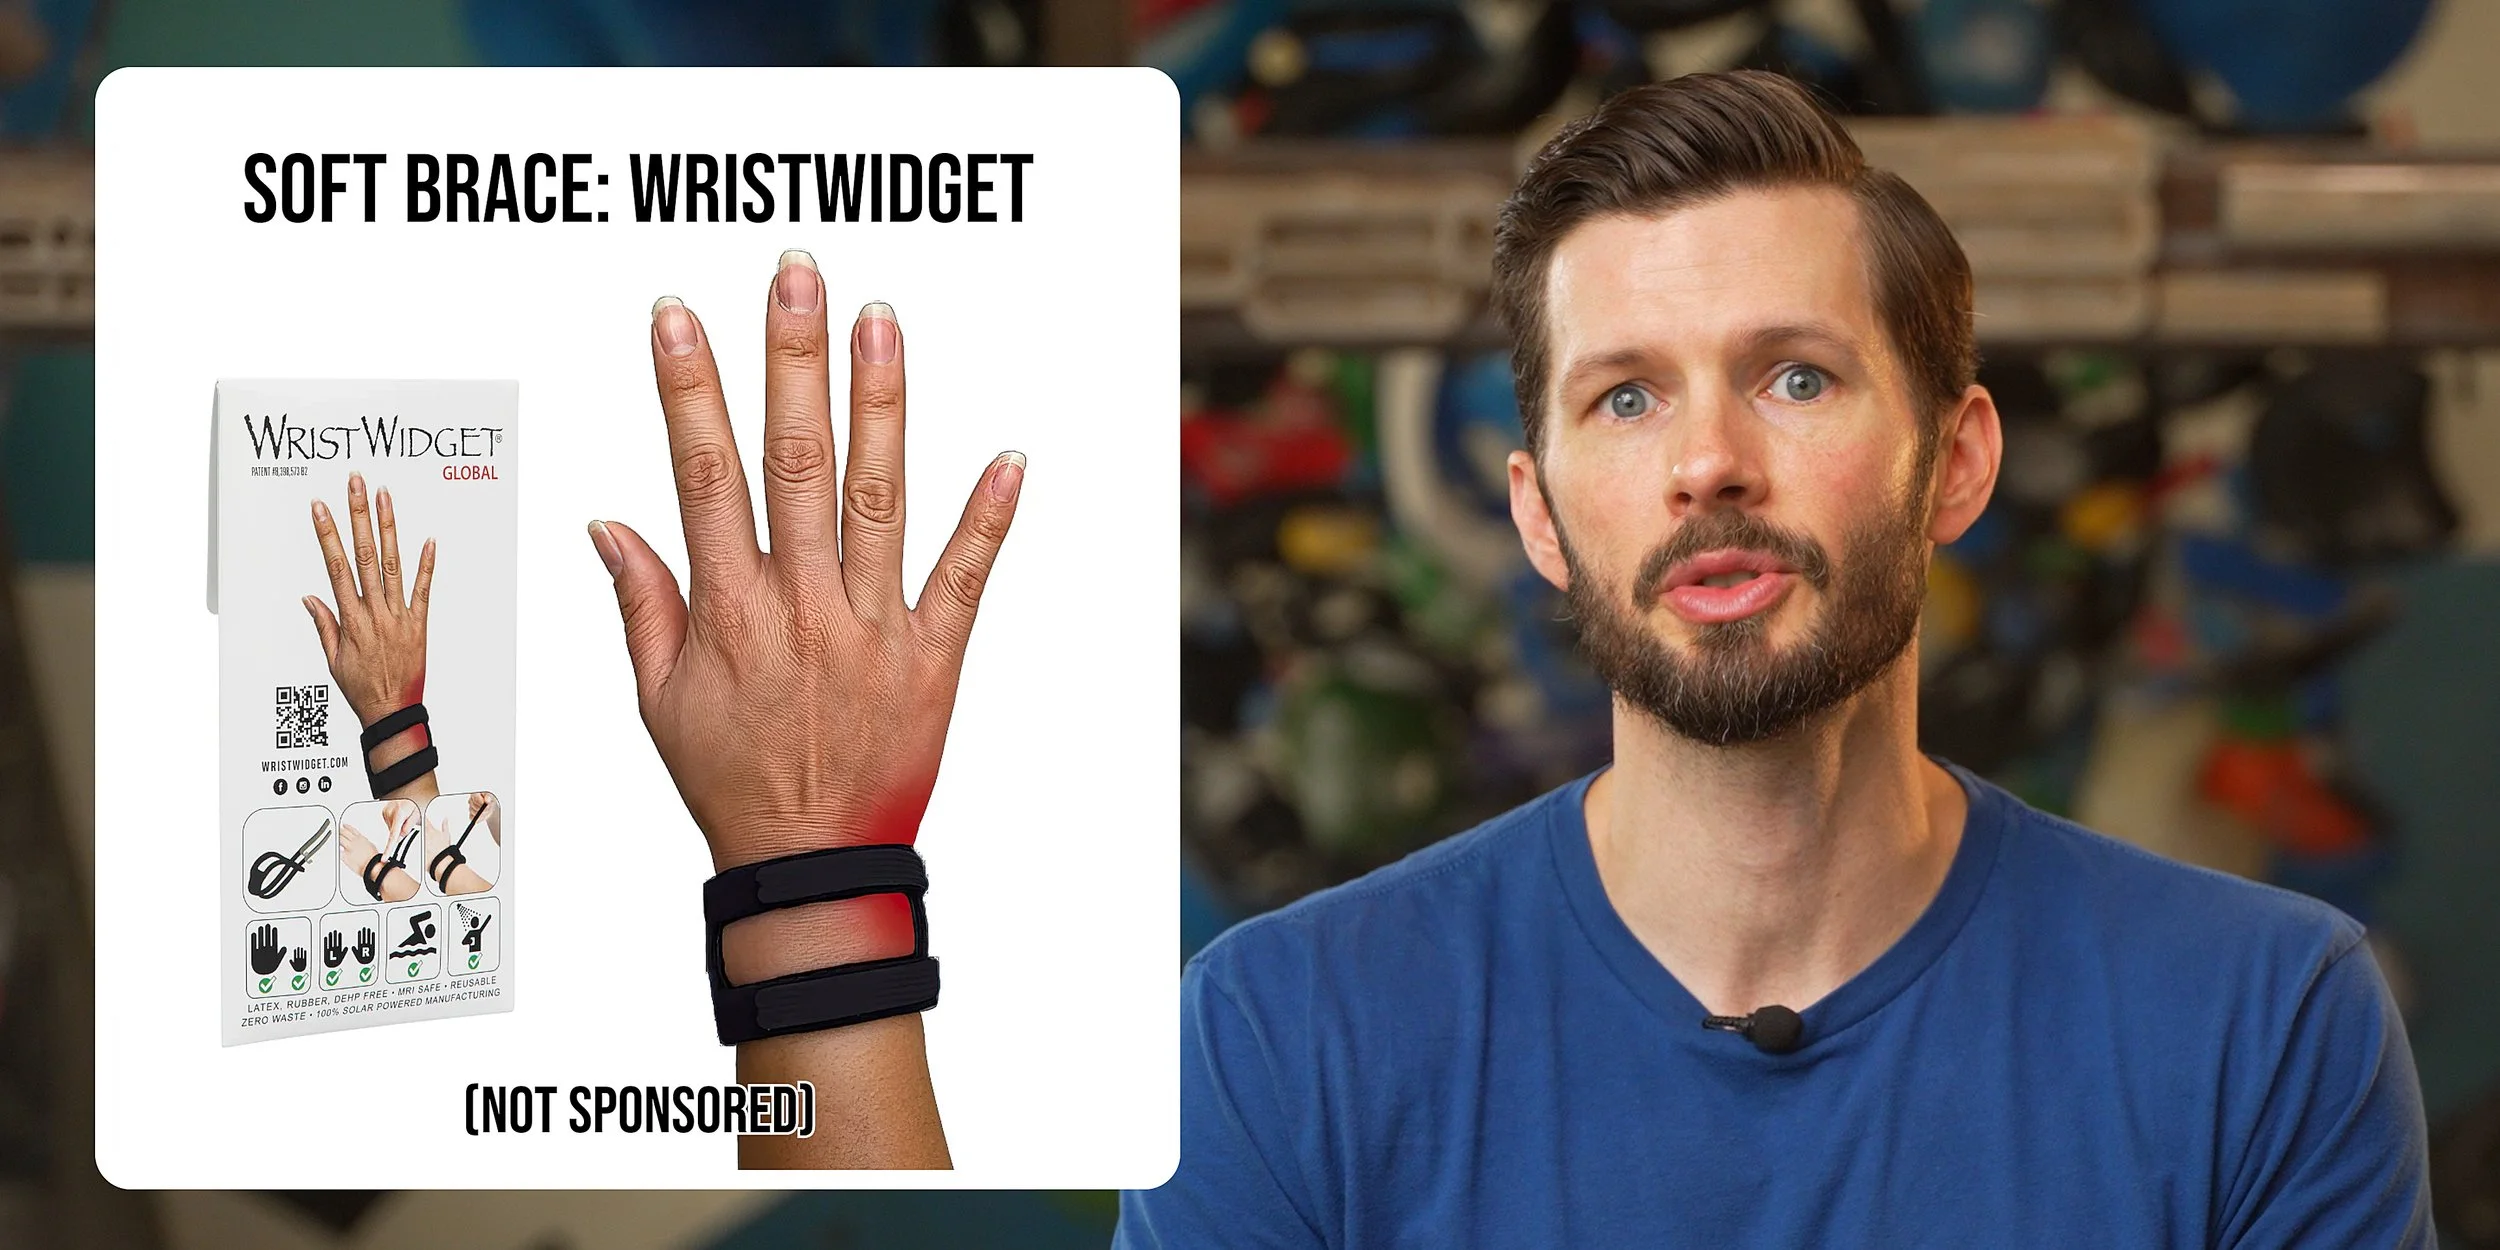
The most common soft brace recommendation for TFCC issues is called a “Wrist Widget.” It provides mild, adjustable compression for the wrist. It preserves most range of motion and proprioception (joint awareness), so you can keep training elbow, thumb, and grip strength. It’s also relatively inexpensive, reusable, and easy to loosen or tighten as needed.
Rigid or Semi-Rigid Brace
A semi‑rigid or rigid wrist brace can be helpful during the first week or two after a more significant sprain when symptoms are worse. A brace of this type is useful if routine tasks like turning a key or lifting a mug spike pain. Because it blocks more range of motion than a soft brace, it gives the TFCC more of a break while early soreness settles. But prolonged brace use should be avoided whenever possible as it can stiffen the wrist and slow your return to normal movement.
Tape
Taping is a third option that can be acceptable for short-duration use if the other two options aren’t available, but it should not be used as a primary support because it’s not as easy to adjust, it can irritate skin or pull hair, and is single-use.
When to Use
When you should wear a brace is mostly determined by pain. In the early phase of injury—when every twist or lift seems to sting—wear a brace during most waking hours, including work, daily chores, and exercise, to keep discomfort down while initial aggravation subsides. Choose the least restrictive device that keeps symptoms manageable. As pain eases and basic tasks become easy, start leaving the support off for light activities and recovery exercises, but keep it on for heavier workouts or chores that still challenge the wrist. By the late stage, use support only for unpredictable, high‑load situations like climbing or maximal lifting. The rest of the time, let your wrist move freely so strength and proprioception can fully return.
3. Range of Motion Exercise
The first recovery activity is a basic range of motion exercise. This involves flexing and extending your wrist, pronating and supinating, and deviating in the ulnar and radial directions. Perform 4-8 reps for each position for 1-2 sets, multiple times throughout the day. You should be able to perform these activities without experiencing more than 2/10 discomfort or pain, both during and after the exercise. If your symptoms exceed that level, reduce the range of motion to a more tolerable level. As your recovery progresses and pain eases, range of motion should increase.
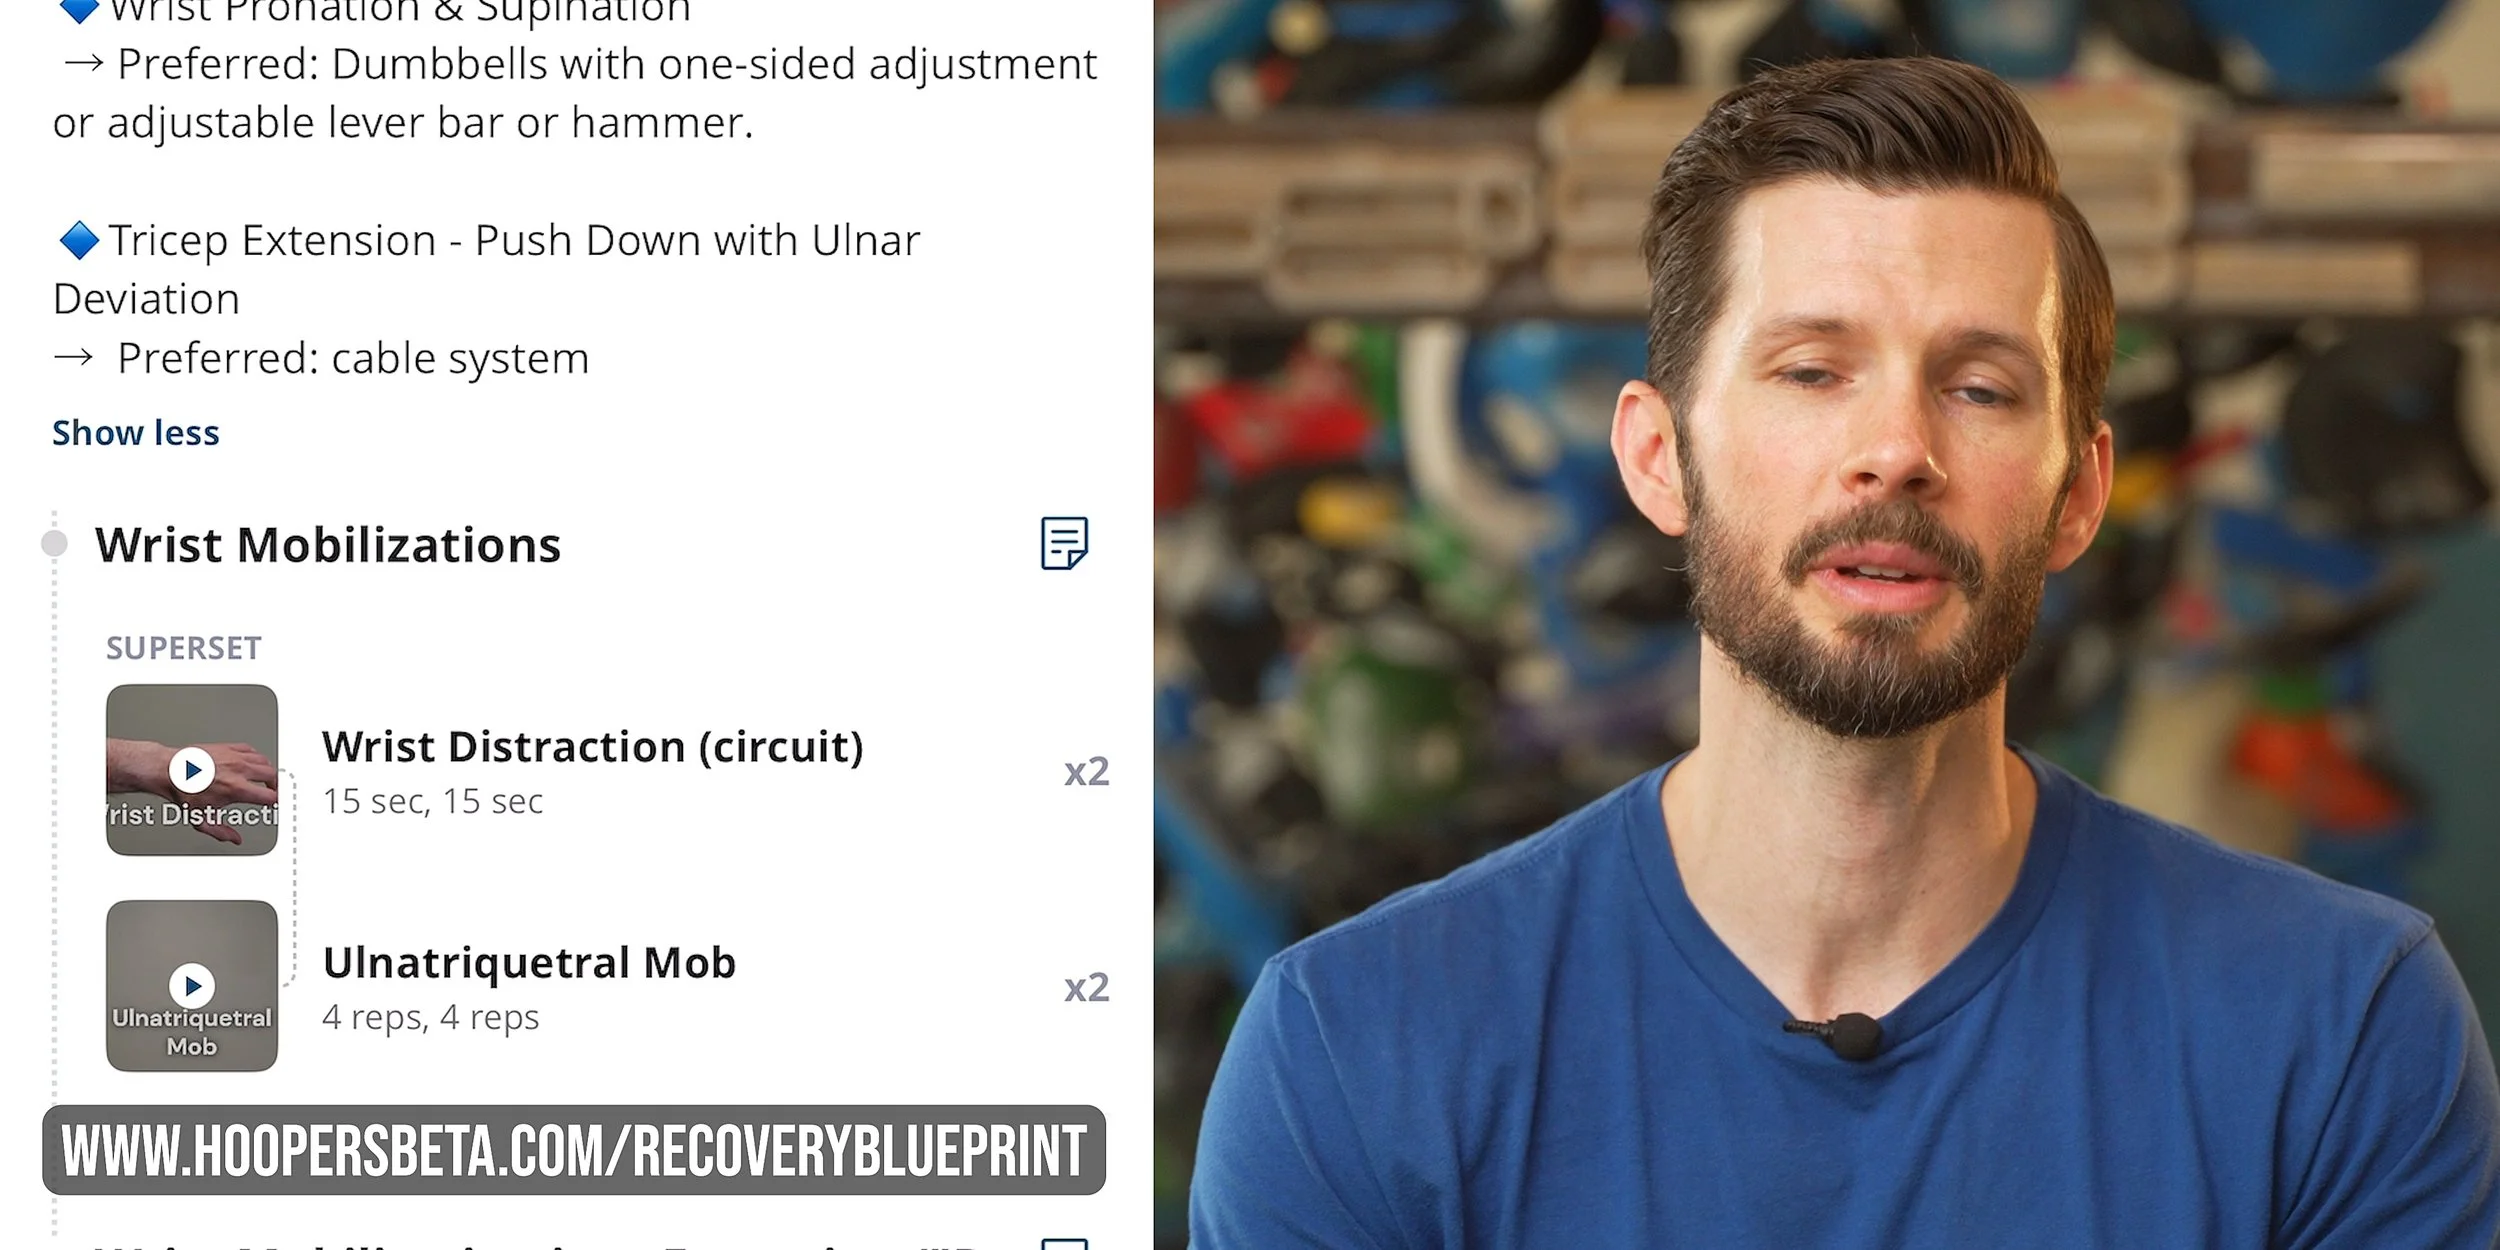
4. Joint Mobilizations
Joint mobilizations are another early tool. They can reduce symptoms, improve mobility, and improve joint positioning to positively impact joint mechanics at the wrist.
Joint Distraction
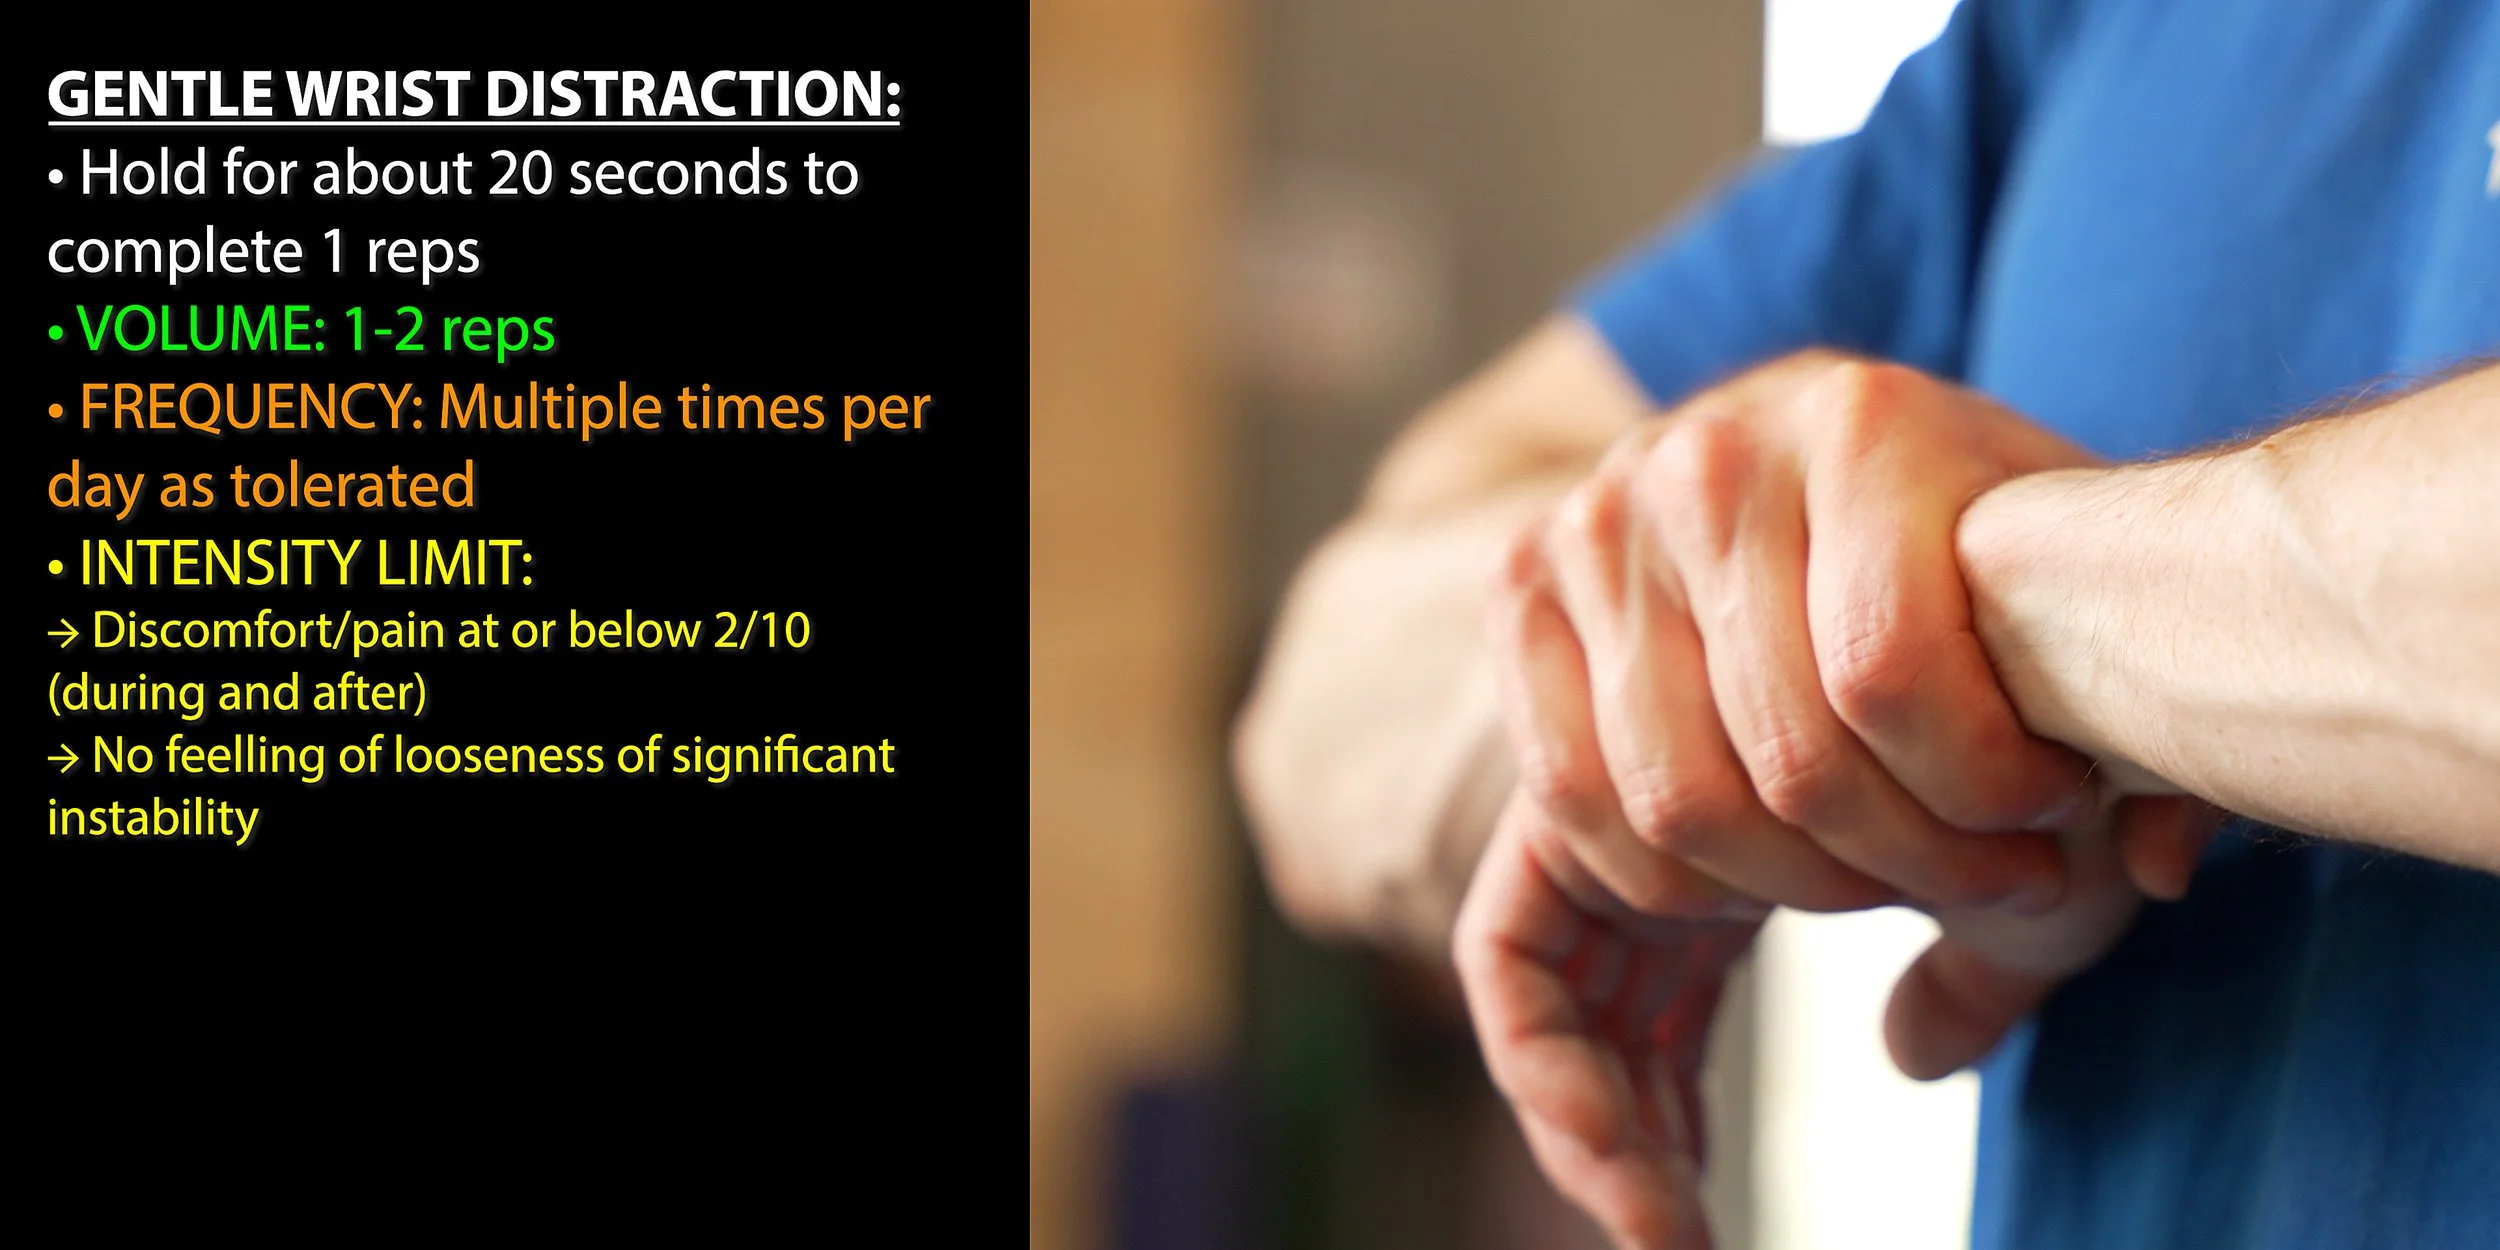
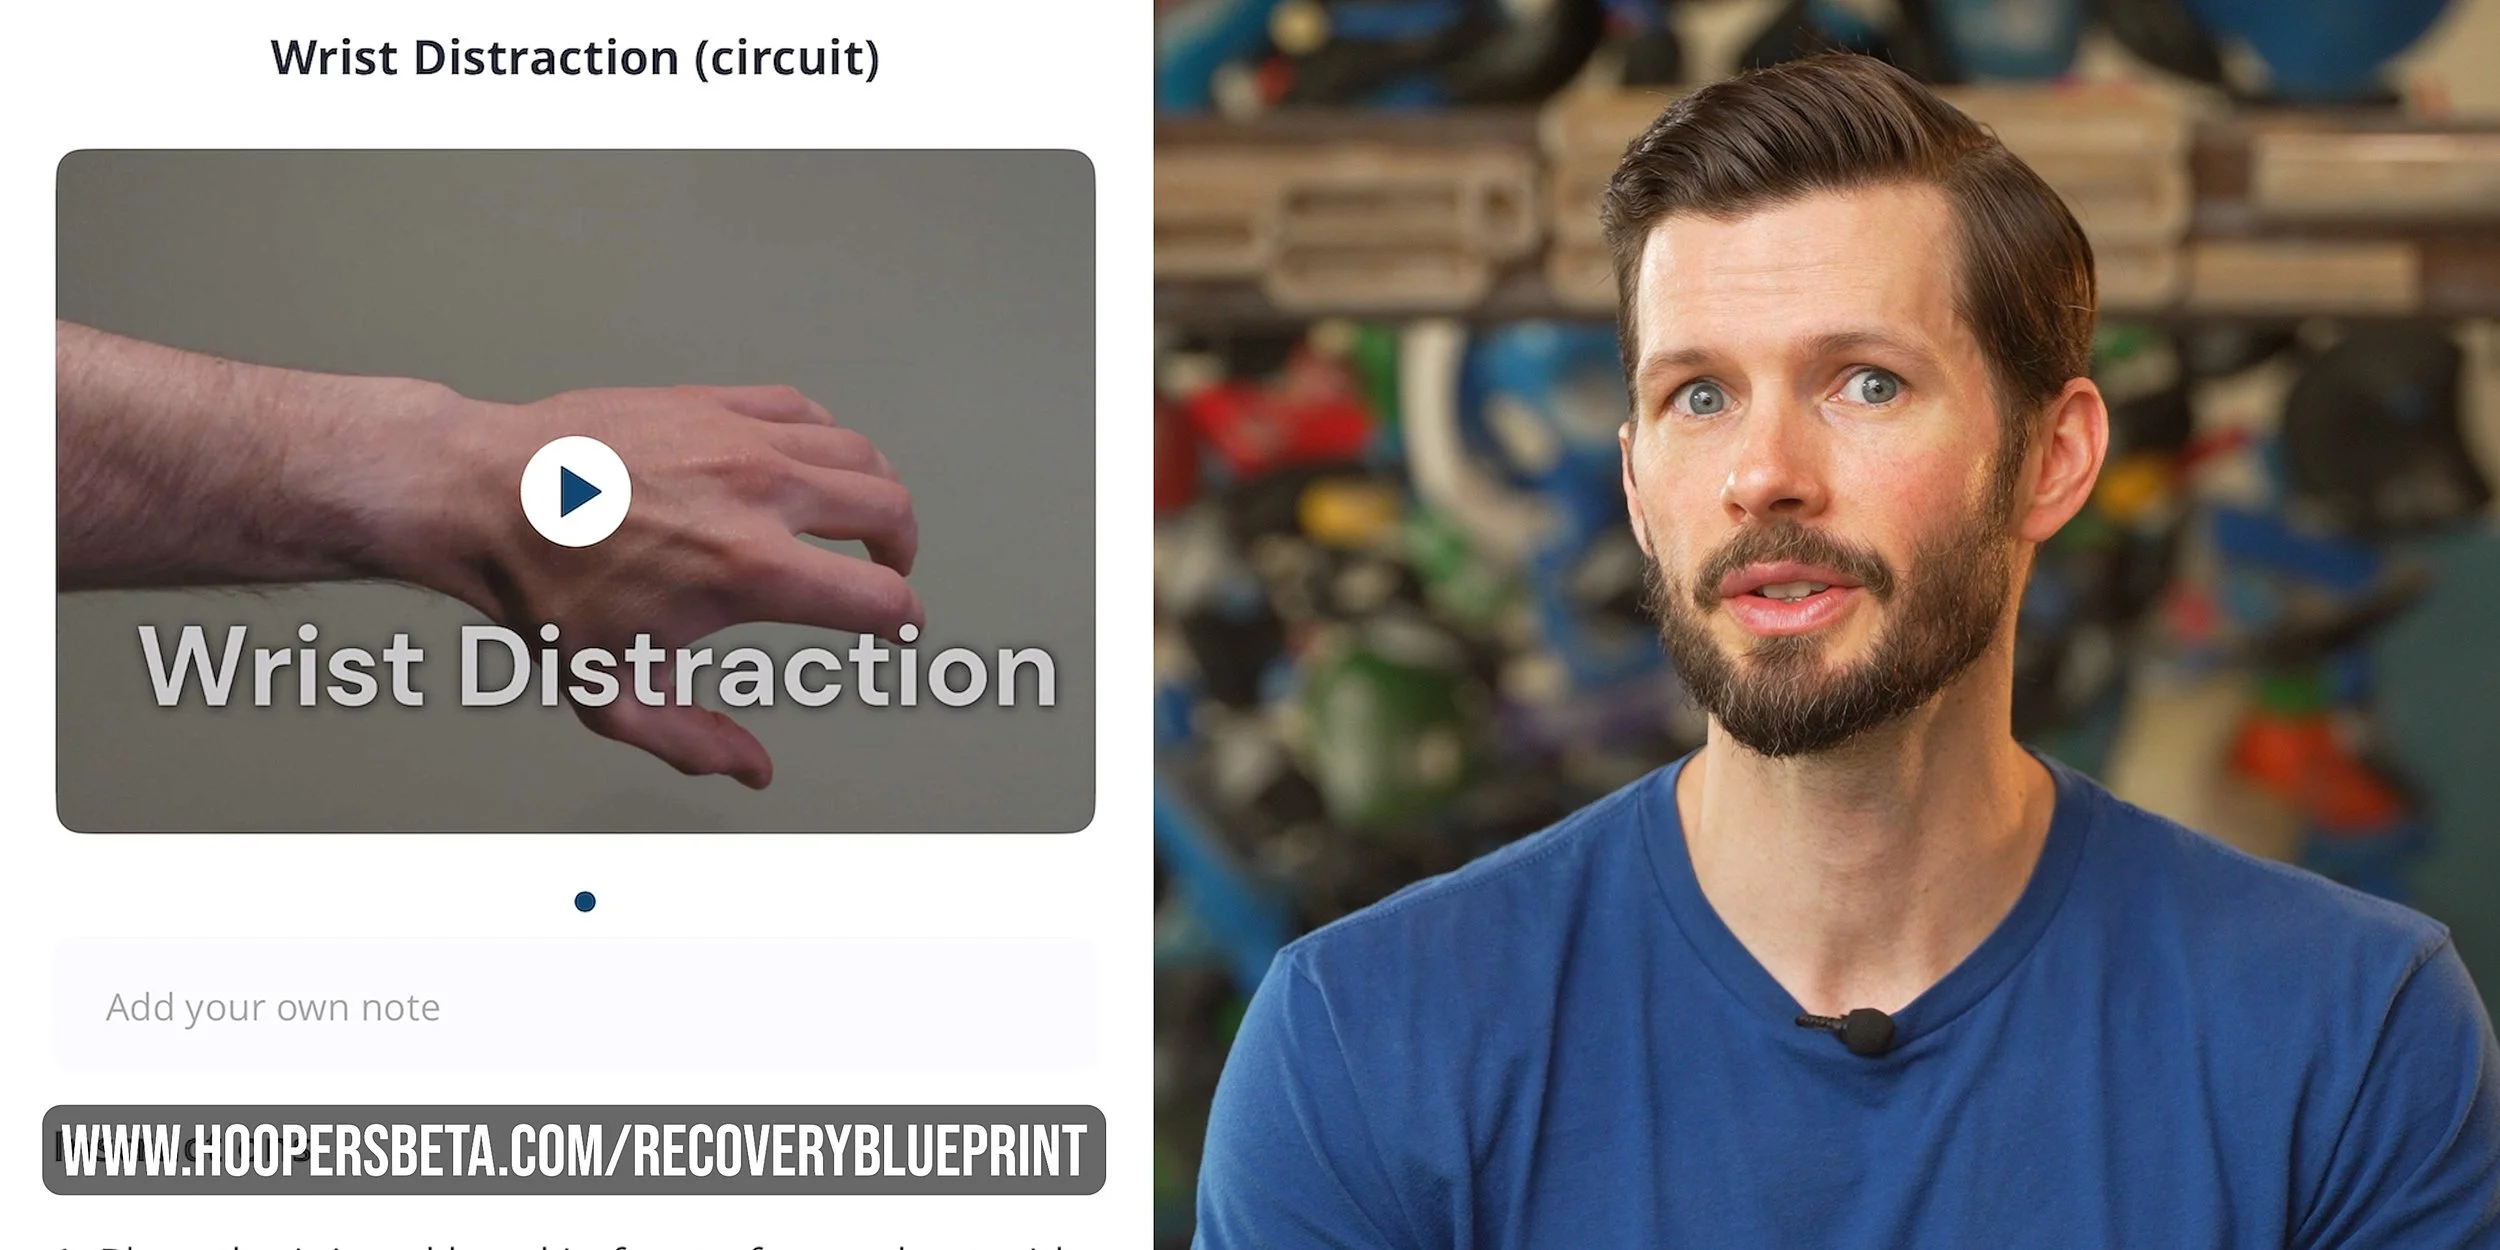
The first will be a gentle wrist distraction technique. For this I like to imagine I’m Luke Skywalker and I’m trying to replace my mechanical hand. Just grab where the wrist narrows right before the hand and pull straight away while keeping your injured hand relaxed. Hold for 15-20 seconds, then stop. Perform 1-2 reps multiple times a day as tolerated.
This is a gentle activity meant to reduce pain, not create it. If you feel discomfort, reduce the intensity. Also, if this creates a feeling of looseness or instability (as if you’re going to dislocate your wrist) you’re likely pulling too hard. If you do not feel like you’re pulling hard and you still feel this sensation, discontinue this activity.
Ulnatriquetral Mob
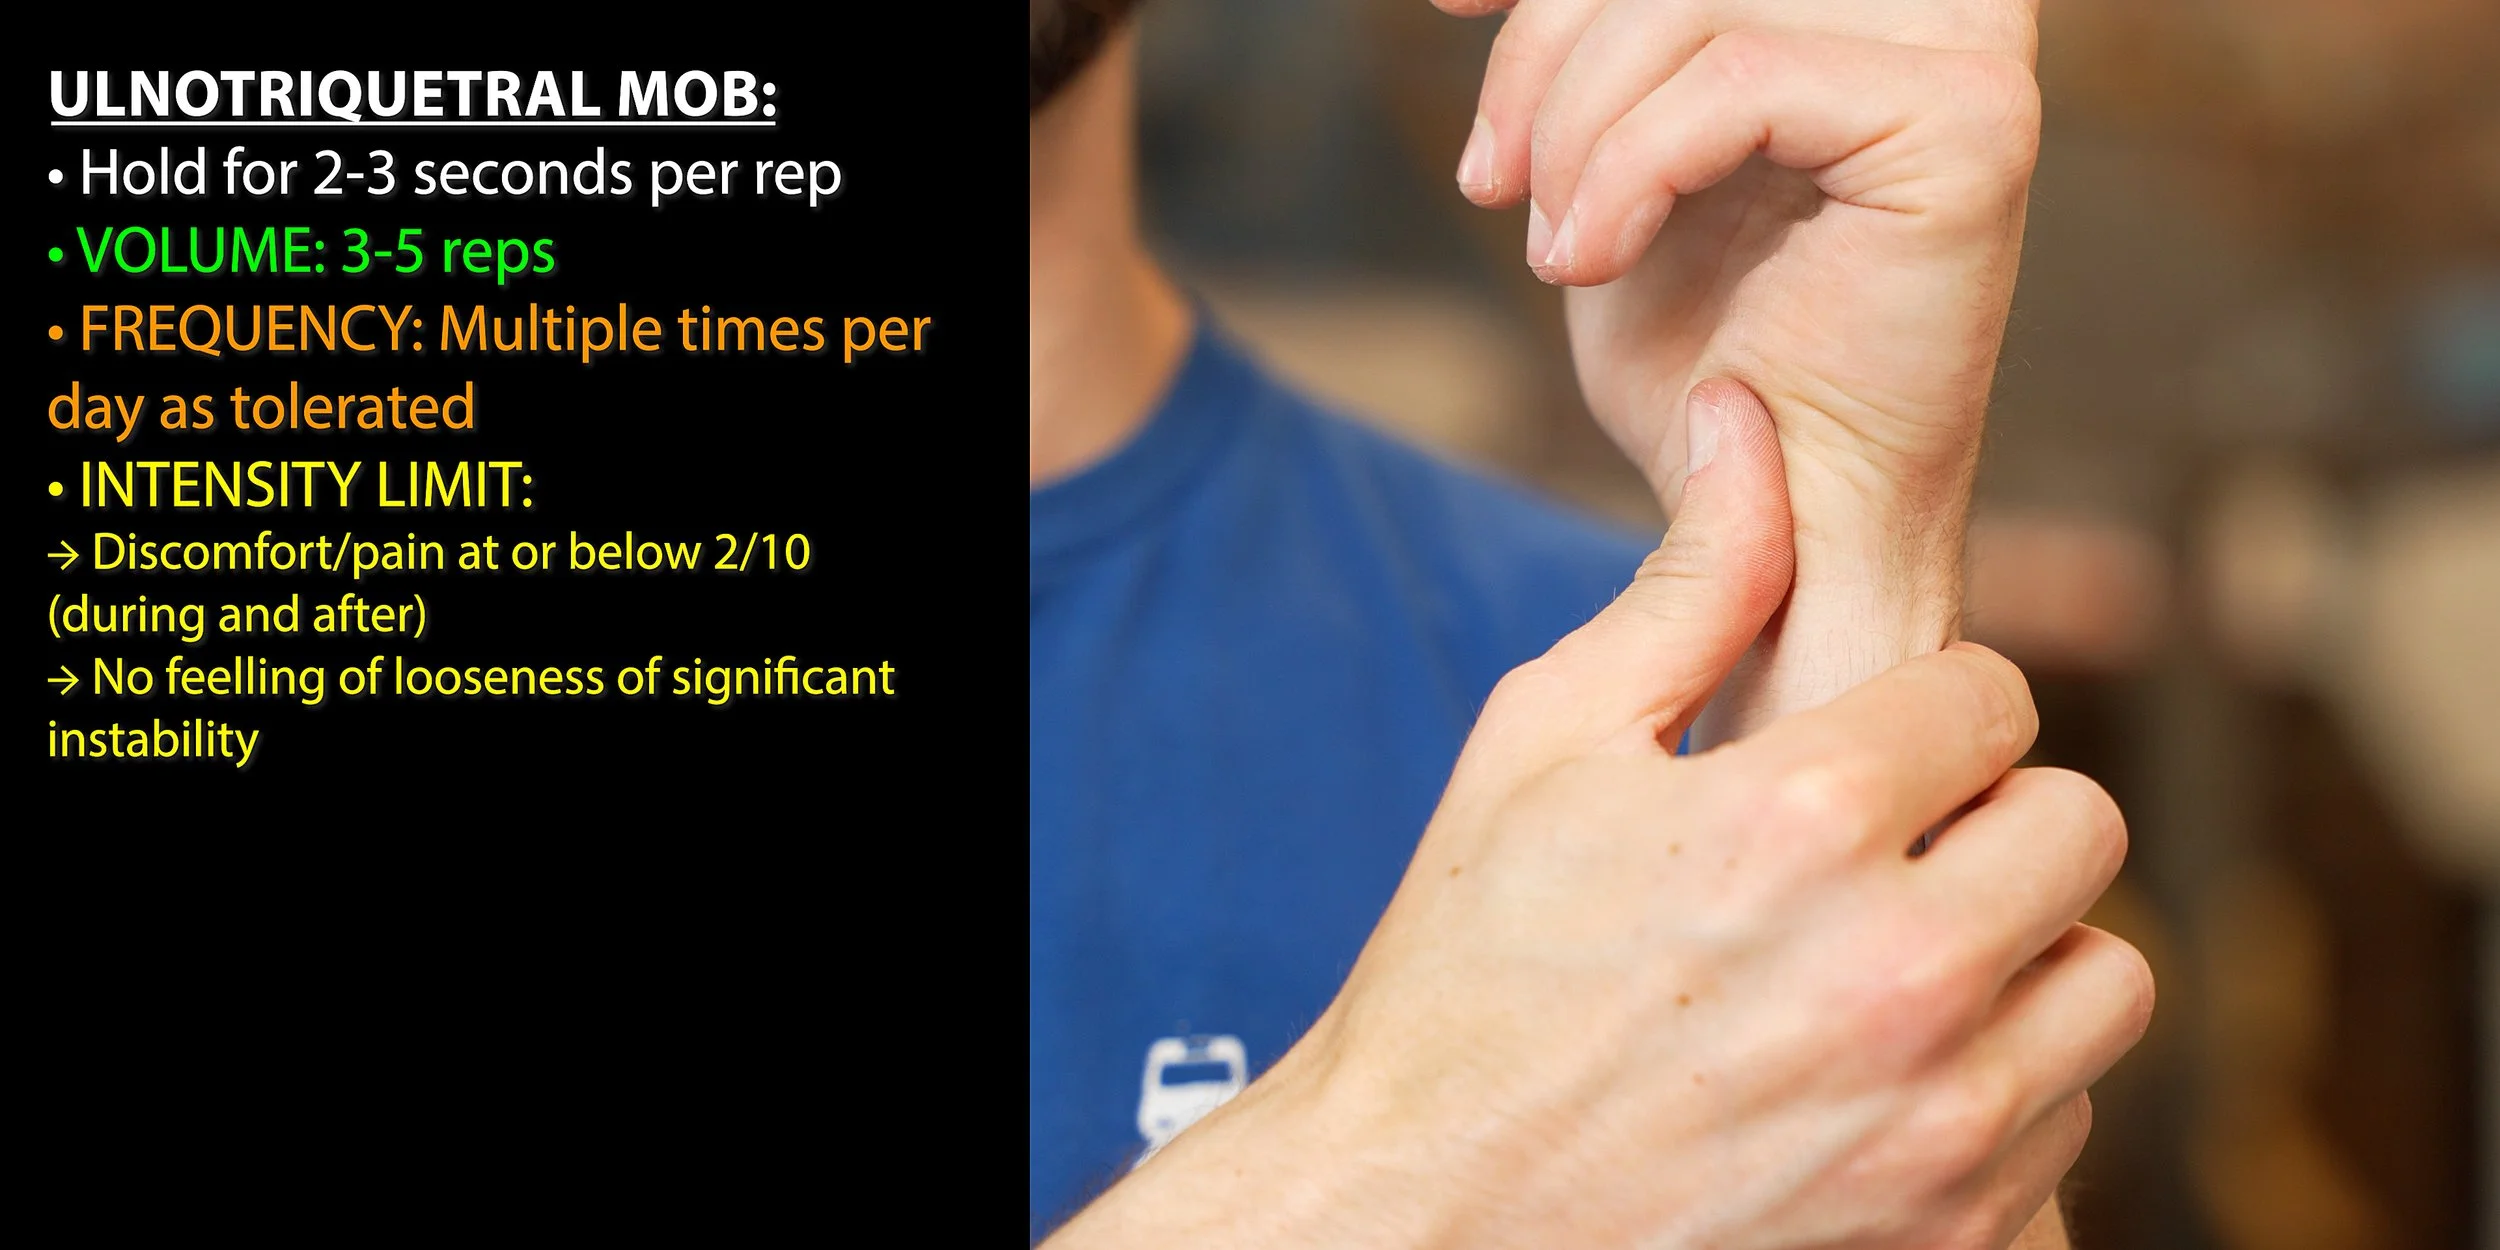
The next mob is a little trickier. Start by placing the index, middle, and ring fingers of your unaffected hand on your injured wrist. The index finger will be on the backside of the ulna, close to the end of the bone. The middle and ring finger will be directly adjacent to that. Next, place the thumb of the unaffected hand on the bony protrusion at the base of your injured hand, by the TFCC region on the pinky side of the hand. While keeping the injured hand relaxed, create an opposing force with the unaffected hand: the thumb pushes while the index, middle, and ring pull in. You should feel the wrist bones moving in opposite directions of each other. Hold for 2-3 seconds before releasing. Perform 3-5 reps, multiple times a day as tolerated.
Similar to the previous, you should feel movement but you should not feel pain or discomfort with this mobilization. Reduce intensity if this causes discomfort.
5. Off-The-Wall Tissue Loading
Before we get into these all-important exercises, it’s important to lay some groundwork. Because TFCC injuries are so complex, the exact recovery exercises needed can vary from one person to the next. That means a few things:
This program will take a broad, cover-all-the-bases approach.
We’re not going to cover every single regression and progression of each exercise because this video would never end. What we lay out here may be too hard for your current stage of recovery, in which case you’ll need to regress the difficulty to the appropriate level. Of course, if you don’t want to deal with that, remember you can always use our Recovery Blueprint.
This is not a personalized program, so you may find there are exercises here *you* don’t need but that may be extremely beneficial for someone else.
You will need access to some tools, namely dumbbells (or alternatively a cable machine), a lever bar or hammer (or better yet our Torque devices), and resistance bands.
The routine itself is made up of three circuits, with three exercises in each circuit. If this routine is new to you, I recommend only performing each circuit twice per session, that way you don’t add a ton of load right off the bat. Once you know that you can tolerate performing each circuit twice, add a third round. Perform each circuit in the order we present here, completing all rounds of one circuit before moving on to the next (e.g. circuit one x2, circuit two x2, circuit three x2).
Circuit 1: Bent-Elbow Wrist Extension, Pronation/Supination, and Hammer Curl
The first exercise in the first circuit will be bent-elbow wrist extension, followed by a pronation/supination exercise, and finally hammer curls.
To perform bent-elbow wrist extension:


1. Hold a dumbbell with a thumb-over grip (thumb on the same side as your fingers).
2. Rest your forearm on a bench or table (or even your leg) with your elbow bent to about 90 degrees and your palm facing the floor (wrist in a straight/neutral position).
3. Keeping the dumbbell horizontal and your forearm flat on the surface (avoid lifting off), slowly allow your wrist to flex so the dumbbell lowers toward the ground. Stop when you’ve reached about 25% of your normal/uninjured range of motion (i.e., your wrist is bent slightly past neutral).
4. Briefly pause, then lift the weight back up, extending your wrist upwards slightly beyond neutral.
To perform wrist pronation/supination:


1. You’ll need an adjustable lever bar, a heavy hammer, or better yet, one of our Torque Rings. Any of these tools will work just fine, but the Torque Ring is ideal because the design allows the torque on your wrist to stay relatively constant, whereas the torque from a lever bar or hammer decreases the closer it gets to vertical. This means that it's actually impossible to load this exercise throughout a full range of motion with the lever bar, but the Torque Ring fixes that. Unfortunately, we’ve never seen these at the gym, so we had to make them ourselves because we didn’t want to pay $120. You can buy one on our website if you’re interested.
2. Add an appropriate amount of weight (we’ll talk about that more later) and hold the handle vertically.
3. Rotate the weight with your wrist so your palm faces down toward the ground (pronation). The pace should be slow and controlled to ensure you don’t move into a larger range of motion than is tolerable. Hold at the end of your tolerable range of motion briefly, then return to the starting position. If using a lever bar or hammer, you can go directly into supination as well (palm facing up), and then return to the starting position. If using a Torque Ring, pronation and supination will be two separate movements, for which you can adjust the weight as needed since often one is stronger than the other.
To perform hammer curls:


1. Simply hold the dumbbells at your side with thumb-side facing forward, then flex both elbows, bringing the handles up until your thumb-side points toward your shoulder or head. Try to mostly isolate the elbow movement here rather than assisting it by arching your back or flexing your shoulder.
2. Lower the weight back down with control and repeat.
3. Note: if you want, you can actually do these with the Torque Ring instead of dumbbells, but I would suggest using significantly less weight as this variation is much more challenging.
Perform 8-10 reps of each exercise to complete one round of this circuit.
Circuit 2: Wrist Flexion, Tricep Extension, and Reverse Curl with Band Over Hand
Moving onto circuit 2, the first exercise will be small range wrist flexion, followed by tricep extension, and finally reverse curls with band over hand.
To perform wrist flexion:


1. Grab yourself a Torque Bar or a dumbbell. Either one will work, but just like the Torque Ring the Torque Bar is a more effective tool because it allows for constant load throughout the range of motion.
2. Hold your implement of choice with a thumb-over grip, meaning the thumb is on the same side as your fingers.
3. Rest your forearm on a bench or table (or even your leg) with your elbow bent to about 90 degrees and palm facing up, then allow your wrist to extend down as far as you can comfortably go. If you’re using a Torque Bar, make sure the rope hold is facing straight down.
4. Now, curl the weight up as far as you can by flexing your wrist. Hold at the top momentarily, then slowly lower back down and repeat.
To perform tricep extension:


1. Adjust the cable system (or resistance band) so it’s anchored above you and the handle rests about shoulder height.
2. Grab the handle thumb-side up.
3. Drive your hands down toward the ground by straightening your elbows.
4. At the bottom of the movement, make sure your wrist is straight/neutral or mildly tilting into ulnar deviation (wrist tilting toward the pinky side).
5. Control the weight back up to the starting point. If you can’t maintain a straight/neutral wrist (or slight ulnar deviation) at the bottom of the movement, reduce the weight.
6. Believe it or not, you can actually use the Torque Ring for this movement as well for an even better ulnar deviation stimulus.
To perform reverse curls with band over hand:


1. Start by anchoring a resistance band under your foot. Place the other end of the band on the backside of your hand with your palm facing the ground. In the starting position your elbow should be straight, arm by your side, with your wrist extended to keep the band in place. Your hand should remain flat relative to the ground throughout the movement in order to keep the band in place.
2. Flex your elbow until your forearm is parallel to the ground. Your wrist should naturally straighten out to maintain placement of the band. You should not flex your elbow beyond this neutral position.
3. Pause briefly then slowly lower your hand back down to the starting position. Intensity for this exercise should be determined at the top of the motion, when your forearm is parallel to the ground.
Perform 8-10 reps of each exercise to complete one round of this circuit.
Circuit 3: Straight-Elbow Wrist Extension, Alternating Knuckle Shoulder Taps, and Pinch Block Lifts
Finally, in circuit three, we’ll start with elbow straight wrist extension, alternating knuckle shoulder taps on a foam surface, and pinch block lifts.
To perform straight-elbow wrist extension:


1. Use a similar setup you did for the wrist flexion exercise, but this time with your palm facing down. Forearm supported, elbow straight, and thumb-over grip.
2. Allow your wrist to flex down as far as you can comfortably go and once again make sure the rope holes are facing the ground if using the Torque Bar. This is your starting point.
3. Now, curl the weight up as far as you can by extending your wrist. Hold at the top momentarily, then slowly lower back down and repeat.
To perform alternating shoulder taps:
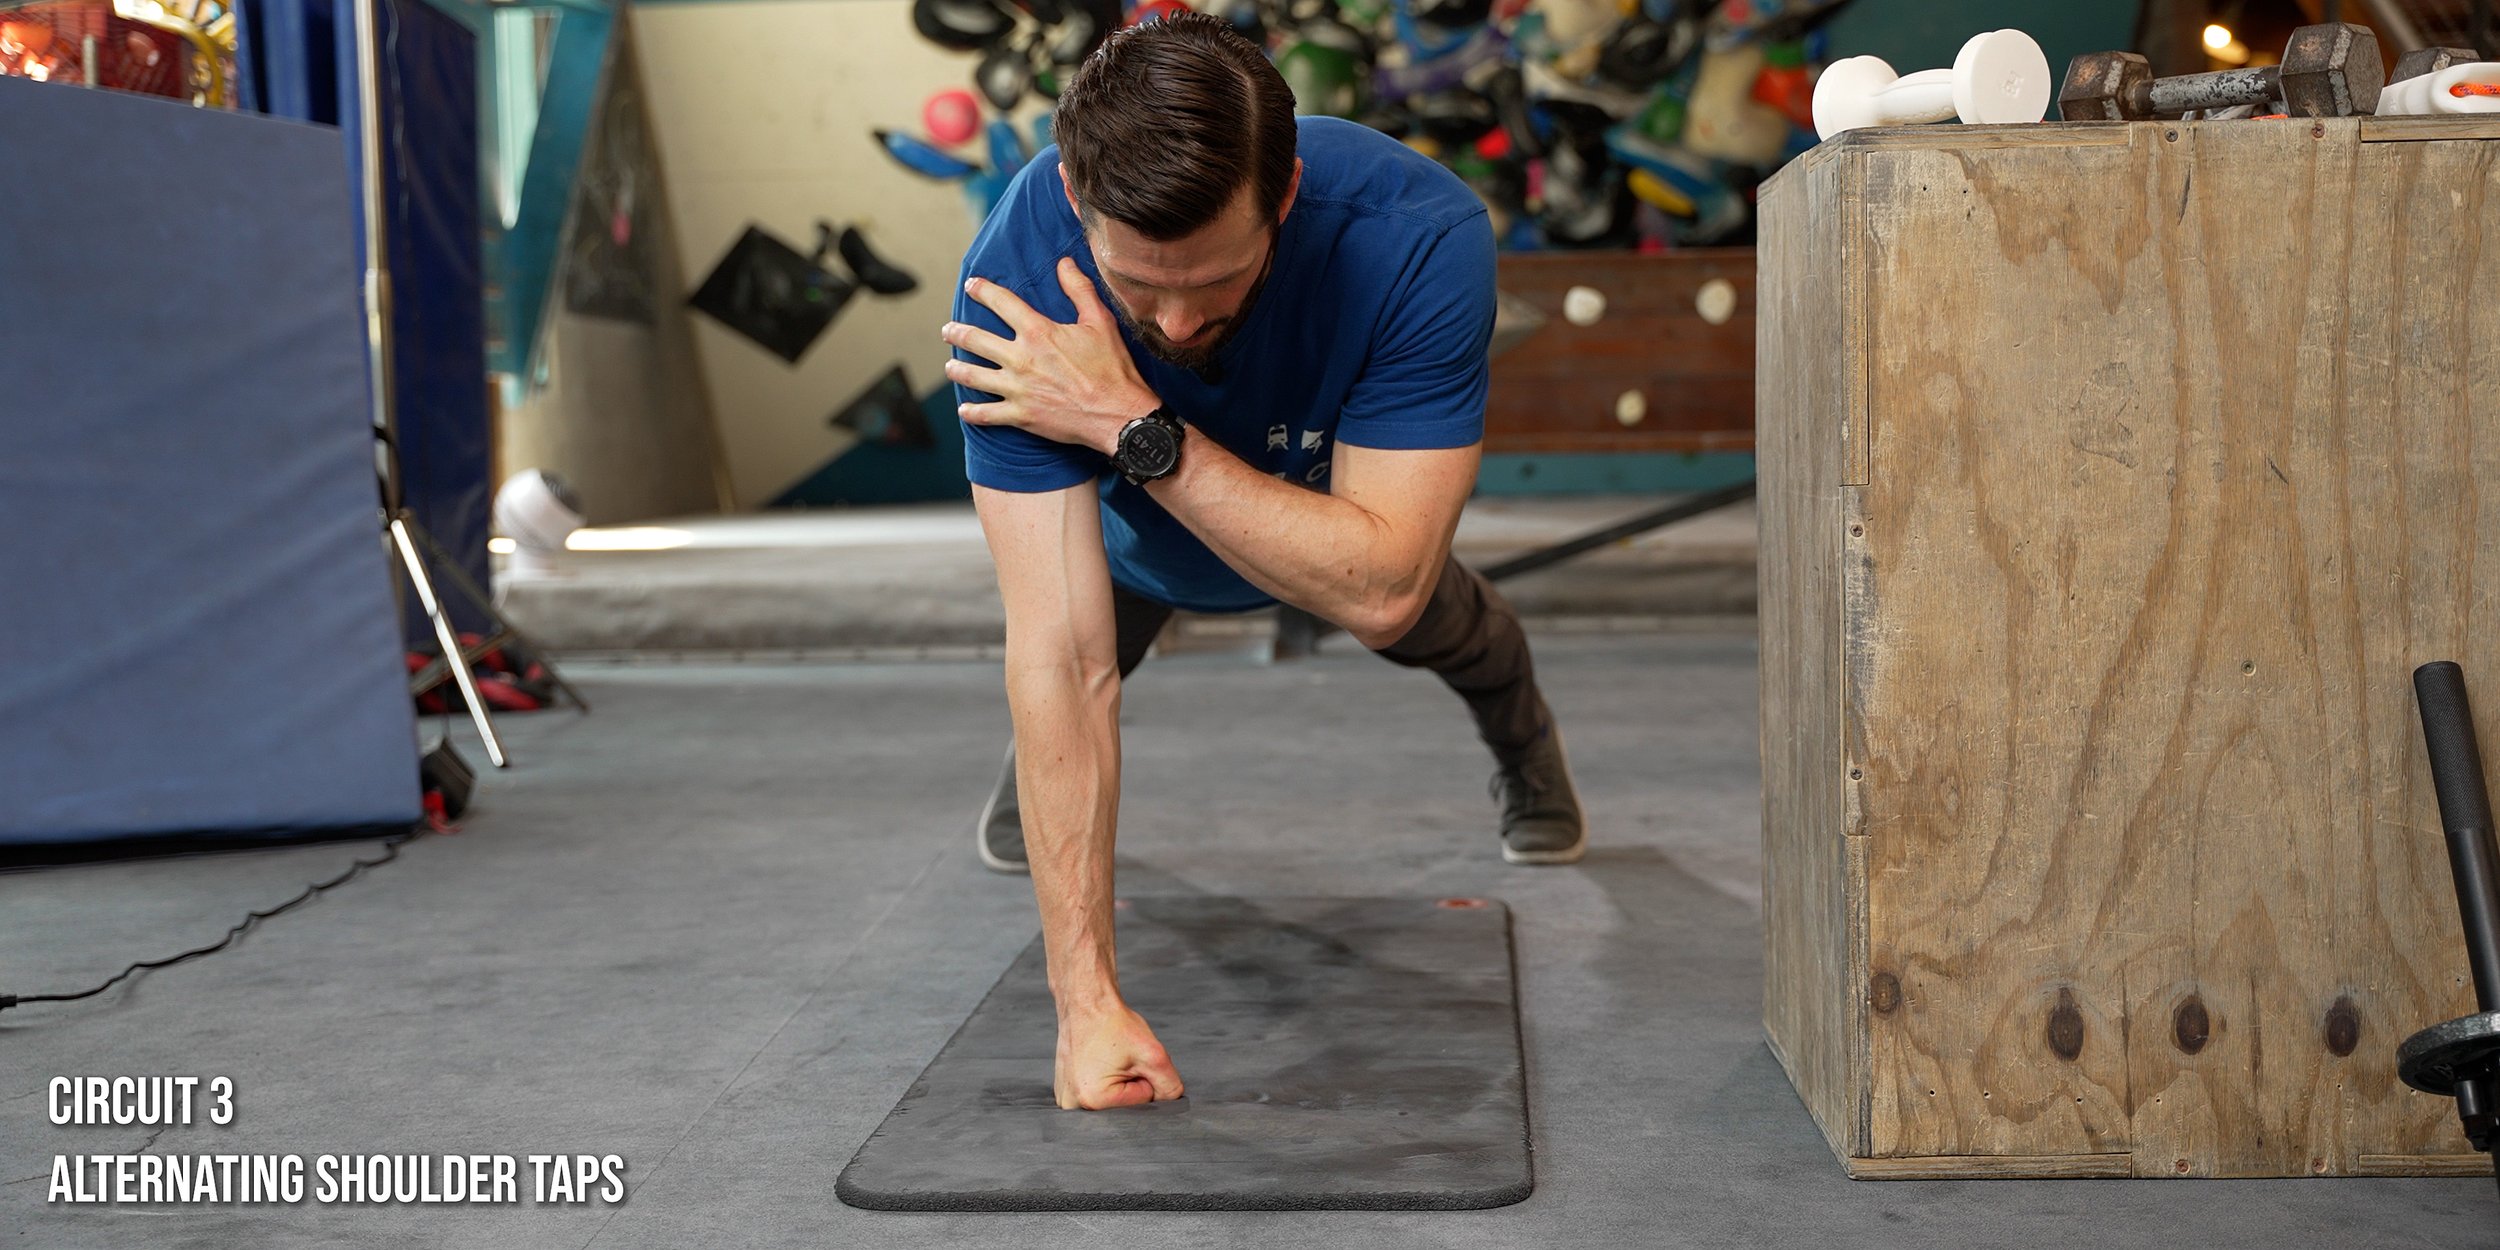
1. Put a yoga mat or foam pad on the ground. The less rigid the foam, the more challenging this exercise will be. Get into a standard plank position on your knuckles, with your feet about hip- or shoulder-width apart. Your arms should be shoulder-width apart or slightly narrower (not wider) and your thumbs should point forward or slightly inward.
2. Ensure your body is straight (no bending at the hips/waist/back) and you’re standing on your toes (not flat-footed). Staying as stable as possible (without major shifts in hip position), lift your right hand up and tap your left shoulder, then place it back down.
3. Now do the same with your left hand tapping your right shoulder.
4. You’ve now completed one rep.
To perform pinch block lifts:


1. Attach a pinch block to a loading pin or dumbbell. A cable system can be used in a pinch but you’ll want to make sure you can place your wrist directly over the cable otherwise you may angle your wrist incorrectly.
2. Grab the pinch block by positioning it against your palm and allowing your fingers to naturally wrap around it, reaching as far down as they can comfortably go. The block and your palm should face roughly toward the ground.
3. Lift the weight off the ground by straightening your legs.
4. Hold for 1-2 seconds at the top of the motion before lowering the weight back to the ground. You have now completed one rep.
5. You should be able to fully control both the raising and lowering portions of each rep. If you have to drop the weight back down suddenly, if your fingers are sliding, or if you cannot maintain the same wrist angle, you should reduce the weight.
And that’s it! This routine covers all the major components required for a strong and stable TFCC. But, you might be wondering…
How Much Weight Should I Be Using for All These Exercises?
Since this routine is meant to be an end-stage recovery / strengthening program, you should be using as much weight as possible without causing more than 2/10 pain or sacrificing form. When you are newer to this, start with lighter weights to get acquainted with the movements.
How Often Should I Be Doing These Circuits?
This entire routine can be performed up to three times per week. To figure out the right frequency for you, use the following guidelines:
If any climbing causes more than a 2/10 pain during or after, you should focus on performing this routine 2-3 times per week while reducing or eliminating climbing until you’re more recovered.
If you are able to climb but feel limited to about 50% of your normal volume or intensity, you should perform this routine twice a week.
If you’re able to do most of your climbing with only mild limitations, you should perform this routine 1-2 times per week.
How Long Will It Take to Recover?
With adherence to a good recovery program, most TFCC issues can be resolved in about two to four months. However, if it's a tear of the articular disc towards the center of the disc, it could take around six months.
The Most Convenient Way to Recover

Remember if you want to take the guesswork out of your recovery, save yourself a whole lot of time, and get a program that’s specifically designed for recovering from TFCC injuries, you can get that today on our website at hoopersbeta.com/recoveryblueprint. These are the exact injury-specific programs I’ve used in my practice to help hundreds of climbers get back on the wall pain-free. They’ll take you from the earliest stages of healing all the way to regaining full strength and returning to peak performance. While most of our previous Recovery Blueprints have focused on finger injuries, we are expanding! This TFCC program is the first of many to come! Our Recovery Blueprints are a proven way to fast-track your recovery and get you climbing hard again.
We also recently added in self-paced Recovery Blueprints for all of our current finger recovery programs, which allows you to progress in your recovery journey at your self-selected speed.
Can I Do Anything to Avoid a TFCC Injury?
Last but not least, here are a few strategies to help reduce risk.
1. Strengthen the Wrists
Don’t avoid strength training for your wrists and forearms, especially if you know or suspect that you have more mobility in your wrists. I often recommend the off-season of climbing for activities like this. For me, that’s summer when it’s hot in the gyms and my skin can’t hold up anyway. If you have the time and recovery capacity, it’s not a bad idea to bulk up the wrists a bit.
Shout out: We also offer wrist bulletproofing programs on our website, designed to fit your setup—whether you have a full gym, minimal equipment, or just want the essentials. Our program includes access to multiple routines to match your needs and gear.
2. Expose Yourself
Often when we know we are bad at things, such as slopers, we constantly avoid them until that project comes along that is just so cool that despite the sloper, you are still going for it. But… you have no training and exposure so you get injured. A better idea is to expose yourself to easier versions of those challenging areas, whether that’s simply finding them on easier climbs or making them up yourself, having that exposure can be protective in the long run.
3. Be Cautious When Fatigued
When you’re tired, your muscles aren’t operating at their prime, your focus and accuracy goes down, and making mistakes is more common. A foot blowing unexpectedly can shockload your wrist, so be more cautious around slopers or underclings if you’re feeling fatigued.
Don’t forget to take advantage of that FREE finger injury self-assessment and until next time: train, climb, send, repeat!
DISCLAIMER
The Beta Agency is providing content on its website that aims to inform rock climbing enthusiasts and/or individuals interested in the field of physical therapy of the various physical conditions that may befall those engaged in the sport of rock climbing, for informational purposes only. None of the information provided by The Beta Agency should be regarded as medical advice or construed to be a medical diagnosis of any form. By using our products, services, and/or the information on our website, you acknowledge that you understand this information is not meant to be a substitute for medical advice from an appropriate licensed healthcare professional, and that you will not rely on any of the information you acquire from us as the sole basis, personally or as a suggestion to others, to make any healthcare-related decision(s). If you suspect that you may have a medical condition that you are trying to diagnose, we strongly urge you to seek the advice of an appropriate medical practitioner. If you have a medical emergency, you should contact emergency services immediately.
Click for full Terms and Conditions and Privacy Policy