How to Fix Lateral Elbow Pain (Tennis Elbow)
Hooper’s Beta Ep. 165
Introduction

I’ve helped [counts on hands - shakes head] a lot of people recover from lateral elbow pain in my practice and today I’m going to help you! And no, the treatment is not pushups. In this video you’ll learn everything you need to know about lateral elbow pain / lateral epicondylitis / tennis elbow / lateral elbow tendinitis, including what causes it, what to do to fix it, and how long it takes to get back to 100%. We’ll also reveal the secret sauce most people have never heard about for unlocking your recovery. Though, it’s not really a secret anymore!
Disclaimer
All this information is for educational purposes only. None of it should be taken as medical advice or a replacement for seeing a qualified professional. Certain injuries such as ligament tears, elbow dislocations, snapping elbow syndrome, and bone fractures will not be covered here. Proceed at your own risk.
What is lateral elbow pain?
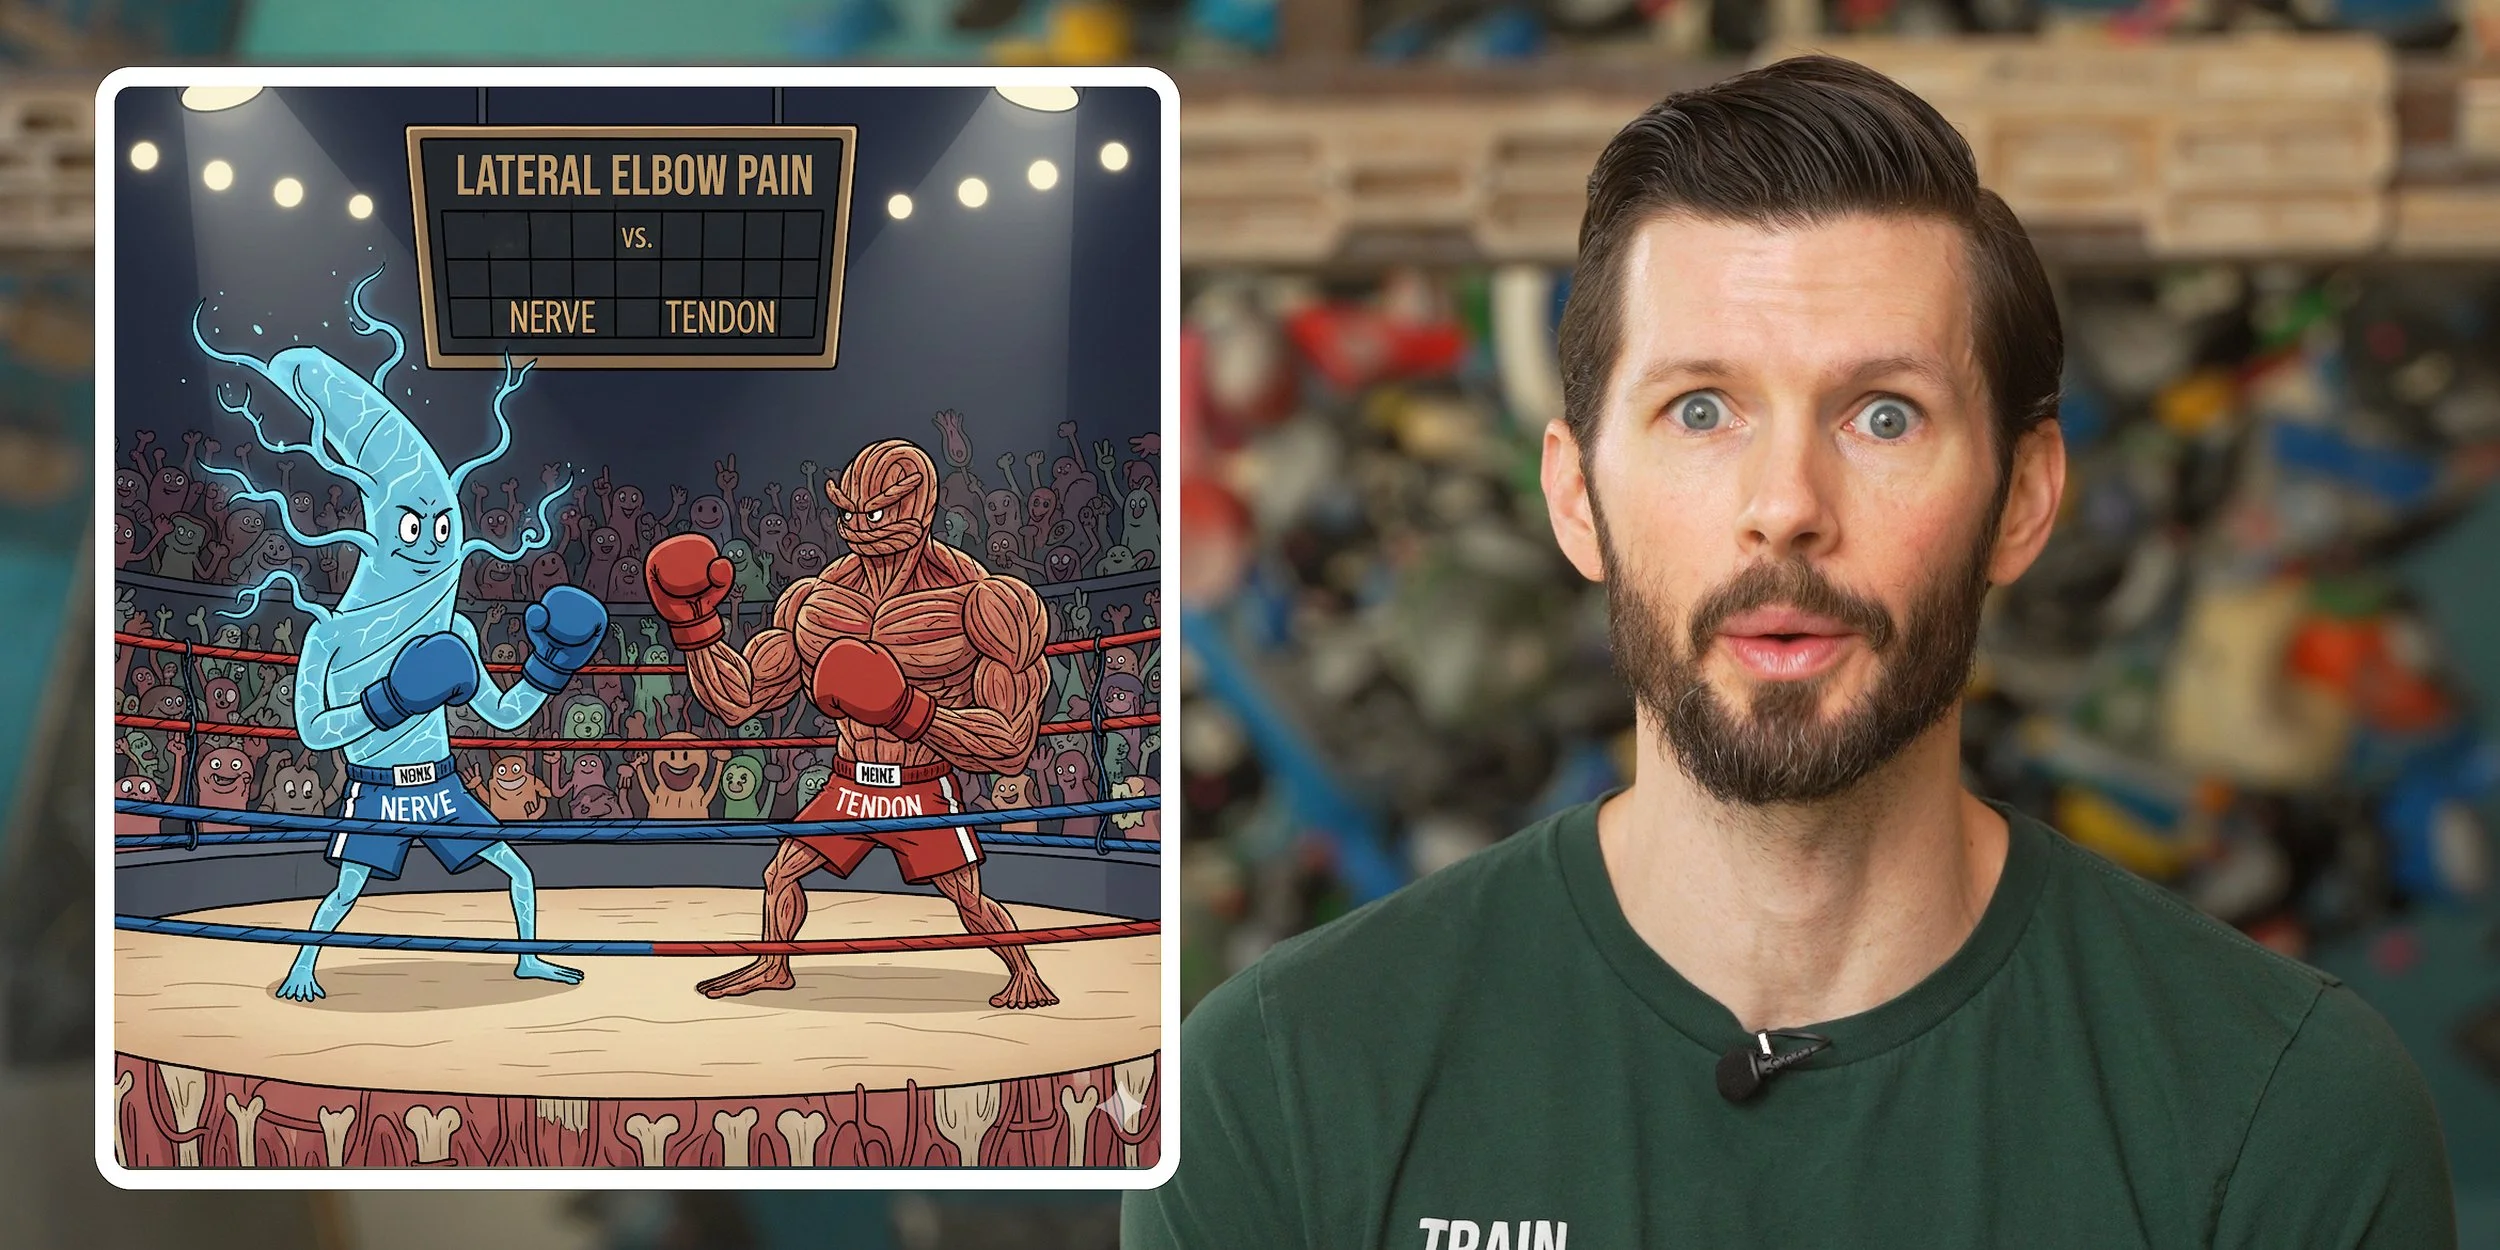
To get rid of lateral elbow pain, it helps to know the symptoms and why they occur. There are two causes you need to know: tendon pathologies and nerve compression/impingement.

Tendon Pathologies
A tendon pathology is the one most people are aware of, which is where a tendon is inflamed and painful due to a chronic build-up of damage, commonly referred to as “tendinitis”, “tendinopathy”, or simply “an overuse injury.”
This type of injury happens when the tendon can’t recover fast enough from the micro-trauma it encounters during intense, repetitive activities like climbing or tennis, meaning the micro-trauma accumulates until it's not-so-micro. This leads to diffuse discomfort, a dull ache (which may be localized or spread out), and/or a sharp or stabbing sensation.
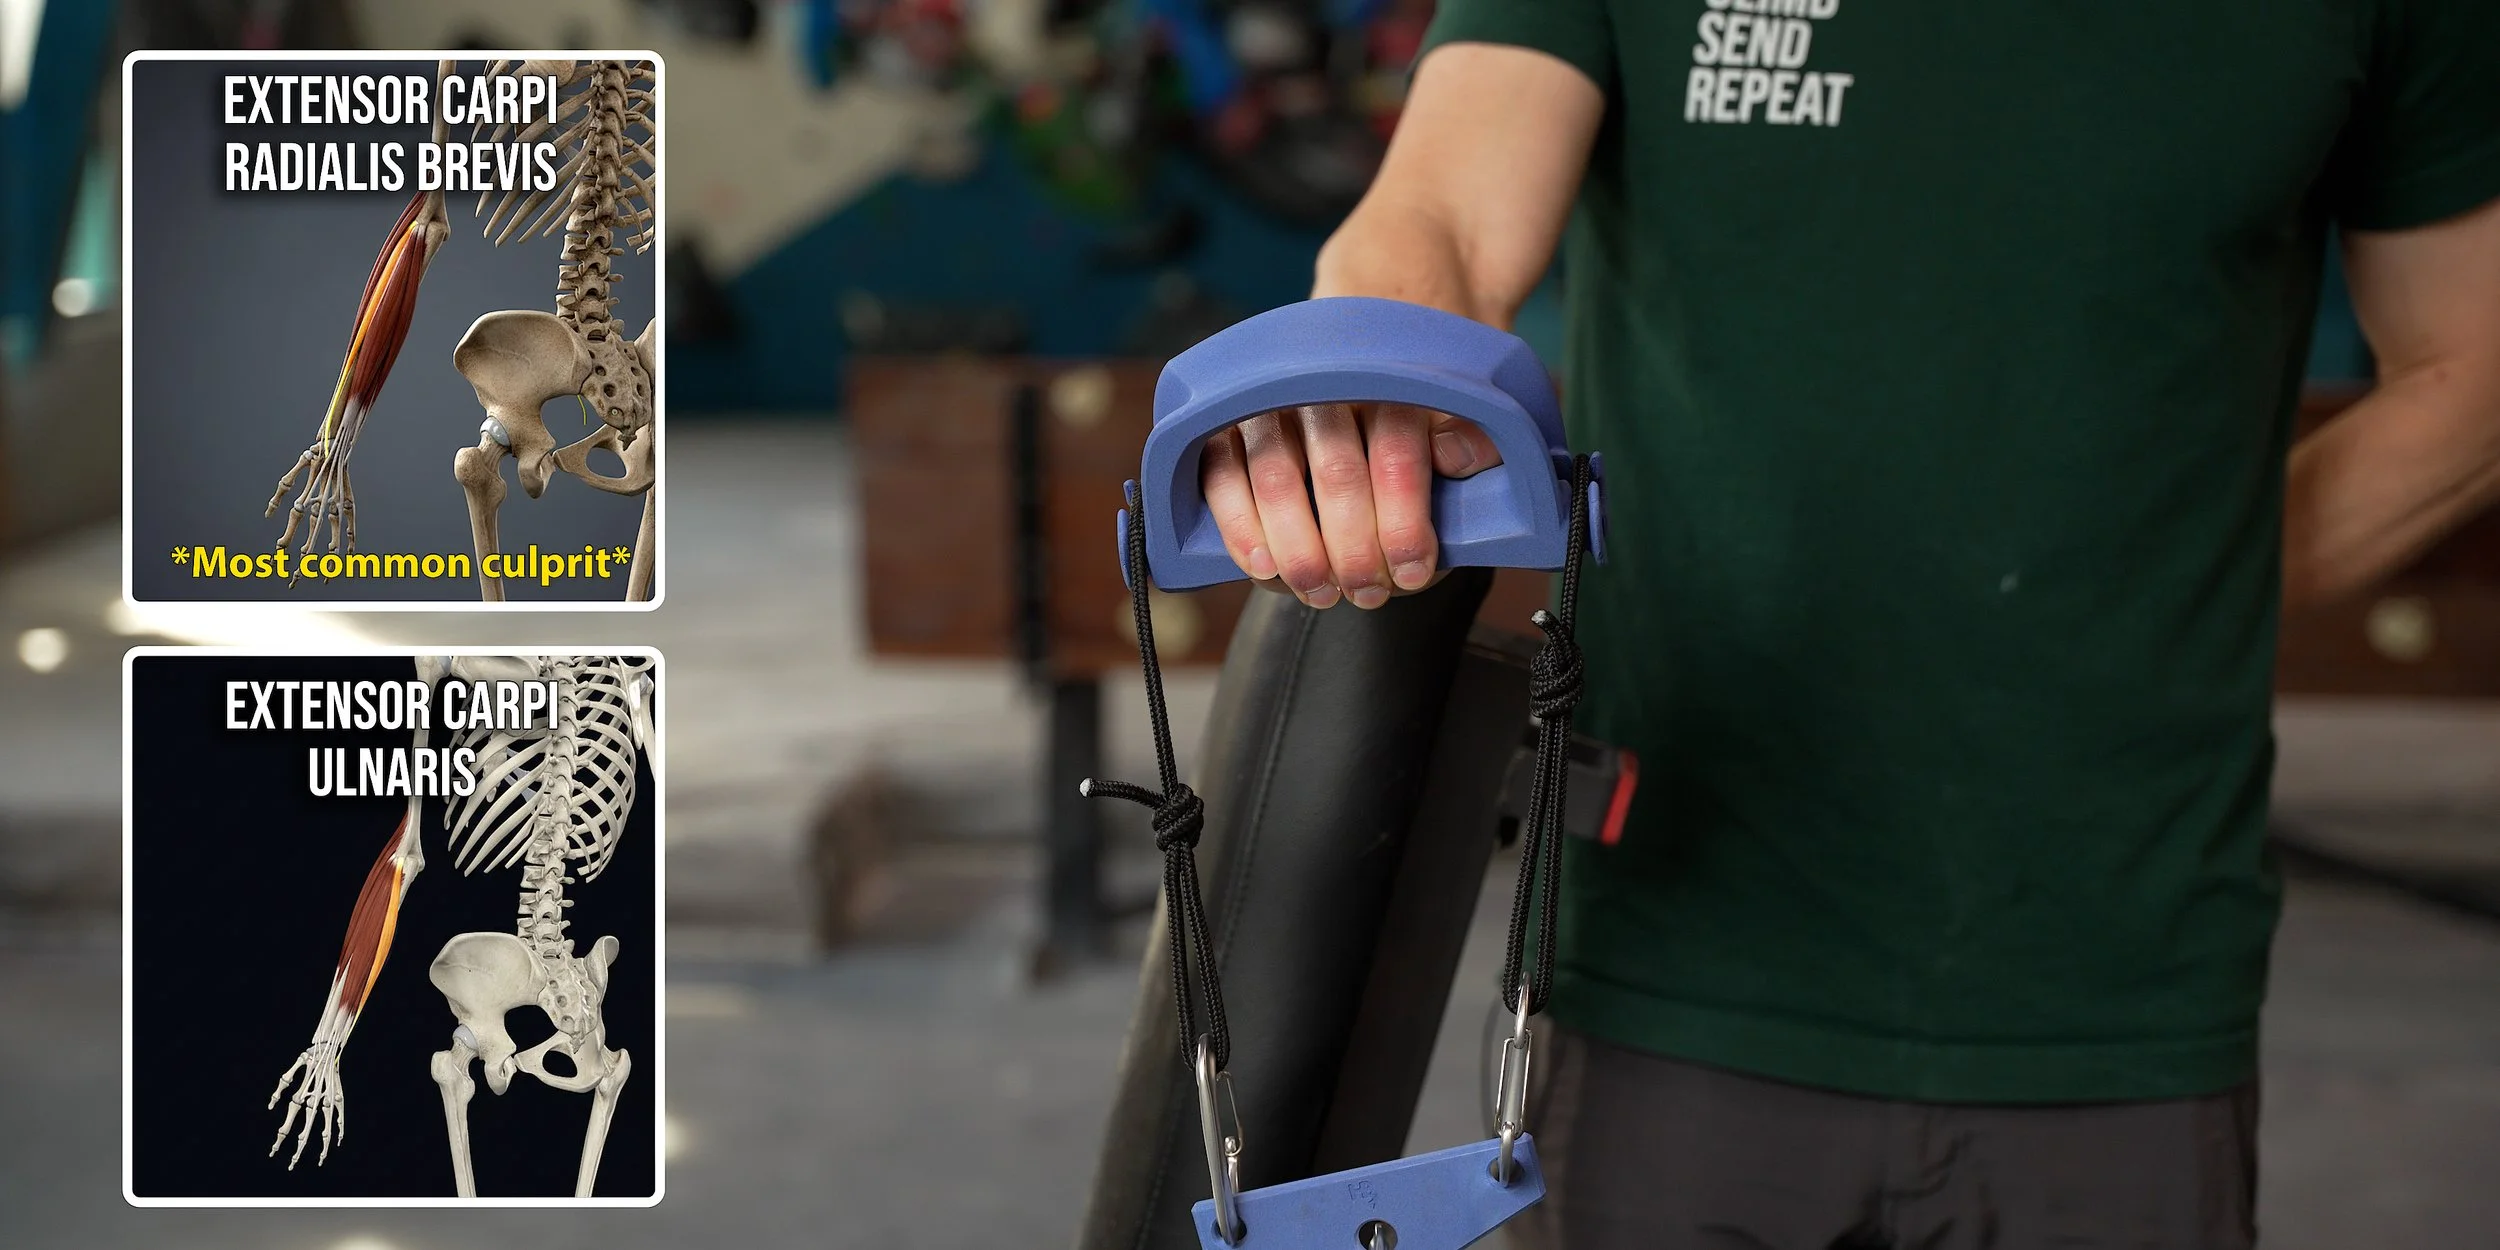
In this case, there are actually seven different tendons that could be the culprit. The muscles these tendons attach to are as follows:
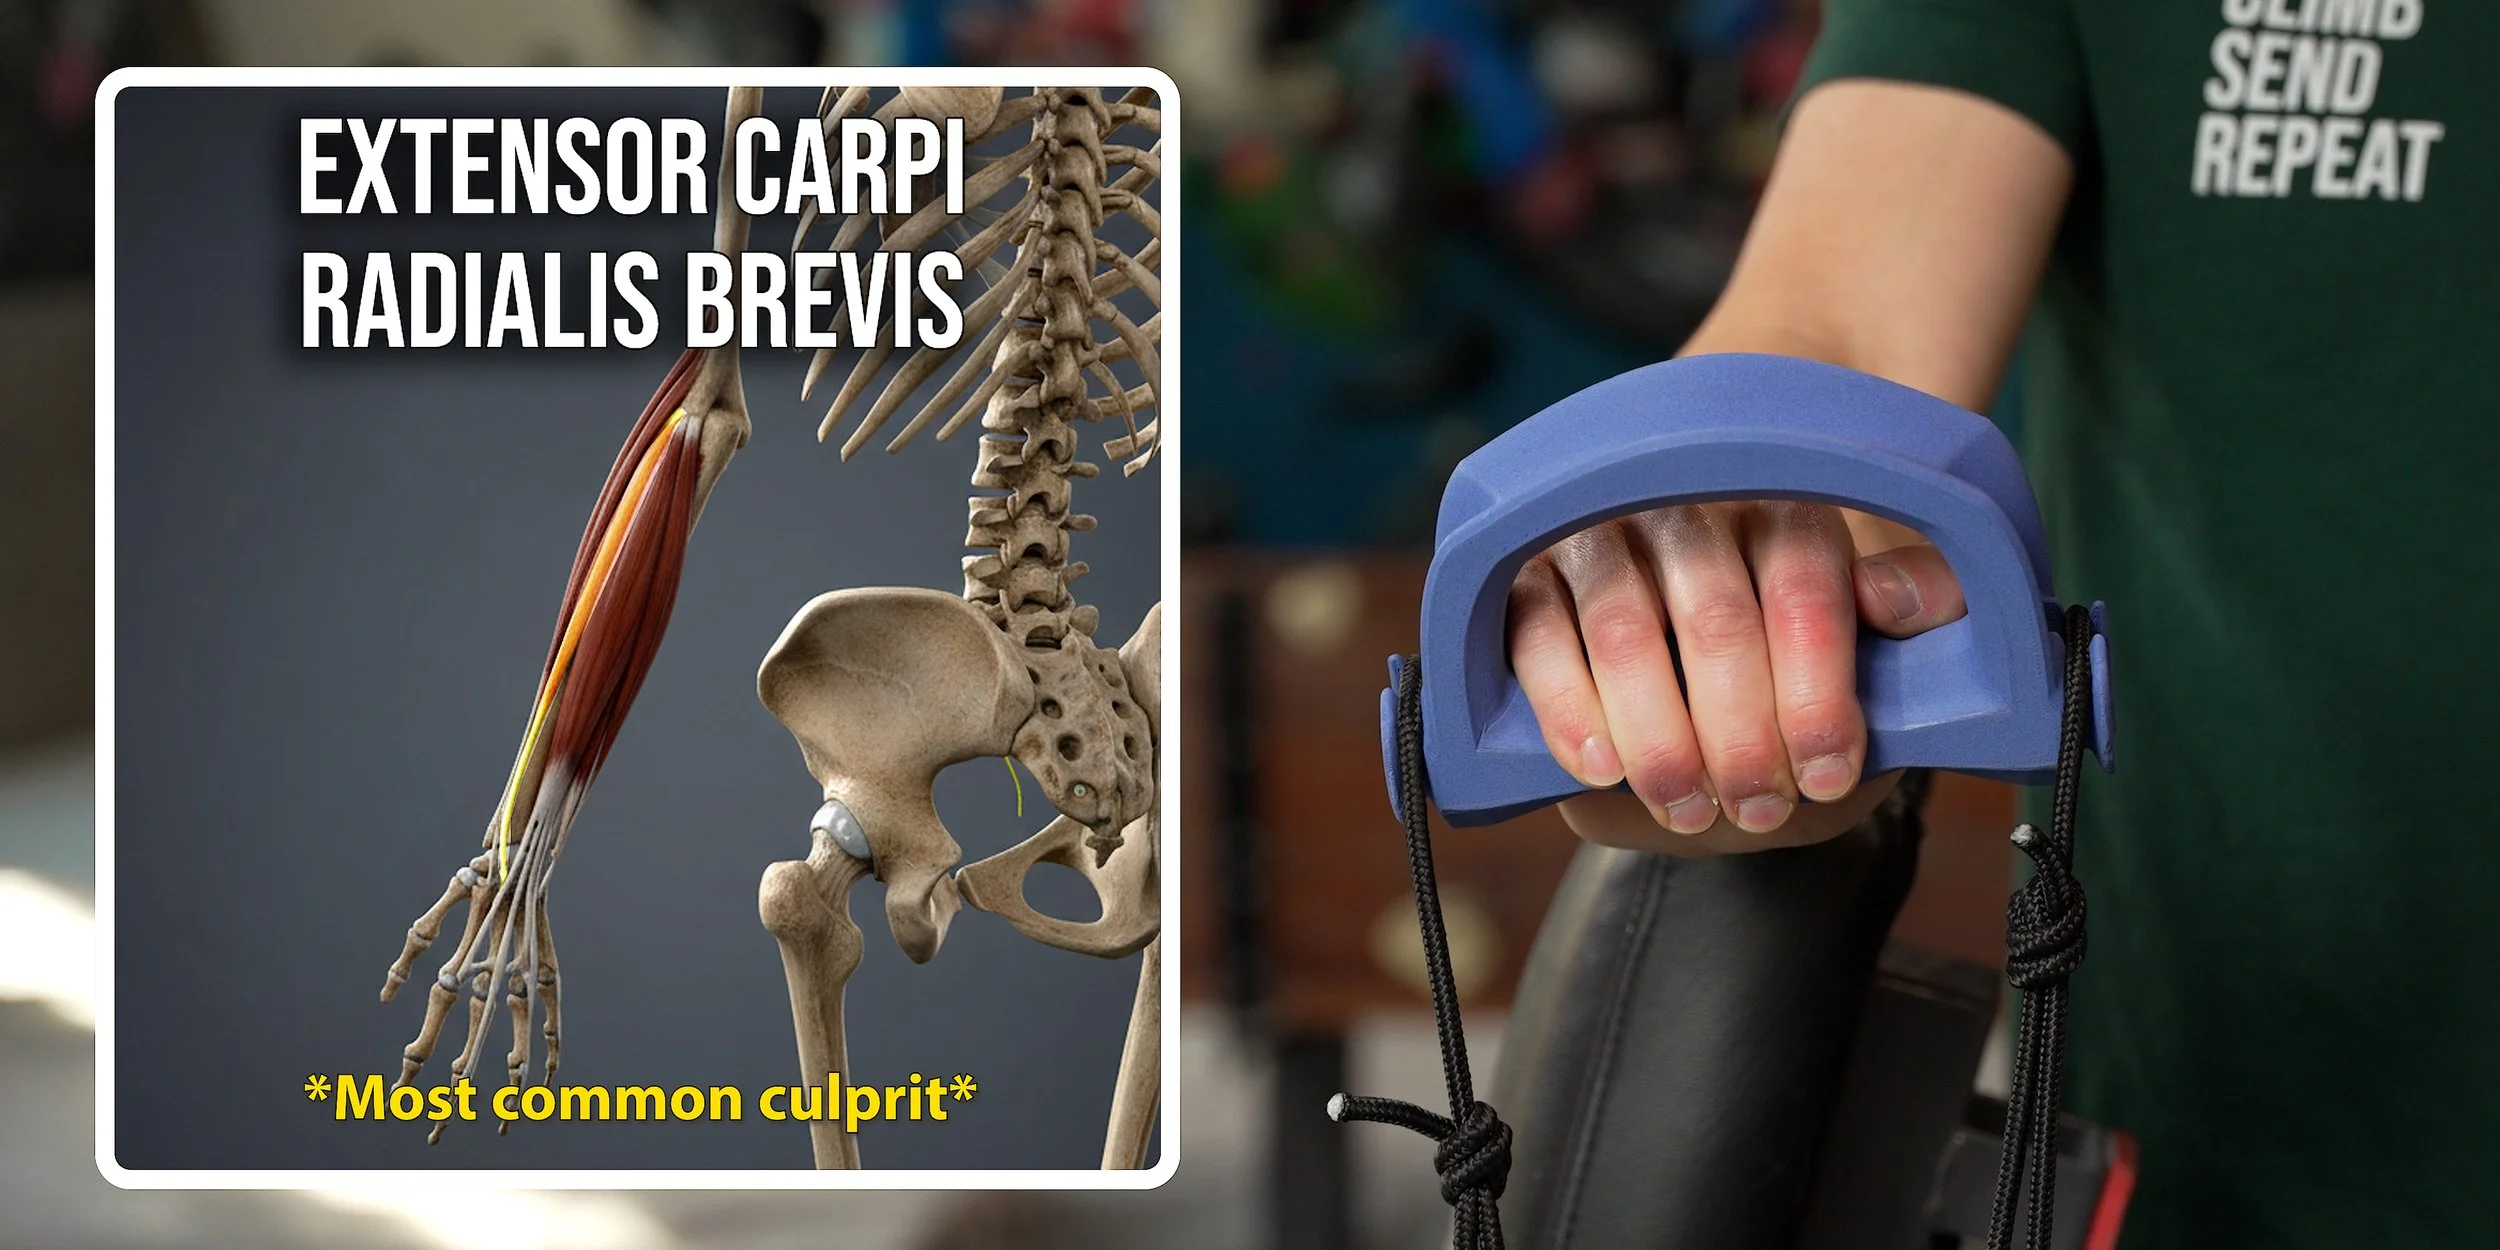
Extensor carpi radialis brevis (ECRB) – this is the most commonly affected one with lateral elbow pain
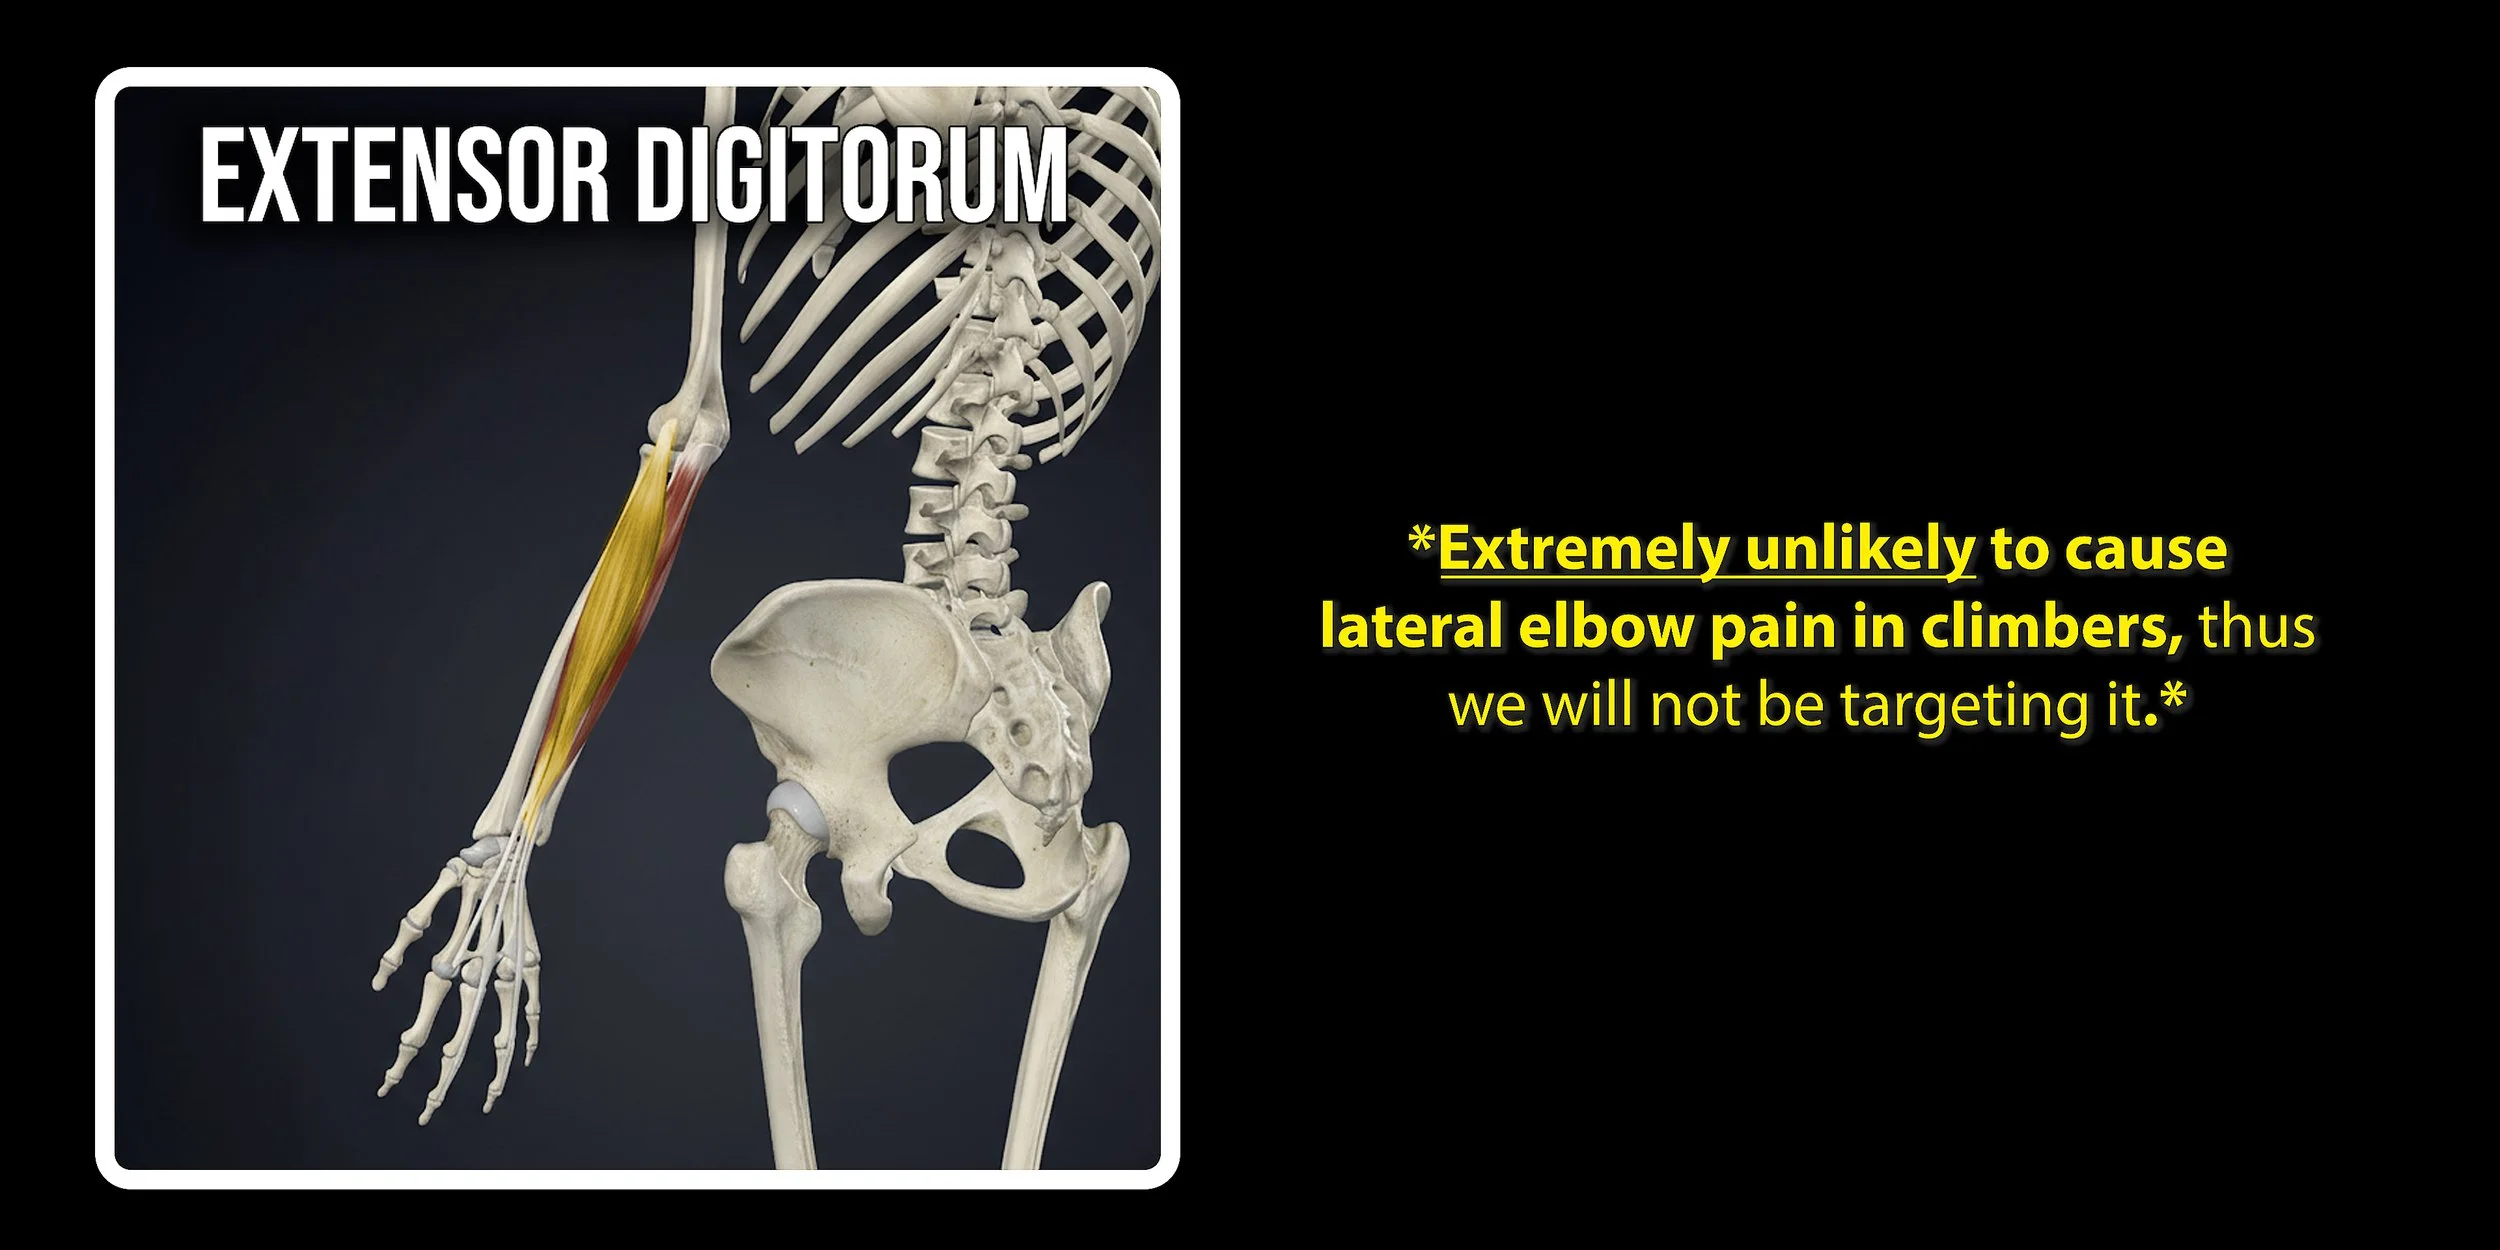
Extensor digitorum (ED) – very unlikely to cause lateral elbow pain in climbers, thus we will not be targeting it here
Extensor digiti minimi (EDM) – very unlikely to cause lateral elbow pain in climbers, thus we will not be targeting it here
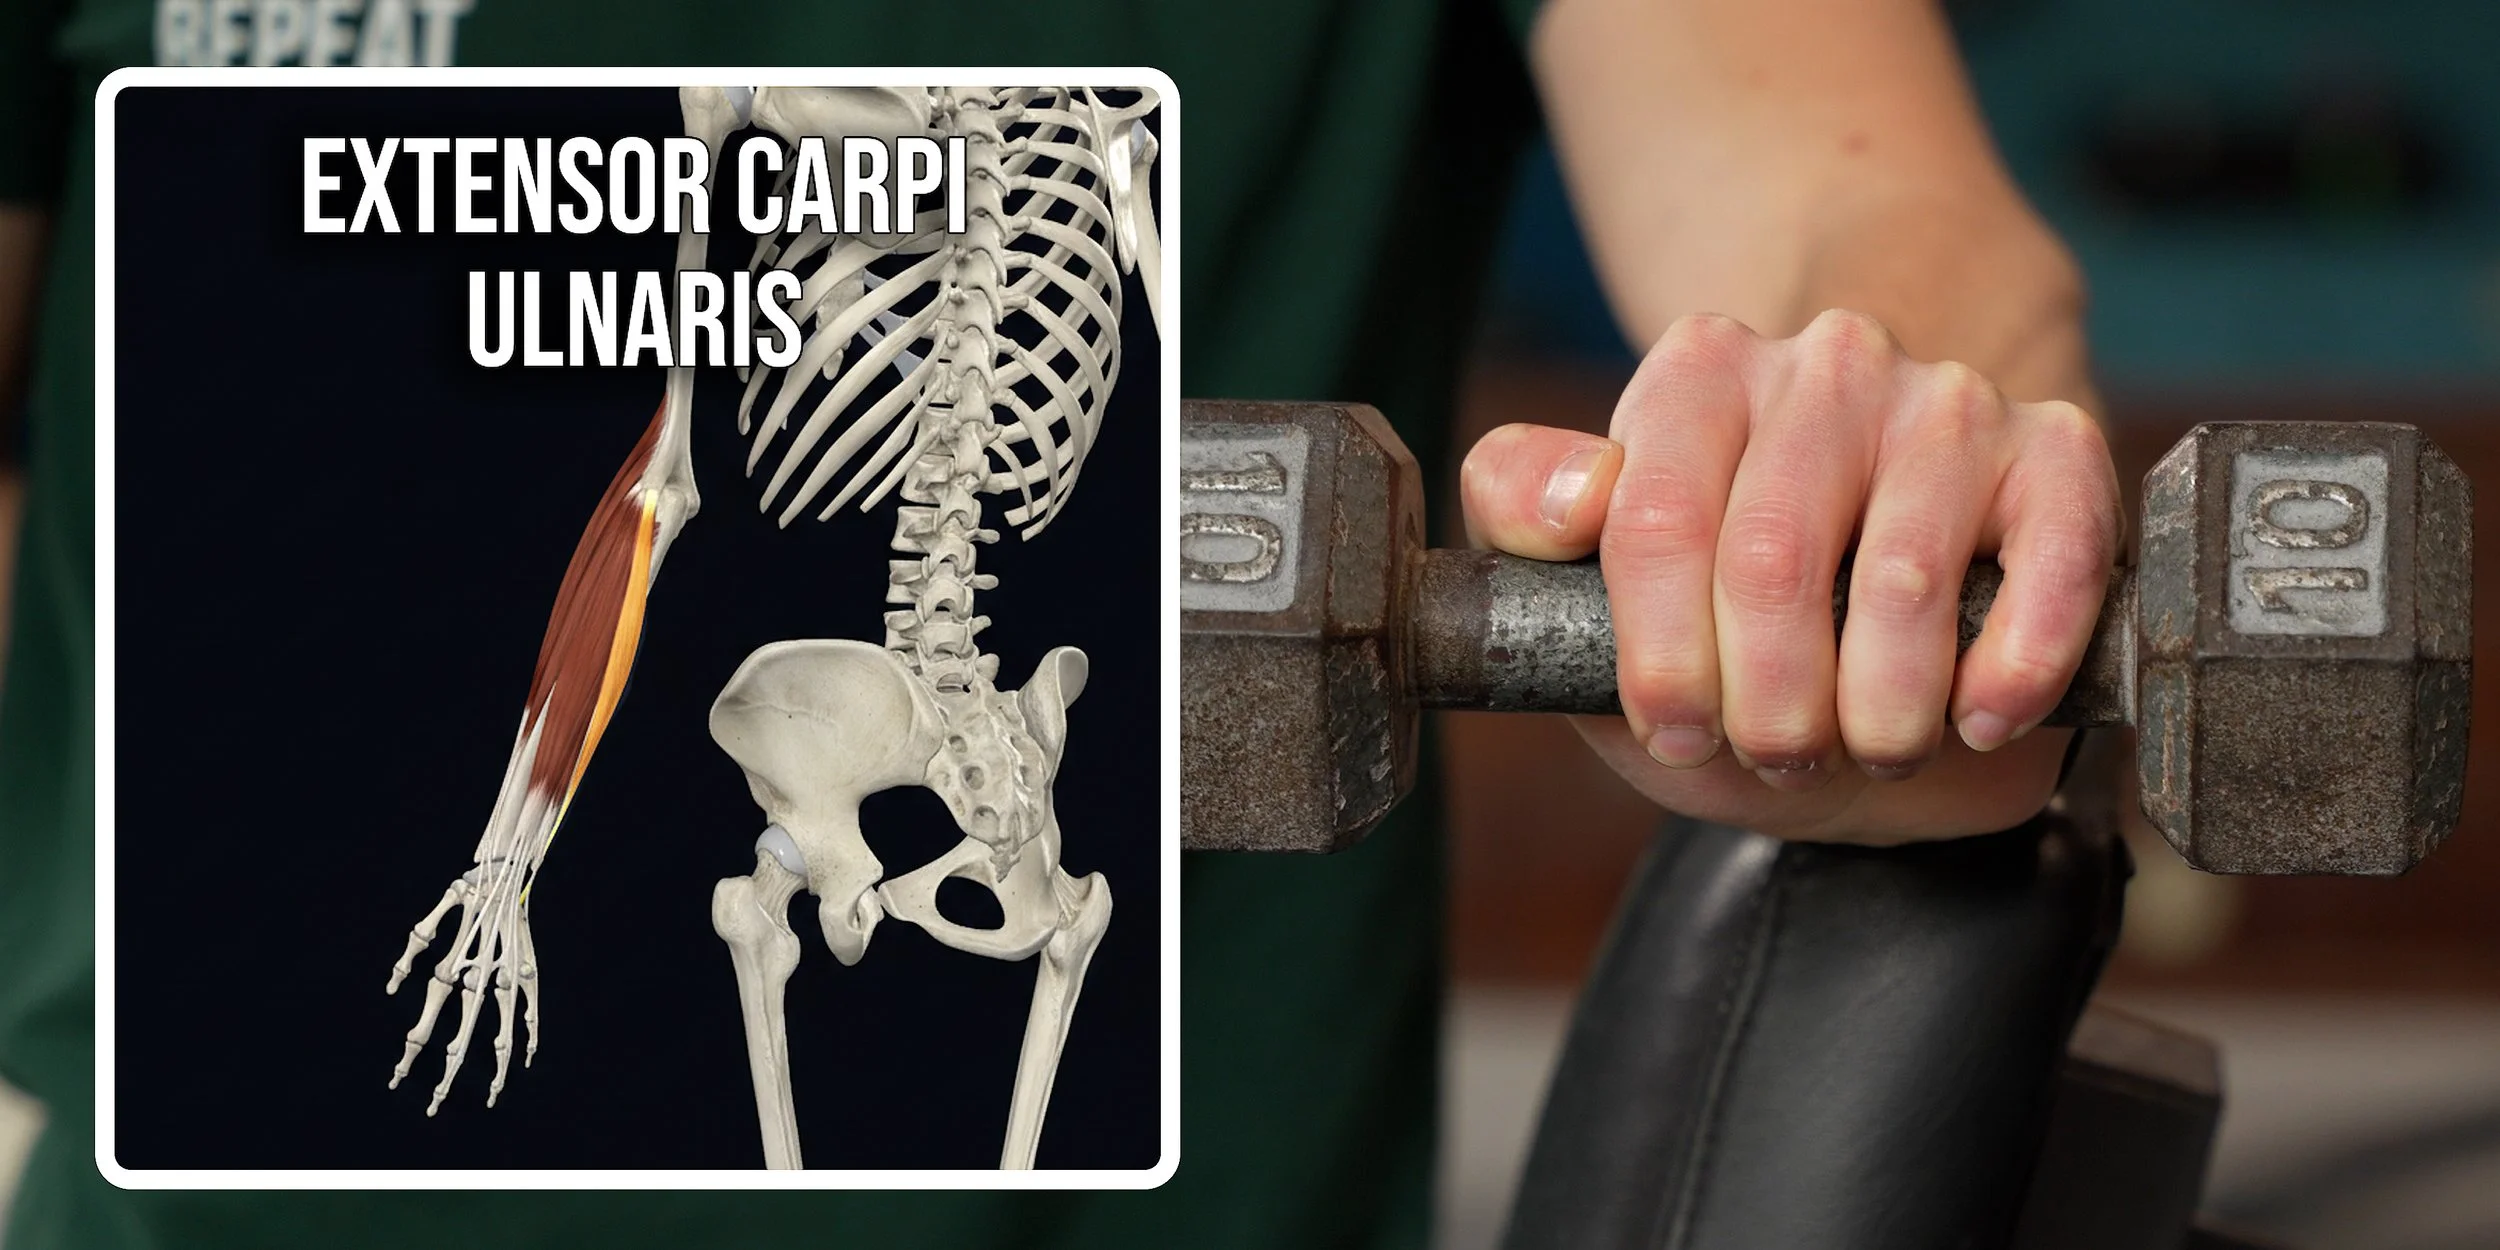
Extensor carpi ulnaris (ECU)
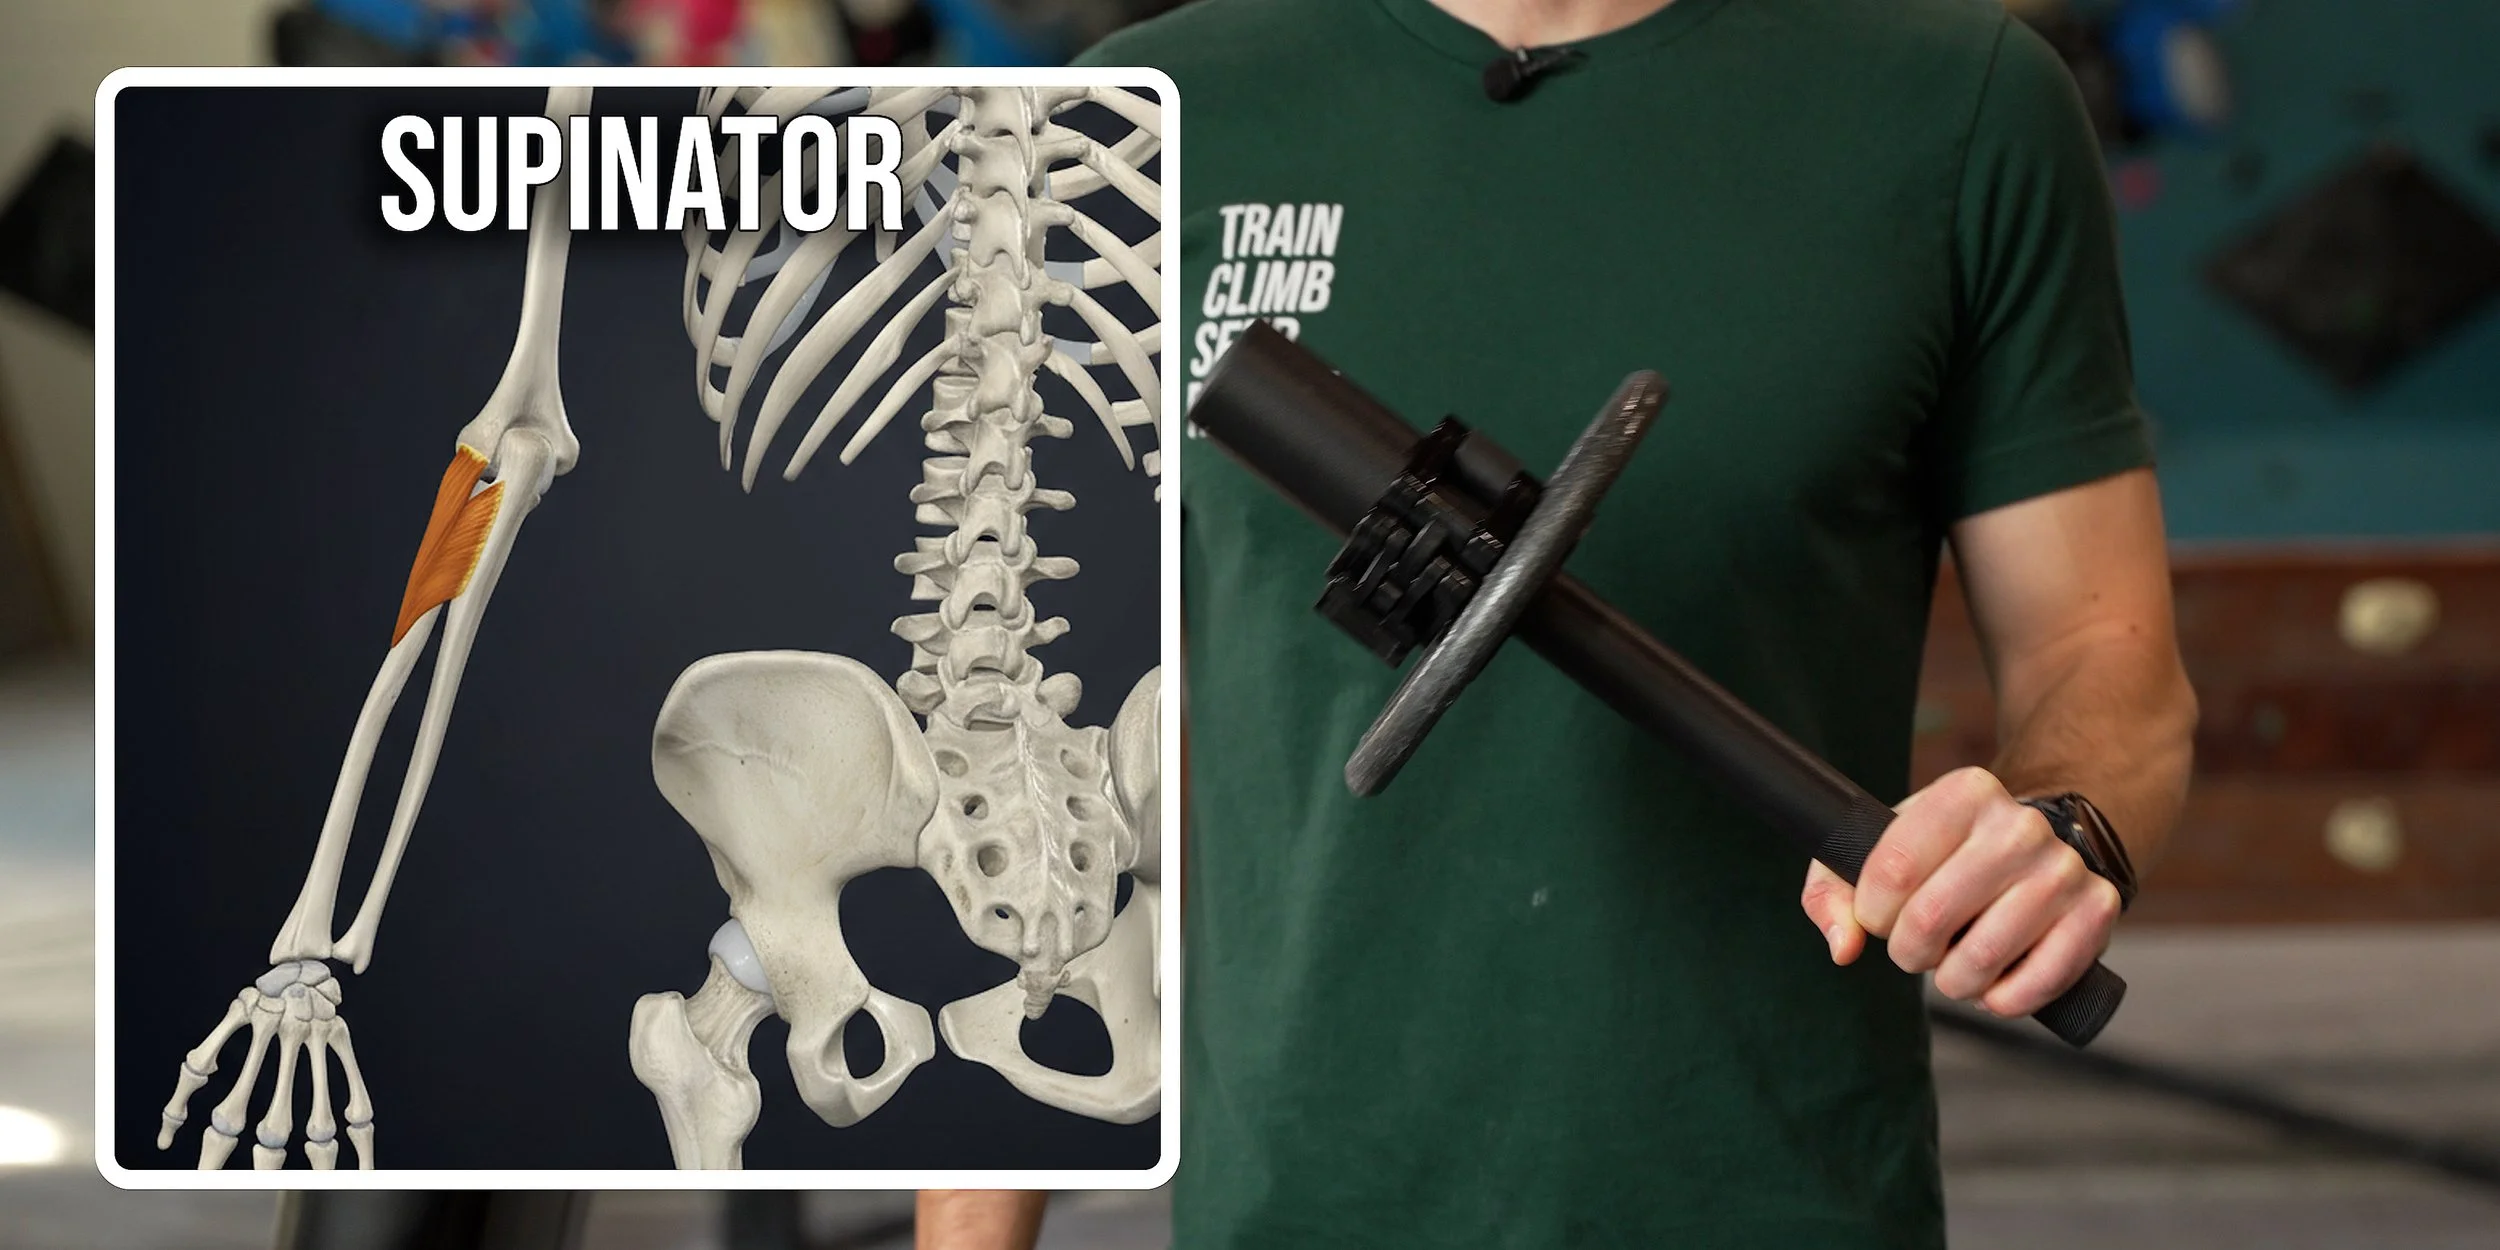
Supinator
Extensor carpi radialis longus (ECRL)
Brachioradialis

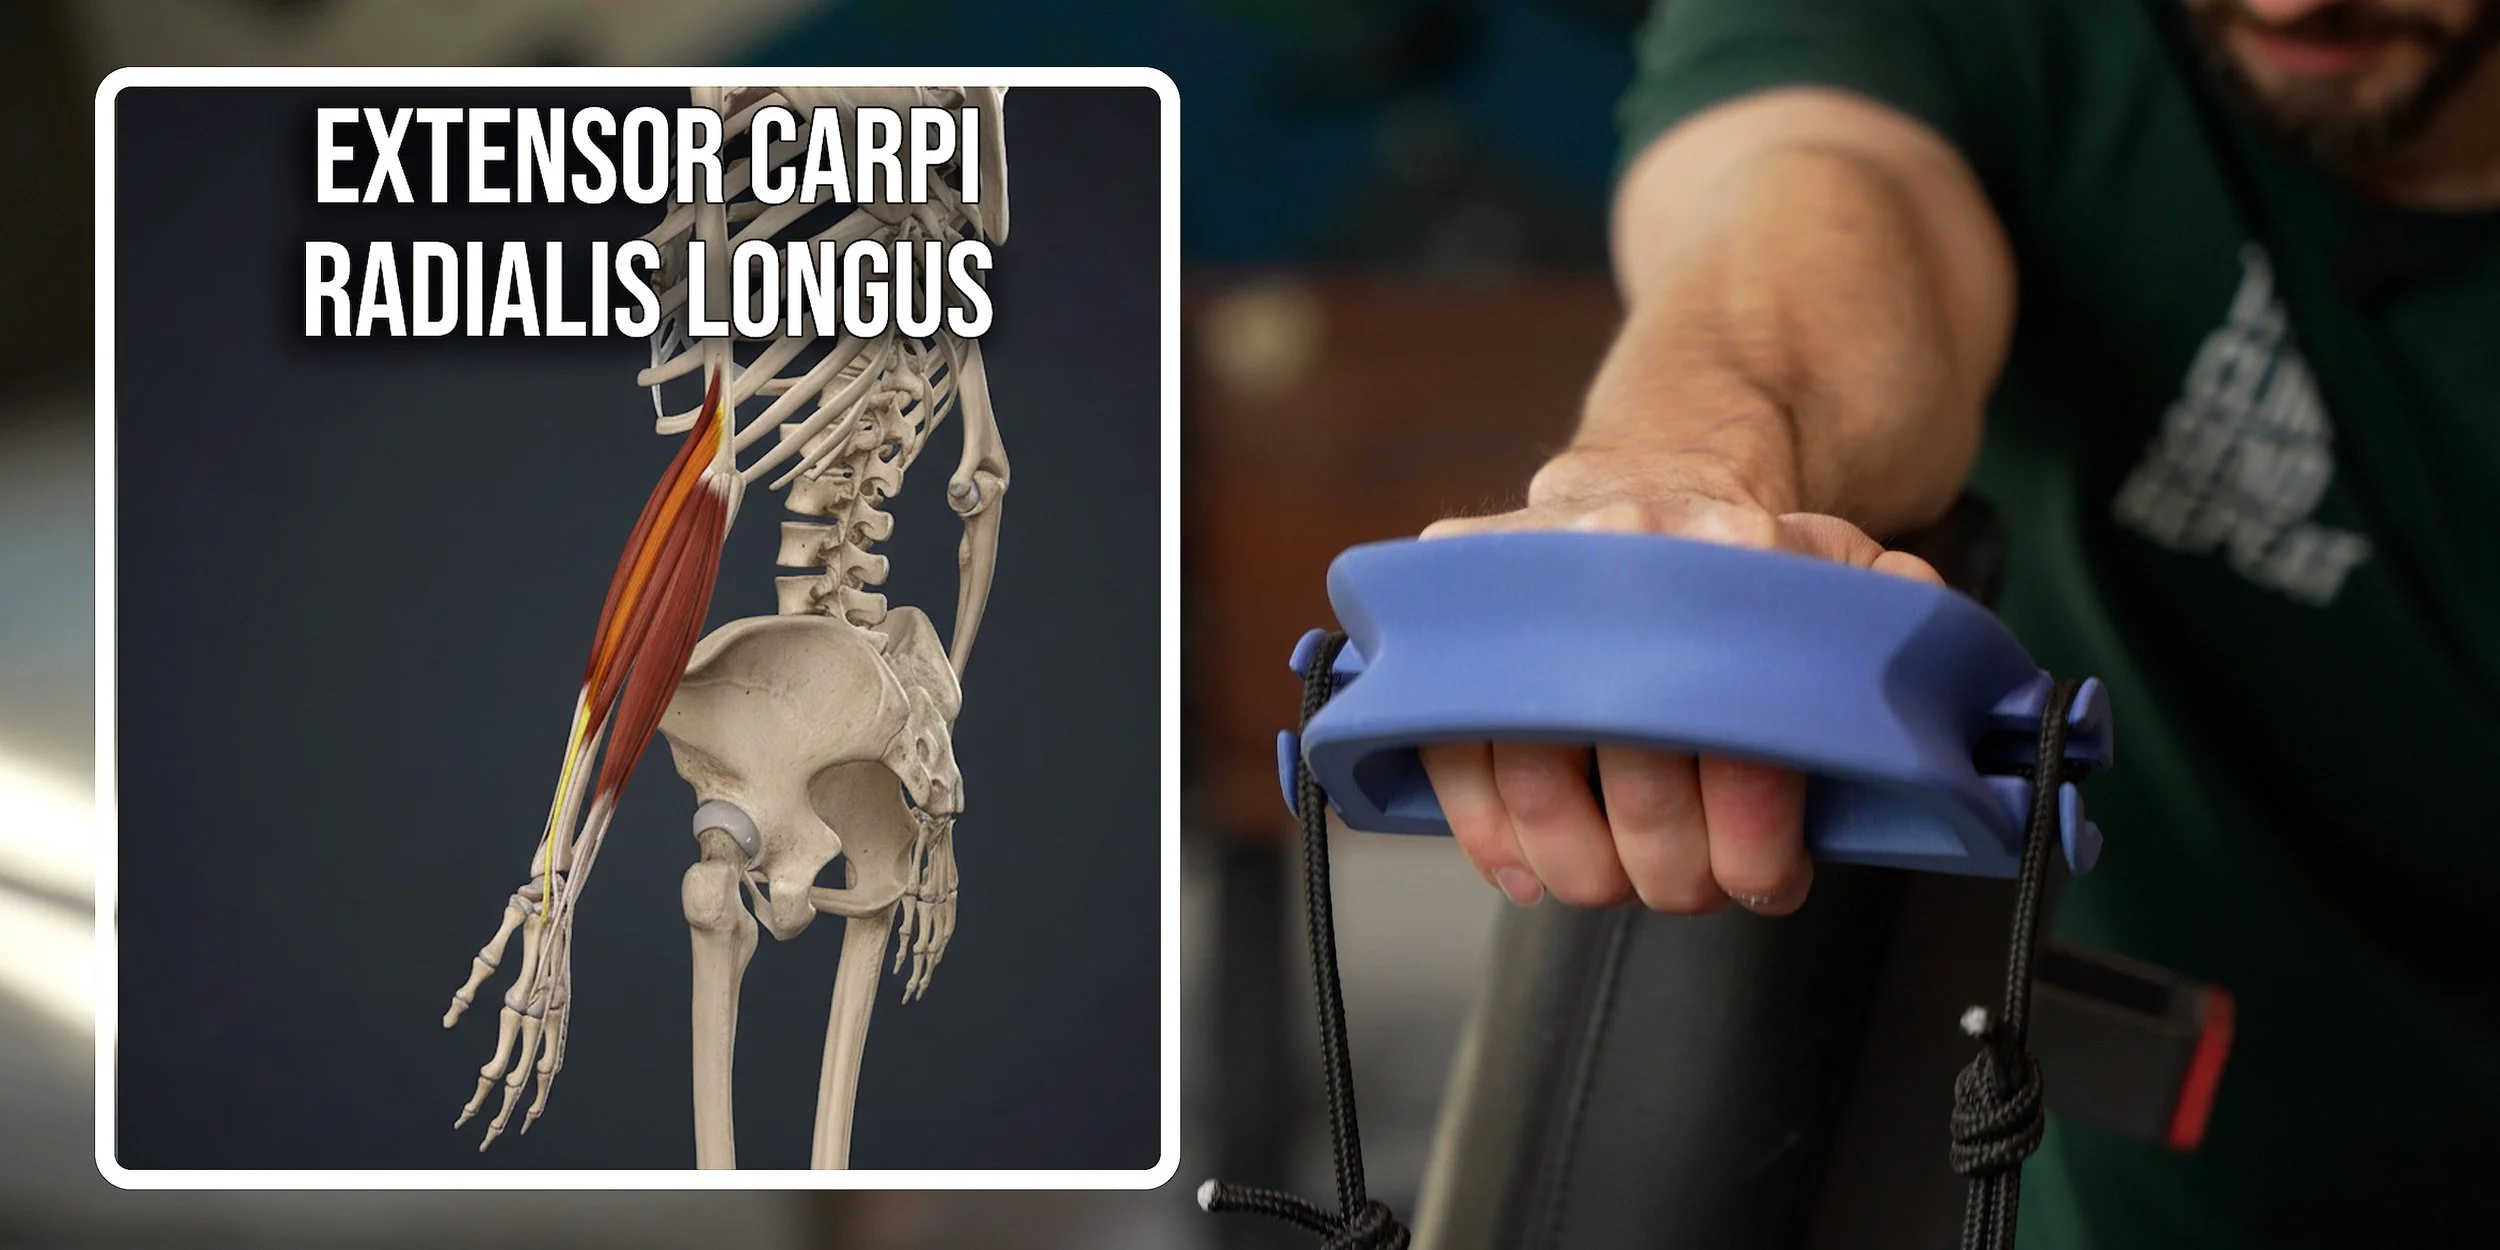
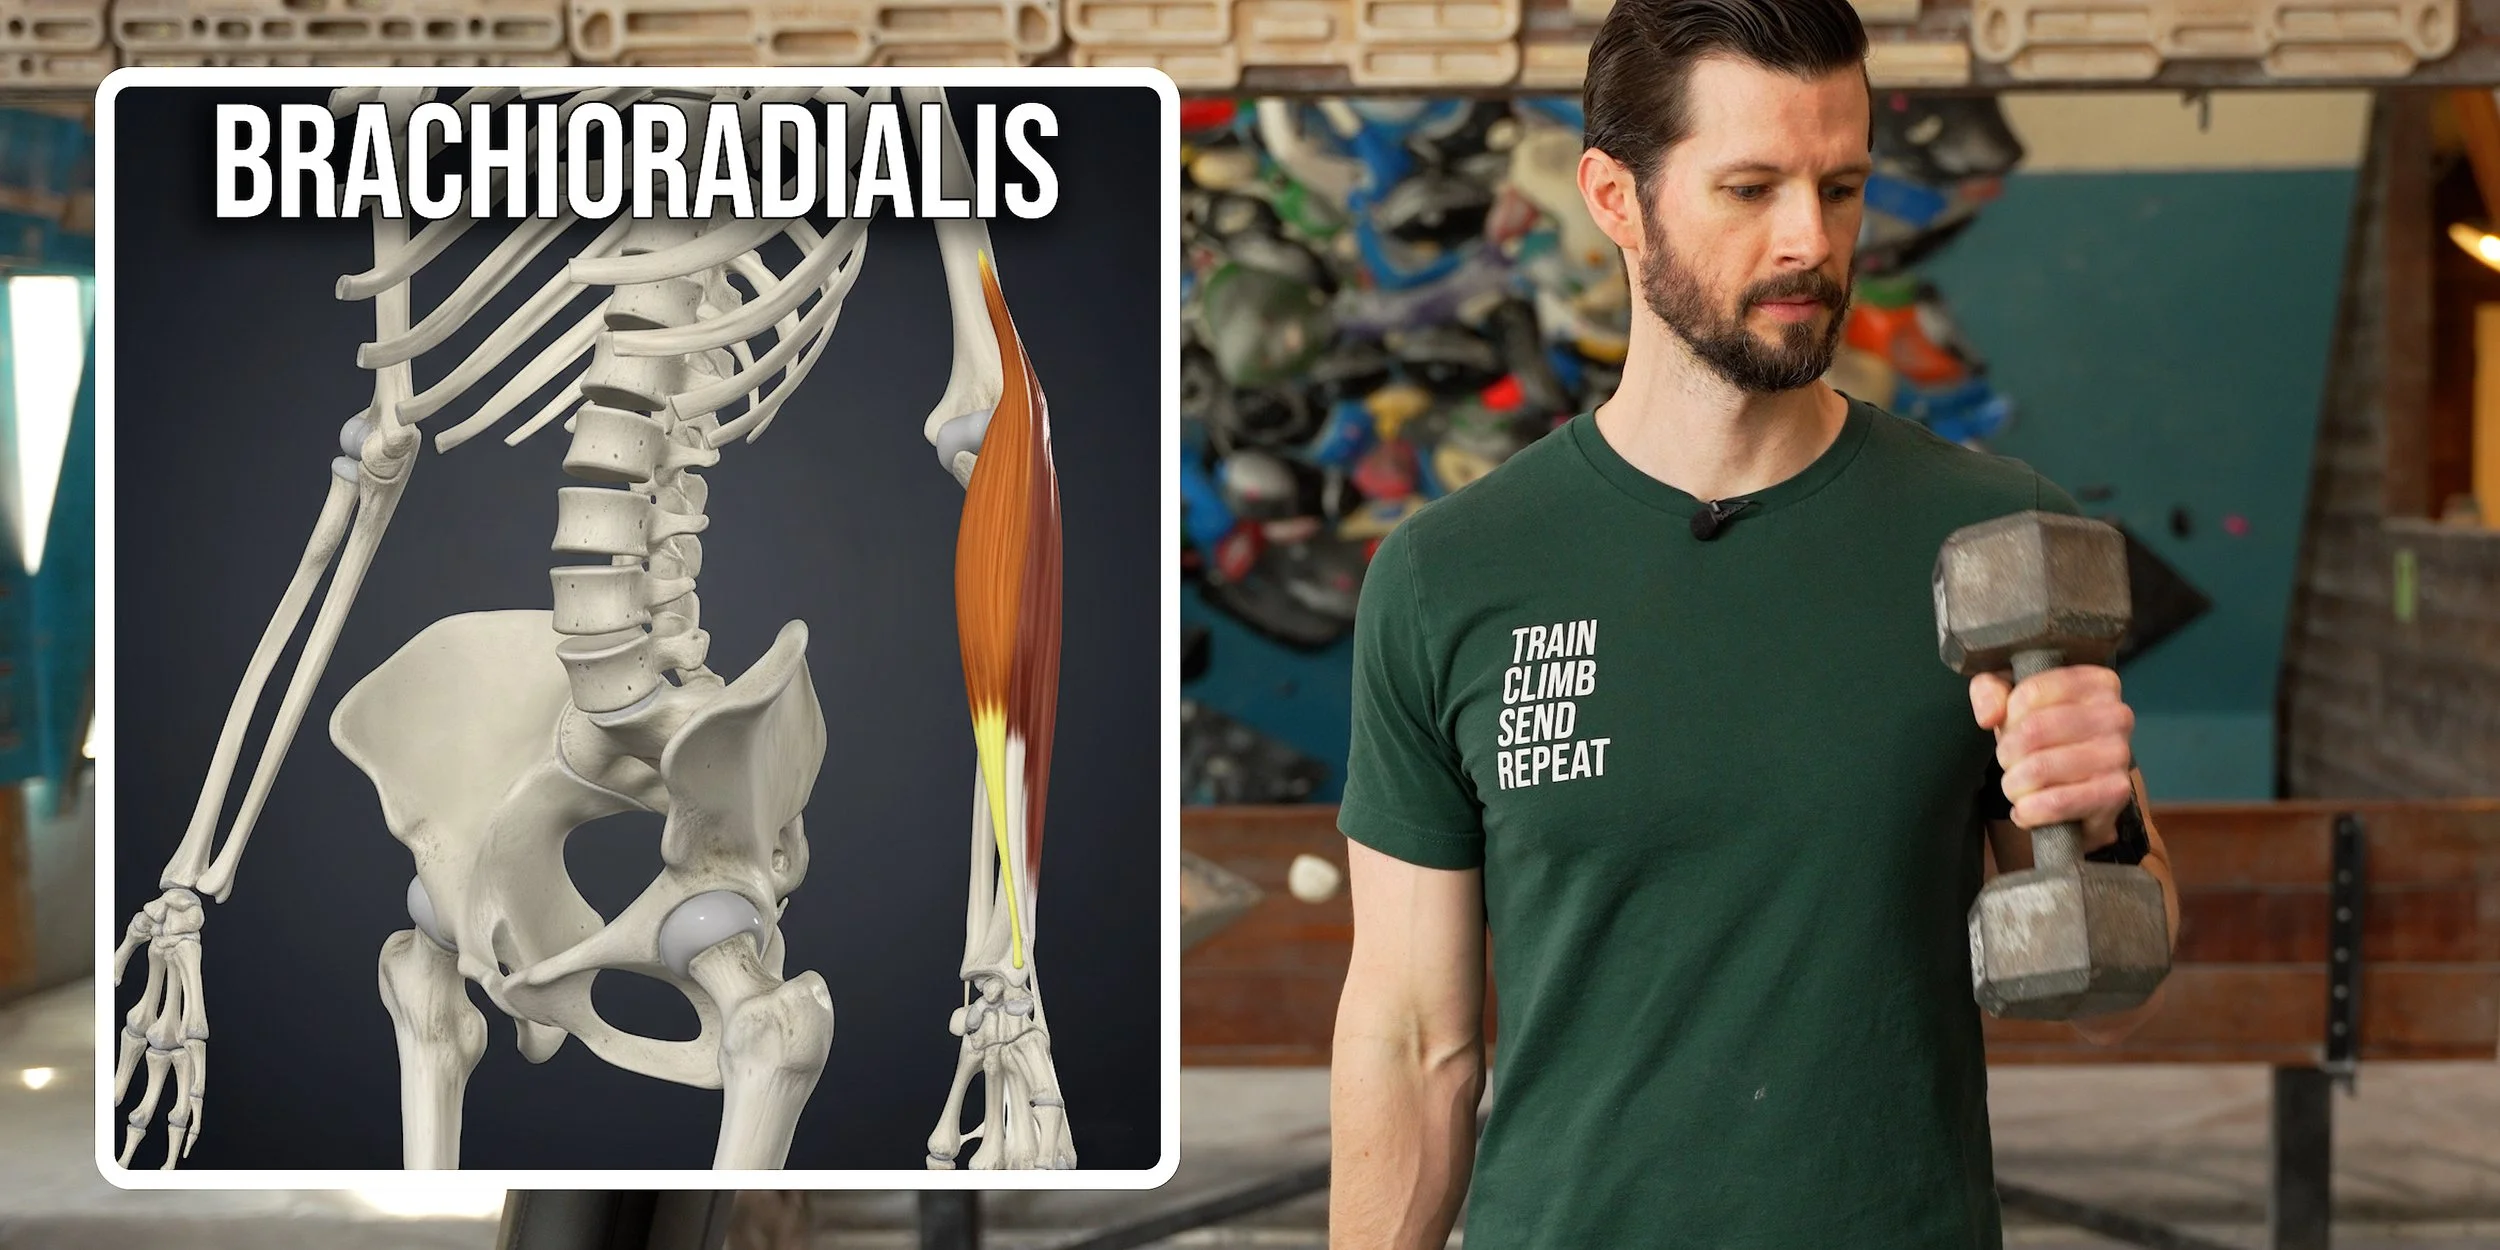
Those first four actually originate from the “common extensor tendon” on the lateral epicondyle, branching off into different wrist and finger extensor muscles. The other three have separate origins.
Now that you’ve got a better idea of the muscles and tendons involved, you may be starting to realize why pushups are not the way to cure them. But first, let’s talk about the second cause.
Nerve Compression
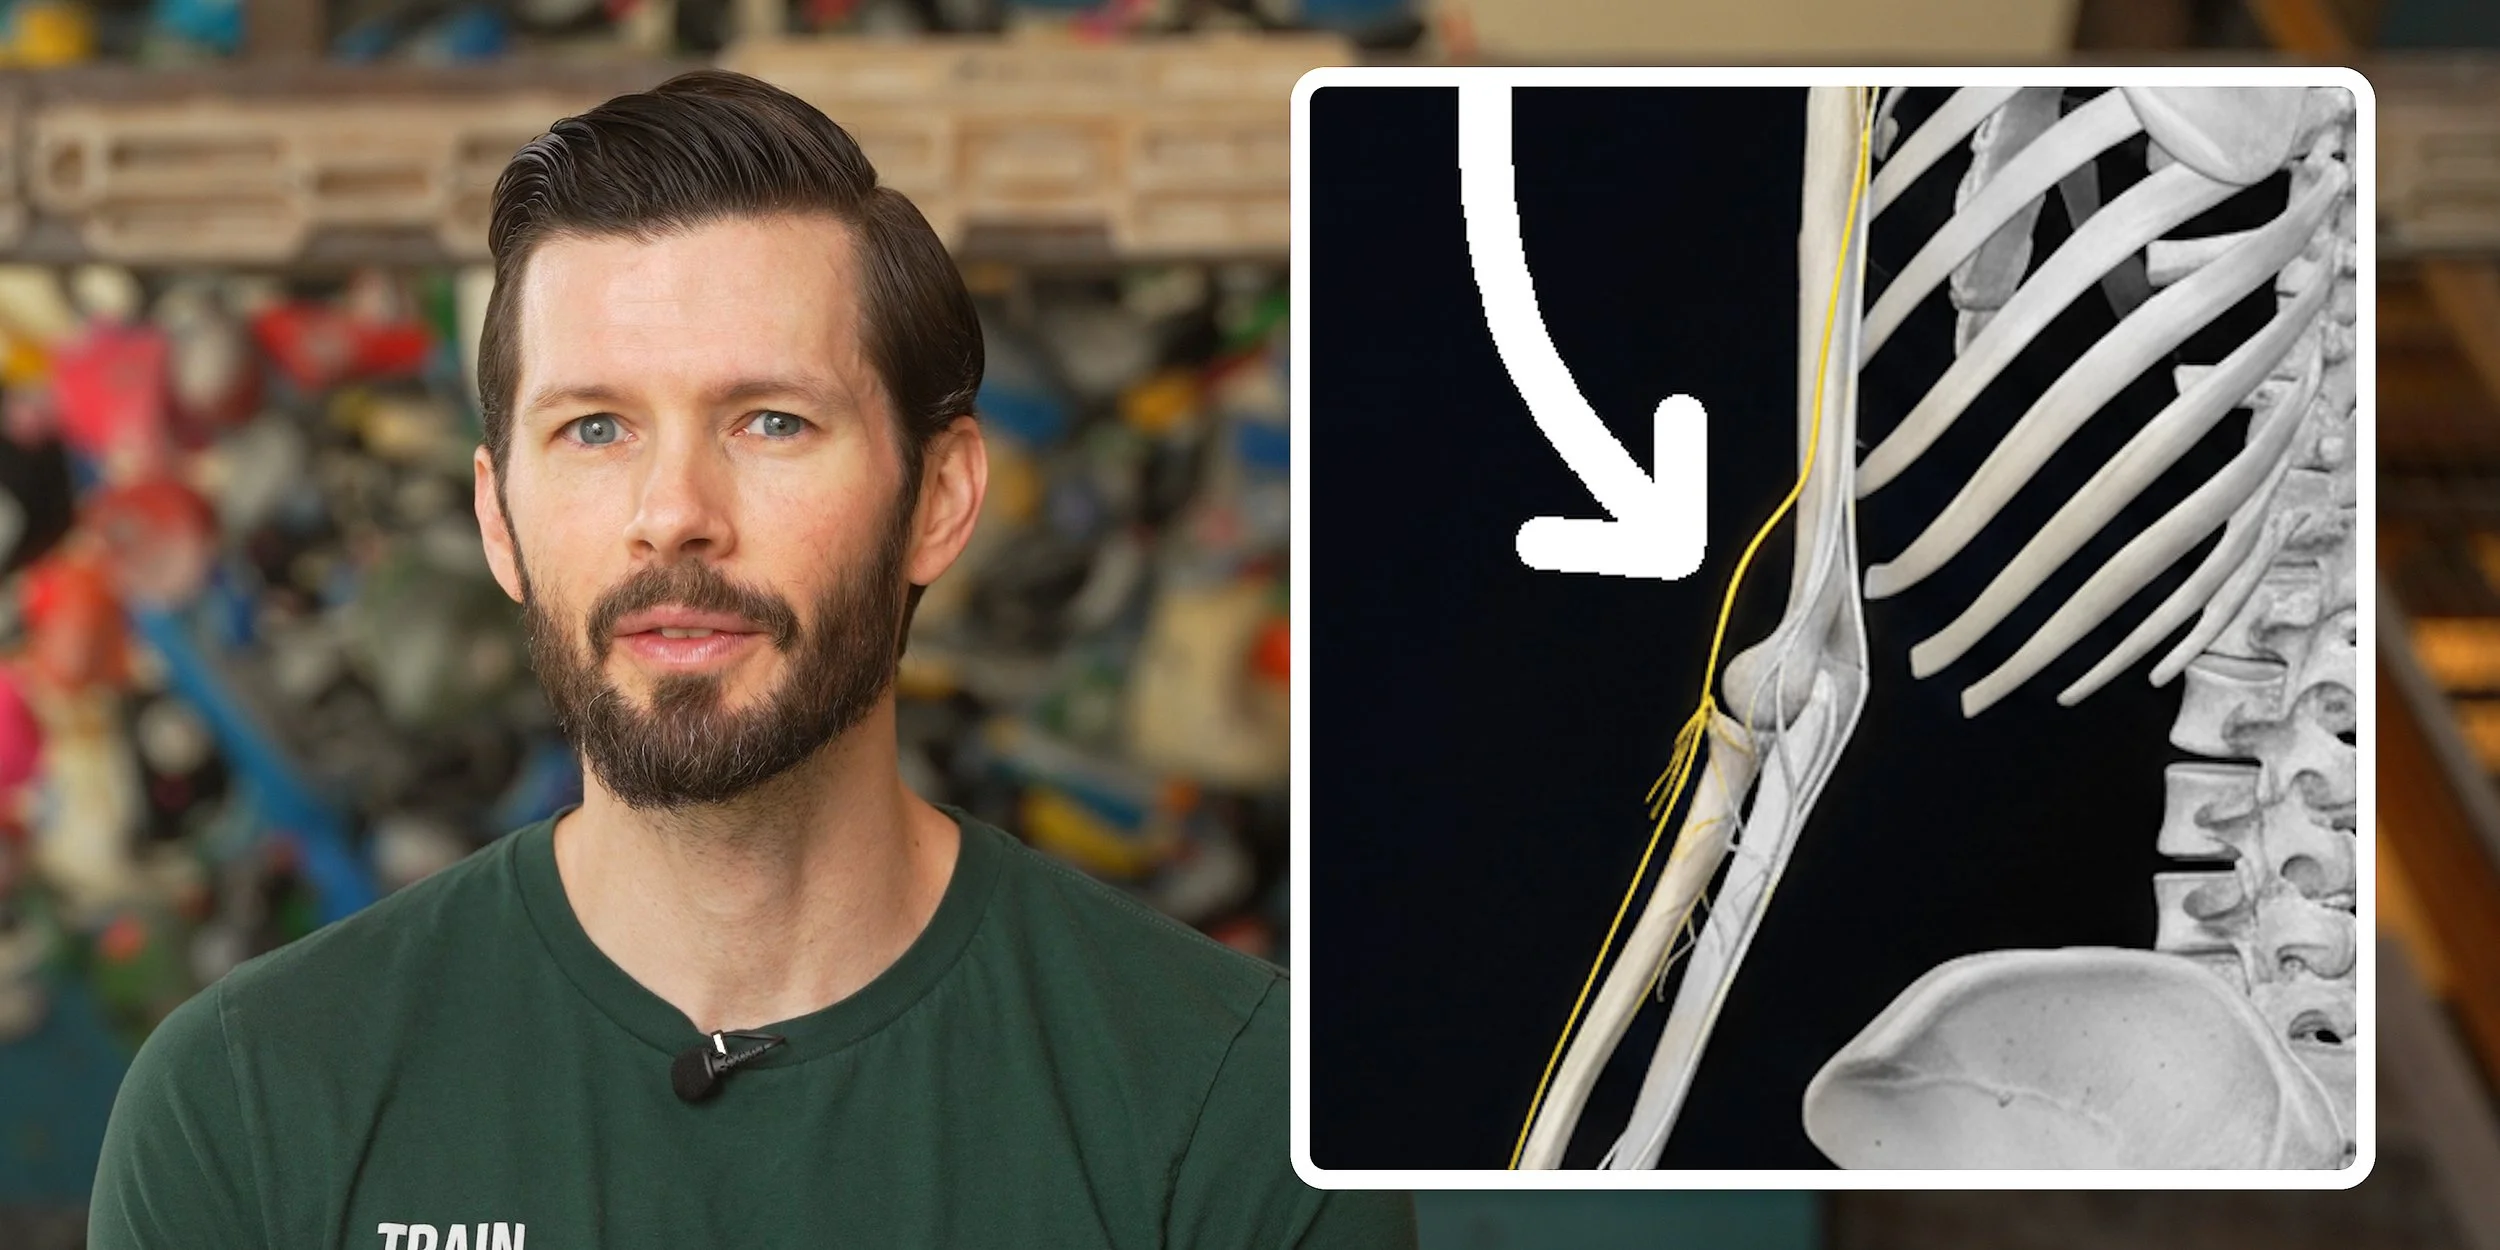
The highly underrated cause of lateral elbow pain is nerve compression, also known as nerve entrapment or impingement. This is the one that gets overlooked by so many people, leading to a frustrating recovery experience.
Why is it so overlooked? Because most people think nerve symptoms can only be a tingling or burning sensation, but that’s not actually true. The real symptoms of nerve compression are: diffuse discomfort, a dull ache (which may be localized or spread out), a sharp or stabbing sensation, and/or numbness, tingling, or burning. Sound familiar? Turns out nerve symptoms in the elbow can mimic the symptoms of a tendon pathology, so if you have any of those overlapping symptoms you shouldn’t immediately assume it’s a tendon issue.
For nerve-related issues in the lateral elbow, the radial nerve is the culprit. Compression of the radial nerve at the elbow is often called radial tunnel syndrome (RTS). However, since the radial nerve passes through, under, and between various muscles in our arms, it can get pinched by a lot of different structures, and sometimes your *elbow* pain can be caused by impingement in a completely *different* area.
Now, with so much overlap between tendon and nerve symptoms, how can you tell which one is actually causing your elbow pain?
How do I know if my symptoms are tendon or nerve related?
This can be quite tricky to figure out because the activities that provoke your symptoms could be irritating either the tendon or the nerve… or both. For example, when you yank on a crimp or swing a tennis racket, you’re putting load on those elbow tendons, but the muscle contraction can also squeeze the nerve. However, there are a few useful differentiators to look for.
Numbness and tingling are symptoms only associated with nerve compression. If you experience this as your primary symptom, it is a nerve.
If you have numbness or tingling along with other symptoms like a dull ache, you might have a combination of nerve and tendon involvement, or you might simply have varying levels of nerve compression at different times. For example, you might sometimes have mild compression that causes a dull ache and other times have more significant compression that causes numbness or tingling. So, combination symptoms could be tendon and nerve or just nerve.
If your symptoms change with the nerve mobilizations or the stretches I’ll be showing you for the chest/shoulder, a nerve is involved.
If your symptoms are constantly provoked when your elbow is bent, such as holding your phone for too long, a nerve is likely involved.
If you’re positive that your symptoms are *only* nerve-related, then you should watch our video “How to Fix Nerve Tension for Climbers” instead of this one. If you think your symptoms are related to *neither* tendons nor nerves (such as a radial head dislocation, fracture, ligament sprain, osteochondral dissecans, arthritis, or any other ligament or bone issue), this video is unfortunately not for you.
For everyone else, I recommend you complete the full routine we’re about to lay out even if you’re dubious about nerve involvement. Since it is possible for lateral elbow pain to be caused by *both* a tendon and a nerve issue, the secret to solving the issue for many people turns out to be treating *both* the tendon and the nerve at the same time. Since nerve issues are constantly missed even by professionals, it's worth performing the nerve exercises for at least a couple weeks – you might be surprised by the results.
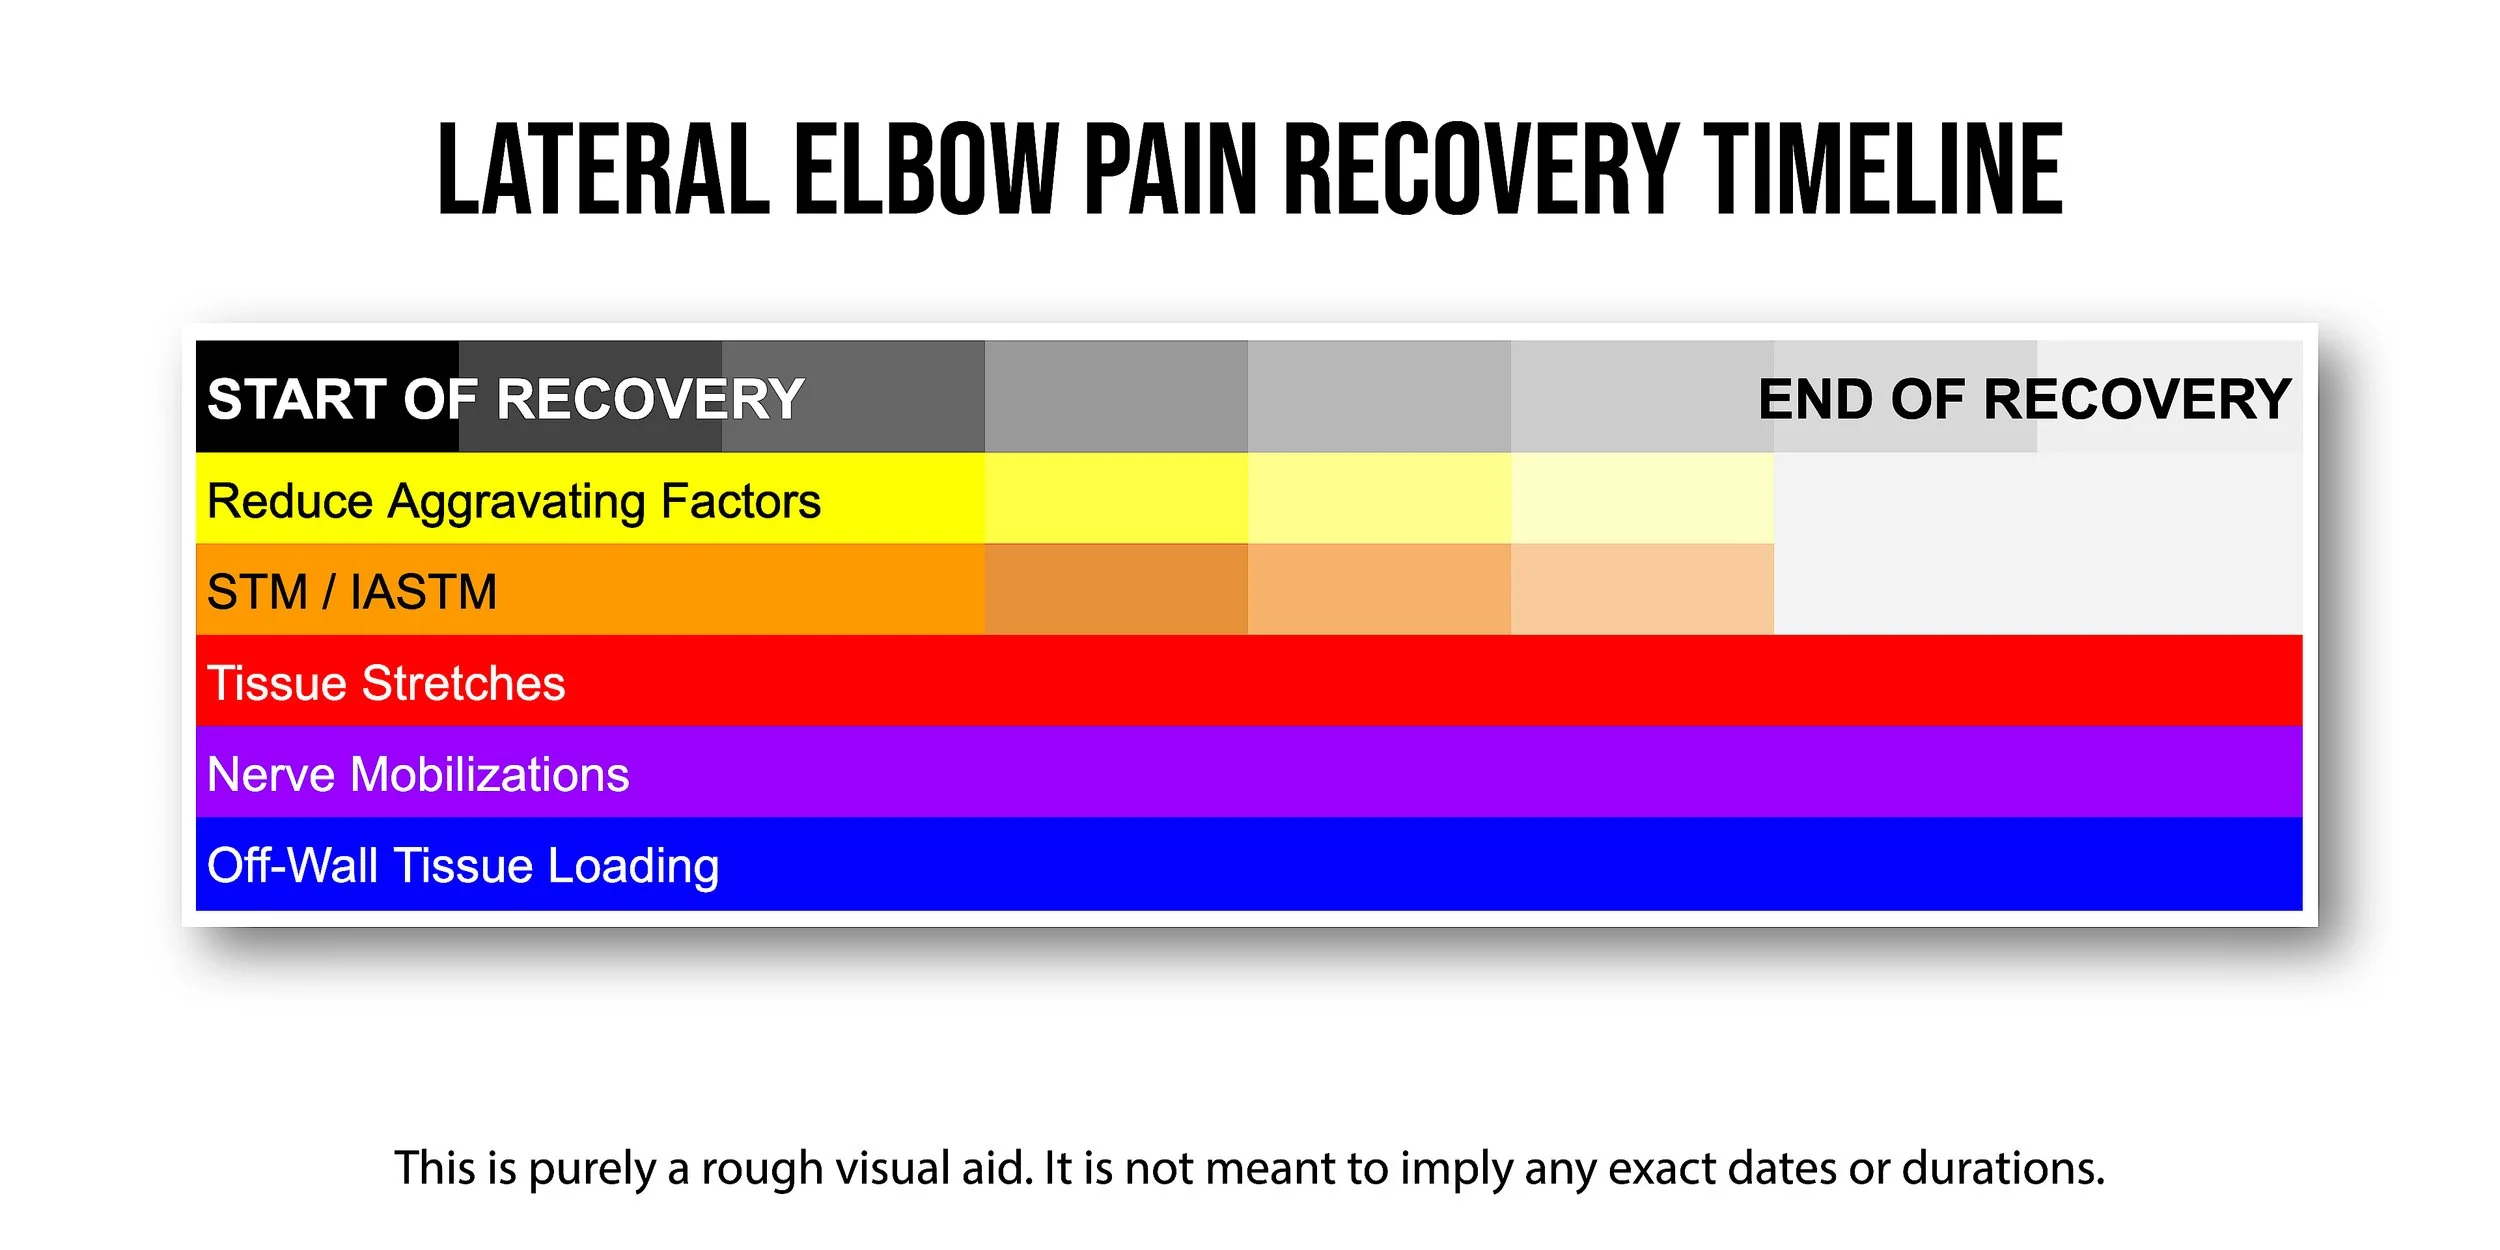
How Do I Recover?
About This Protocol
Before you begin this protocol, you should have a bit of context. Because there are multiple structures that can cause symptoms at the elbow, the exact recovery exercises needed can vary from one person to the next. That means a few things:
For the best chance of success, this program will take a broad, cover-all-the-bases approach. While this method has proven quite effective in lieu of an individually-tailer program, it does mean the protocol involves a lot of exercises. But don’t let that discourage you; it won’t take long to get the hang of it.
We’re not going to cover every single regression and progression of each exercise because this video would never end. If what we lay out here is too hard for your current stage of recovery, you’ll need to regress the difficulty to the appropriate level on your own. Of course, if you don’t want to deal with that, remember you can always use one of our pre-made Recovery Blueprints to make it easy.
This is not a personalized program, so you may find there are exercises here *you* don’t need but that may be extremely beneficial for someone else.
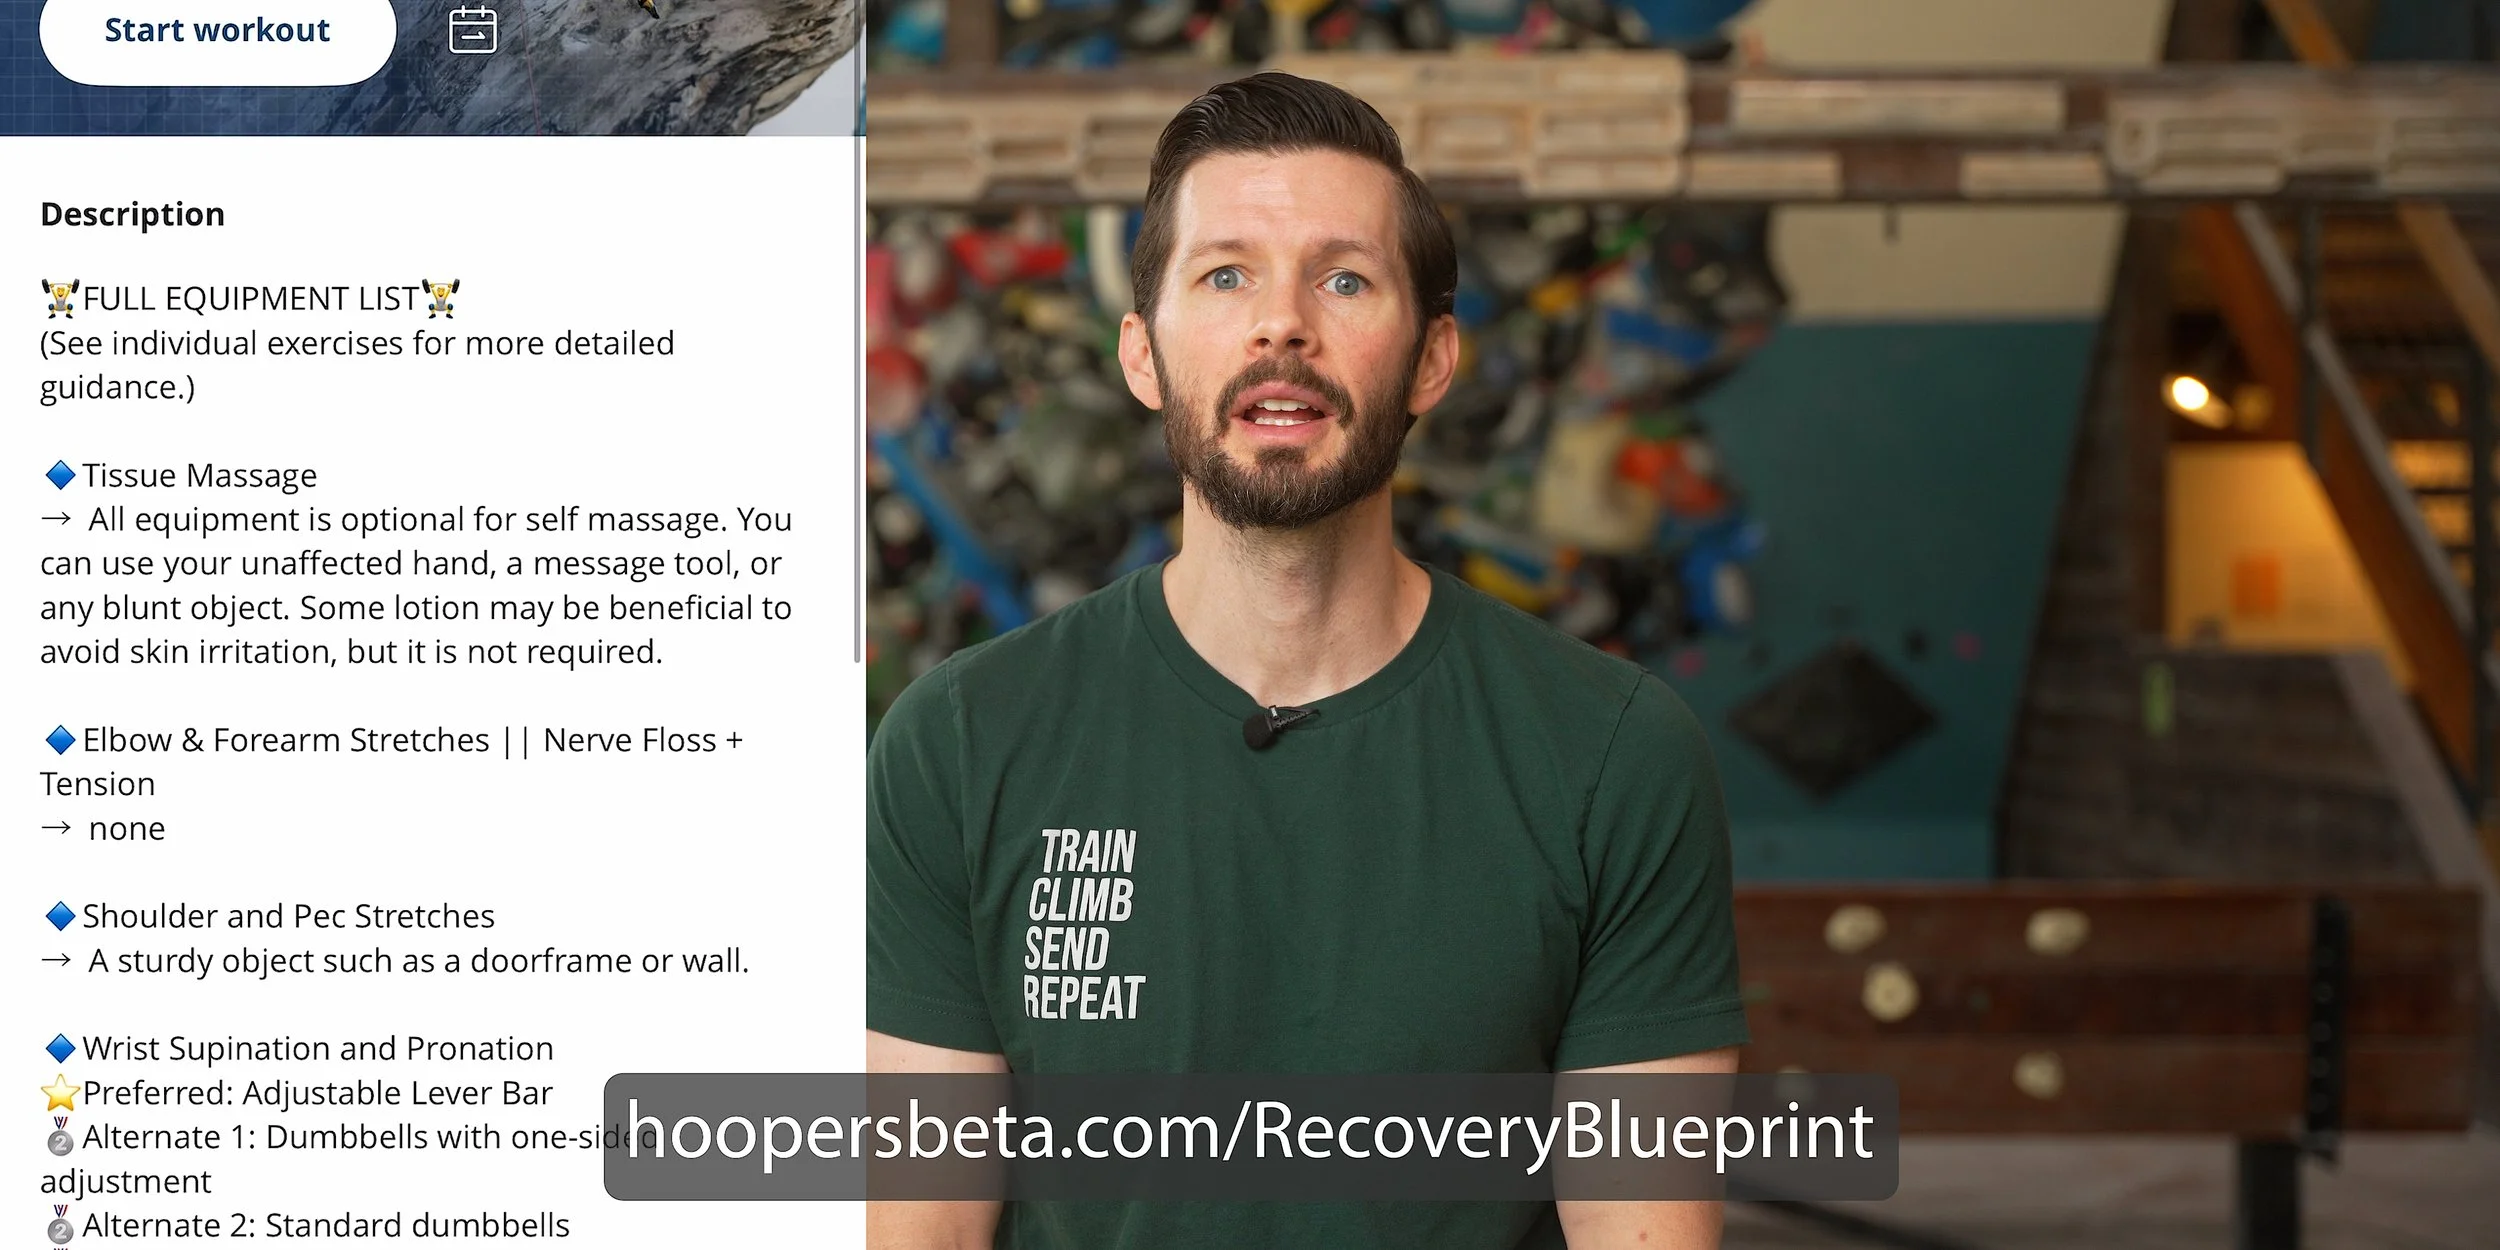
You will need access to some tools, namely dumbbells (or a cable machine) and a lever bar or hammer (or better yet one of our Torque Pro devices).
1. Reduce Aggravating Factors
Before you add recovery exercises, you first need to reduce aggravating factors, which are things that make your symptoms worse. Since one of the common causes of elbow pain is too much work being asked of specific tendons, you shouldn’t expect to recover if you keep piling on the exact same work.
This does *not* mean you should stop *all* activity; but you need to cut back on the aggravating factors based on the severity of your symptoms. In general:
If the pain from an activity does not exceed 2/10 *during* and *24 hours after* you do it, that activity is likely fine.
If an activity causes more or longer-lasting pain than that, you likely need to reduce the intensity, reduce the volume, or change the movement style to bring the pain down to the acceptable level.
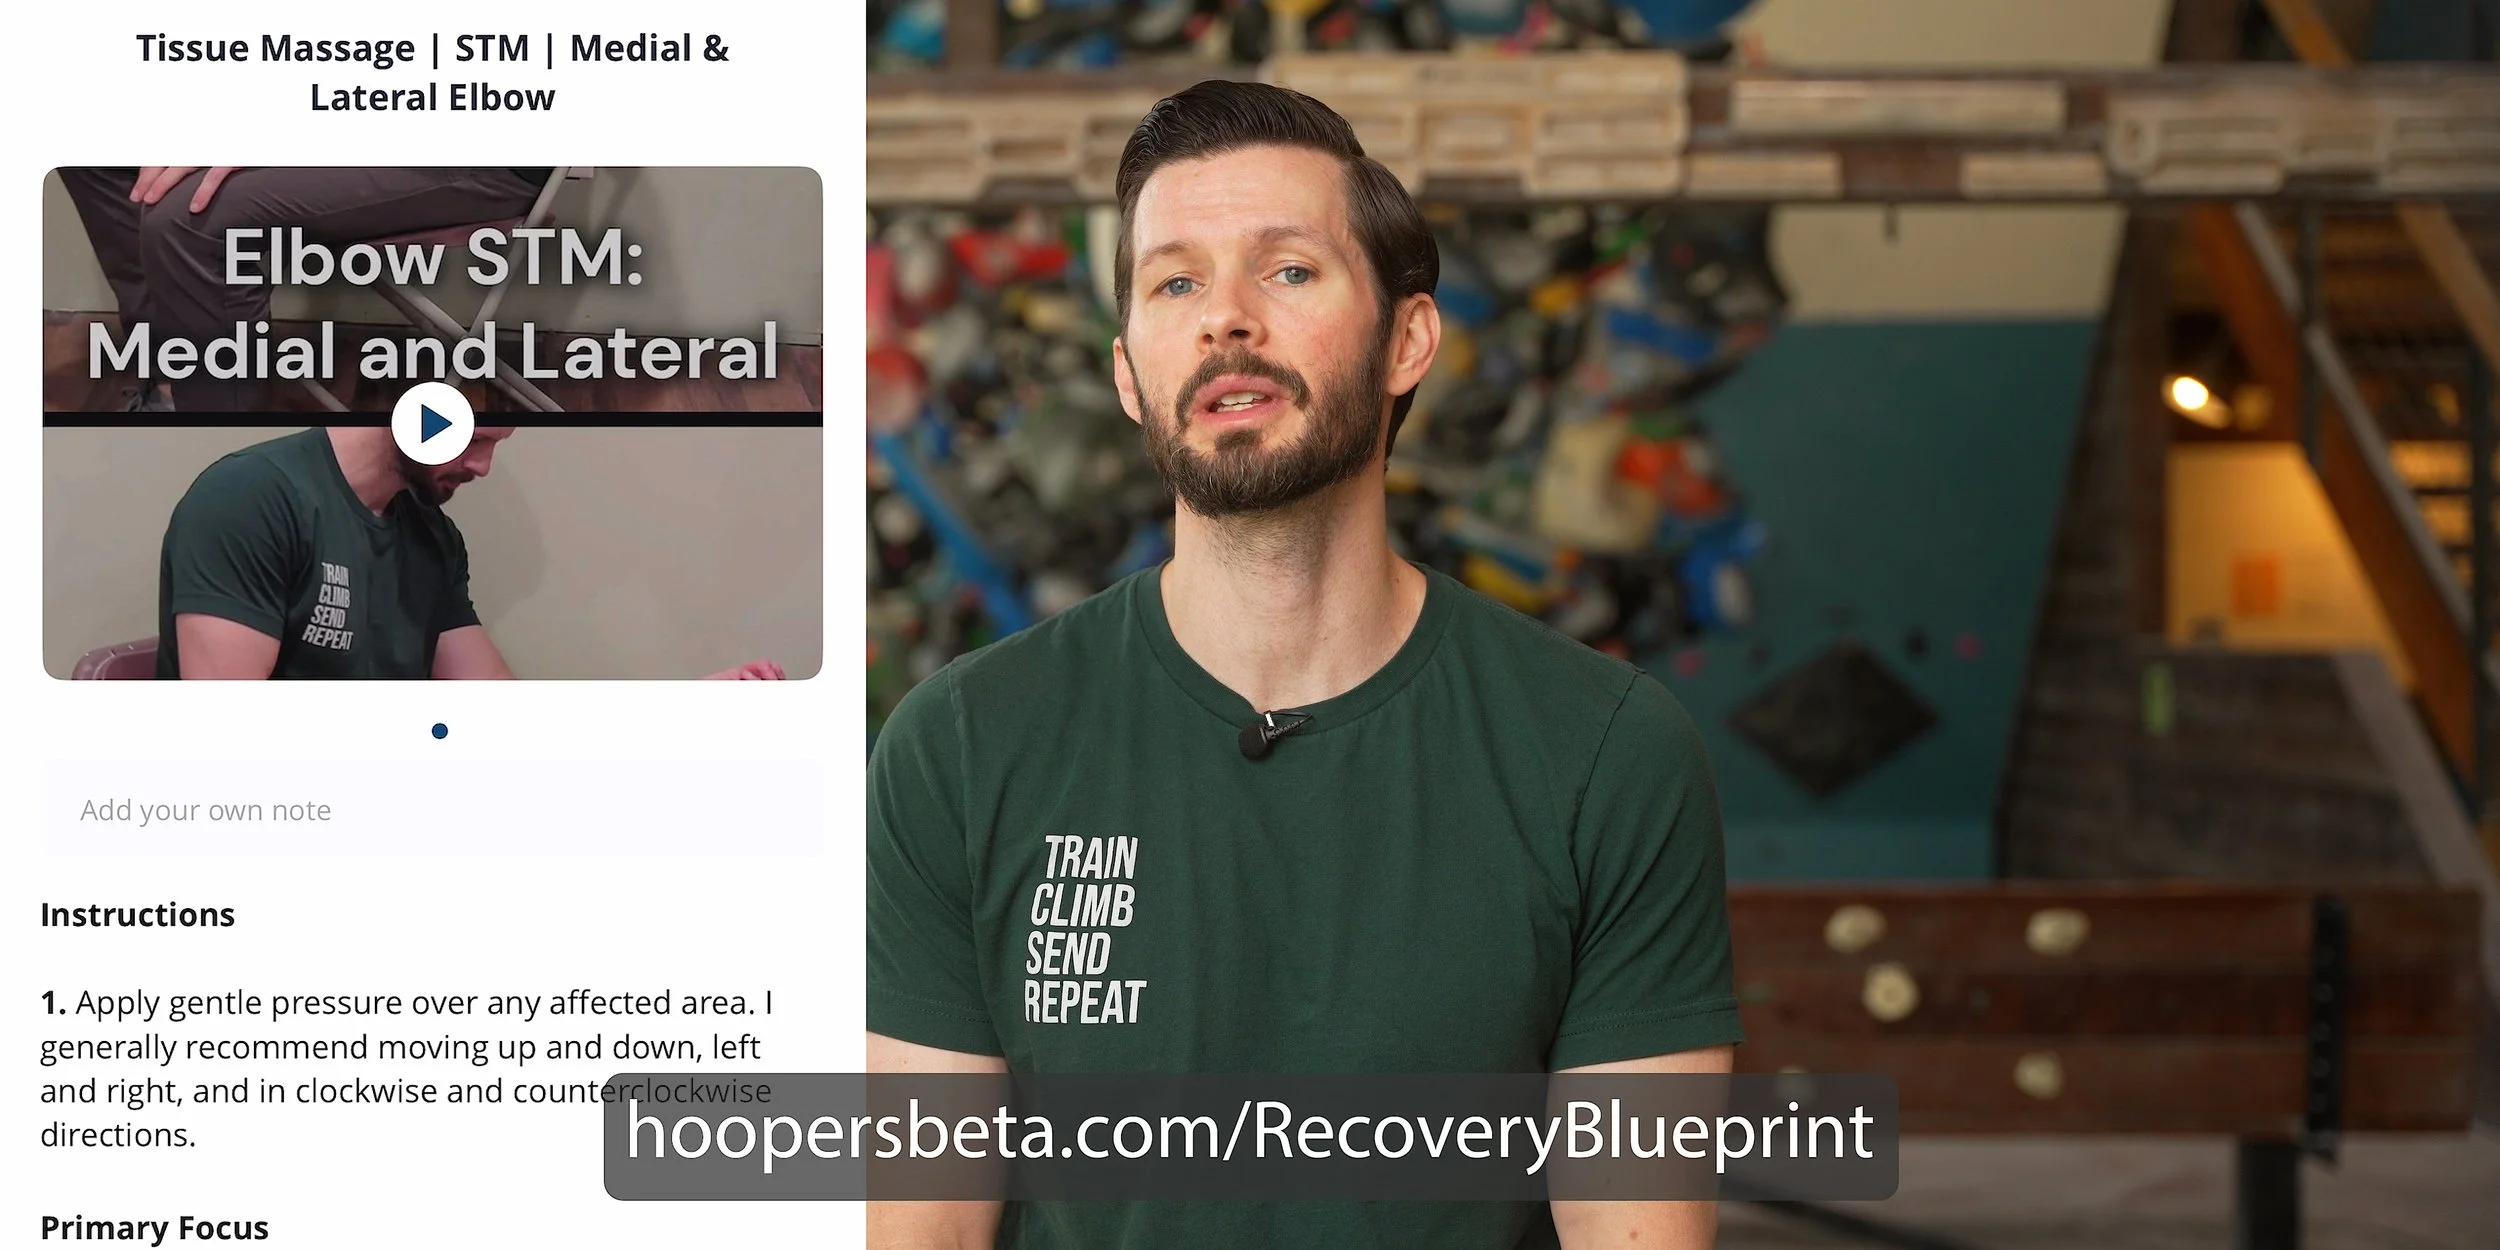
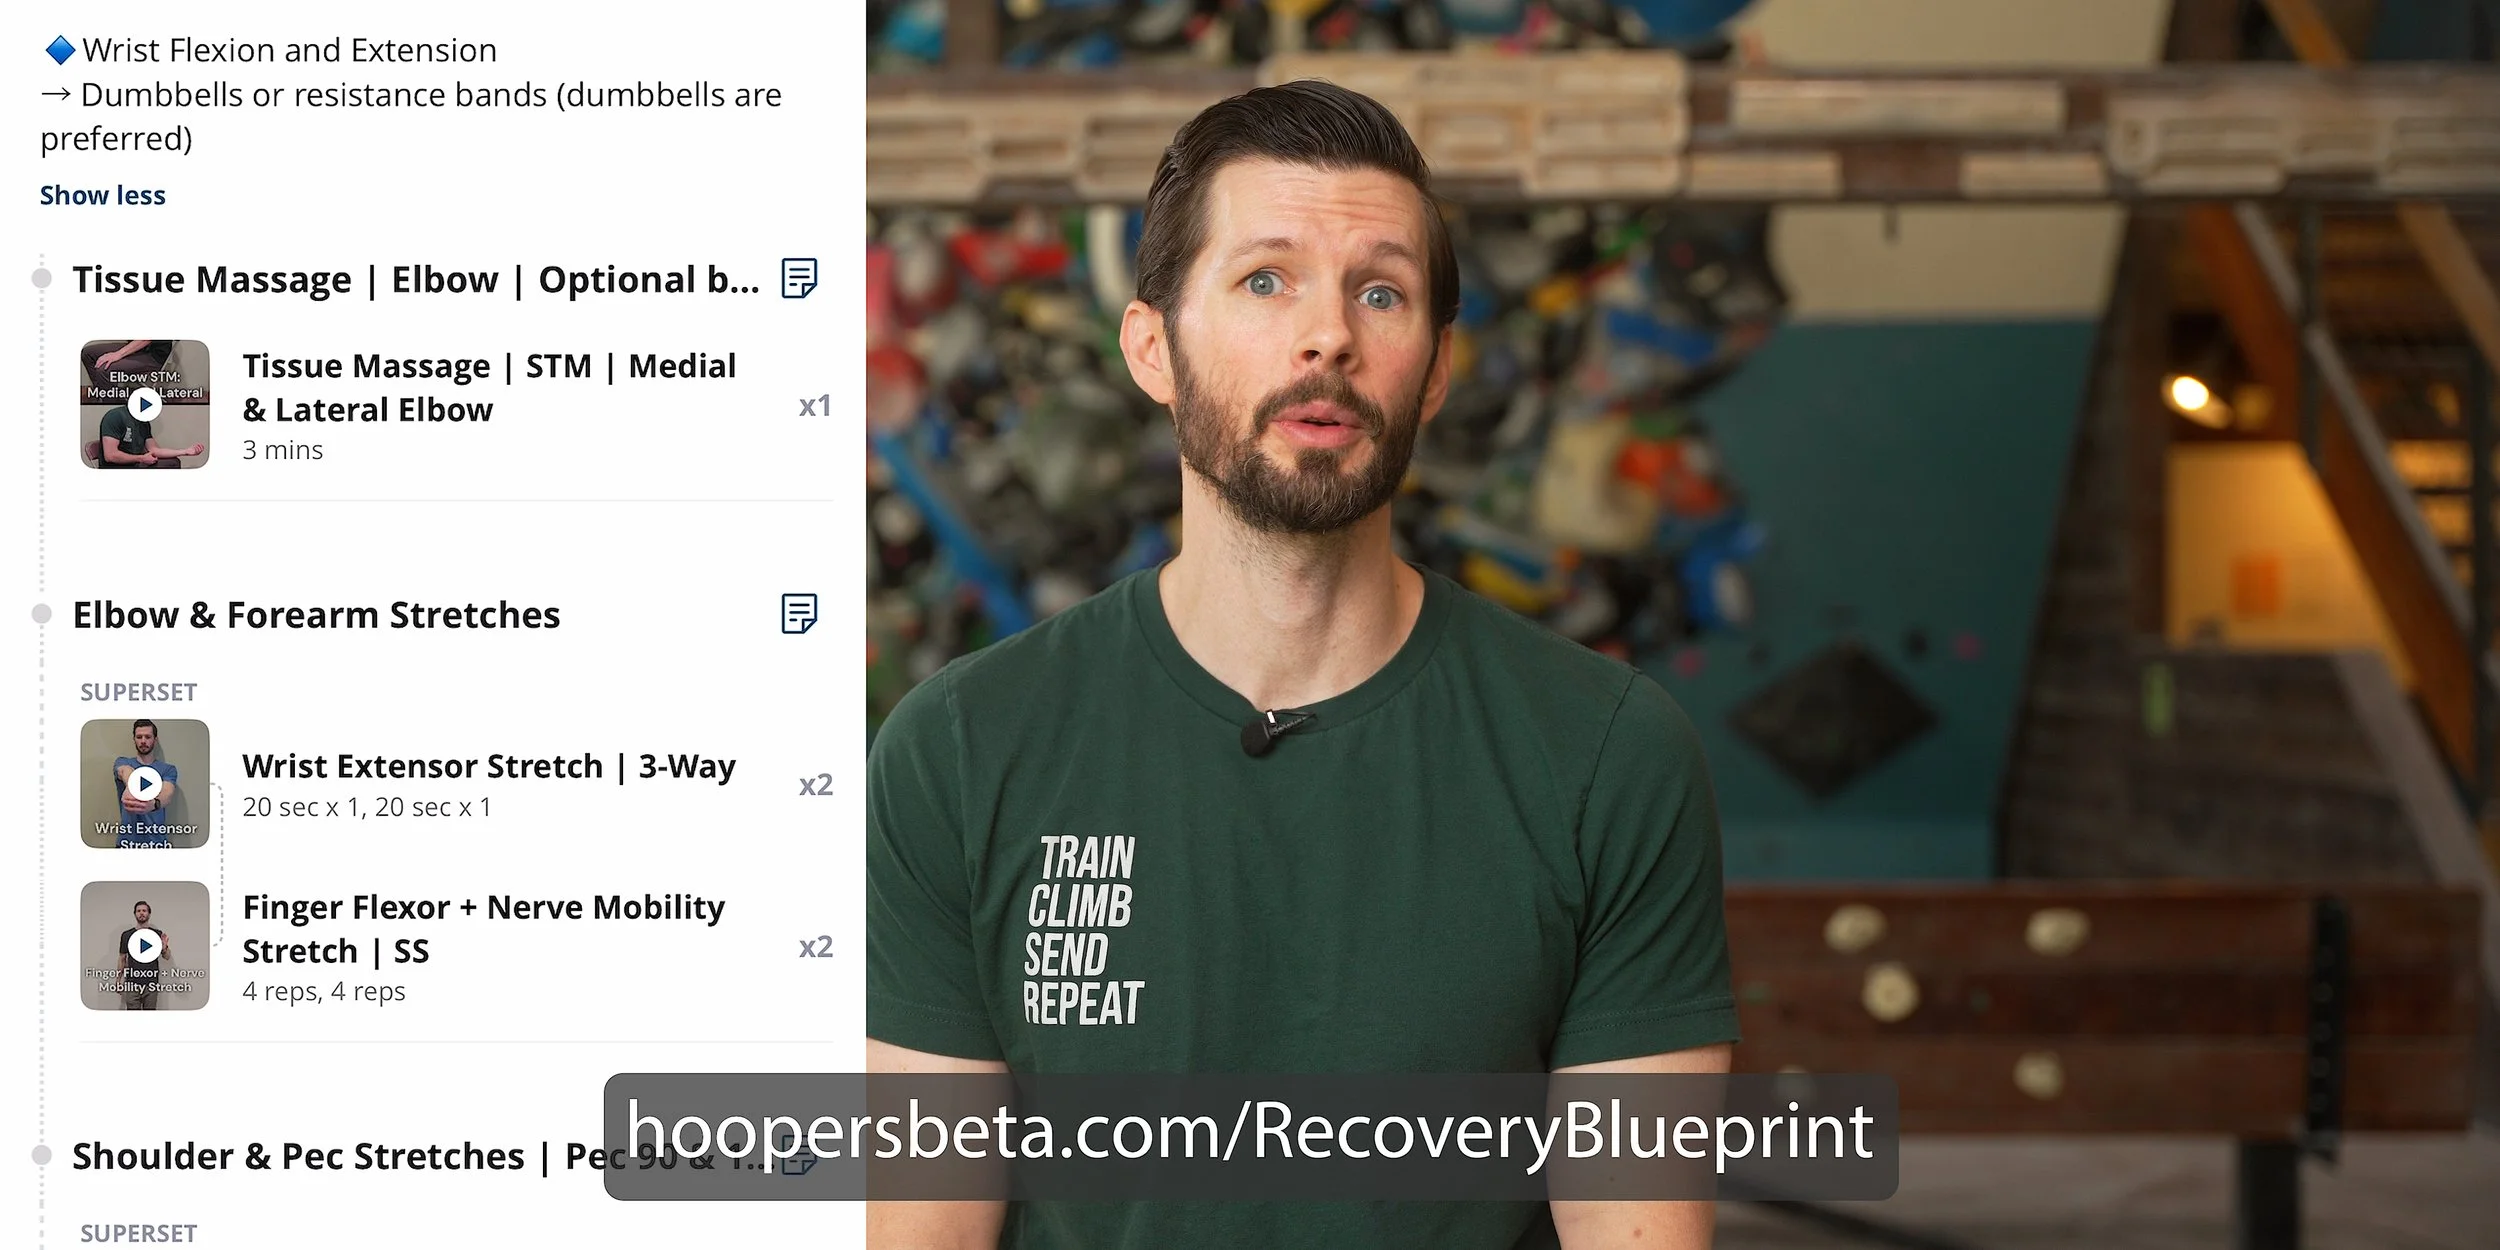
2. Soft Tissue Mobilization (STM) / Instrument Assisted Soft Tissue Mobilization (IASTM)
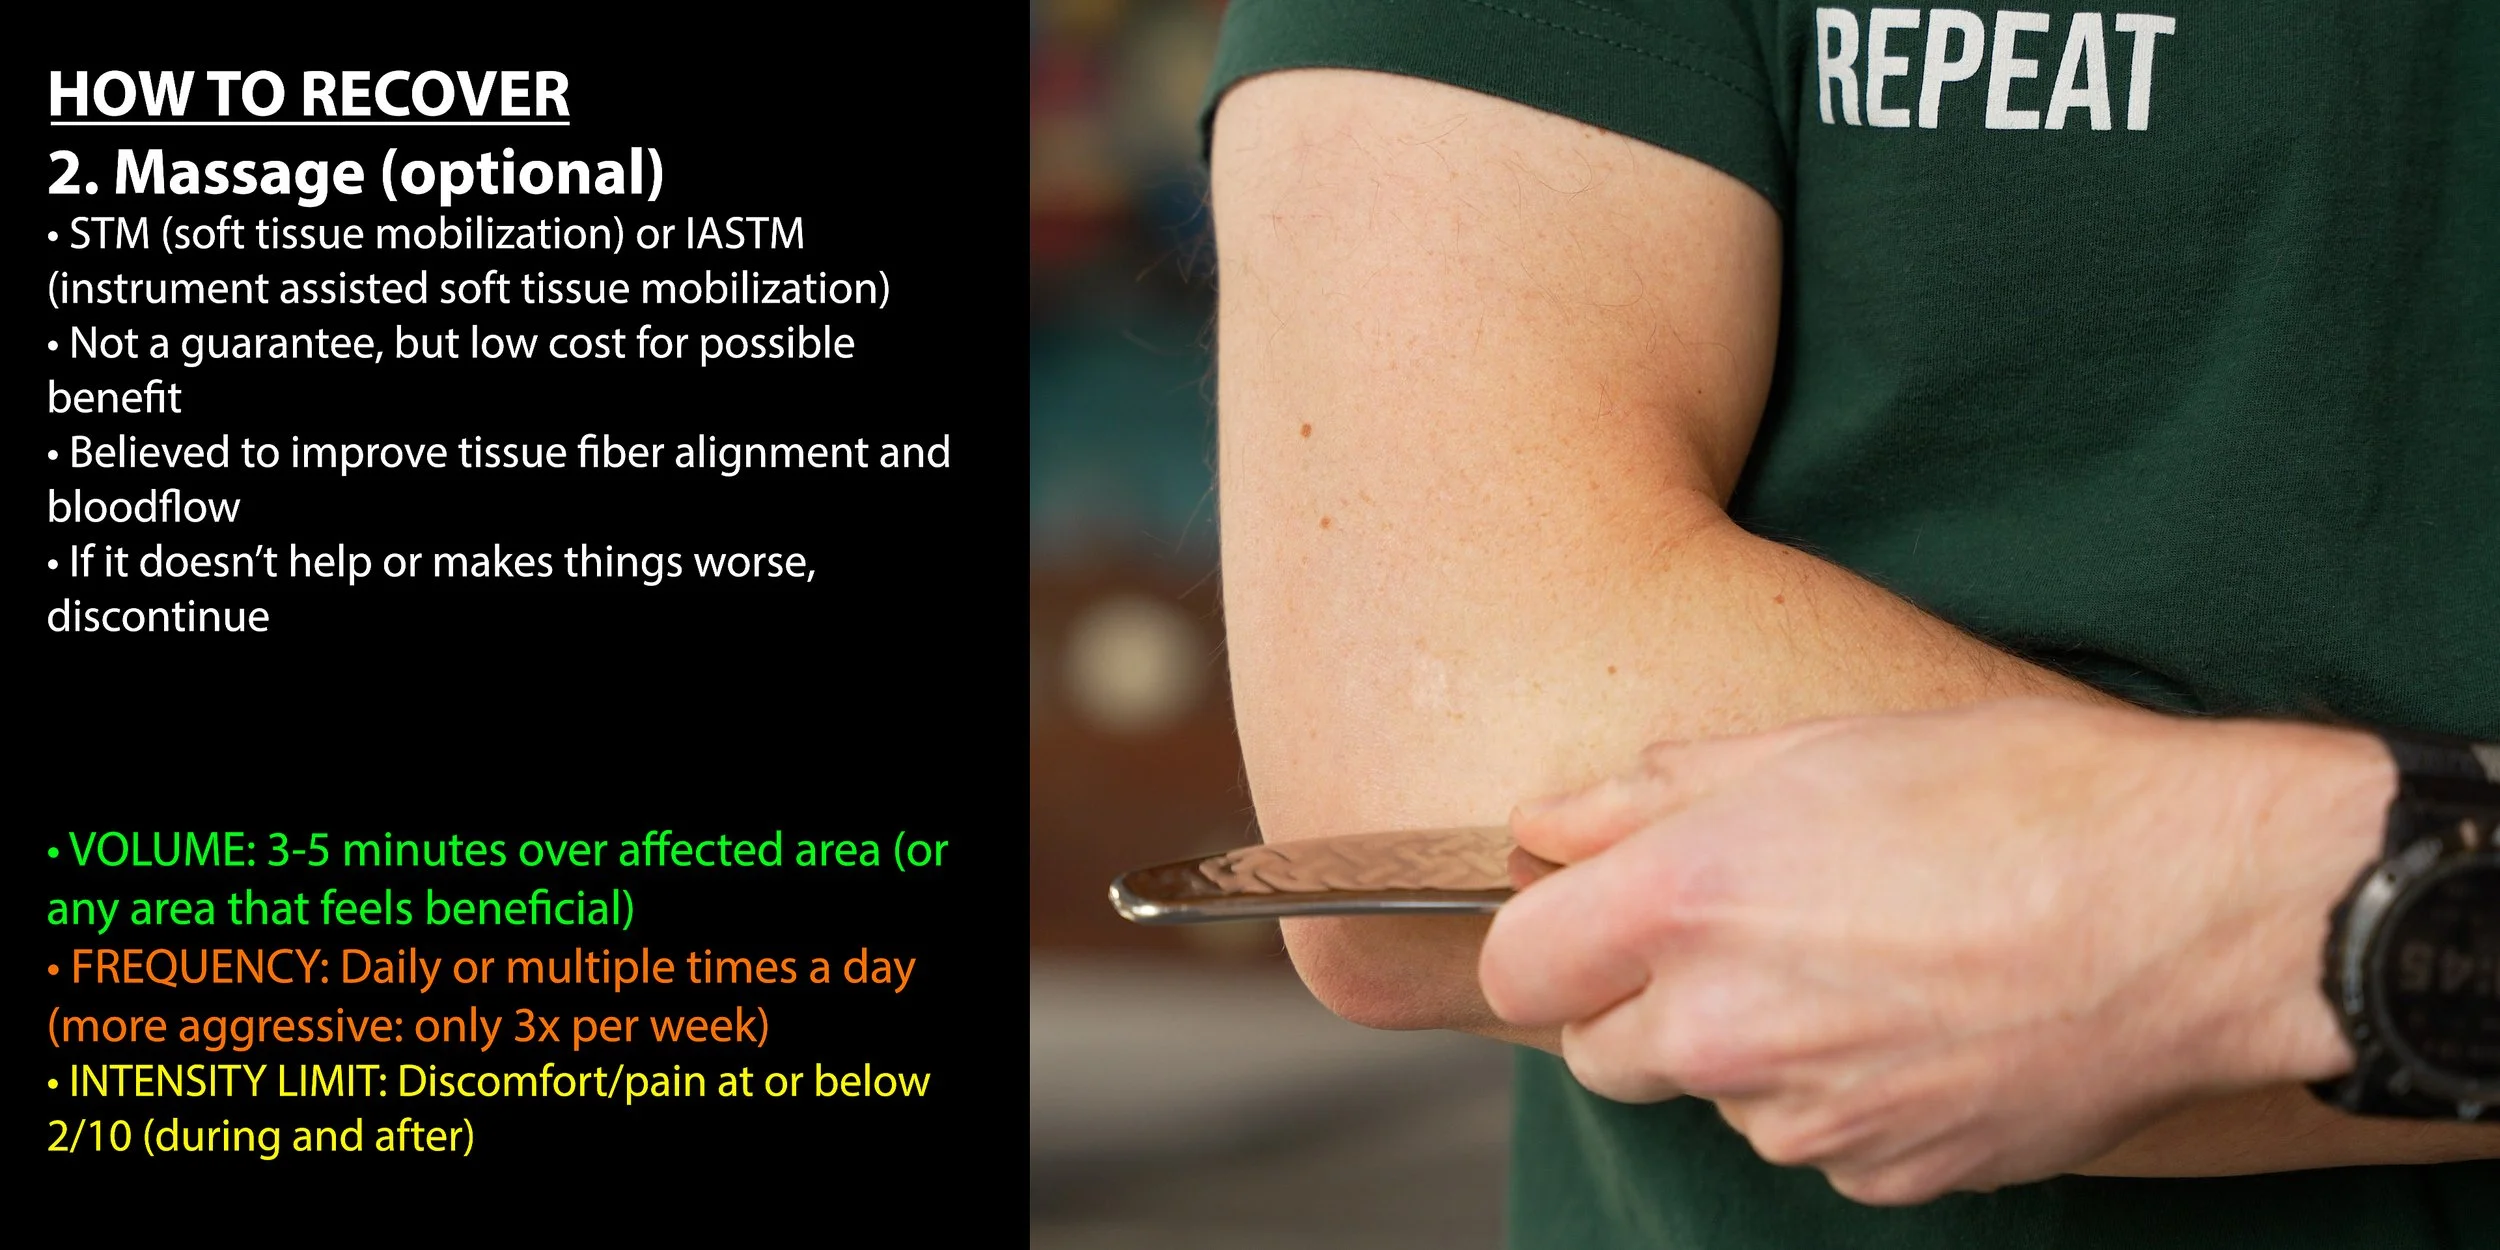
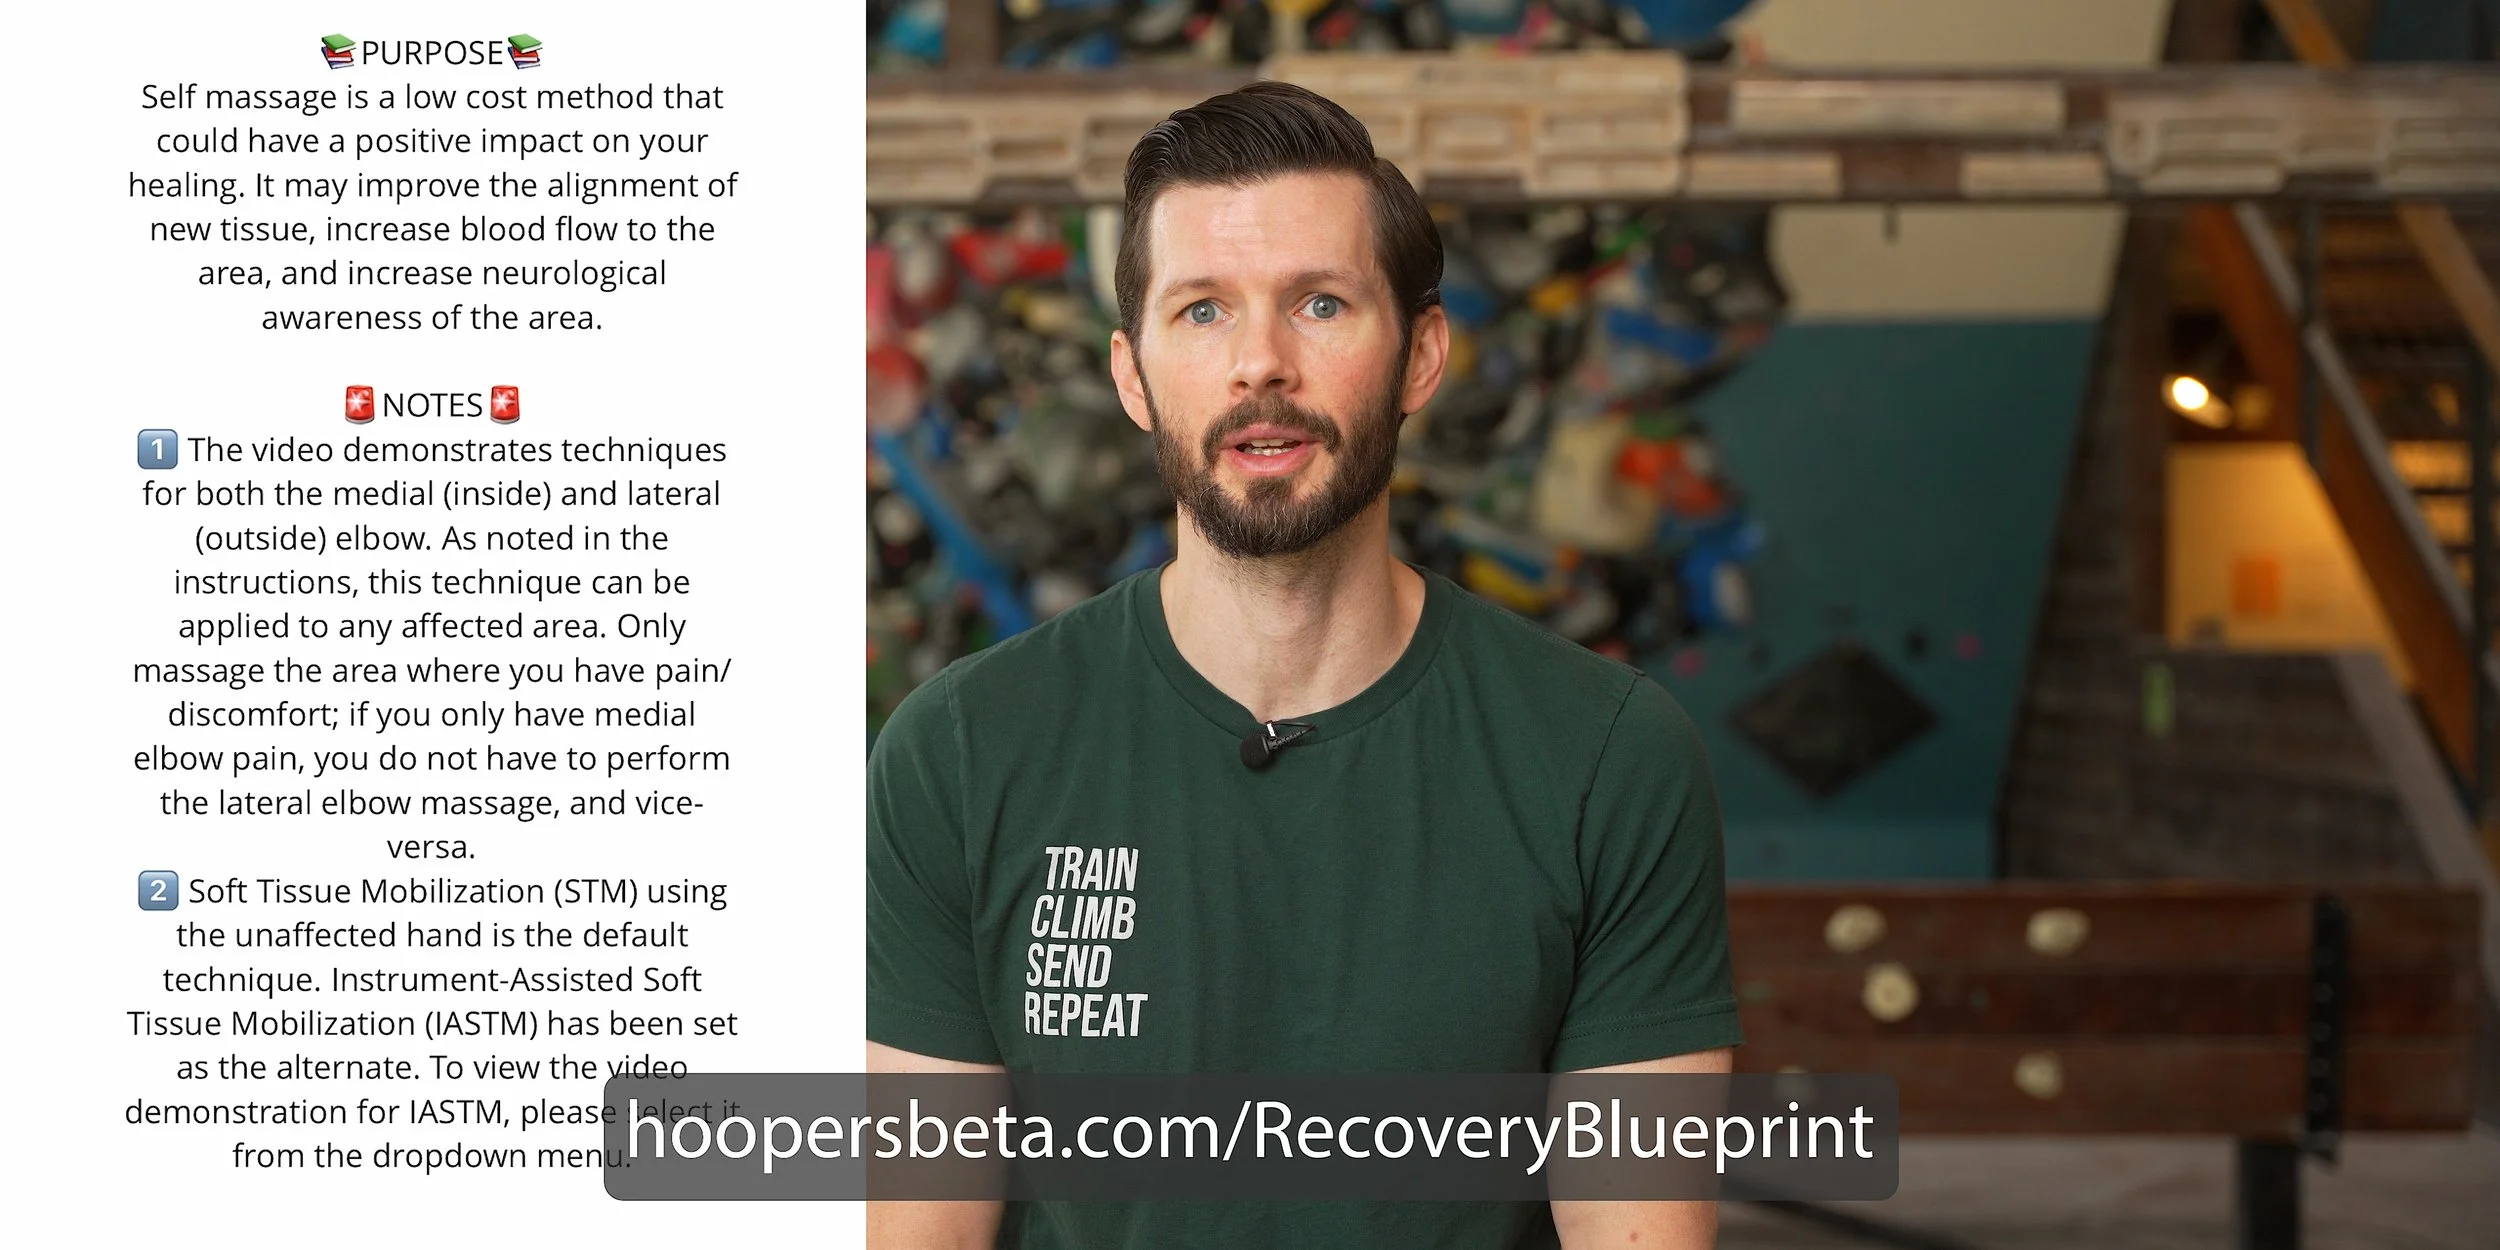
STM and IASTM are both forms of massage therapy, which is a low cost method that could have a positive impact on your healing. It’s not a guarantee, but it’s thought to improve the alignment of new tissue, increase blood flow to the area, and increase neurological awareness of the area.
Note: it is optional here. If you find that it irritates or worsens your symptoms, it might be because the painful structure you’re trying to massage is actually your nerve, and it might not like that. So if this type of massage makes things worse or does nothing for you, discontinue it.
→VOLUME: 3-5 minutes over affected area (or any area that feels beneficial)
→FREQUENCY: Daily or multiple times a day (if more aggressive: only 3x/week)
→INSTENSITY LIMIT: Discomfort/pain at or below 2/10 (during and after)
3. Tissue Stretches
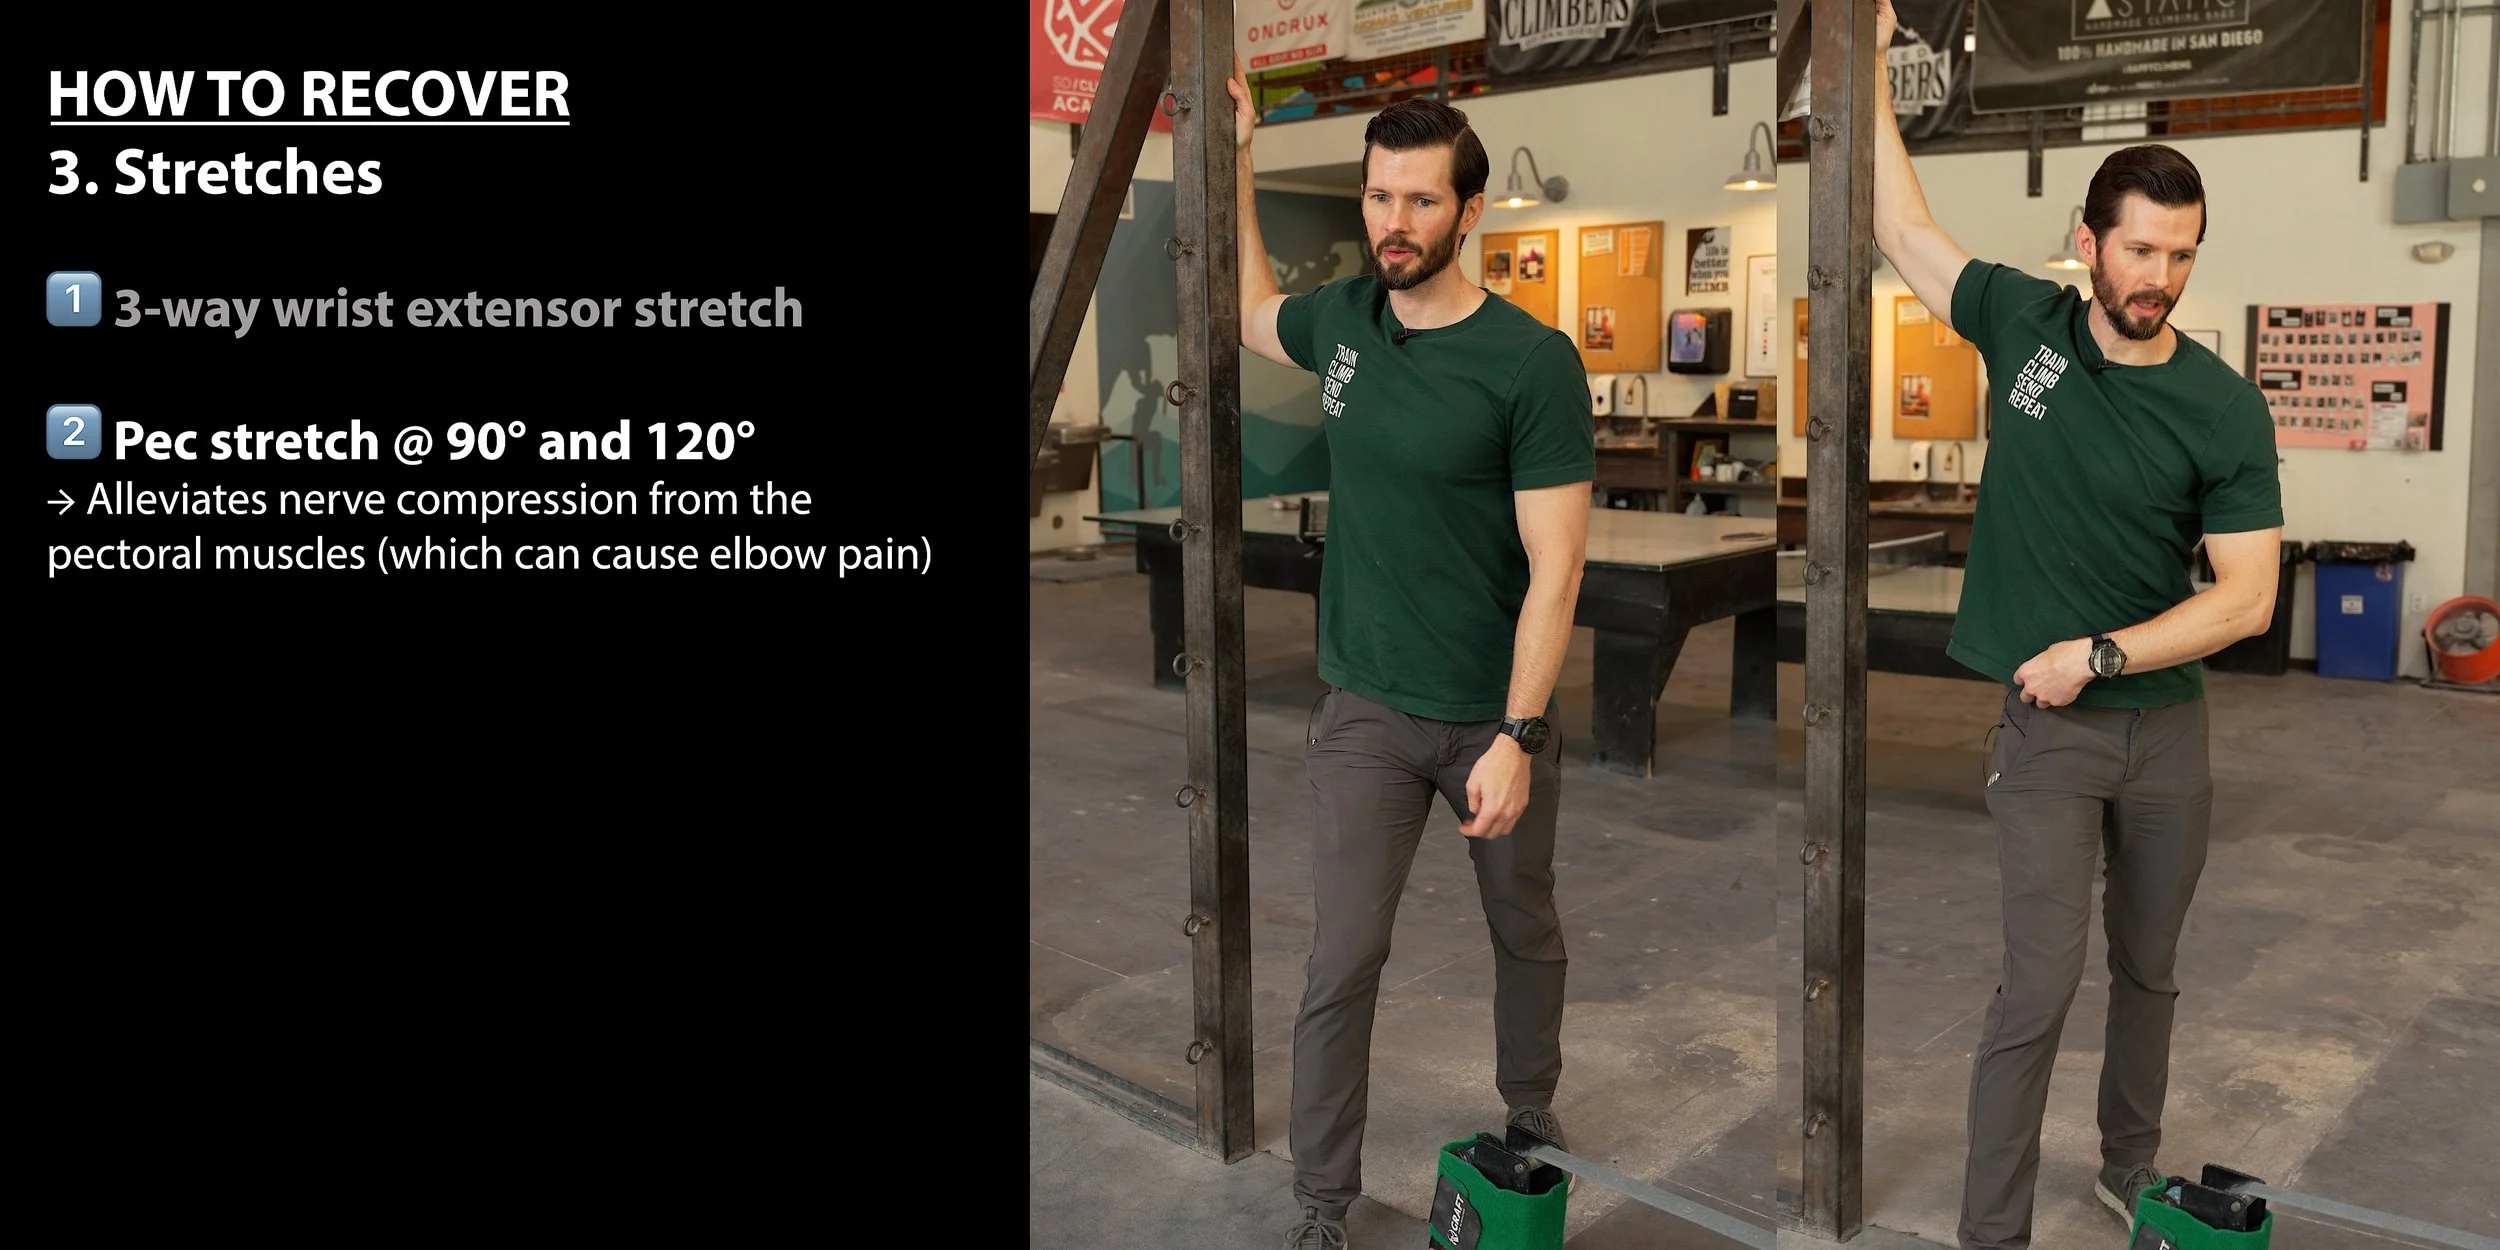
Next, let’s get into a few different stretches. Unlike the optional massaging, I do recommend you perform these stretches even if you don’t notice an immediate change in your symptoms. It may take a couple weeks for the benefits to show up.
1: 3-Way Wrist Extensor Stretch
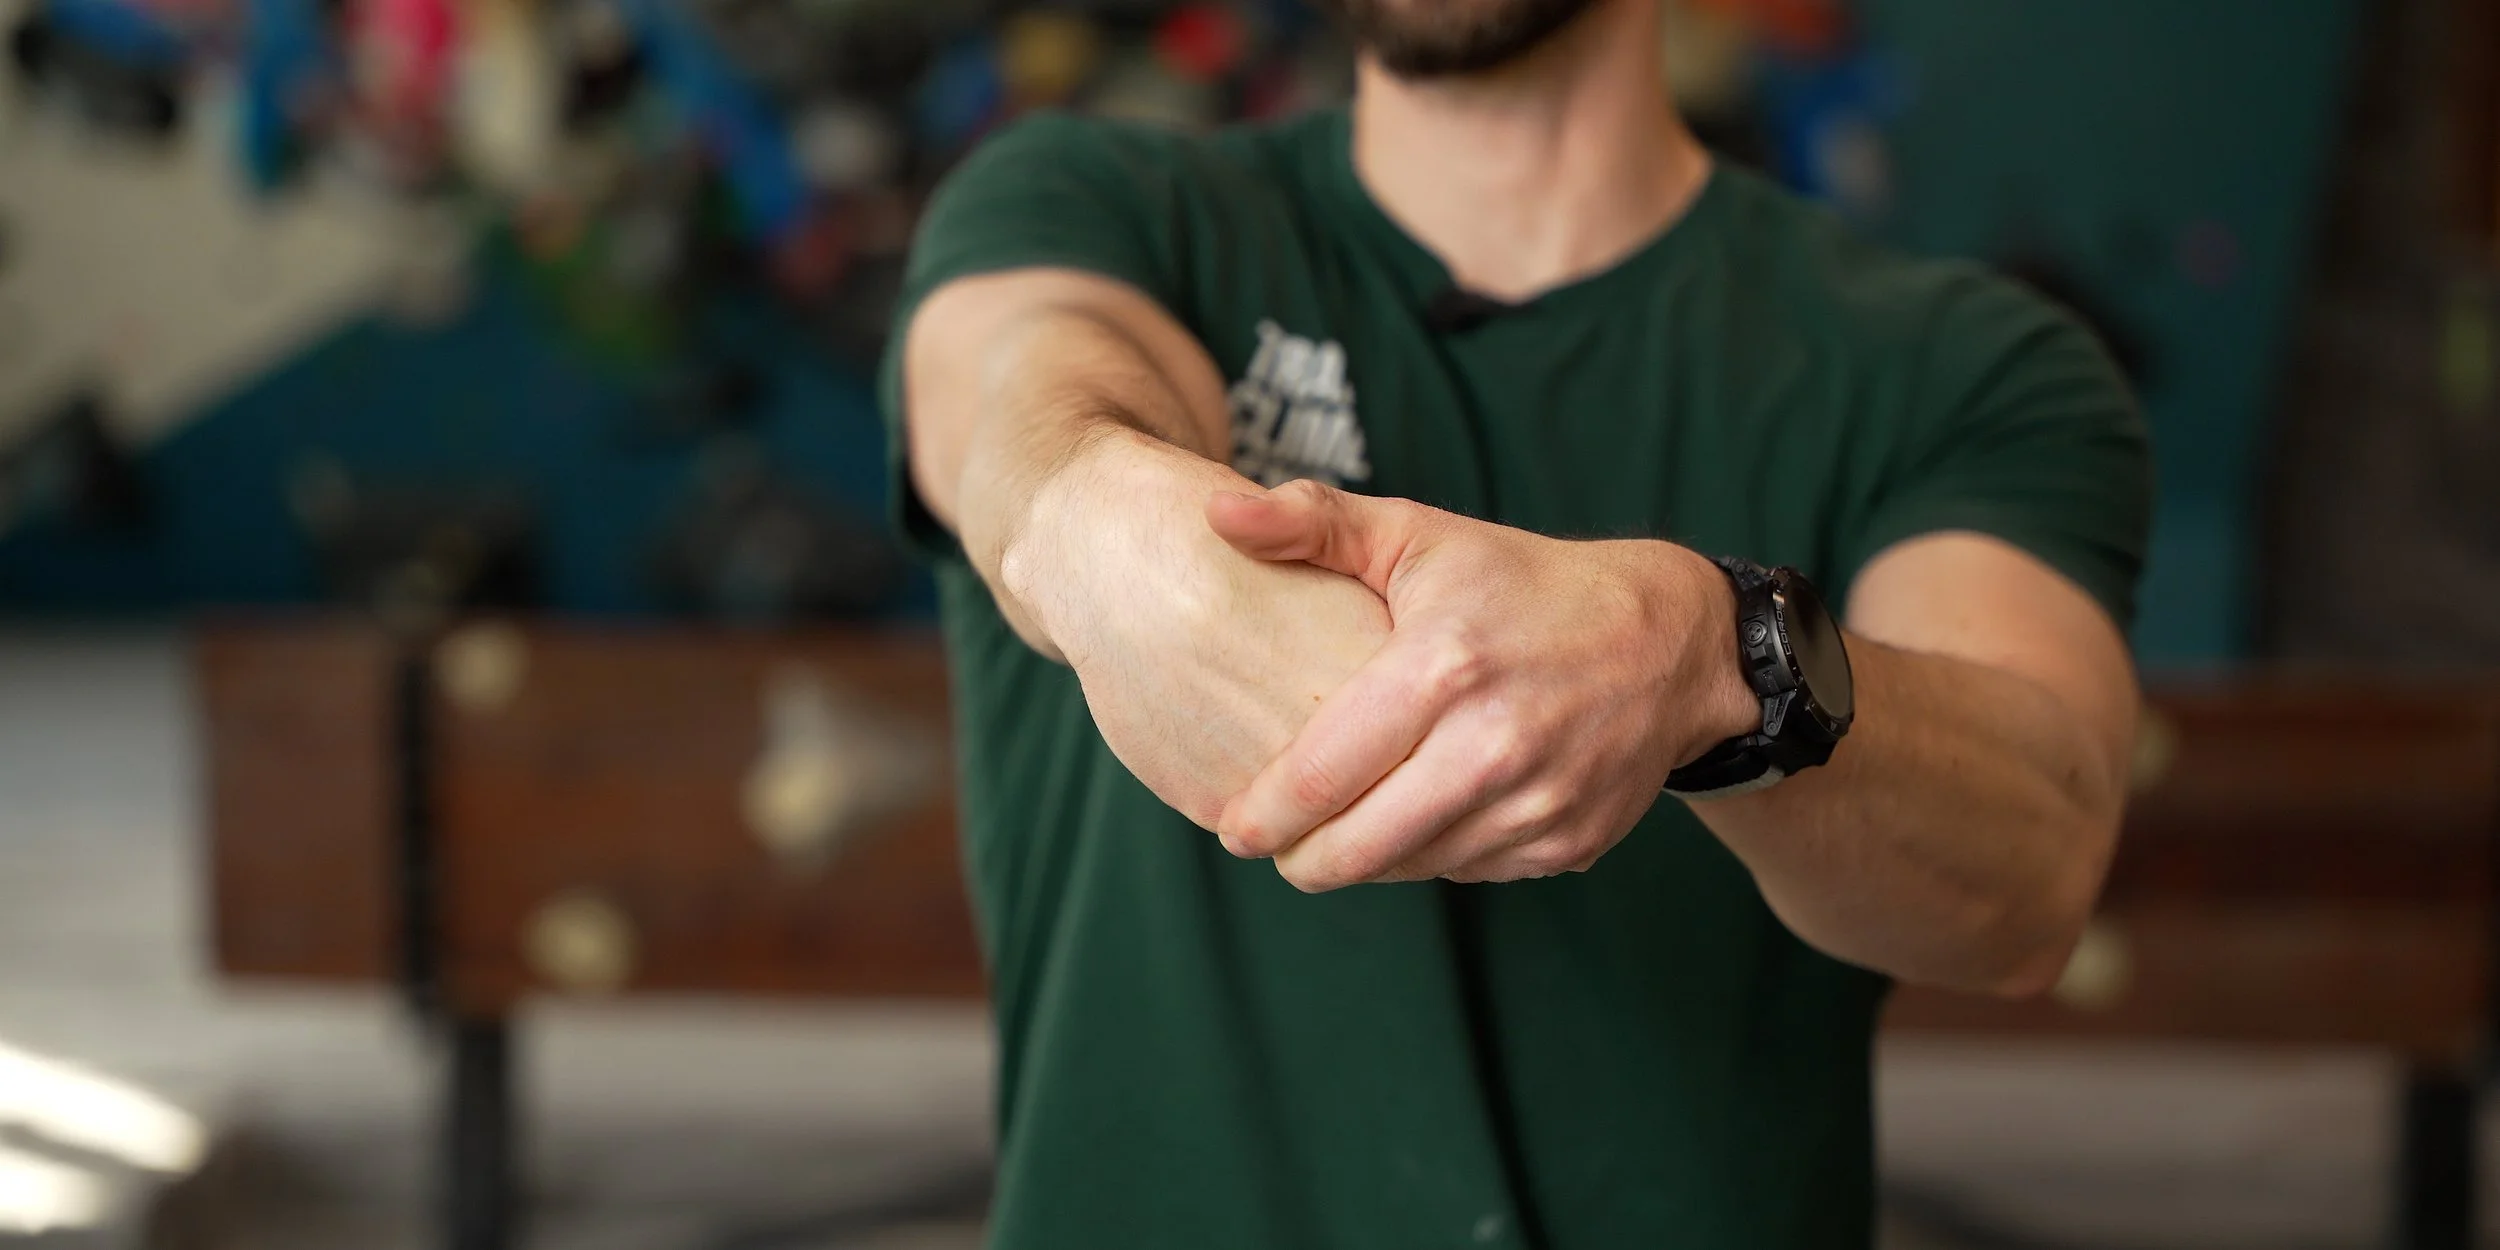
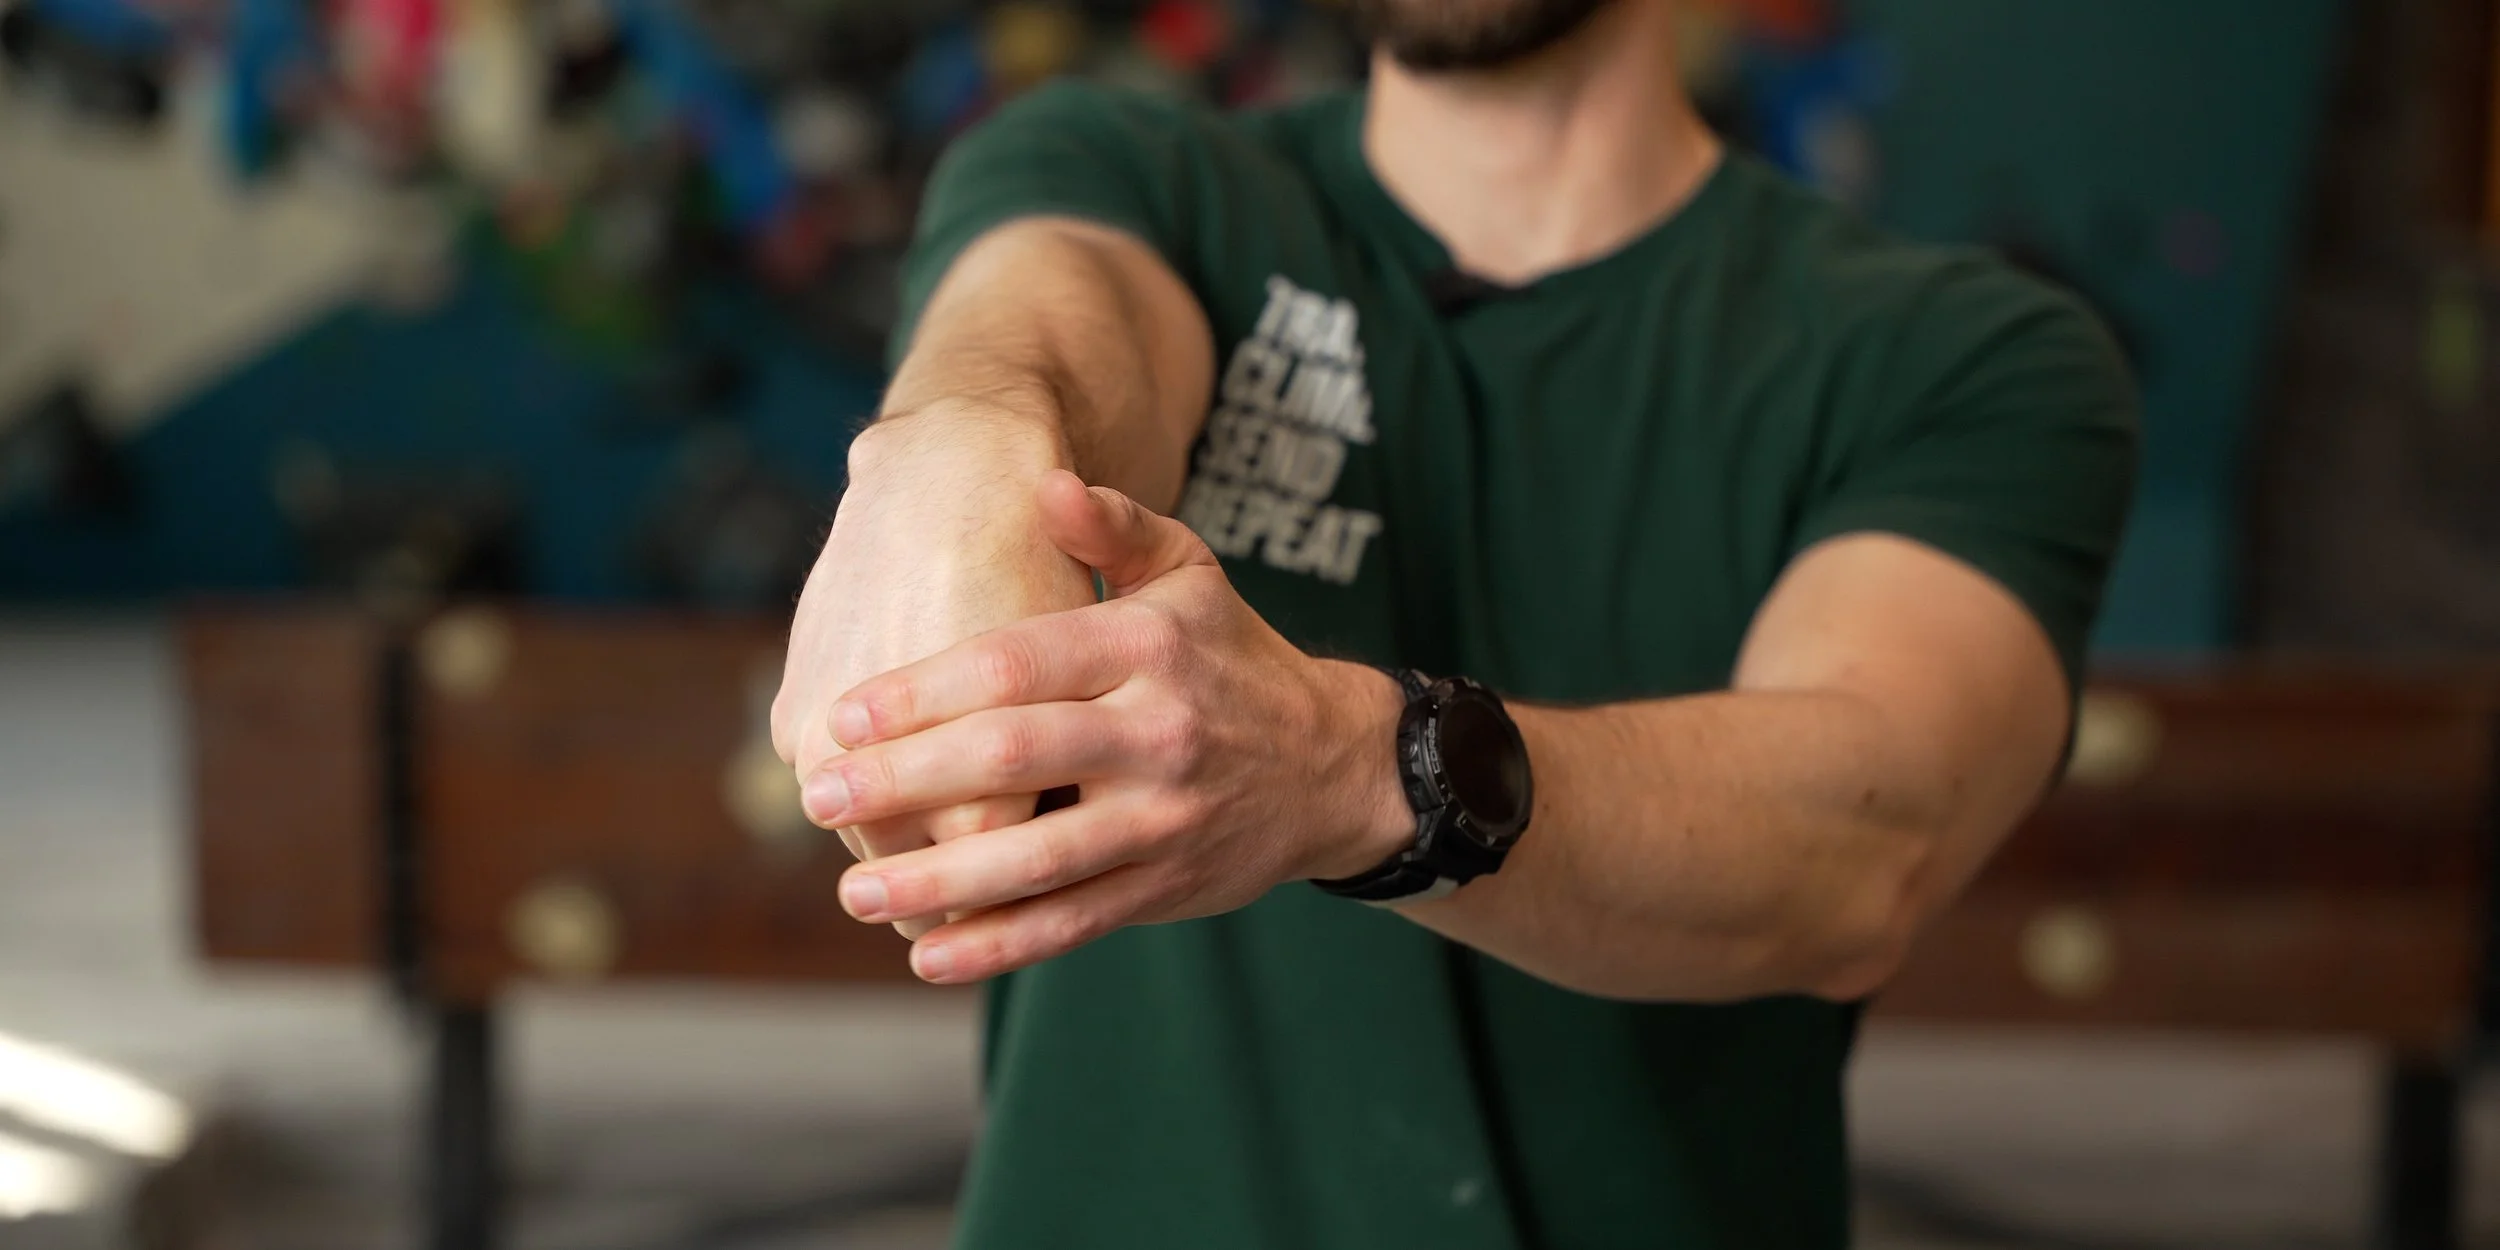
Up first is a 3-way wrist extensor stretch. The purpose of this stretch is to loosen up five out of the seven target muscles of lateral elbow pain (ECRB, ECRL, ECU, ED, and EDM), so it’s quite efficient!
To perform the 3-way wrist extensor stretch:
Start by straightening the target arm straight out in front of you at shoulder height.
Make a fist and point it down toward the floor. This is your starting position.
Now, use your opposite hand to grasp the fist and pull it back toward you (maintaining a straight elbow) until you feel a comfortable stretch in the lateral or dorsal side of your forearm. Hold the stretch for 10 to 20 seconds.
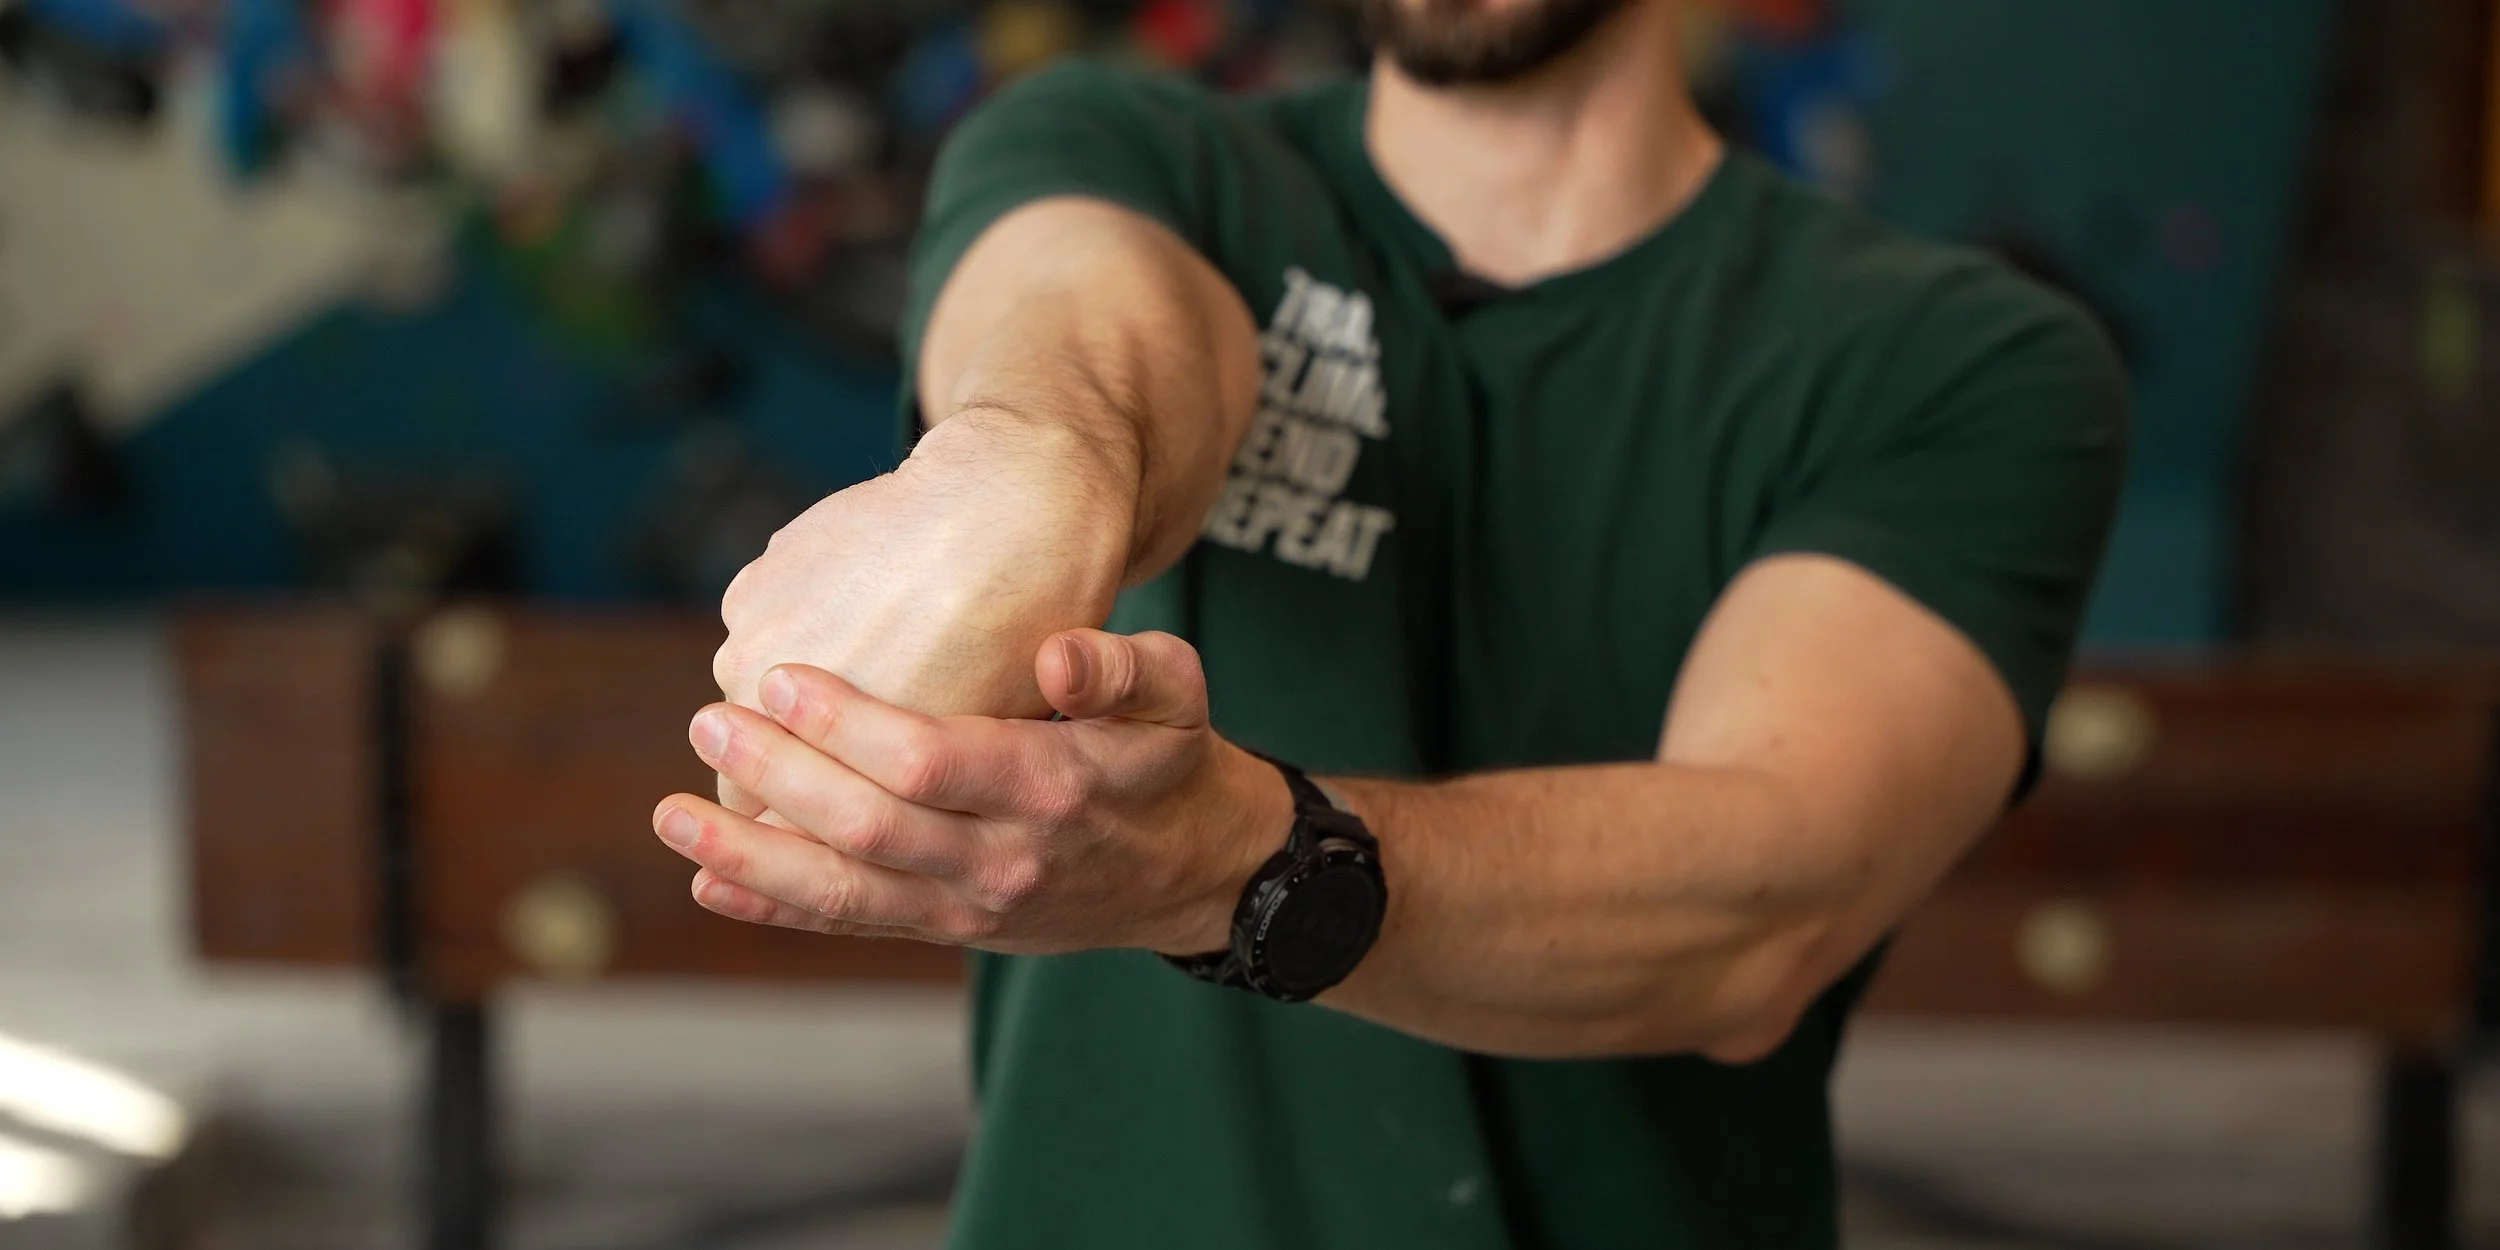
Return to the starting position. Now pull the target hand medially (it’s OK if the forearm rotates a bit). This should bias the ulnar side of the wrist. Hold the stretch for 10 to 20 seconds.
Return to the starting position. Now push the target hand laterally. This should bias the thumb side of the wrist. Hold for 10 to 20 seconds.
NOTES:
It’s OK if the forearm rotates while performing steps 4 and 5.
If you feel a more effective stretch with step 4 or 5, it’s OK to focus on those variations more than the initial one (step 3).
→VOLUME: 1-2 reps (1 rep = 1 time in all three positions or just the ones you prefer)
→Hold each position for 10-20 seconds
→FREQUENCY: Multiple times a day as tolerated
→INTENSITY LIMIT: Discomfort/pain at or below 2/10 (during and after)
2: Pec 90 & 120 Stretches
Up next will be two pec stretches: one with the arm at 90 degrees and the other at about 120 degrees to get more pec minor involvement.
These two stretches are important because lateral elbow pain can actually stem from nerve compression in the chest or shoulder region. Performing pec stretches can mobilize these areas and help alleviate this compression, leading to reduced discomfort.
To perform the Pec 90 stretch:
Stand with your feet staggered. I recommend placing your left foot forward if stretching your right arm.
Place your hand on the doorframe (or sturdy surface). Your arm should be raised 90 degrees to the side (elbow at shoulder height) and your forearm should be vertical (elbow bent to 90 degrees). Your palm should be facing forward.
To begin the stretch, take a small step forward until you feel a gentle stretch in the chest or shoulder.
At the same time, slightly angle your chest down toward the ground and away from the arm that is on the doorframe to improve the stretch.
Hold this position for 20-30 seconds, then switch sides and perform with the other arm.
To perform the Pec 120 stretch:
Stand with your feet staggered. I recommend placing your left foot forward if stretching your right arm.
Place your hand on the doorframe (or sturdy surface) above head height. Your palm should face forward and your elbow should be gently bent.
To begin the stretch, take a small step forward until you feel a gentle stretch in the chest or shoulder.
At the same time, slightly angle your chest down towards the ground and away from the arm that is on the doorframe to improve the stretch.
Hold this position for 20-30 seconds, then switch sides and perform with the other arm.
Notes
During these stretches, you should avoid engaging your midback to try and enhance the stretch; your midback should be relaxed.
If you feel any numbness or tingling in your target arm, you should stop the stretch and return the arm to your side until normal sensation is restored. Once that is achieved you can perform the stretch again.
Staggering your feet is important so you aren’t holding yourself up with your arm, which would reduce the effectiveness of this stretch.
You can vary the amount of forward lean or rotation (or combination thereof), to find what feels best to you.
→VOLUME: 1 set of 2-3 reps per arm at 90°, 1 set of 2-3 reps per arm at 120°
→Hold each stretch for 20-30 seconds
→FREQUENCY: Multiple times a day as tolerated
→INTENSITY LIMIT: Discomfort/pain at or below 2/10 (during and after)
Note About Stretch Intensity
These stretches should not be painful. Apply only enough force to generate a mild stretch. While a small amount of discomfort (1-2/10) may be experienced, it should never truly feel painful. If you do start to feel pain, reduce the stretch intensity by reducing the range of motion or the amount of force you’re using.
4. Isolated Nerve Mobilizations
Let’s now get into some isolated nerve mobilizations. There are two primary techniques: nerve flossing, which is the gentlest form, and nerve tensioning, which is the most aggressive form. In my experience, the radial nerve appears to be pretty tolerant to slightly more aggressive techniques, so to be ultra-efficient we’ll focus on the “nerve floss + tension” hybrid technique. If you find this hybrid technique to be too aggressive, you should regress to the nerve flossing techniques.
Radial nerve flossing.
1. Start in a standing position looking straight ahead, with your target arm's elbow fully bent, hand in a gentle fist facing in towards your chest.
2. Straighten your elbow while rotating your forearm and flexing your wrist so that your palm will end up facing backward and up towards the sky once your elbow is fully straightened. Your hand should remain in a gentle fist.
3. While the elbow is straightening, simultaneously rotate or lean your head in the same direction (if straightening the right arm, move your head to the right. This decreases tension on the nerve).
4. Hold for 1 second or less then return to the starting position with your elbow flexed and once again looking straight ahead.
5. You have now completed 1 repetition. Repeat as indicated in your app.
→VOLUME: 1-2 sets of 6 reps
→FREQUENCY: 1x/day at first. Increase frequency as tolerated.
→INTENSITY LIMIT: Discomfort/pain at or below 2/10 (during and after)
Determining Intensity
Nerve *flossing* should not produce pain or discomfort. If done correctly, minimal to no tension is placed on the nerve, so there should not be a strong stretching sensation (a mild stretch is OK). The absence of sensation does not mean it's ineffective.
Radial Nerve Floss + Tension
The radial nerve floss + tension technique is an efficient method of combining the two primary styles of nerve treatment (flossing and tensioning) into one motion, allowing you to get the benefit of each technique from one, efficient movement.
To perform radial nerve floss + tension
Start with both elbows fully bent and hands in fists, palms facing your shoulders. You should be looking straight ahead.
Straighten both elbows and rotate your arms inward until your fists point backward and out to the sides. Keep your shoulders down (do not allow them to shrug up) and extend your arms slightly behind your body. Flex your fists as if you are attempting to place the back of your hand on the floor behind you.
While moving your arms, simultaneously turn your head to look at one of your hands (e.g., turn your head to the left as your arms extend).
Flex your arms back up to the starting position, and look straight ahead.
Repeat the arm movement, but this time, turn your head to look at the opposite hand (e.g., turn your head to the right).
Return to the starting position. You have now completed one rep.
→VOLUME: 1-2 sets of 3-4 reps
→FREQUENCY: 2-3x/week at first. Over time, increase to 4-5x/week if tolerated.
→INTENSITY LIMIT: Discomfort/pain at or below 2/10 (during and after)
Determining Intensity
With nerve floss + tension techniques, there should be a gentle stretch in one arm at a time but it should not cause pain or discomfort. Some symptoms may temporarily increase for up to a few minutes but should not last longer than that. If you feel pain or discomfort, check your form. If you believe you are doing this correctly and still experience an excessive increase in symptoms, try reducing the range of motion to reduce the intensity. If that doesn’t work, discontinue this activity and consider seeking out more in-depth management of this issue with a qualified healthcare provider. You may have some nerve tension contributing to your symptoms that requires additional management.
5. Off-The-Wall Tissue Loading
Finally, we’ll need to do some off-the-wall tissue strengthening. You might be asking: “Why are you telling us to add these exercises when earlier you said a primary cause of this issue is doing too much work?” Great question! Replacing aggravating factors and unpredictable loads with specific recovery exercises gives you a controlled environment to better understand your symptoms and how they respond to certain exercises. Tissues heal better with controlled, specific loading protocols, which we can accomplish with these off-the-wall exercises.
For lateral elbow pain, there are four primary exercises and one bonus:
Wrist extension with elbow bent
Wrist extension with elbow straight
Hammer curls
Forearm supination
Bonus: flat bar reverse curl
Which Off-the-Wall Exercises Should I Do?
We’ve presented these exercises in order from most to least likely to be effective in lateral elbow pain recovery. That doesn’t mean supination never helps with lateral elbow pain, it just means that wrist extension with elbow bent is more frequently effective. Before you make any decisions about which ones you should do, I recommend you try all of them (on both your injured and uninjured side) to get a comparison. This lets you see if any of the exercises feel like they target your symptoms way more effectively than the others, or if you feel way weaker with some exercises than others compared to your uninjured side. Once you do that, follow these guidelines to create your tissue loading program:
If some of the tissue loading exercises do end up feeling far more effective than others (or significantly impaired compared to your uninjured side), it’s OK to focus on those exercises and not do the other ones.
If #1 does not apply to you and you want the most efficient program possible, perform only forearm supination and flat bar reverse curls. The flat bar reverse curl works the wrist extensors and brachioradialis but in a slightly less optimal/targeted way than the other exercises on this list, so it’s a good option if you require efficiency.
If you’re feeling uncertain or just want to do the most comprehensive protocol possible, perform all four of the primary exercises. Just remember that you need to avoid adding in too much extra load all at once, so you may need to start with lower volume (fewer sets, reduced frequency, or both). Basically, just start out easy and increase gradually.
With all that in mind, let’s go ahead and demonstrate the exercises and then we’ll discuss some final notes. By the way, I’m going to demonstrate these exercises with the devices that I think are best, but you can feel free to use whatever equipment is available to you.
Exercise 1: Wrist Extension with elbow bent
Wrist extension with a bent elbow helps work on the ECRB and ECU. The ECRB is the most commonly irritated tendon in the lateral elbow, hence why this is exercise #1. It is also extremely useful in all grip sports as it serves as a counterbalance to the force generated by our wrist and finger flexors. In climbing, this increases strength during crimp grips and drastically improves stability of the wrist during slopers.
To perform wrist extension with a bent elbow:
Hold a dumbbell with a thumb-over grip (thumb on the same side as your fingers).
Rest your forearm on a bench or table (or even your leg) with your elbow bent to about 90 degrees and your palm towards the ceiling (wrist in a straight/neutral position).
While keeping the dumbbell horizontal and your forearm flat on the surface (avoid lifting off), lower the weight towards the ground by allowing your wrist to flex, moving through all available range of motion.
Pause momentarily at the bottom of the movement, then lift the weight back up as high as you comfortably can.
→VOLUME: 2-3 sets of 8-10 reps
→FREQUENCY: 2-3x/week as tolerated
→INTENSITY: 2 reps in reserve (OK to start out easier). Discomfort/pain at or below 2/10 (during and after).
Exercise 2: Wrist Extension with elbow straight
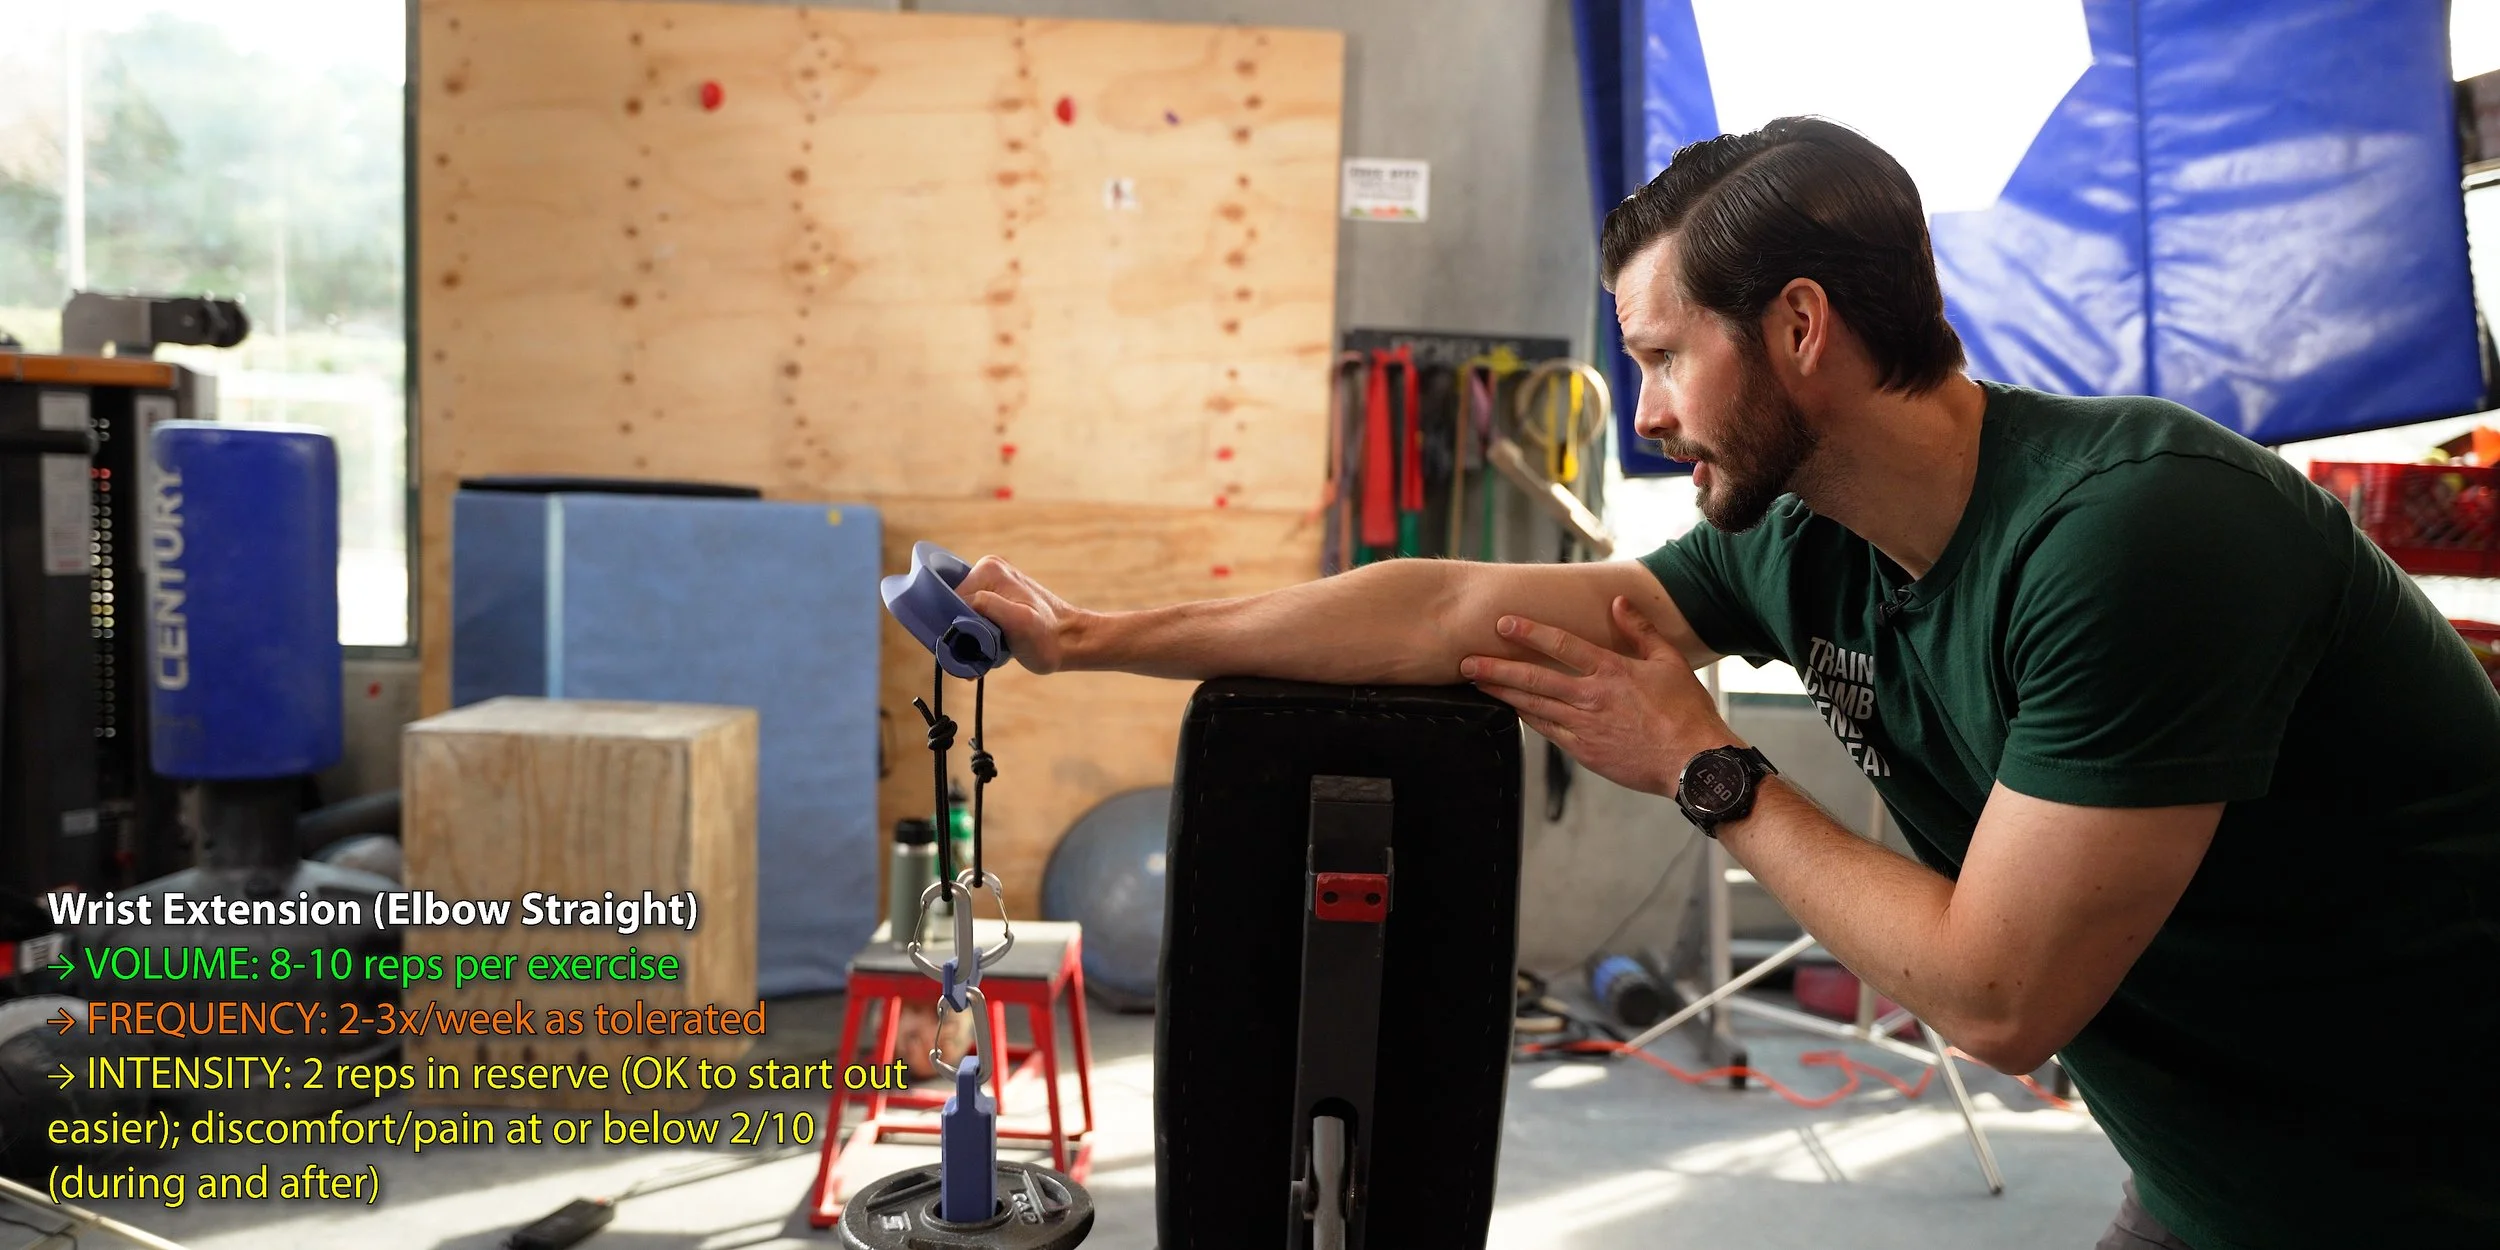
Wrist extension with a straight elbow now shifts the bias to the ECRL, which helps with extended-elbow activities like reaching overhead.
To perform wrist extension with a straight elbow:
Hold a dumbbell with a thumb-over grip (thumb on the same side as your fingers).
Rest your forearm on a bench or table (or even your leg) with your elbow bent to about 90 degrees and your palm facing the floor (wrist in a straight/neutral position).
Lean your body back to fully extend your elbow.
While keeping the dumbbell horizontal and your forearm flat on the surface (avoid lifting off), lower the weight towards the ground by allowing your wrist to flex, moving through your full range of motion.
Pause momentarily at the bottom of the movement, then lift the weight back up as high as you can.
→VOLUME: 2-3 sets of 8-10 reps
→FREQUENCY: 2-3x/week as tolerated
→INTENSITY: 2 reps in reserve (OK to start out easier). Discomfort/pain at or below 2/10 (during and after).
Exercise 3: Hammer Curls

Hammer curls work the brachioradialis, which is a primary elbow flexor when the wrist is in a neutral position (not pronated or supinated). Besides being a useful recovery activity, this exercise is especially helpful for crack climbing since they’re constantly in this position.
To perform hammer curls:
Adjust the cable system or band so it’s anchored below you and there’s tension on the system with your arms fully extended by your side (or, if using dumbbells, simply hold one in each hand by your side).
Hold the handles with thumb-side facing forward, then flex both elbows, bringing the handle up until your thumb-side points toward your shoulder or head. Try to mostly isolate the elbow movement here rather than assisting it by arching your back or flexing your shoulder.
Lower the weight back down with control and repeat.
→VOLUME: 2-3 sets of 8-12 reps
→FREQUENCY: 2-3x/week as tolerated
→INTENSITY: 2 reps in reserve (OK to start out easier); discomfort/pain at or below 2/10 (during and after)
Exercise 4: Forearm Supination
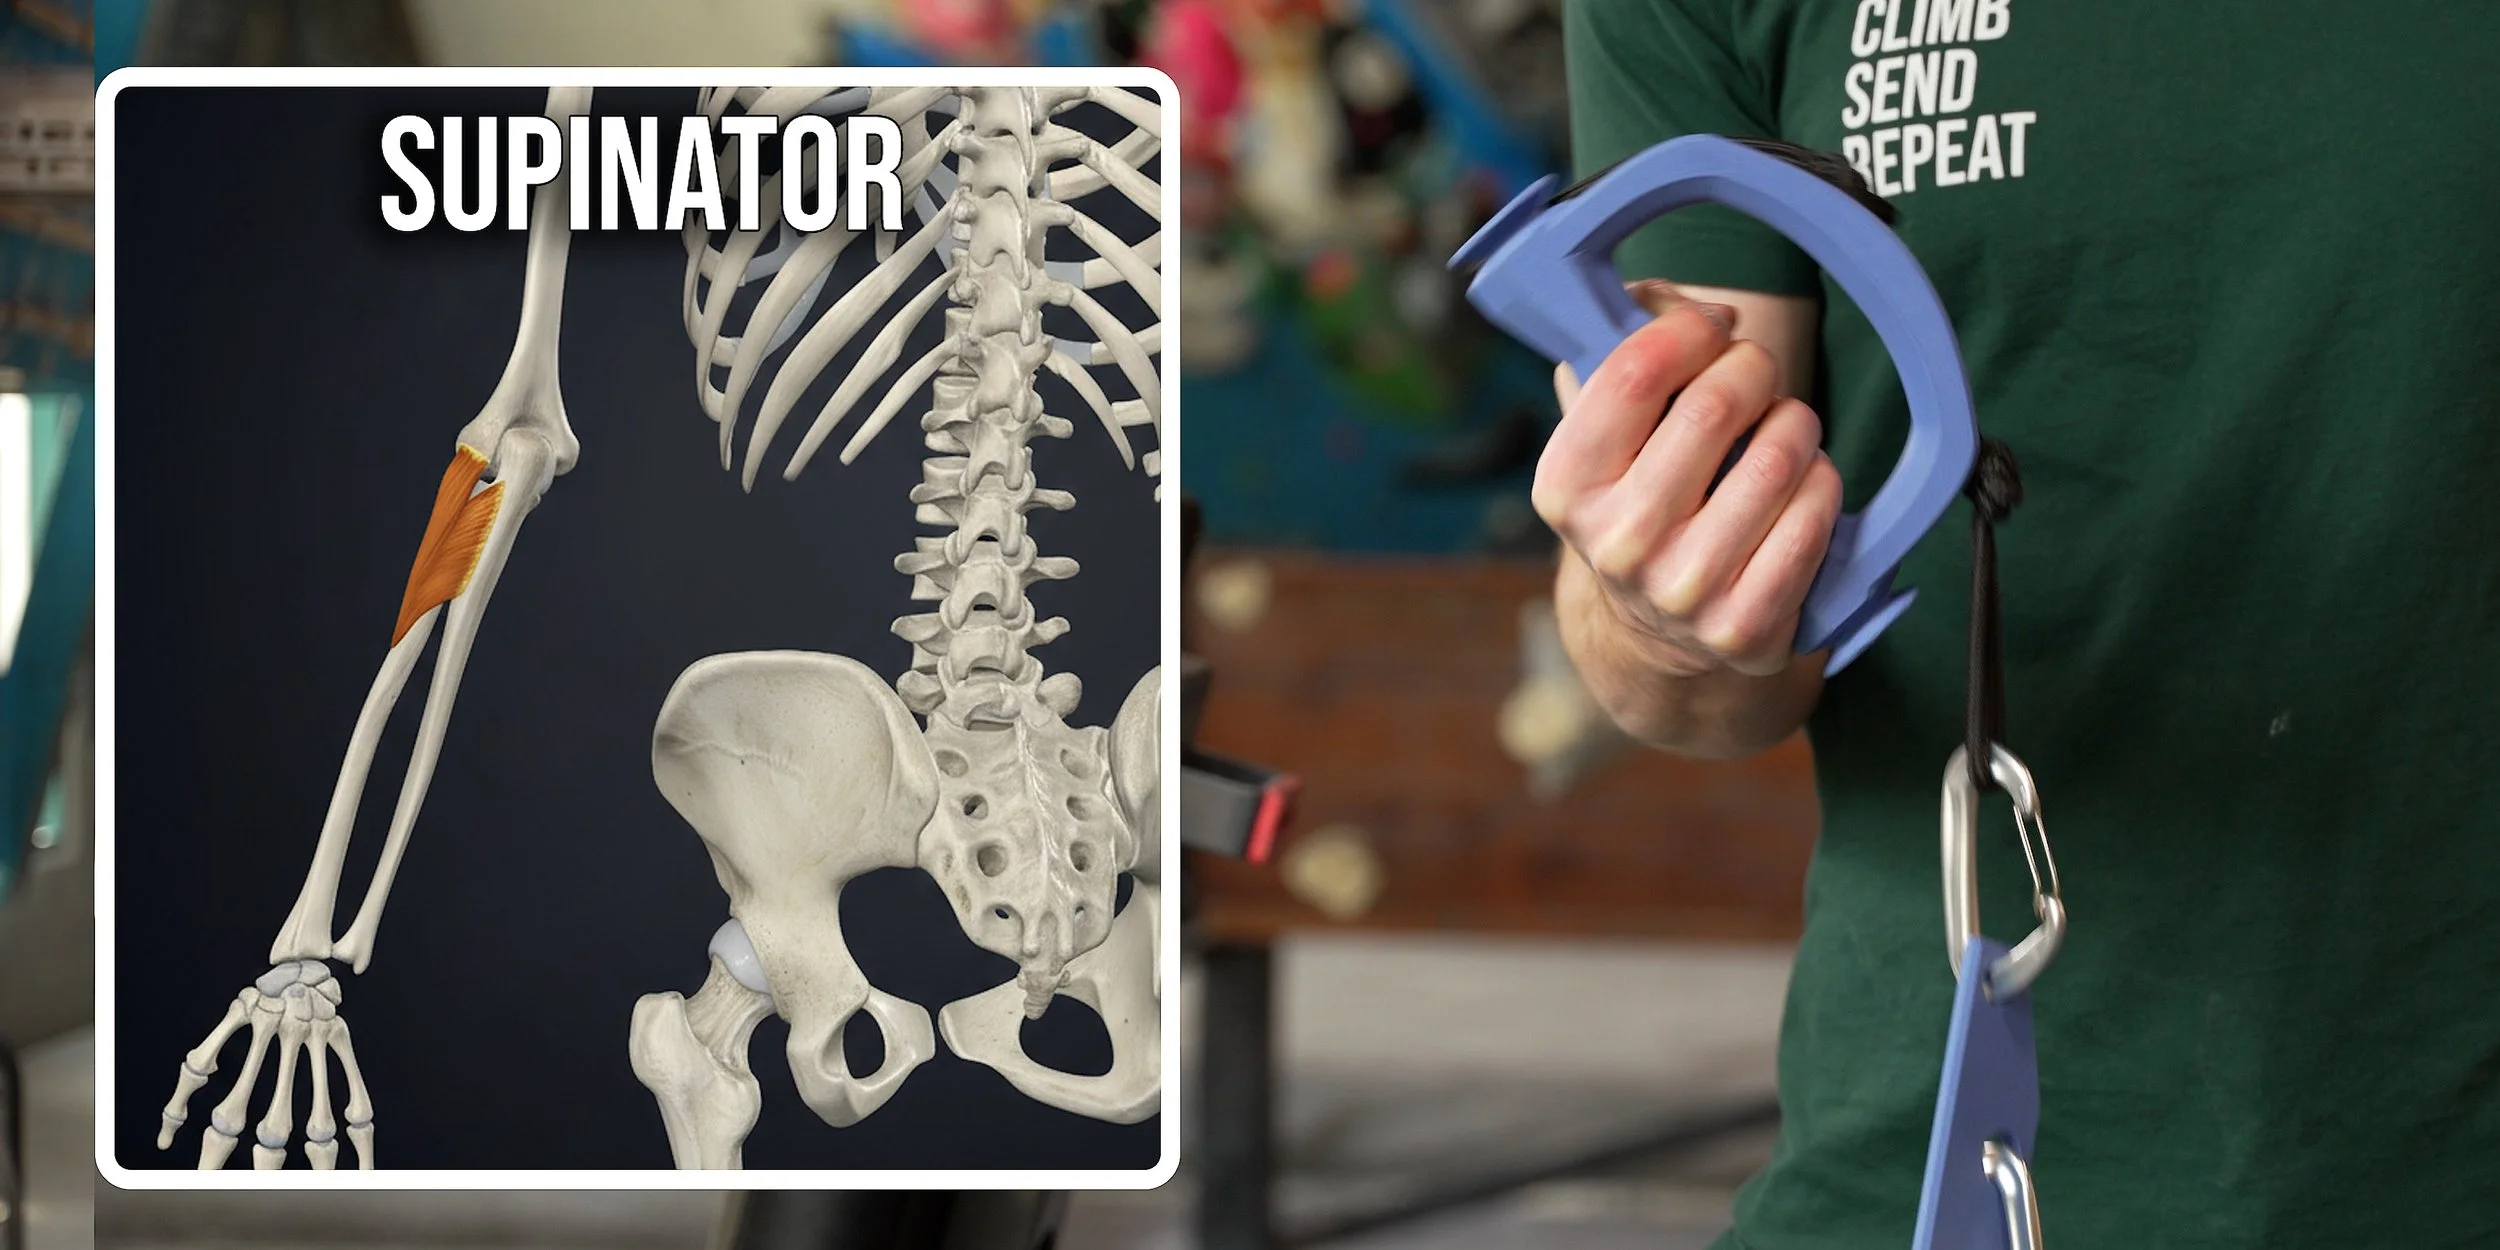
Forearm supination specifically targets the supinator muscle which attaches to the lateral epicondyle. In climbing, it helps stabilize the forearm and wrist while supinated, which is great for underclings.
To perform forearm supination:
SETUP
ADJUSTABLE DUMBBELLS OR LEVER BAR: Add weight to one side while leaving the other empty or at a lower weight (for example, 5 pounds on one side and 10 pounds on the other). Grab it at its normal grip point, but hold it so the heavier side (10 pounds in this example) is on top.
NON-ADJUSTABLE DUMBBELLS: Grab the dumbbell on one end (the actual weight, not the handle) and hold it vertically so the other end points toward the ceiling.
HAMMER: Grab the hammer by the handle and hold it vertically with the metal head up towards the sky.
HOW TO
Hold the weight in a comfortable position in front of you.
Slowly rotate the weight with your wrist so your palm faces down toward the ground. The pace should be slow and controlled to ensure that you do move into a larger range of motion than is tolerable.
Hold at the end of your tolerable range of motion briefly, and then return to the starting position.
You’ve now completed one rep.
→VOLUME: 2-3 sets of 8-10 reps
→FREQUENCY: 2-3x/week as tolerated
→INTENSITY: 2 reps in reserve (OK to start out easier). Discomfort/pain at or below 2/10 (during and after).
Bonus: Flat Bar Reverse Curl
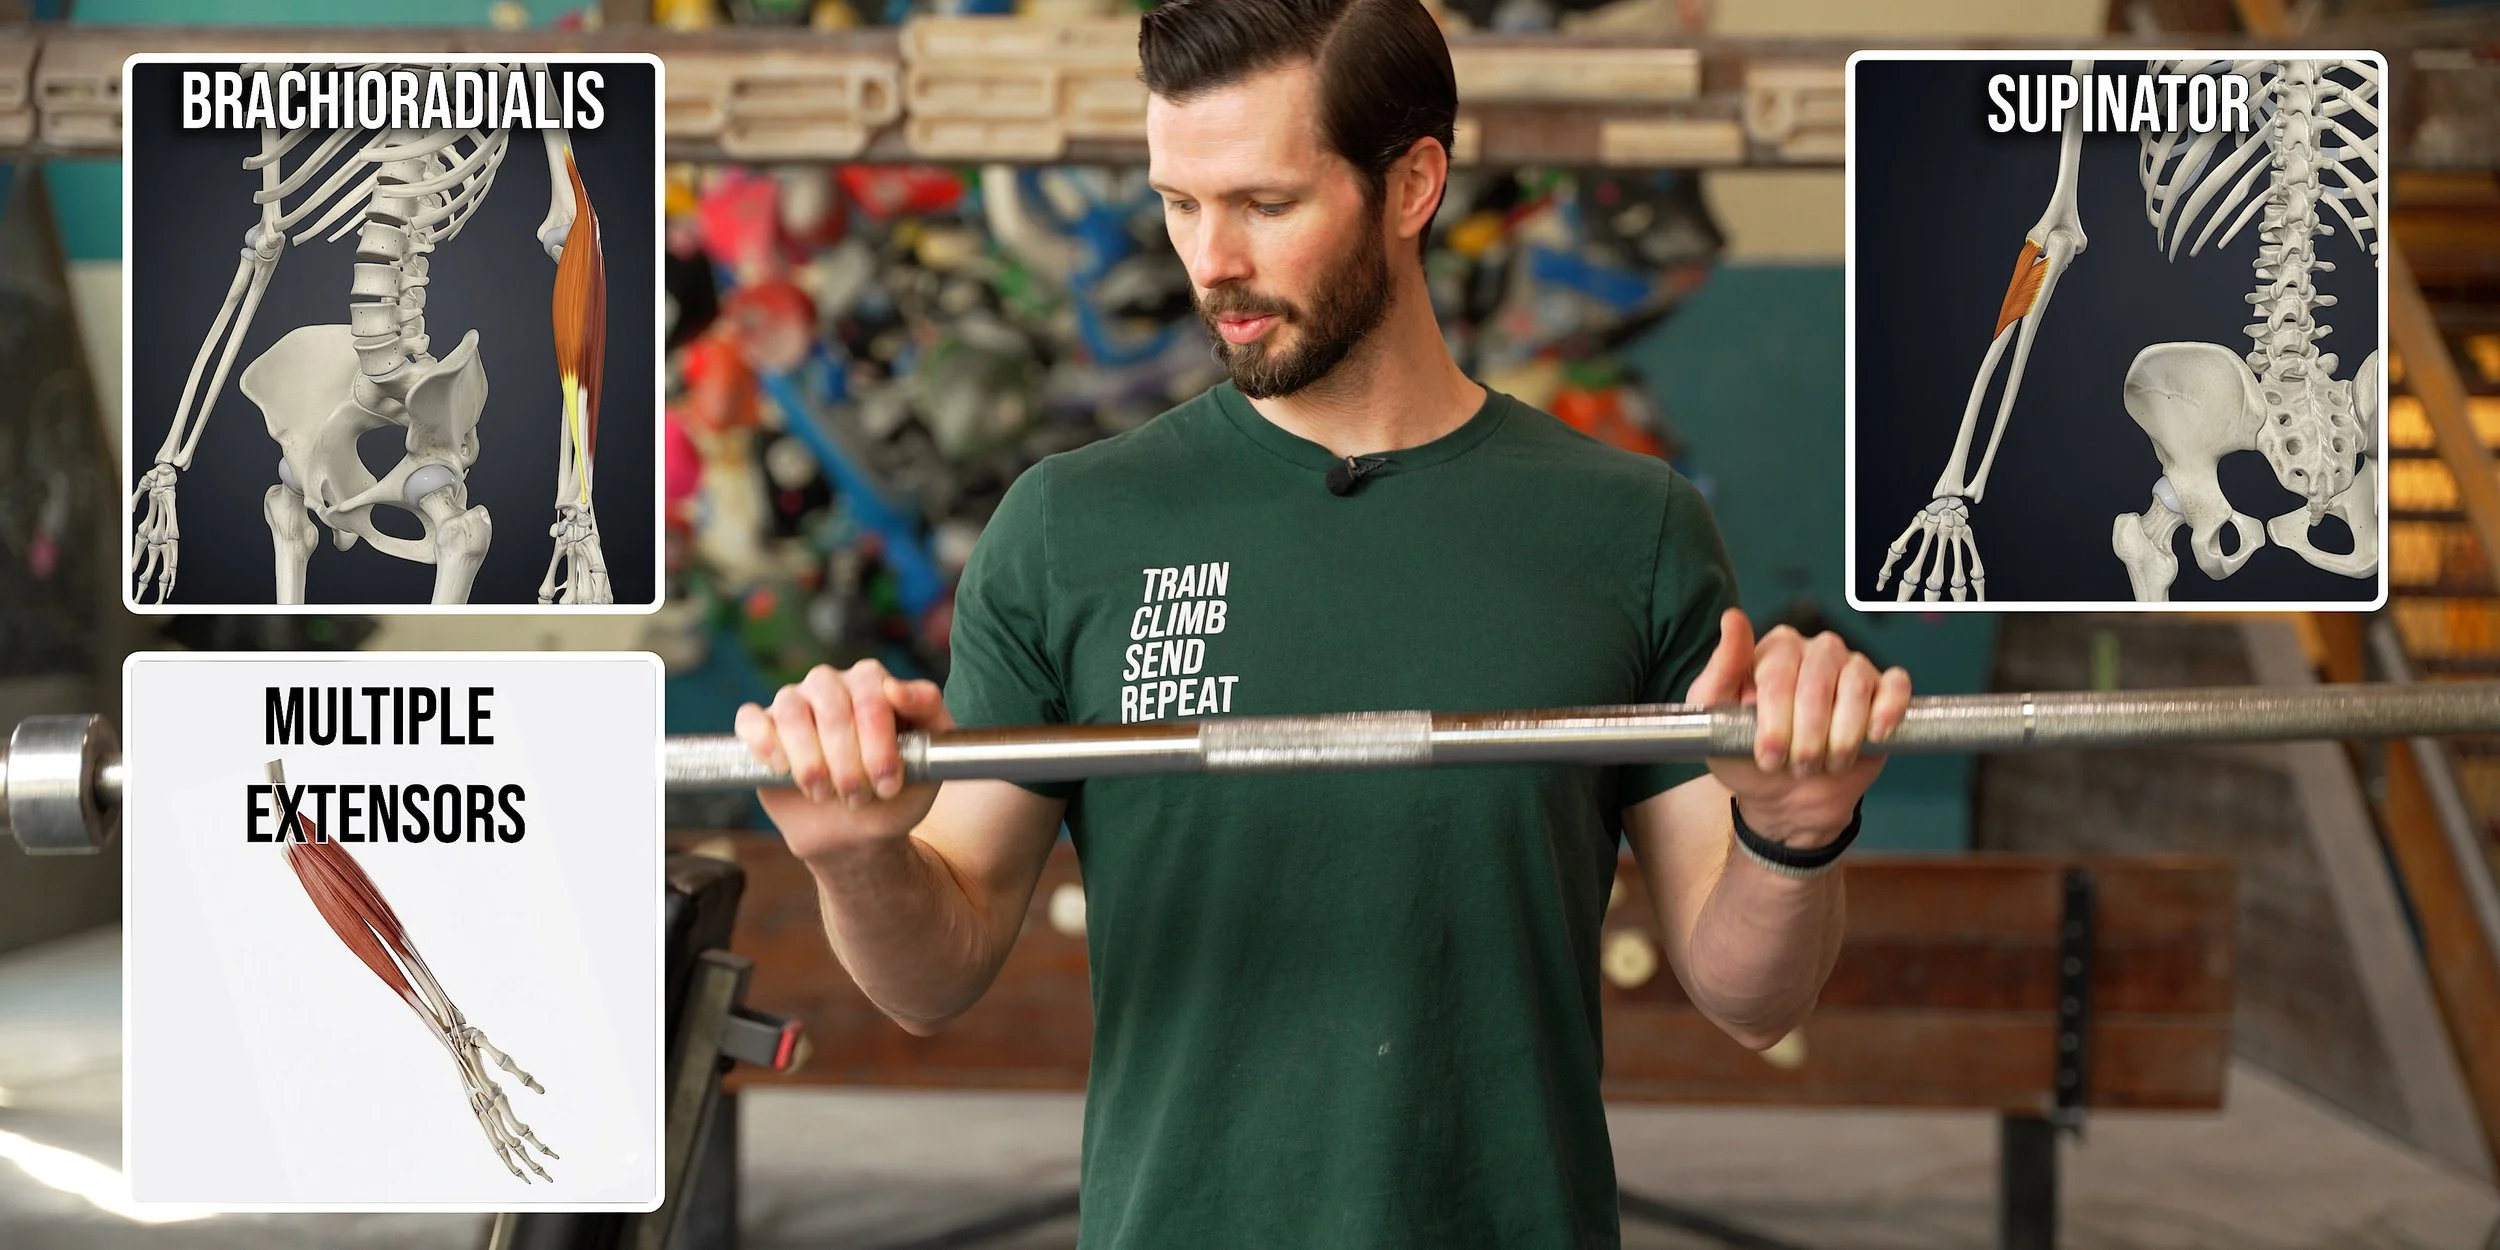
Flat bar reverse curls place the forearm in a pronated position, meaning as you perform the curl, your wrist extensors are working hard. The pronated position shifts the bias away from the biceps brachii and toward the brachioradialis, brachialis, and ECU, while also stretching the supinator. The motion of going from a straight to bent elbow also helps work both the ECRB and ECRL. Now this all sounds lovely, I know, and that’s why it is a great all-purpose exercise for climbers and athletes alike to perform. But keep in mind that since it does not isolate a single muscle, it may be less effective at healing tendinopathies than the more targeted exercises we just covered.
To perform flat bar reverse curls:
Grab a barbell with an overhand (pronated) grip with thumbs on the same side as your fingers.
Start in a standing position with your arms straight and the barbell resting down at your thighs.
Flex your elbows to lift the barbell up toward your chest, moving through your full range of motion, then lower back down to the starting position. You’ve now completed one rep.
→VOLUME: 2-3 sets of 6-10 reps
→FREQUENCY: 2-3x/week as tolerated
→INTENSITY: 2 reps in reserve (OK to start out easier). Discomfort/pain at or below 2/10 (during and after).
Programming Recommendations
You can perform these exercises in whatever order you prefer, but here are a couple of my preferred methods.
Method 1 (if performing all exercises):
Superset 1 (perform 2-3x)
Wrist extension with elbow bent
Hammer curls
Superset 2 (perform 2-3x)
Wrist extension with elbow straight
Forearm supination
Optional Bonus (perform 2-3x)
Flat bar reverse curl
Method 2 (if performing the minimum number of exercises):
Superset 1 (perform 2-3x):
Flat bar reverse curl
Forearm supination
Optional Rest/Stretch
Between each superset round, you can take a short rest or you can add in one of the tissue stretches or the radial nerve floss+tension technique for extra efficiency. For example: perform your wrist extension and hammer curl superset, then perform the pec 90 stretch before repeating that superset.
Example:
Superset 1 (perform 2-3x)
Wrist extension with elbow bent
Hammer curls
Pec 90 stretch
Superset 2 (perform 2-3x)
Wrist extension with elbow straight
Forearm supination
Pec 120 stretch
Optional Bonus (perform 2-3x)
Flat bar reverse curl
Radial nerve floss + tension
How much weight should I be using for all these exercises?
With all the tissue loading exercises, you may have noticed the recommended intensity is typically two reps in reserve (RIR). Two RIR means you should be using as much weight as you can for each set while stopping two reps shy of failure.
If you’re not familiar with this concept, it may take a bit of practice to figure out what “two reps shy of failure” feels like. For our purposes, failure happens when your rep velocity significantly slows down, your form significantly degrades, or you experience more than 2/10 pain during the set. So if you do experience any of those things, then you know you’ve gone too hard and need to reduce the weight or number of reps until you’re further away from failure.
If you’re new to resistance training, I recommend starting at a very low intensity and working your way up to 2 RIR over the course of a few sessions as you get acquainted with the movements.
How Long Will It Take to Recover?
If it turns out it was just your nerves getting on your nerves the entire time, you should notice a quick improvement in symptoms within a few days to a few weeks. Though, keep in mind you might have to manage this long term and some nerve symptoms can take much longer to fully resolve. If you notice an improvement with the radial nerve floss+tension technique and stretches, keep doing them!
If it’s a regular tendon pathology, it can take 2-4 months to recover depending on how severe it was initially and how well you program your recovery.
Alternative Forms of Treatment
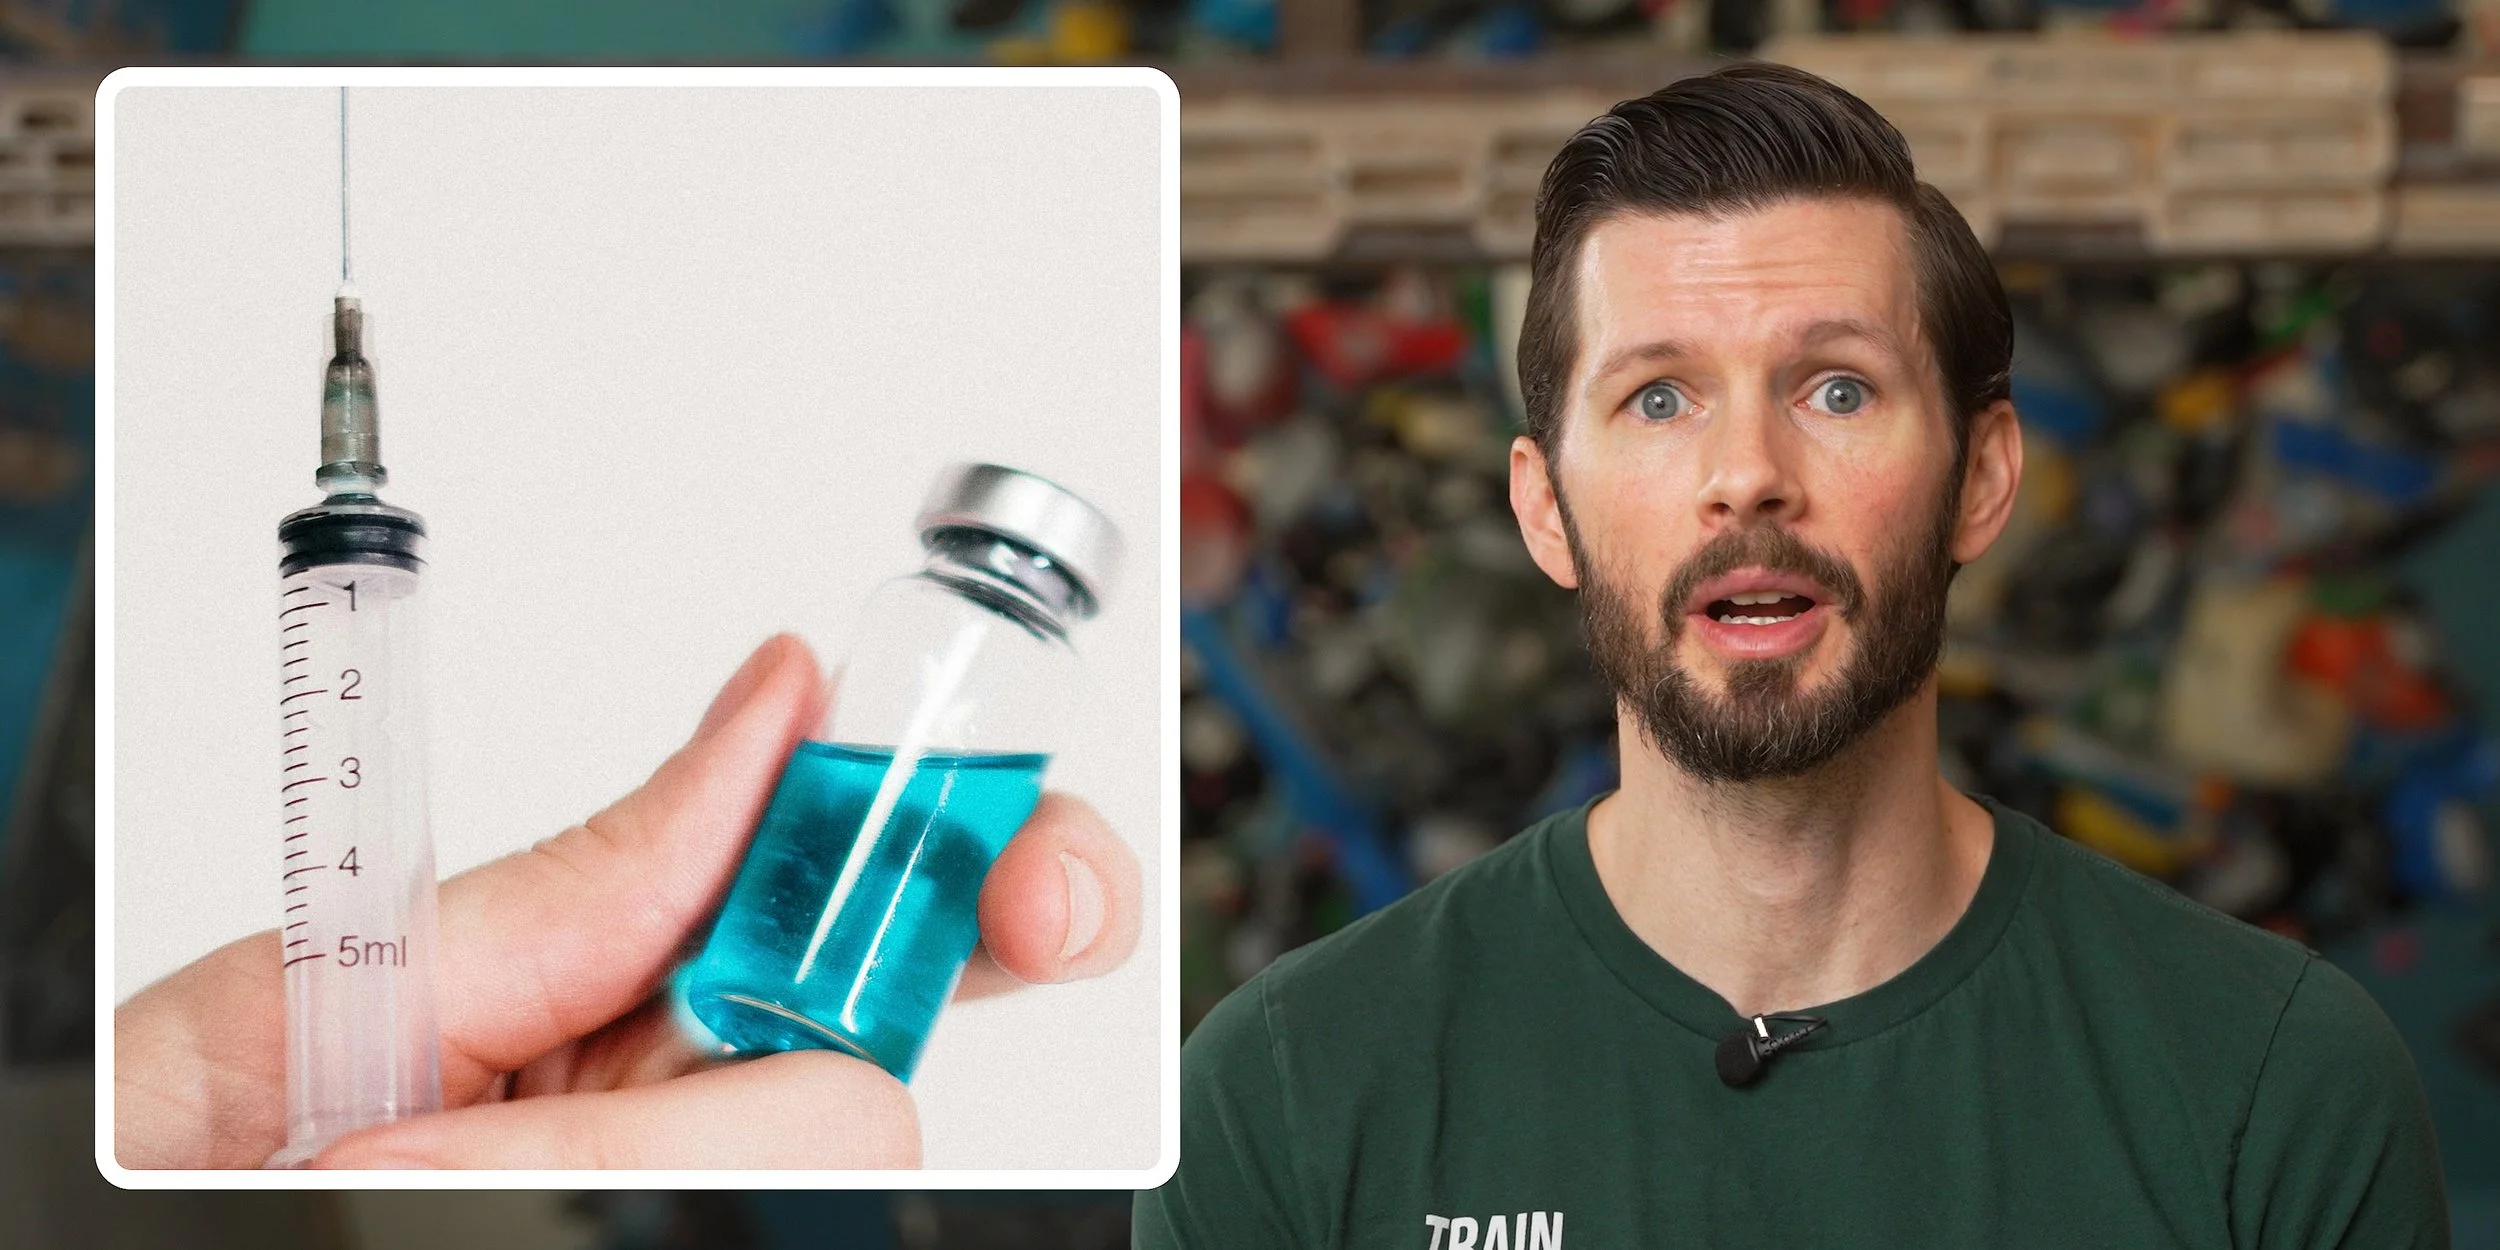
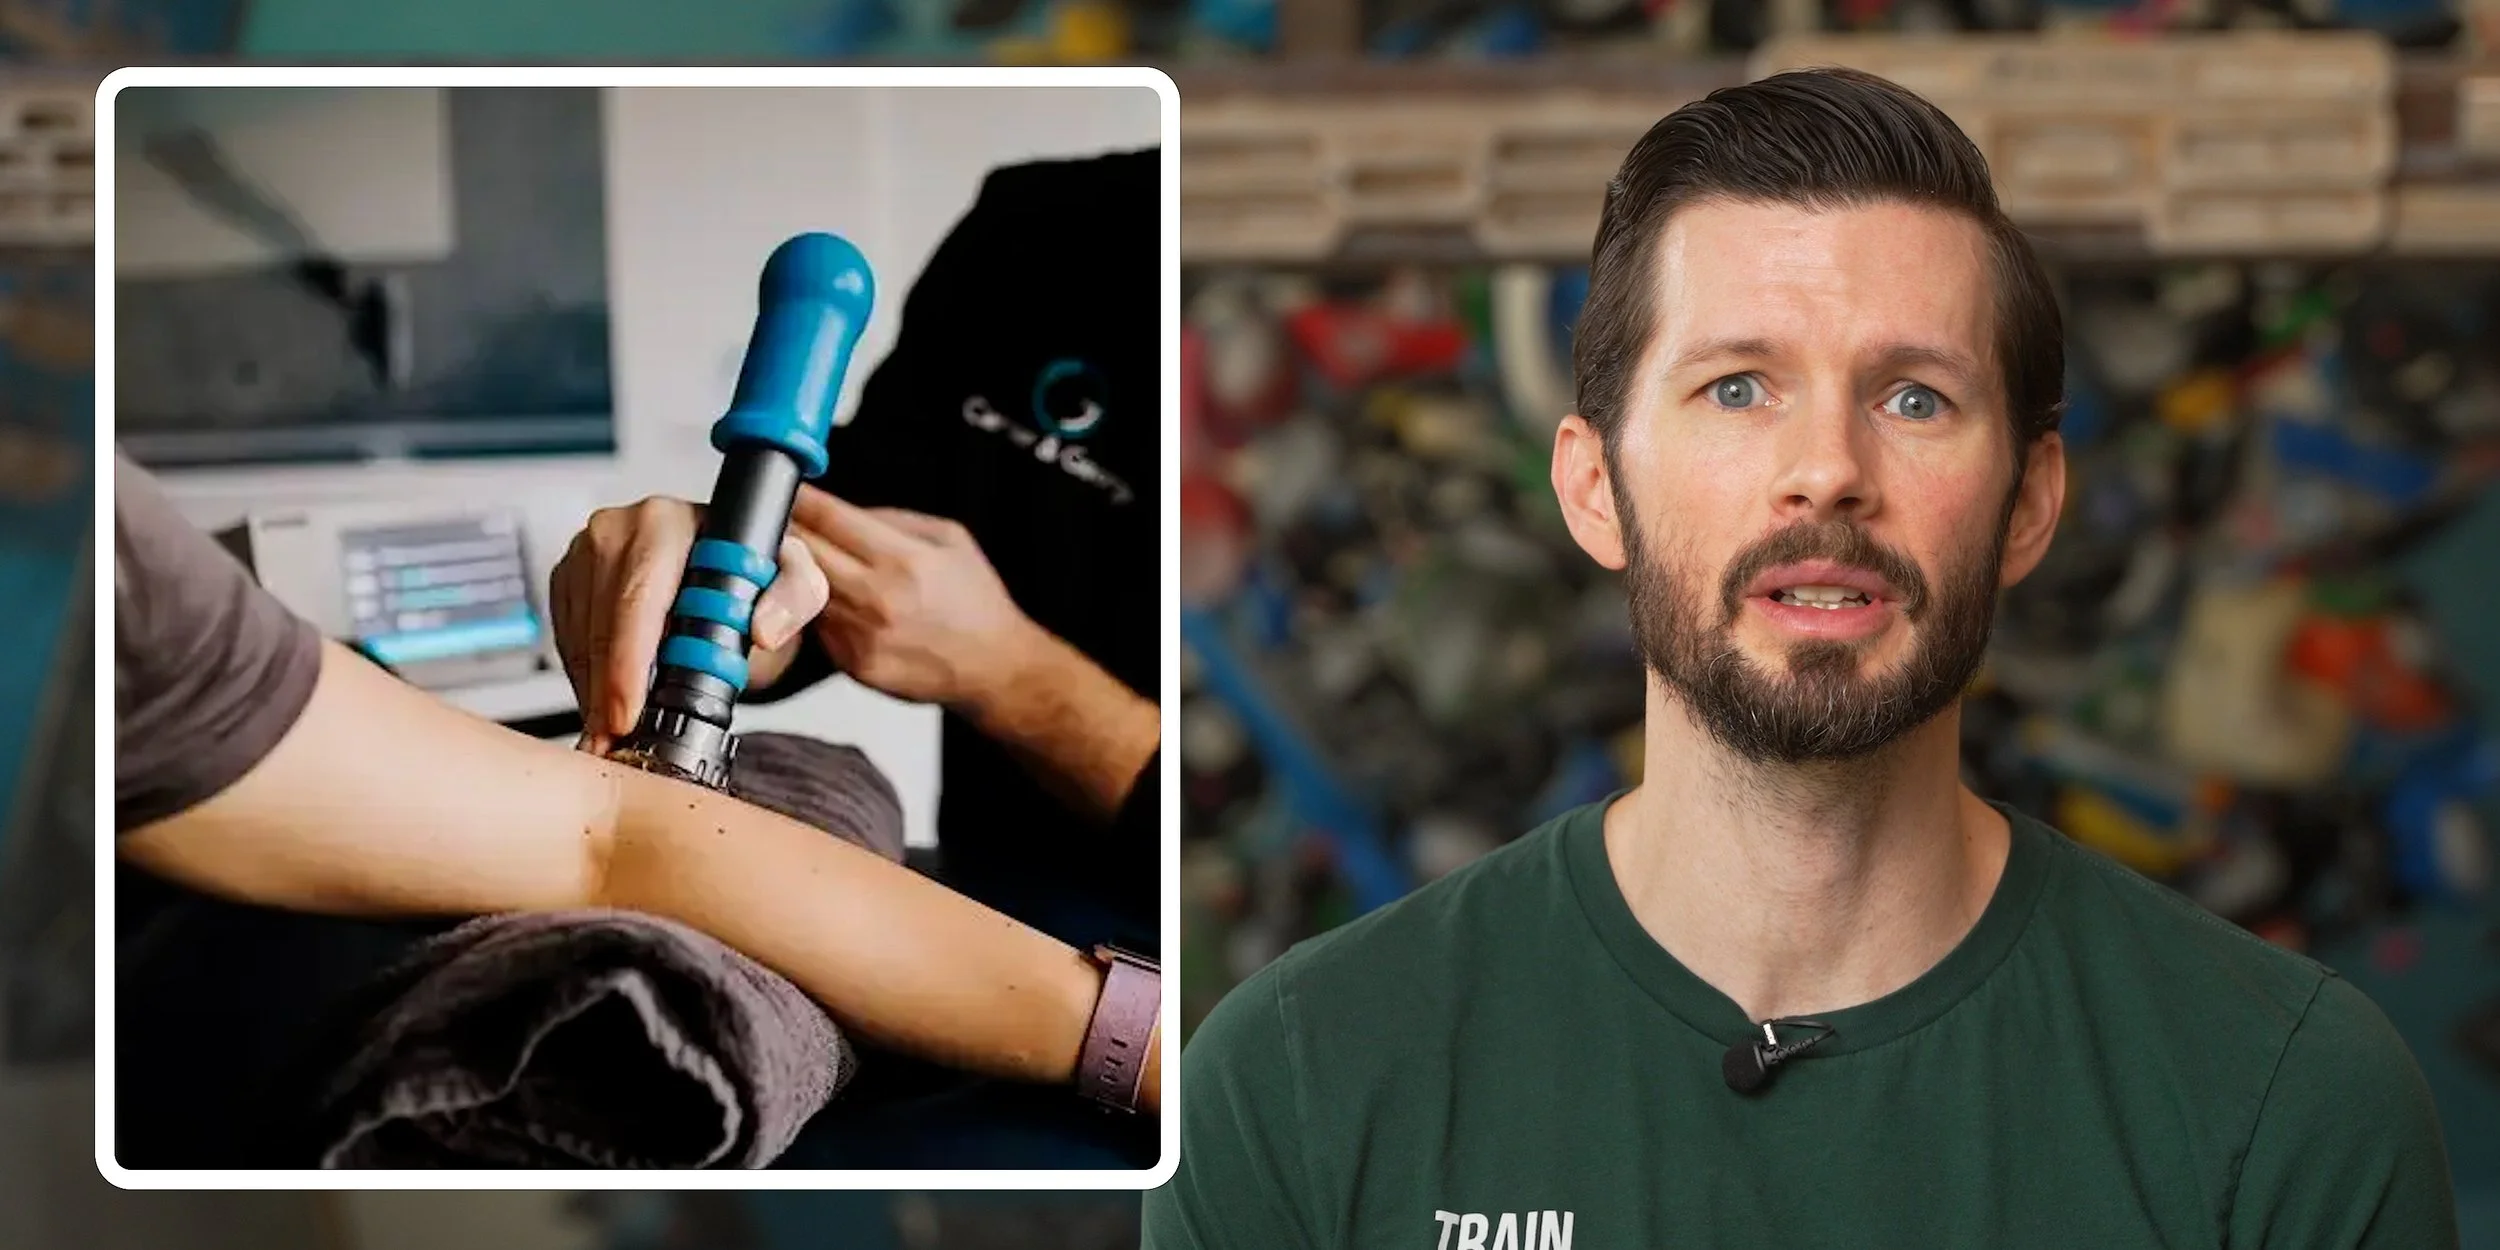
If you are struggling with elbow pain that doesn’t respond to load management, strength training, or nerve mobilizations, the first step would be to seek professional medical advice for individualized treatment. But here are a few other options that you should be aware of in no particular order:
Injections, including cortisone, PRP, and prolotherapy among others
Extracorporeal shockwave therapy, which is a non-invasive treatment that delivers high-energy acoustic waves to the painful tendon area
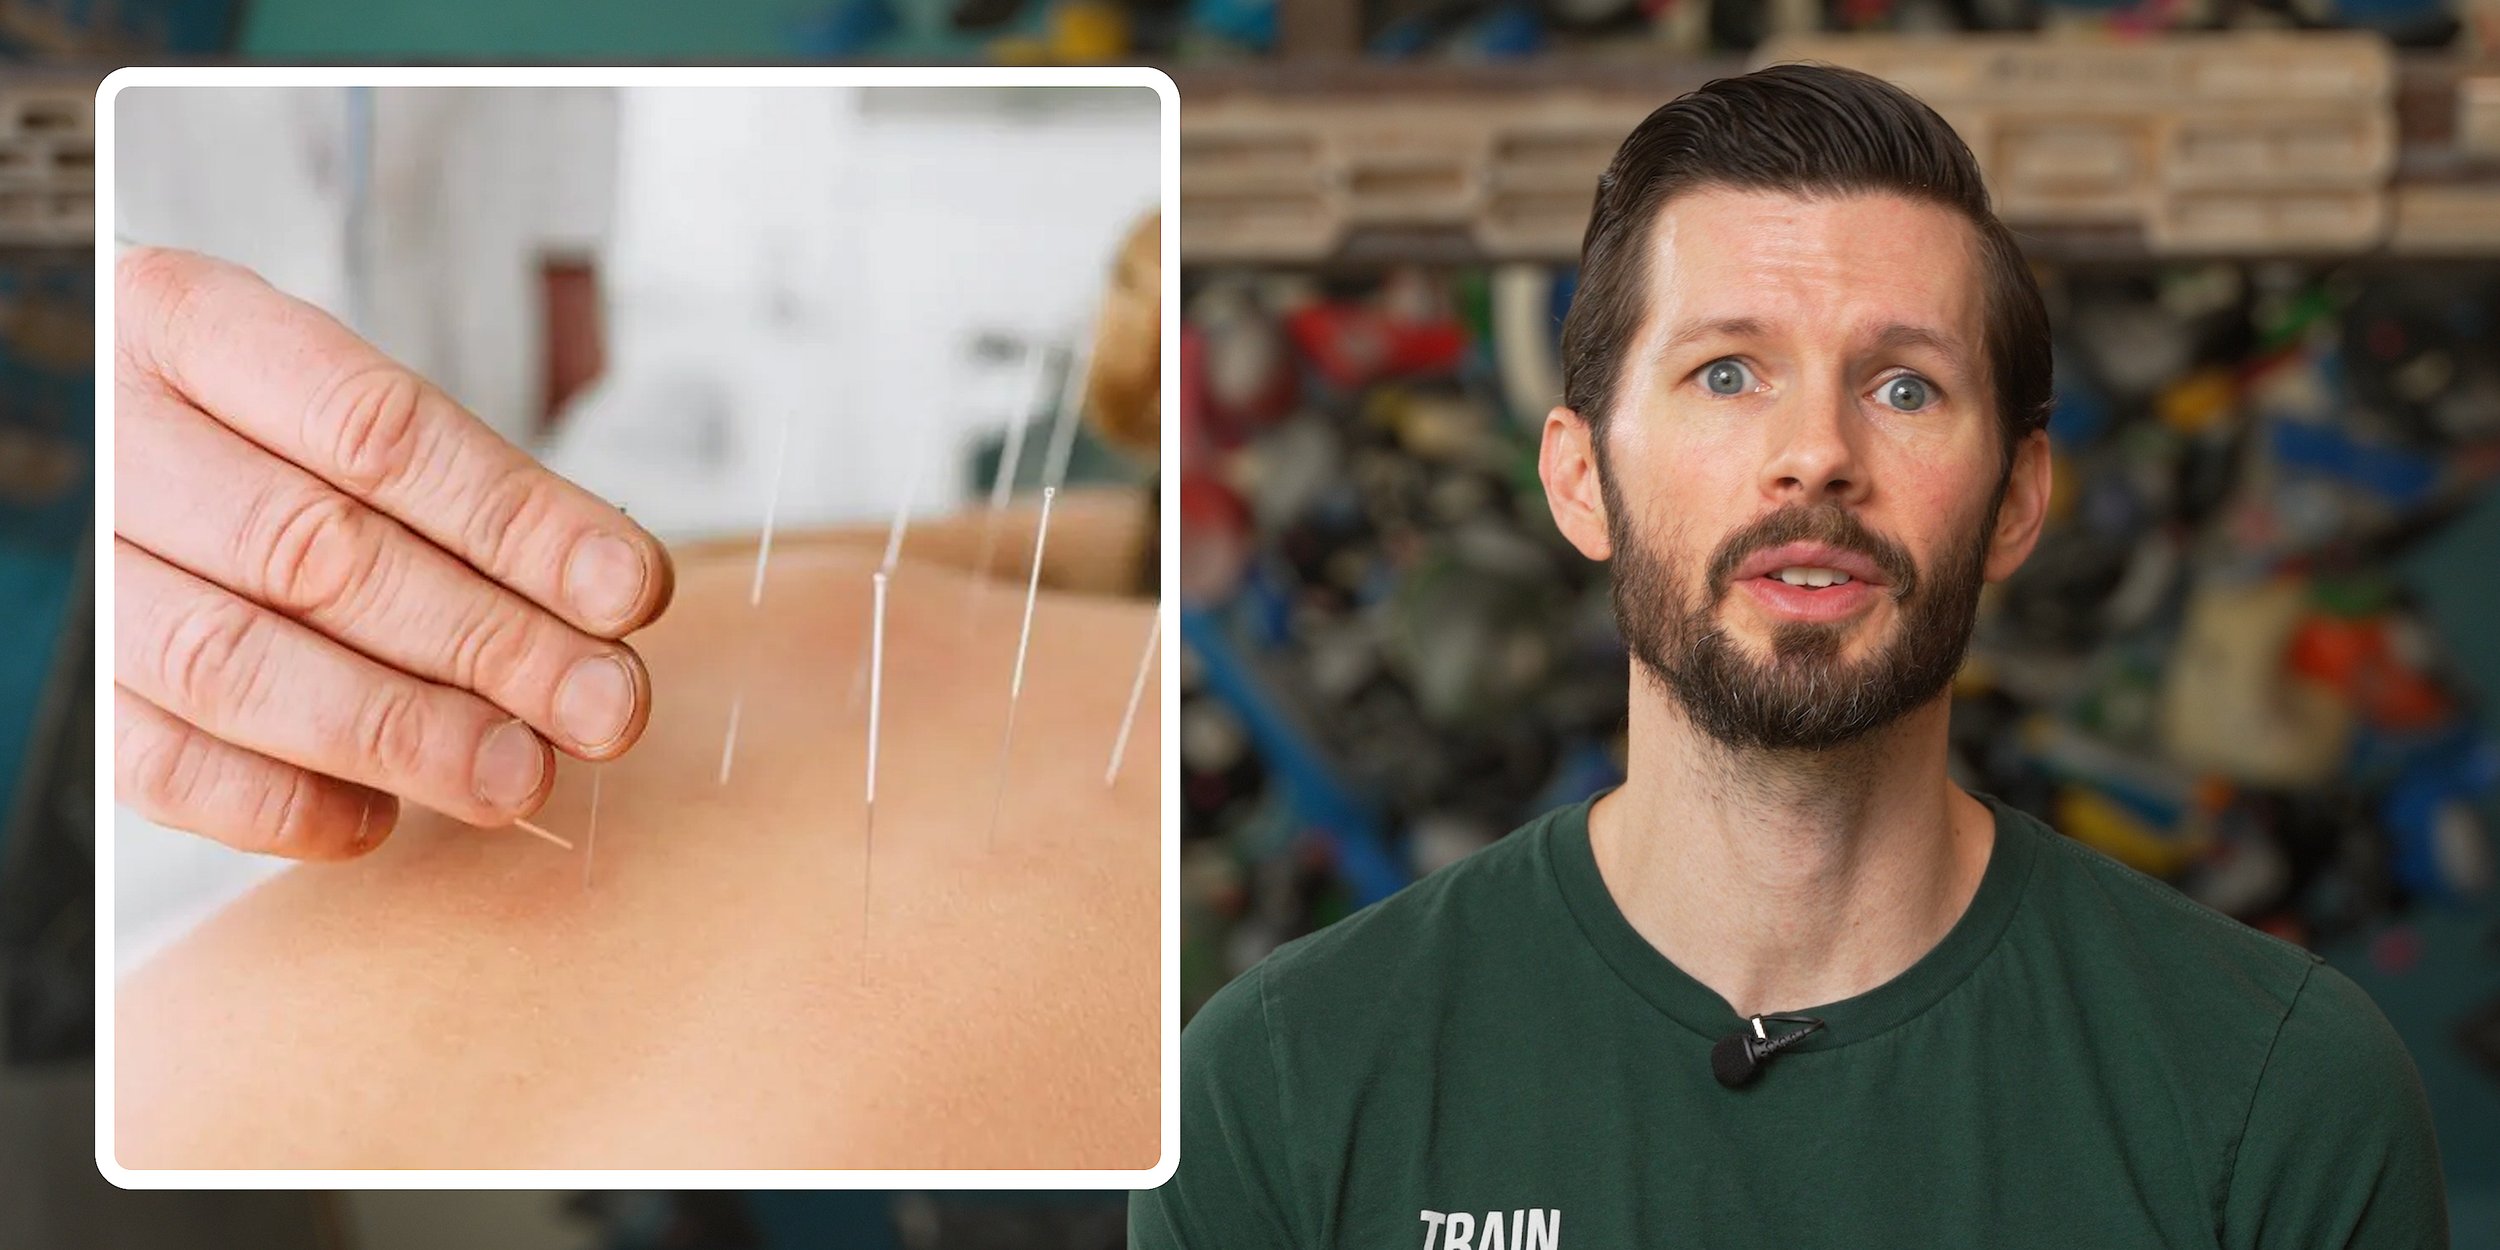
Dry needling, which involves inserting thin, sterile needles into specific myofascial trigger points (muscle knots) in the tight forearm muscles
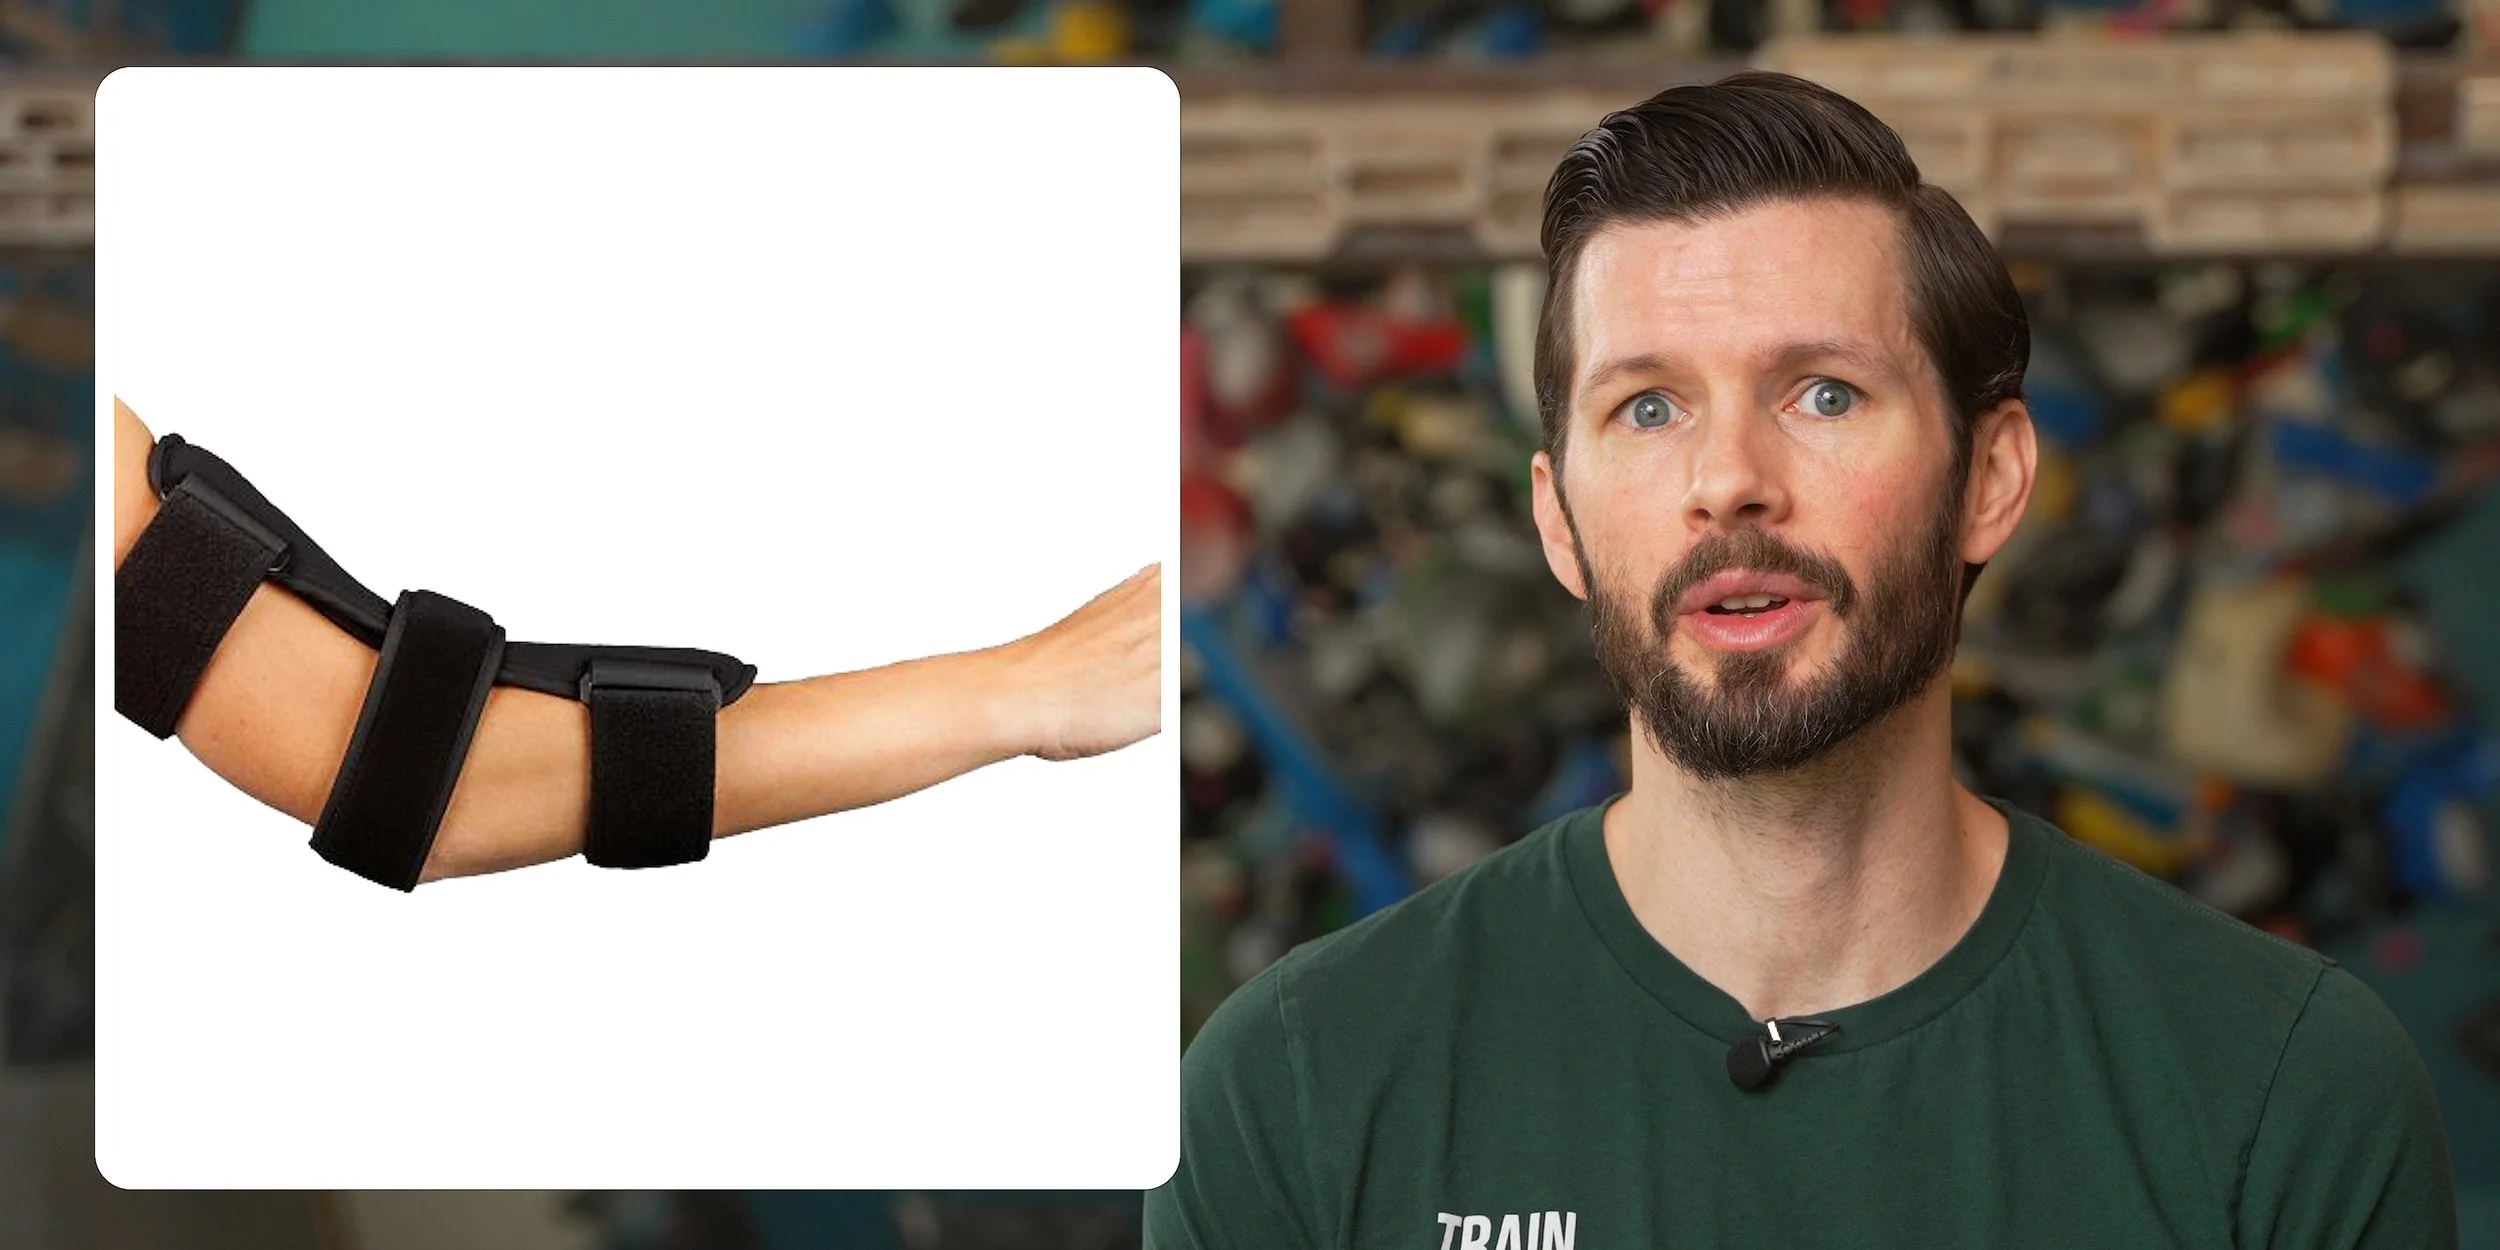
Bracing, which can help if you’re experiencing symptoms from your elbow being in a certain position while you sleep.
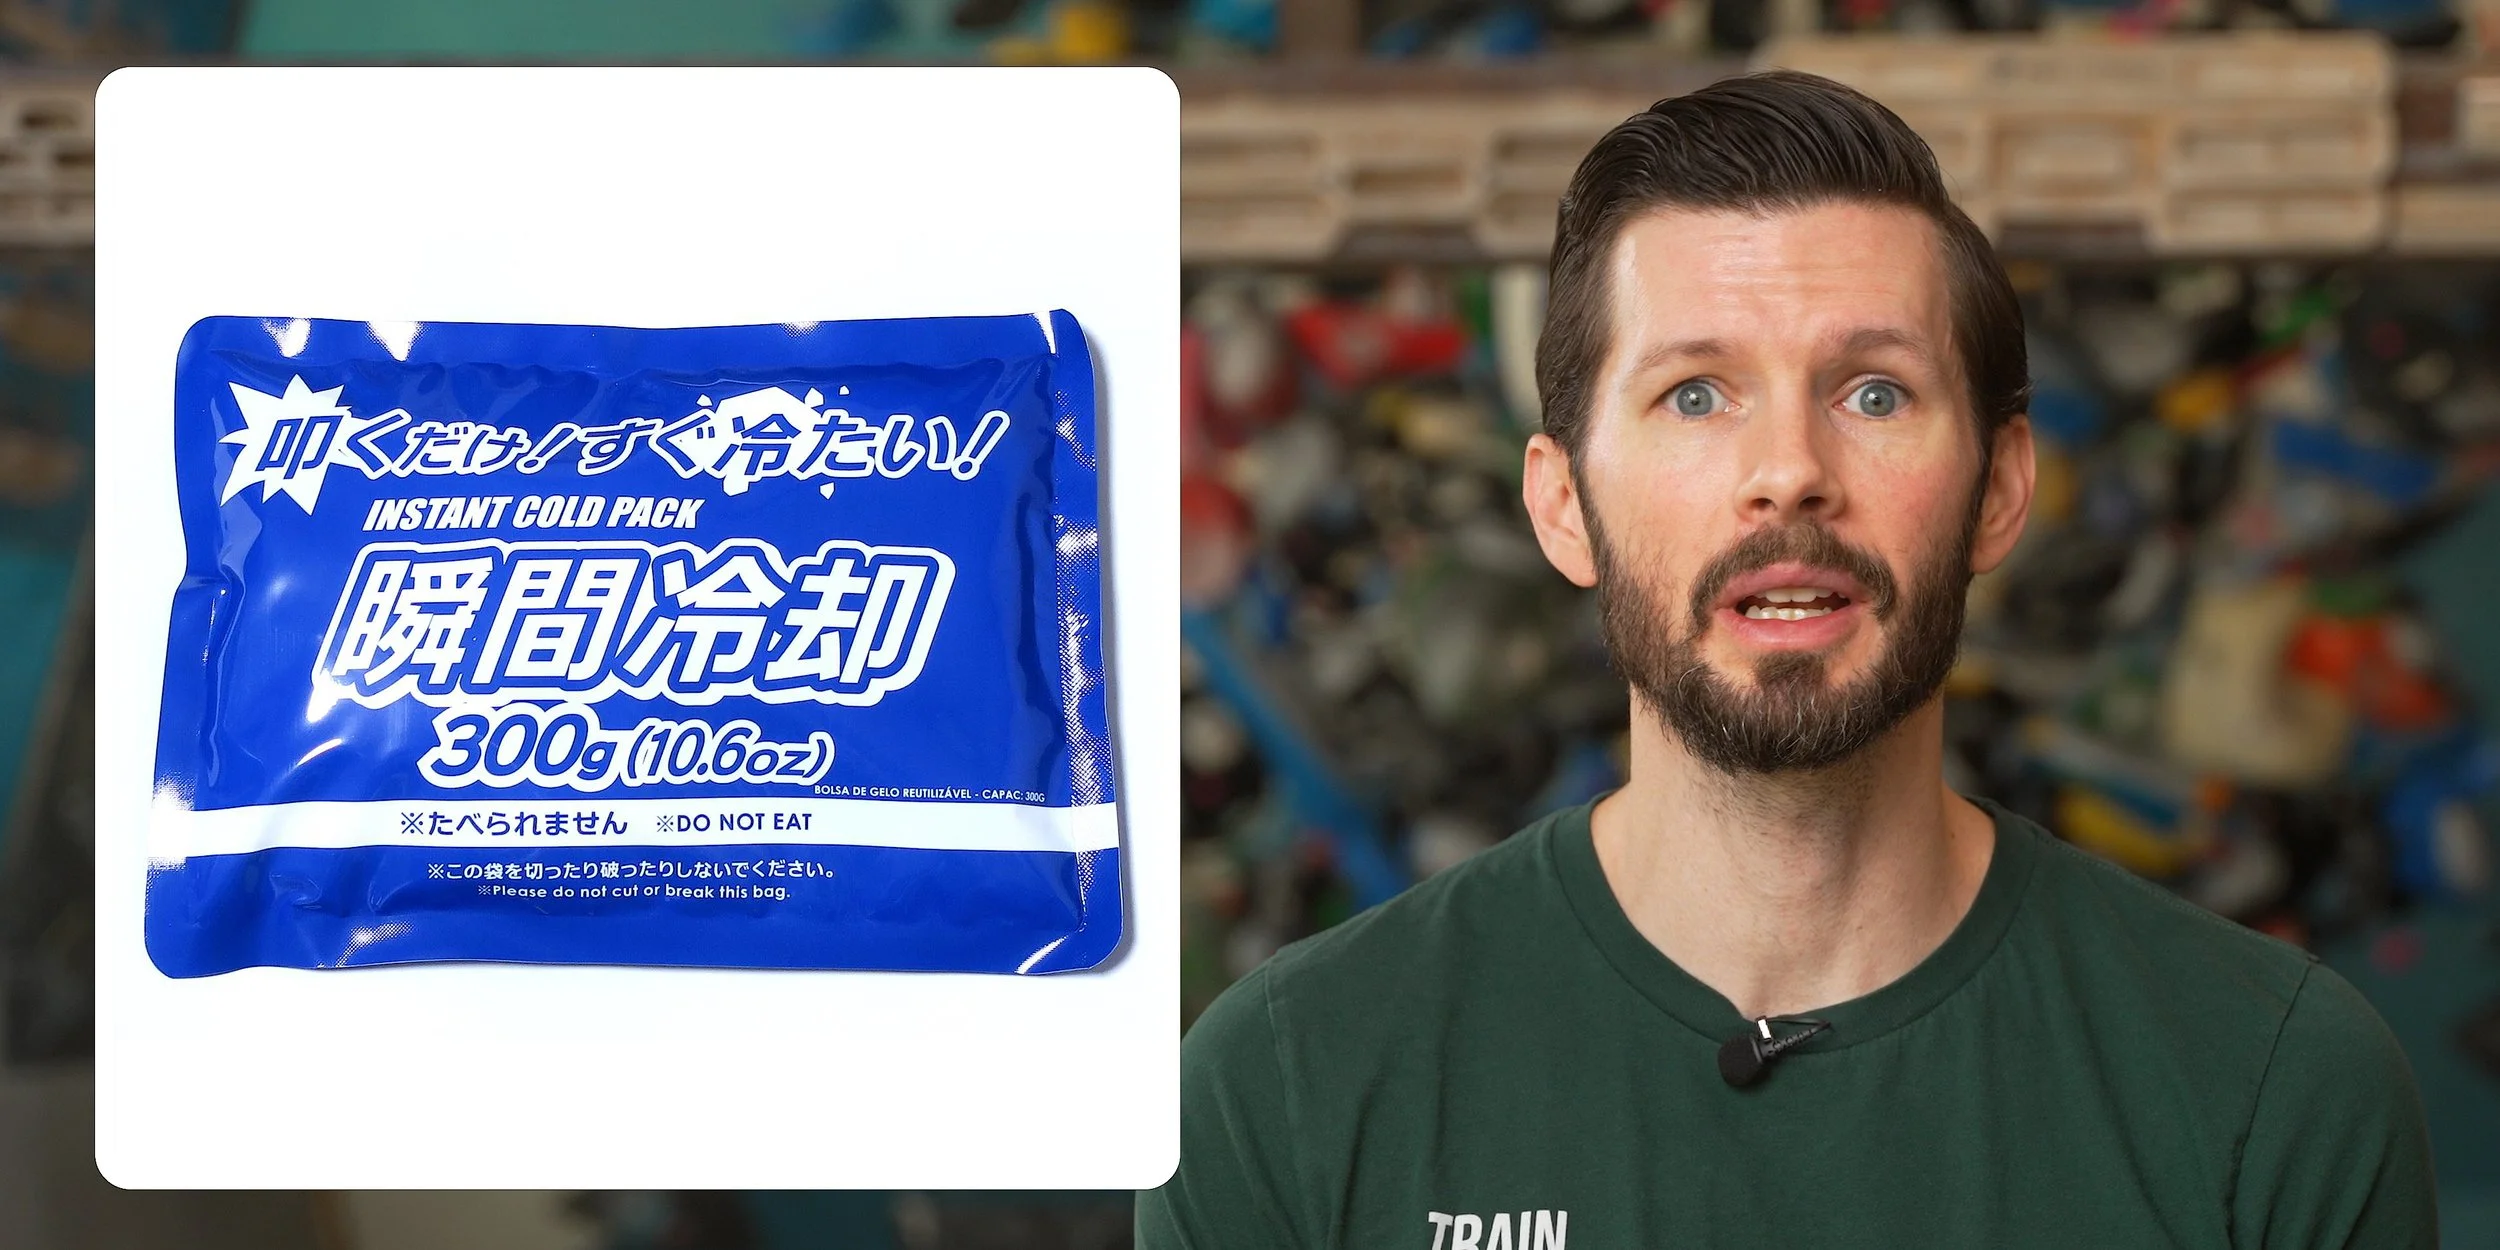
Ice, which can help some individuals immediately after activity to calm a reactive tendon or nerve
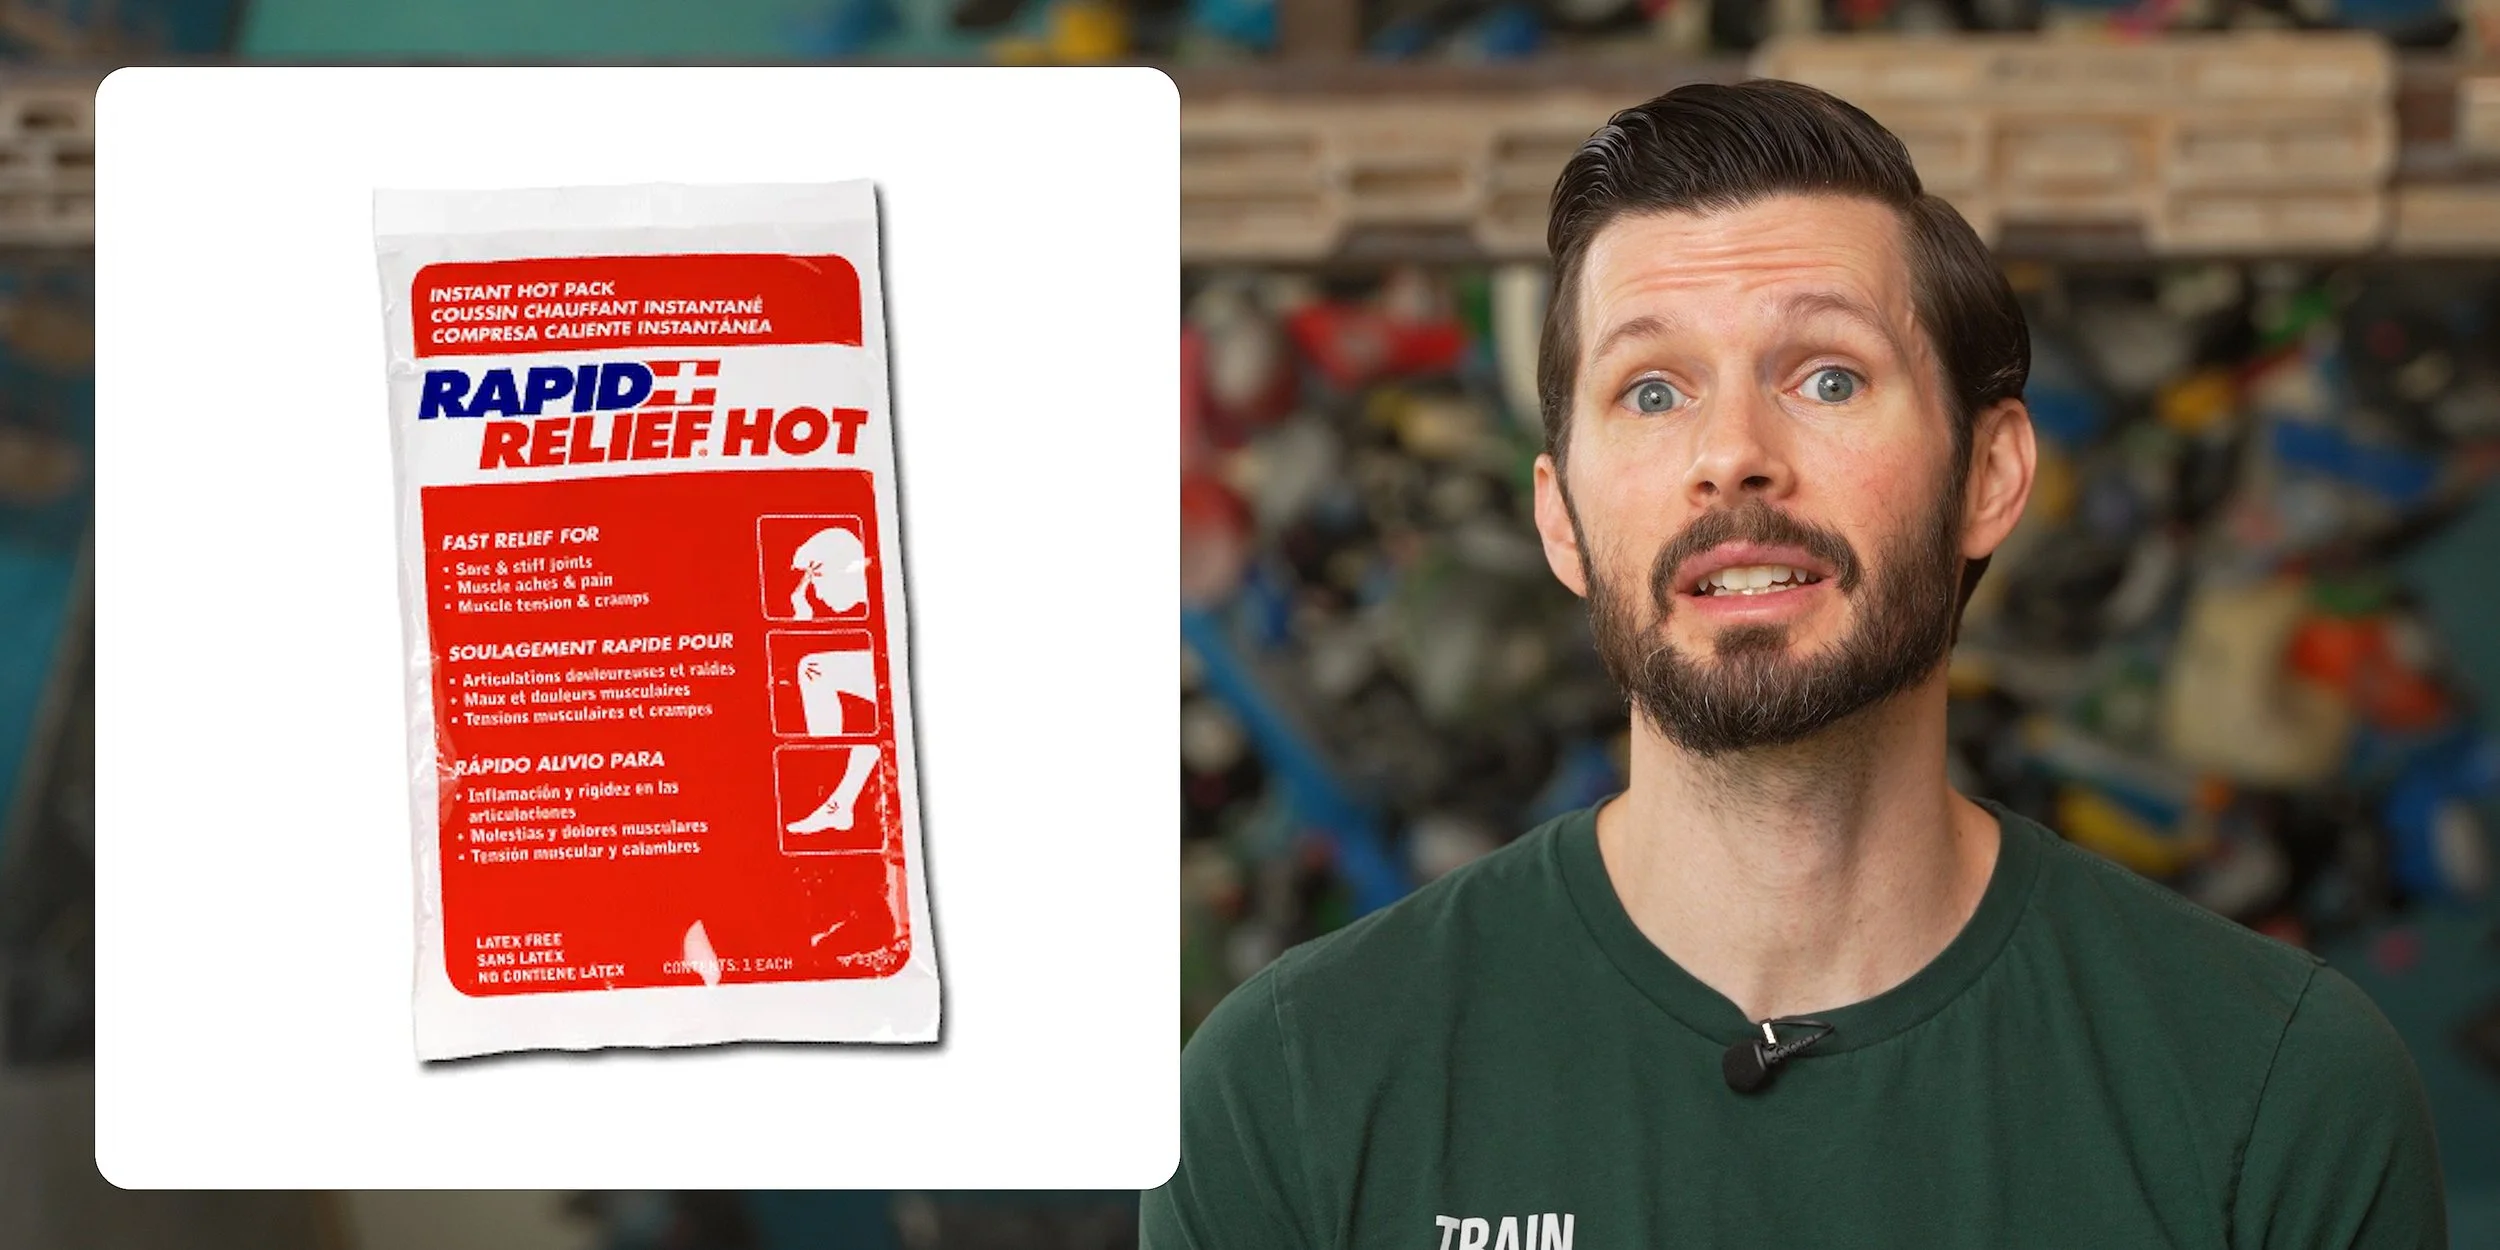
Heat, which can relax tight muscles and promote blood flow
The Most Convenient Way to Recover
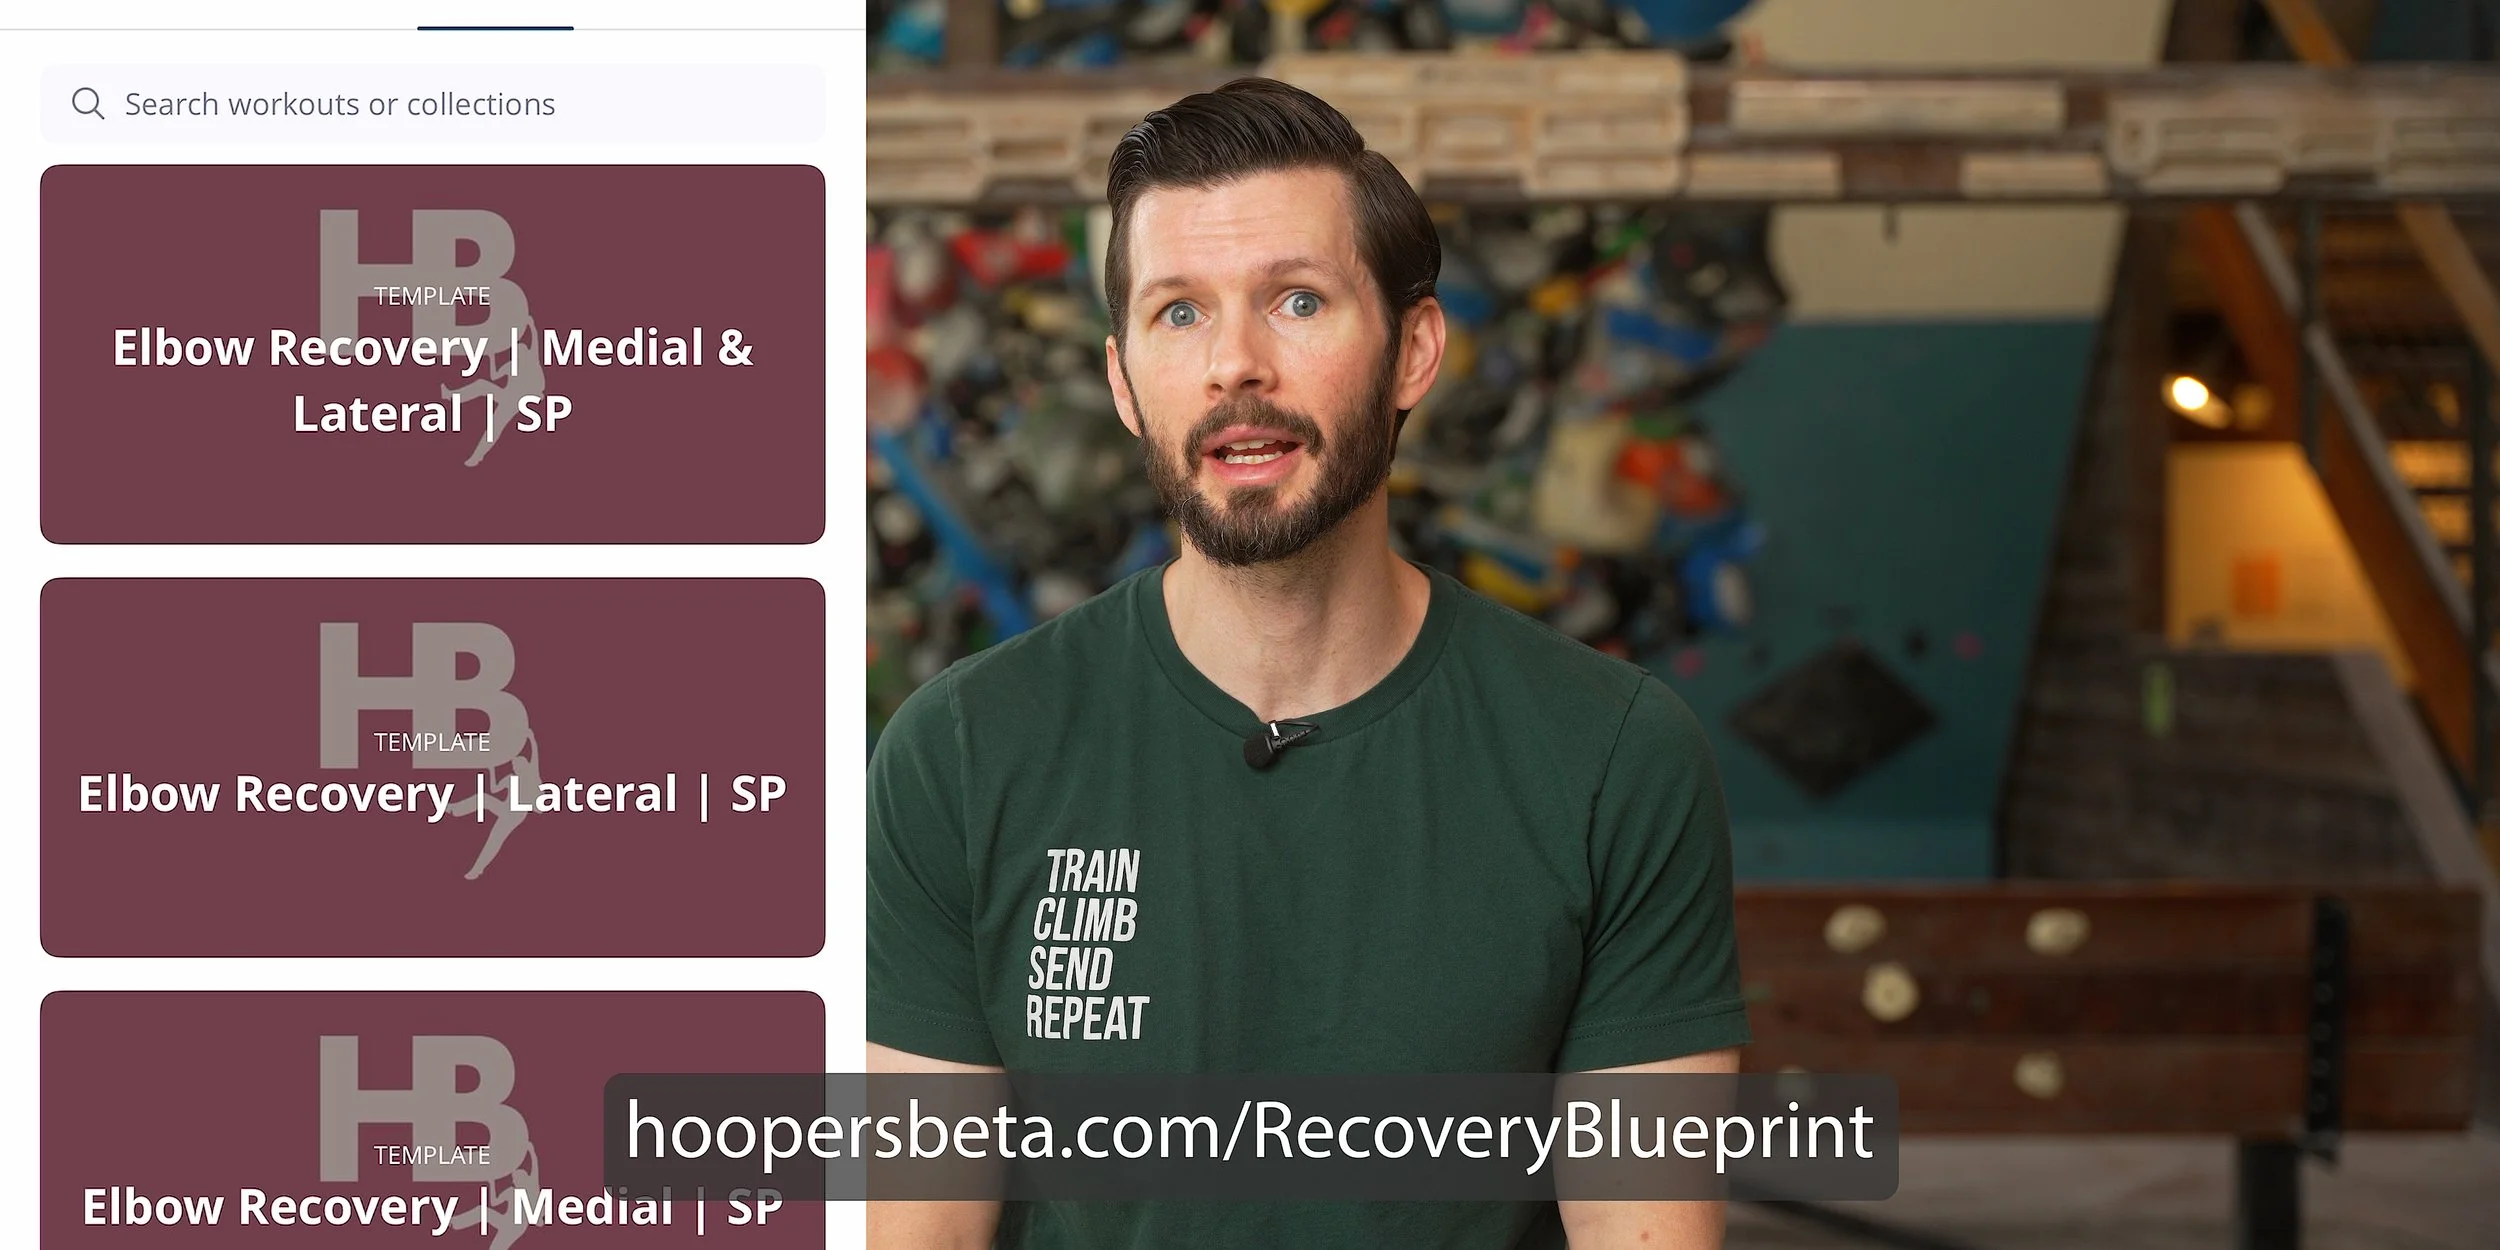
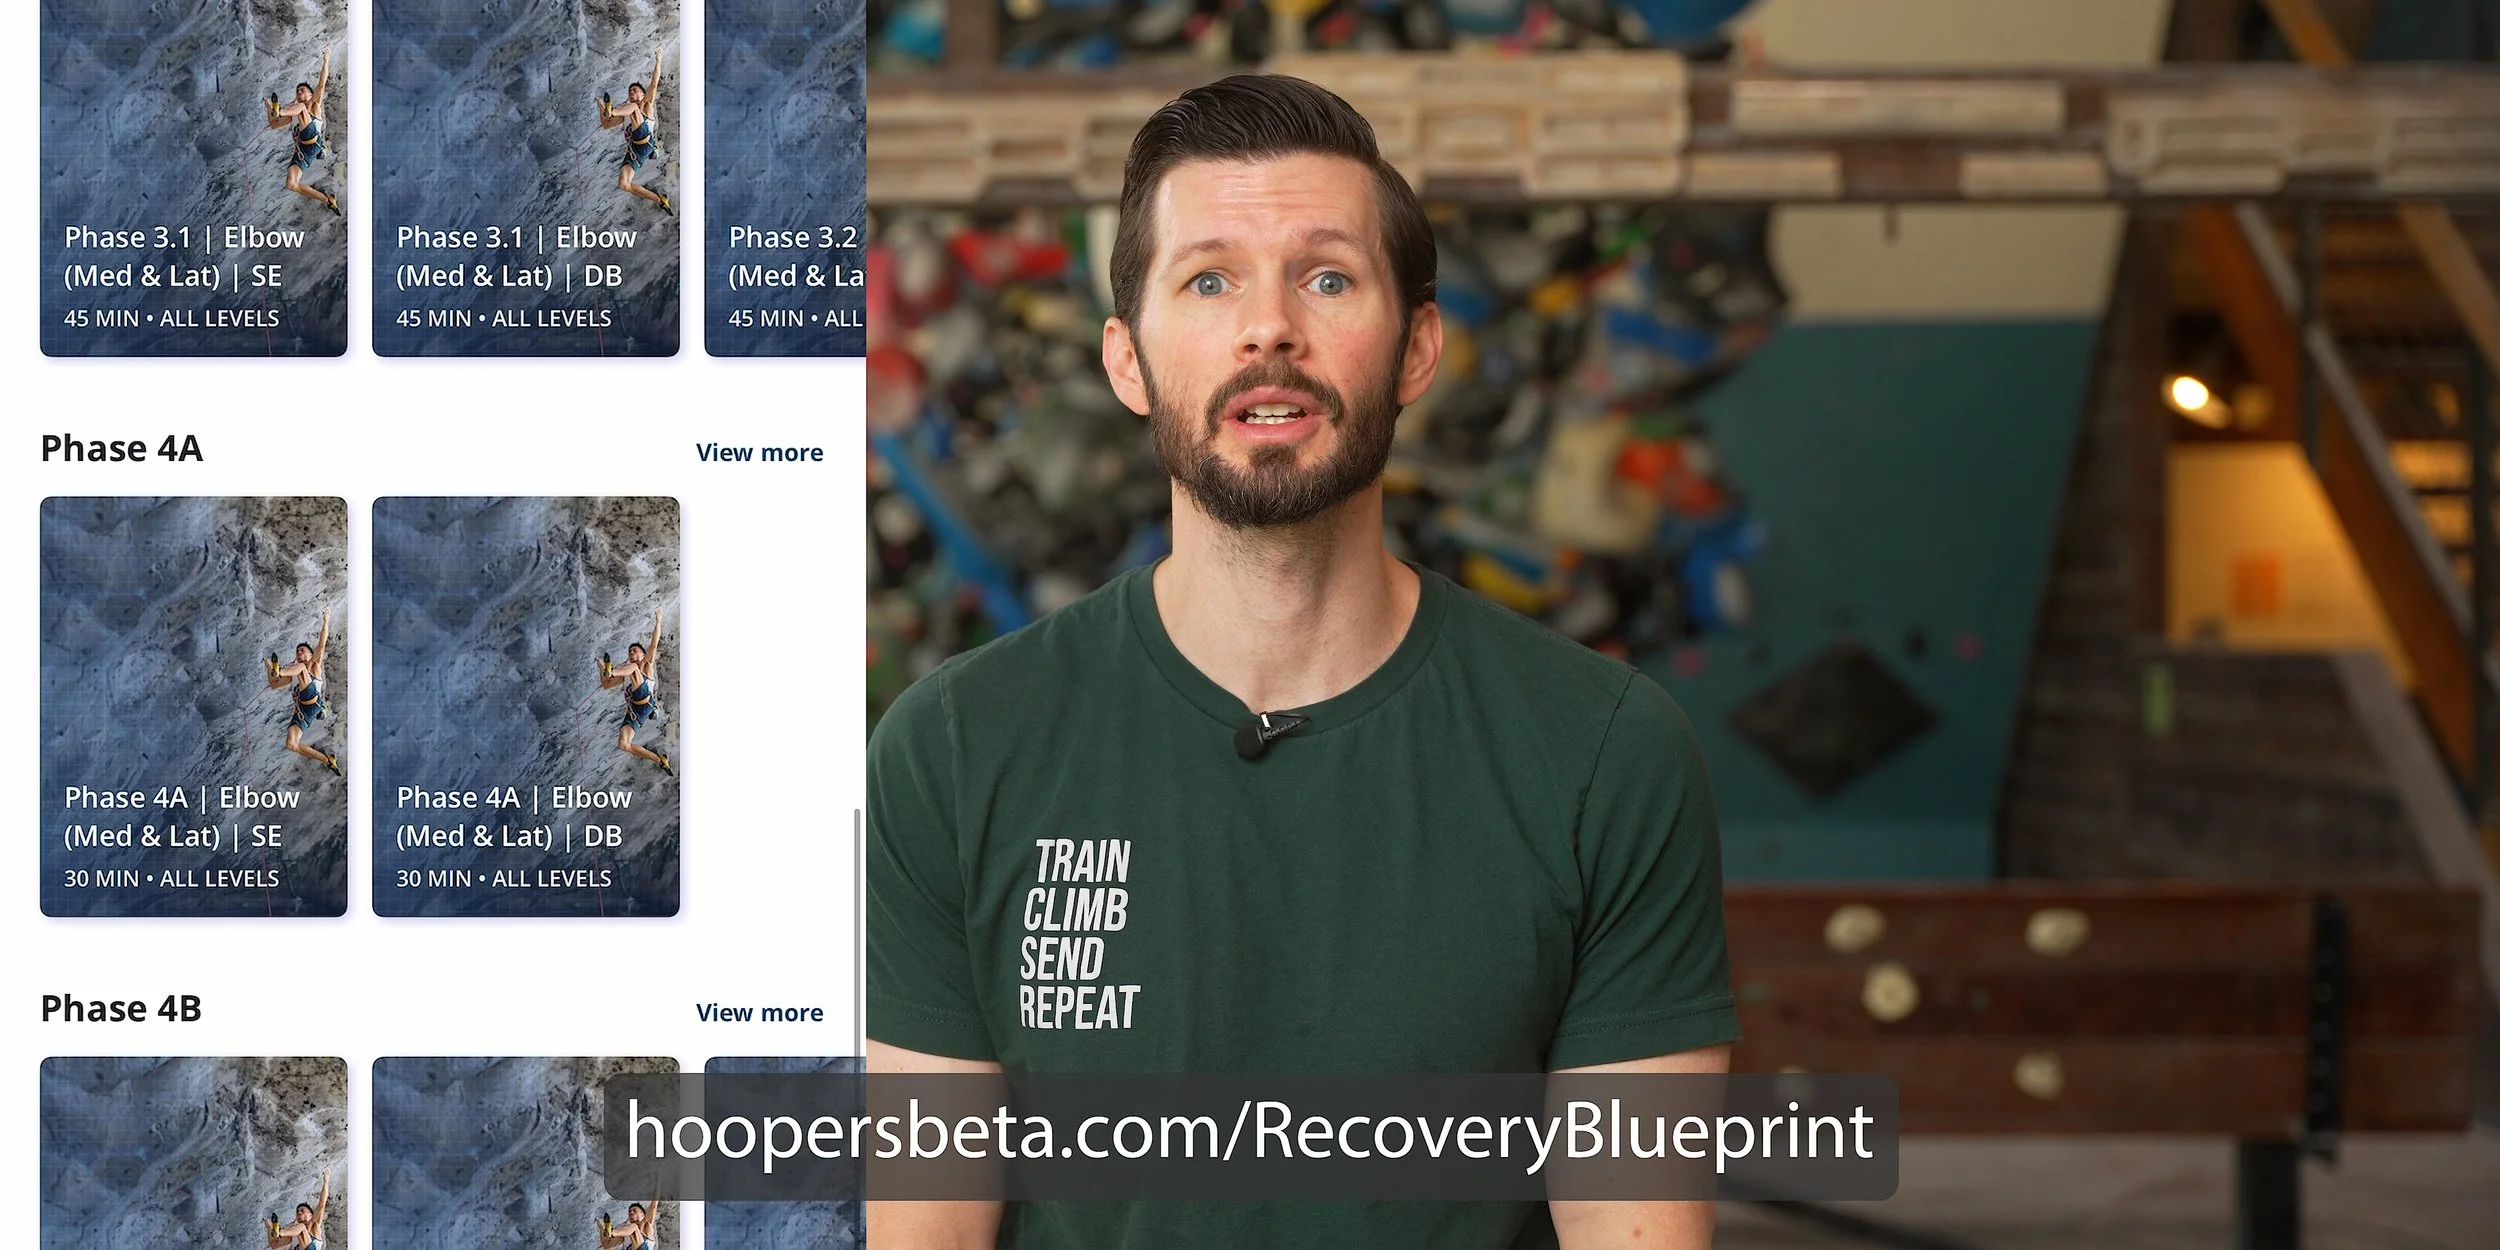
Remember if you want to take the guesswork out of your recovery, save yourself a whole lot of time, and get a program that’s specifically designed for recovering from lateral elbow pain, which combines stretches, nerve mobility, and strength training all into one convenient routine on your phone, you can get that today on our website at hoopersbeta.com/recoveryblueprint. These are the exact injury-specific programs I’ve used in my practice to help hundreds of climbers get back on the wall pain-free. They’ll take you from the earliest stages of healing all the way to regaining full strength and returning to peak performance. Our Recovery Blueprints are a proven way to fast-track your recovery and get you climbing hard again. We don’t just have elbow recovery blueprints either! If you’ve been dealing with Finger or TFCC pain, we’ve got you covered, with more to come in the future!
If you’re interested in reading that research paper I mentioned but don’t have access, just email pt@hoopersbeta.com - until next time: train, climb, send, repeat!
DISCLAIMER
The Beta Agency is providing content on its website that aims to inform rock climbing enthusiasts and/or individuals interested in the field of physical therapy of the various physical conditions that may befall those engaged in the sport of rock climbing, for informational purposes only. None of the information provided by The Beta Agency should be regarded as medical advice or construed to be a medical diagnosis of any form. By using our products, services, and/or the information on our website, you acknowledge that you understand this information is not meant to be a substitute for medical advice from an appropriate licensed healthcare professional, and that you will not rely on any of the information you acquire from us as the sole basis, personally or as a suggestion to others, to make any healthcare-related decision(s). If you suspect that you may have a medical condition that you are trying to diagnose, we strongly urge you to seek the advice of an appropriate medical practitioner. If you have a medical emergency, you should contact emergency services immediately.
Click for full Terms and Conditions and Privacy Policy