How to Start Strength Training for Climbing [My Minimalist Routine]
Hooper’s Beta Ep. 141
Intro
Off-the-wall strength training for climbing does not have to be complicated. In fact, the “big secret” to getting stronger isn’t doing a million fancy exercises, it’s picking a functional routine that’s easy for you to perform consistently and progress the difficulty over time. So, pro climber Dan Beall and I created this routine from some of the actual training programs we give our own clients, and we’ve had excellent responses so far. If you want to get started strength training for climbing but you have no idea where to start, this video is for you!
Before Climbing
Recruitment Pulls


Our first exercise is one of the only ones we’re going to do *before* climbing, and that is our finger training. We do this before climbing because it serves as an excellent warm up and because it allows us to perform the exercise at a high intensity, rather than performing after climbing when our fingers are fatigued. This leads to a safer and more effective intervention
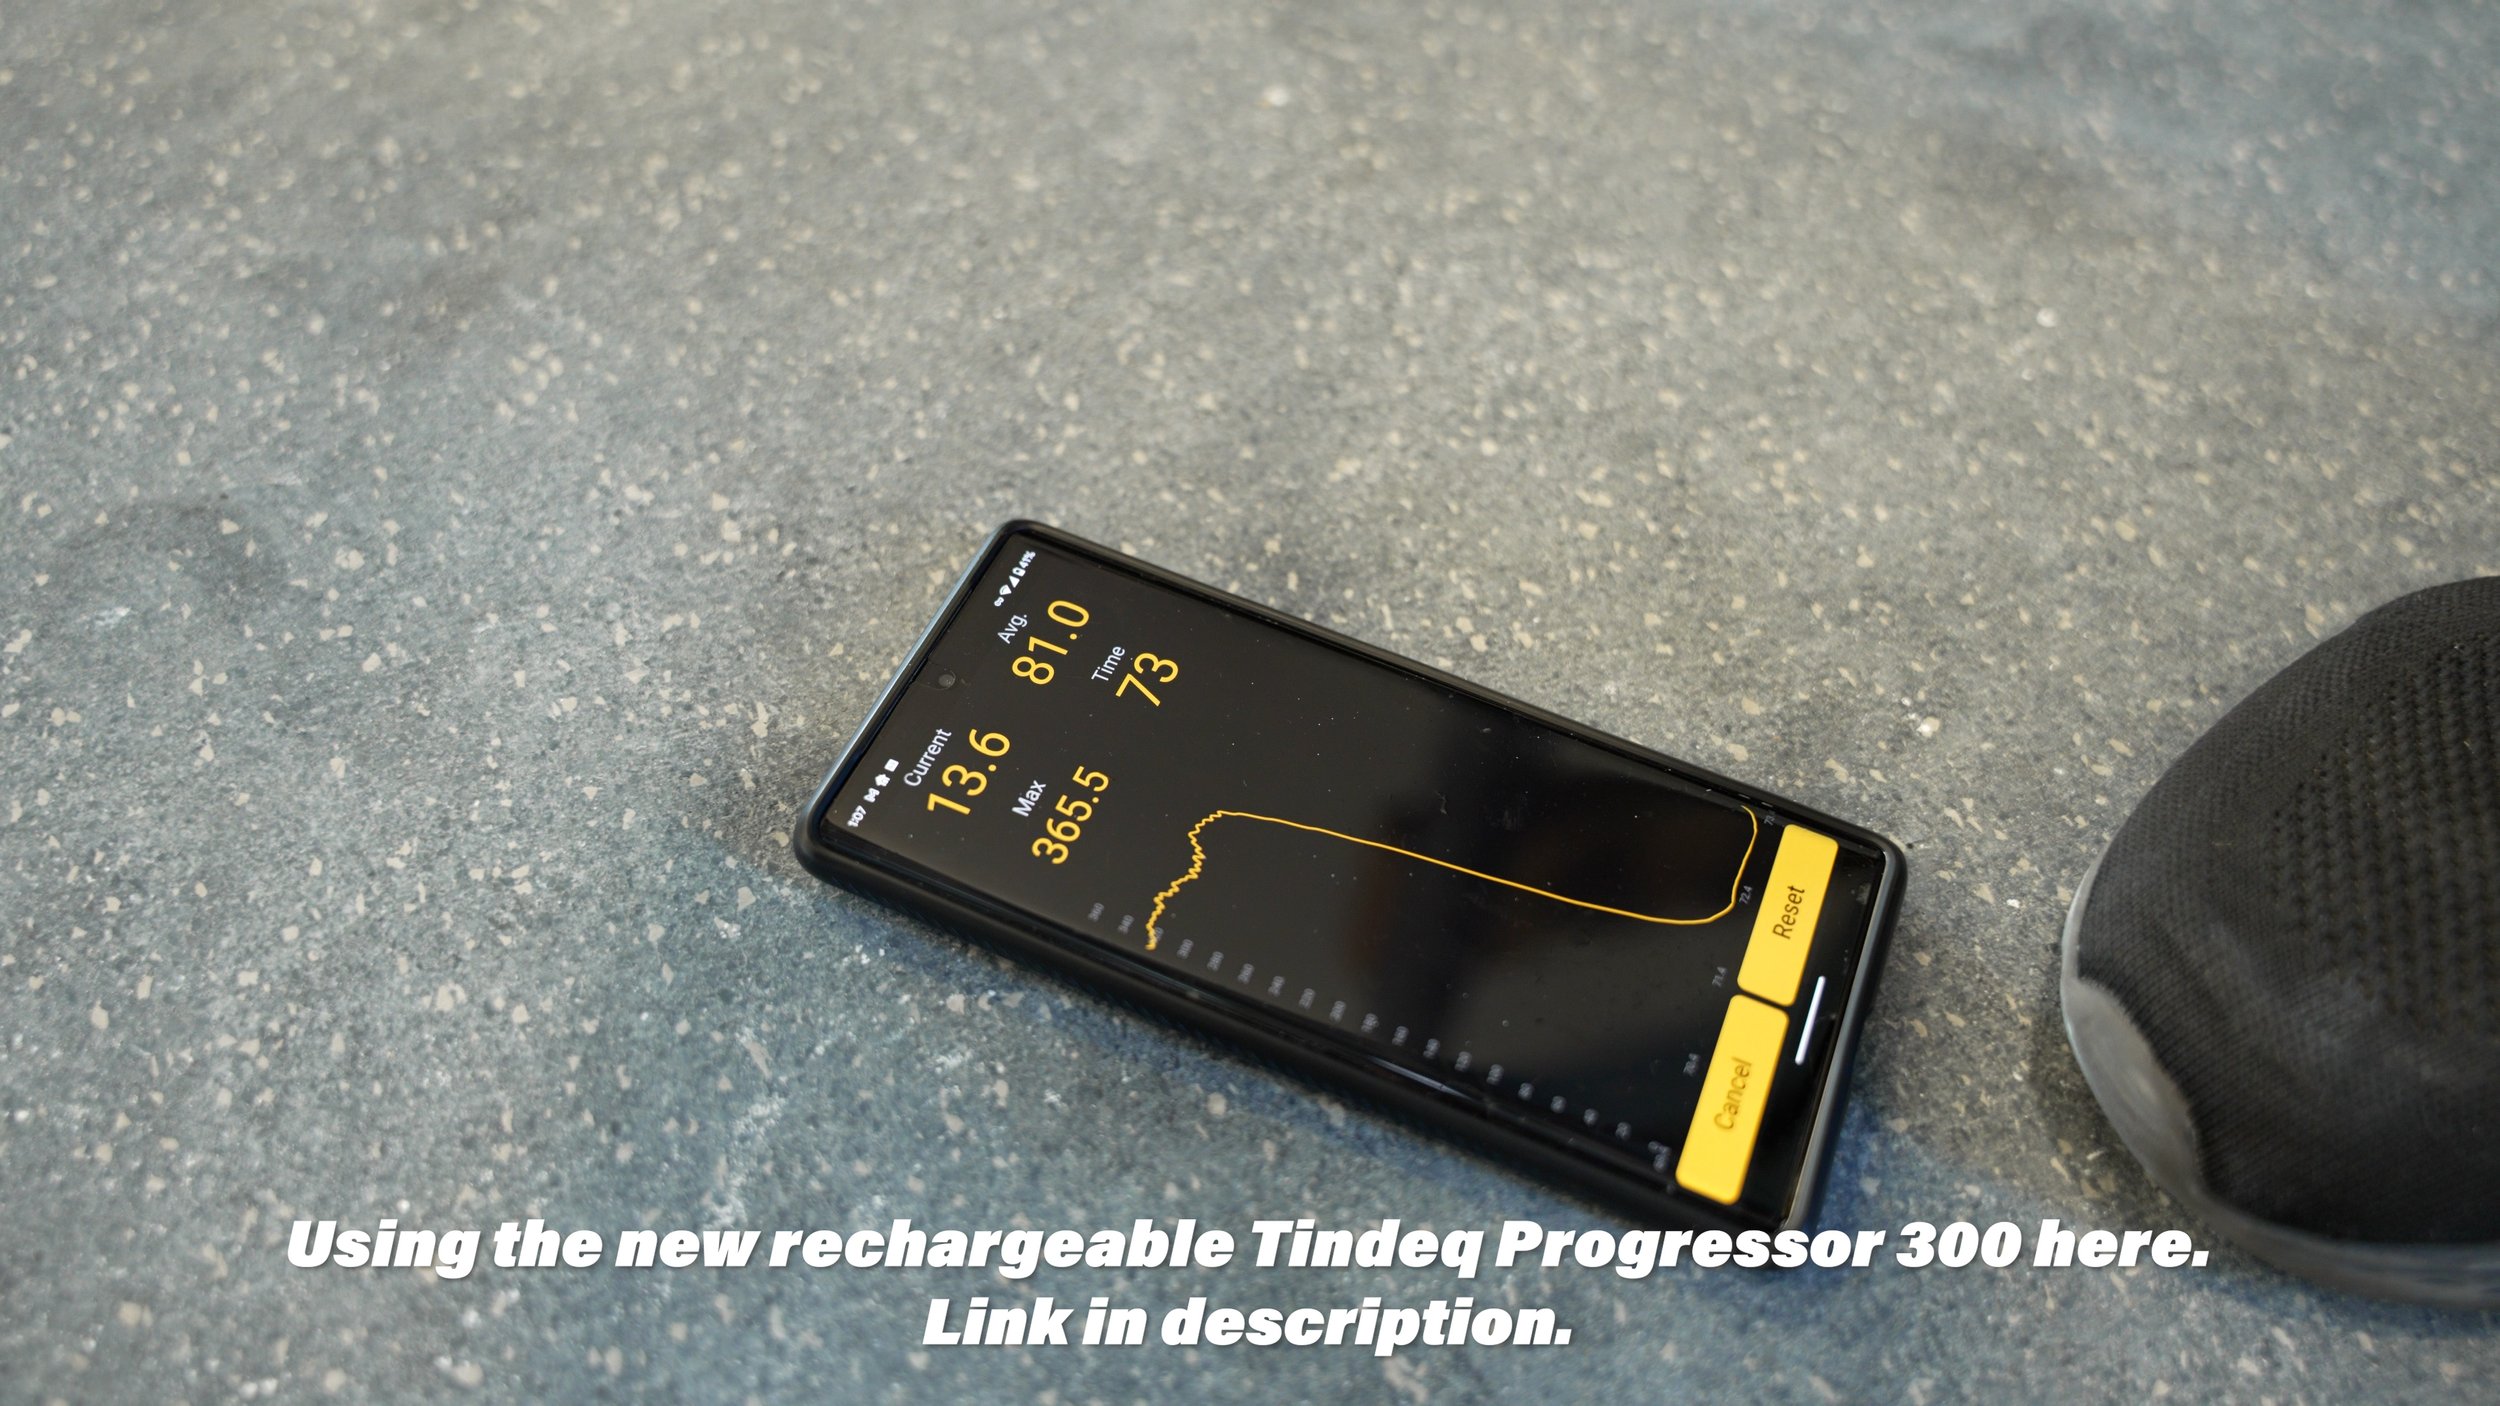
The exercise we’re going to perform goes by several different names, but we’re going to call them “recruitment pulls.” The best thing about these is their simplicity, requiring no equipment other than a single edge or a hangboard. I’m going to demonstrate today with this Frictitious block because it’s portable and has multiple edge sizes.
The first step is to pick an edge and a grip that feels the most comfortable to you or suits your goals best. A 20mm edge with a chisel grip or half crimp is my recommendation if you’re unsure. Anchor the edge to the ground with a rope, a carabiner, or even your own weight on top of it. You can also anchor it overhead if you prefer. Finally, all we’re going to do is start pulling gently, building up to maximum effort over the course of 5-8 seconds, and then relax. Now, here’s the interesting part: rather than trying to perform this like a deadlift or by pulling from your shoulder, I personally like to focus on only pulling with my fingers as much as possible. This might take some getting used to, as our natural inclination is to yank with our arms, but isolating the fingers feels a lot less taxing on other muscles and may even allow us to get better engagement of the fingers in certain positions.


Once you’ve done a single pull on both hands, you’ve completed one set. The first several sets of this exercise will simply be a warm-up and can be performed at your own pace. Then, once you feel like your fingers are awake, perform 5-8 “working sets,” resting about three minutes in between. And that’s it!
This type of training tends to be more autoregulated than traditional hangboarding, so you can do it every session if you like. Of course, any new addition to your training needs to be implemented with care, so if you’re worried about overdoing it it’s perfectly fine to start with once a week.
As a final note: if you’re the data-oriented type like me and you want a way to see how hard you’re actually pulling, a force gauge is a great tool, as it also allows you to see how strong your fingers are that day compared to previous days.

Shoulder Warm-Up
While we rest between working sets of recruitment pulls, we have the option of using that time strategically to get our shoulders working. This is more than a boring old warm-up, this is a great introductory way to strengthen our shoulders to increase our climbing performance and reduce our chance of injury on the wall.
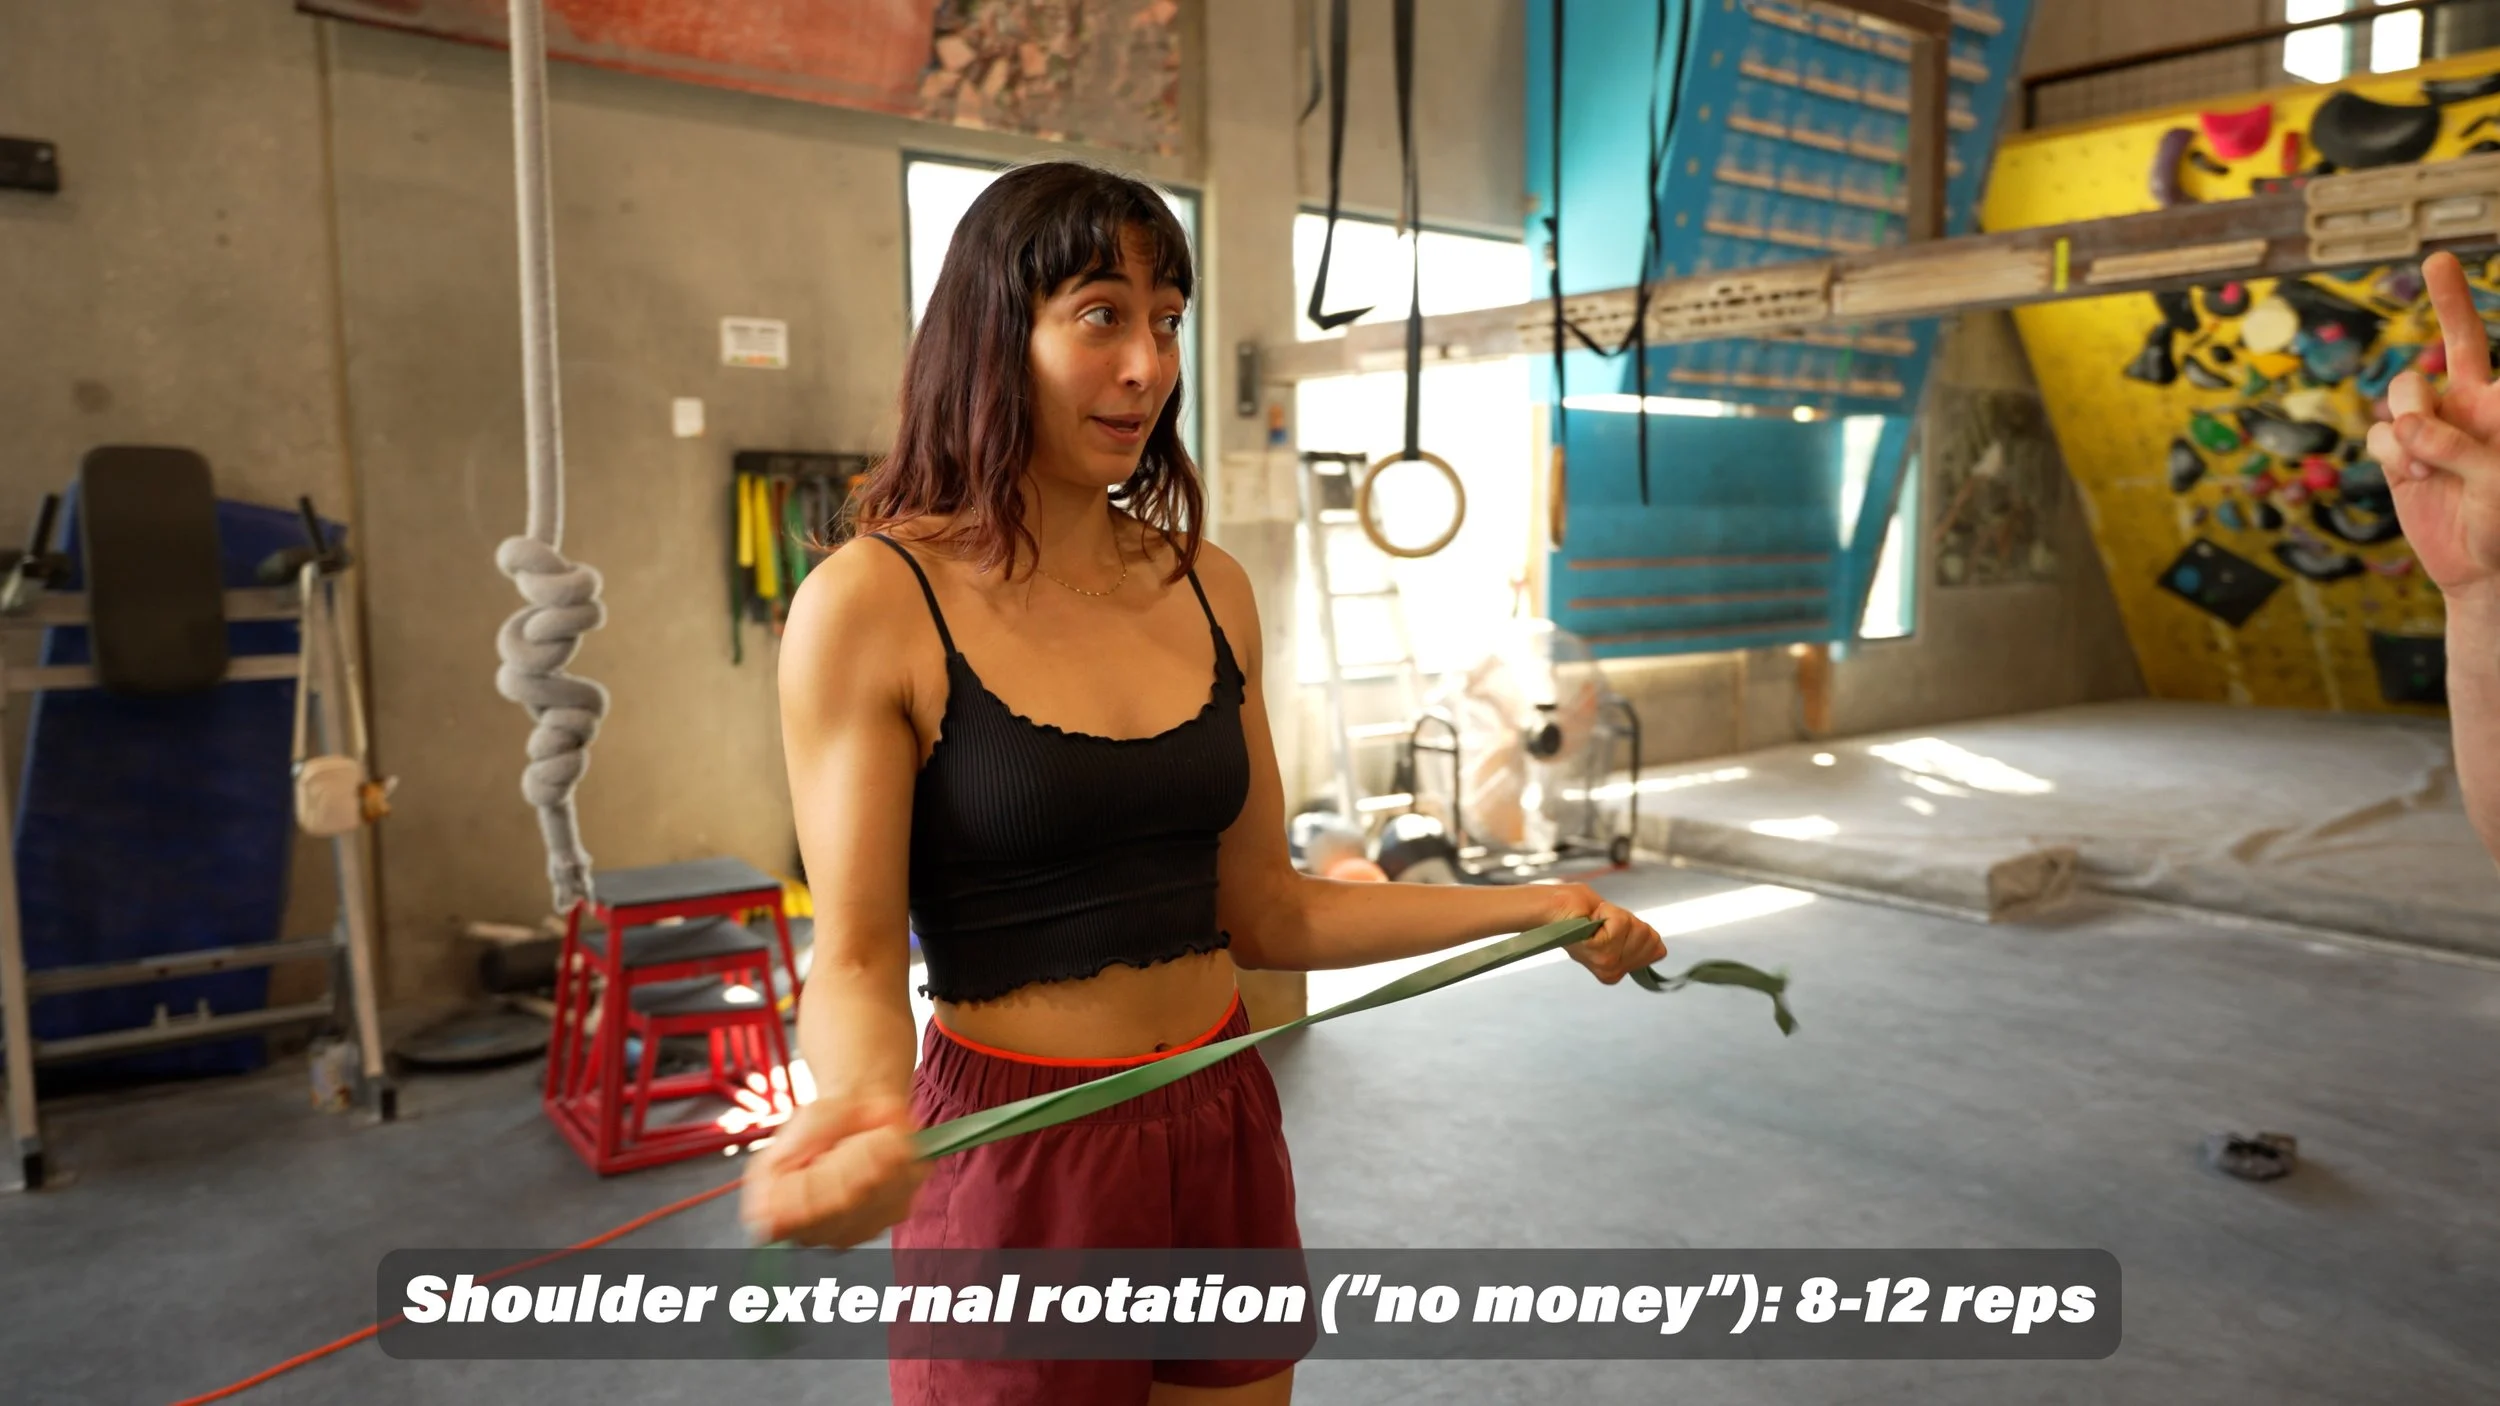

For the external rotator muscles in our rotator cuff, we’ll do “no moneys” with a resistance band. Start with your hands close together, then pull your hands apart, focusing on squeezing those shoulder blades back and down. Control the motion the entire time and don’t let the band go slack. Perform 8-12 repetitions per set for up to three sets total.
Now, we still have a little rest time left to fill, so we’re also going to throw in some gentle shoulder mobility work with stick dislocates. Perform for 30-60 seconds, keeping the motion dynamic, for up to three sets total. If this is new to you or you just don’t have a stick around, you can use a band.
Now that we’re done with the pre-climbing routine, it’s time to climb!
Climbing Session
How you structure your climbing session is not the focus of this video, but if I had to give basic advice I would say: arrive at every session adequately recovered, try things at your limit, rest appropriately between attempts, and stop climbing when you feel a notable drop in performance. These are all key to getting the most out of your session, just like using a high quality chalk is key to maximizing friction on holds. That’s why we’re psyched that Rúngne is the sponsor of this video.
After Climbing
Now that we’re done climbing, it’s time to do the rest of our strength training. For this routine, we’re going to save time by doing two exercises back to back without resting in what we call supersets. There will be two supersets in total, one primary and one optional.
Please note, there are many different ways to teach and learn good form for the exercises we’re about to show, and this video isn’t meant to be an in-depth guide on form, though we will be giving some basic guidelines.
I recommend you start by doing this routine once a week if you’re brand new to training or twice a week if you already have some athletic background. You can eventually increase to three times a week, but only if you have the time and recovery capacity to do so without compromising your climbing sessions. Remember: the goal of this training is to *supplement* our climbing, not take away from it. If you find you’re arriving at each session fatigued, you’re either going way too hard or your recovery is compromised by some other factor.
Superset One: Vertical Pull-Push
We’re going to start off with a vertical pull-push superset. If you only have the time or energy for one superset, this is it!
Exercise A: Pullups


Our first exercise shouldn’t surprise anyone, and there’s a good reason for that: pullup-like motion is the most ubiquitous movement in climbing, and thus proficiency is a major boon to climbers. Let’s go through a few progressions.
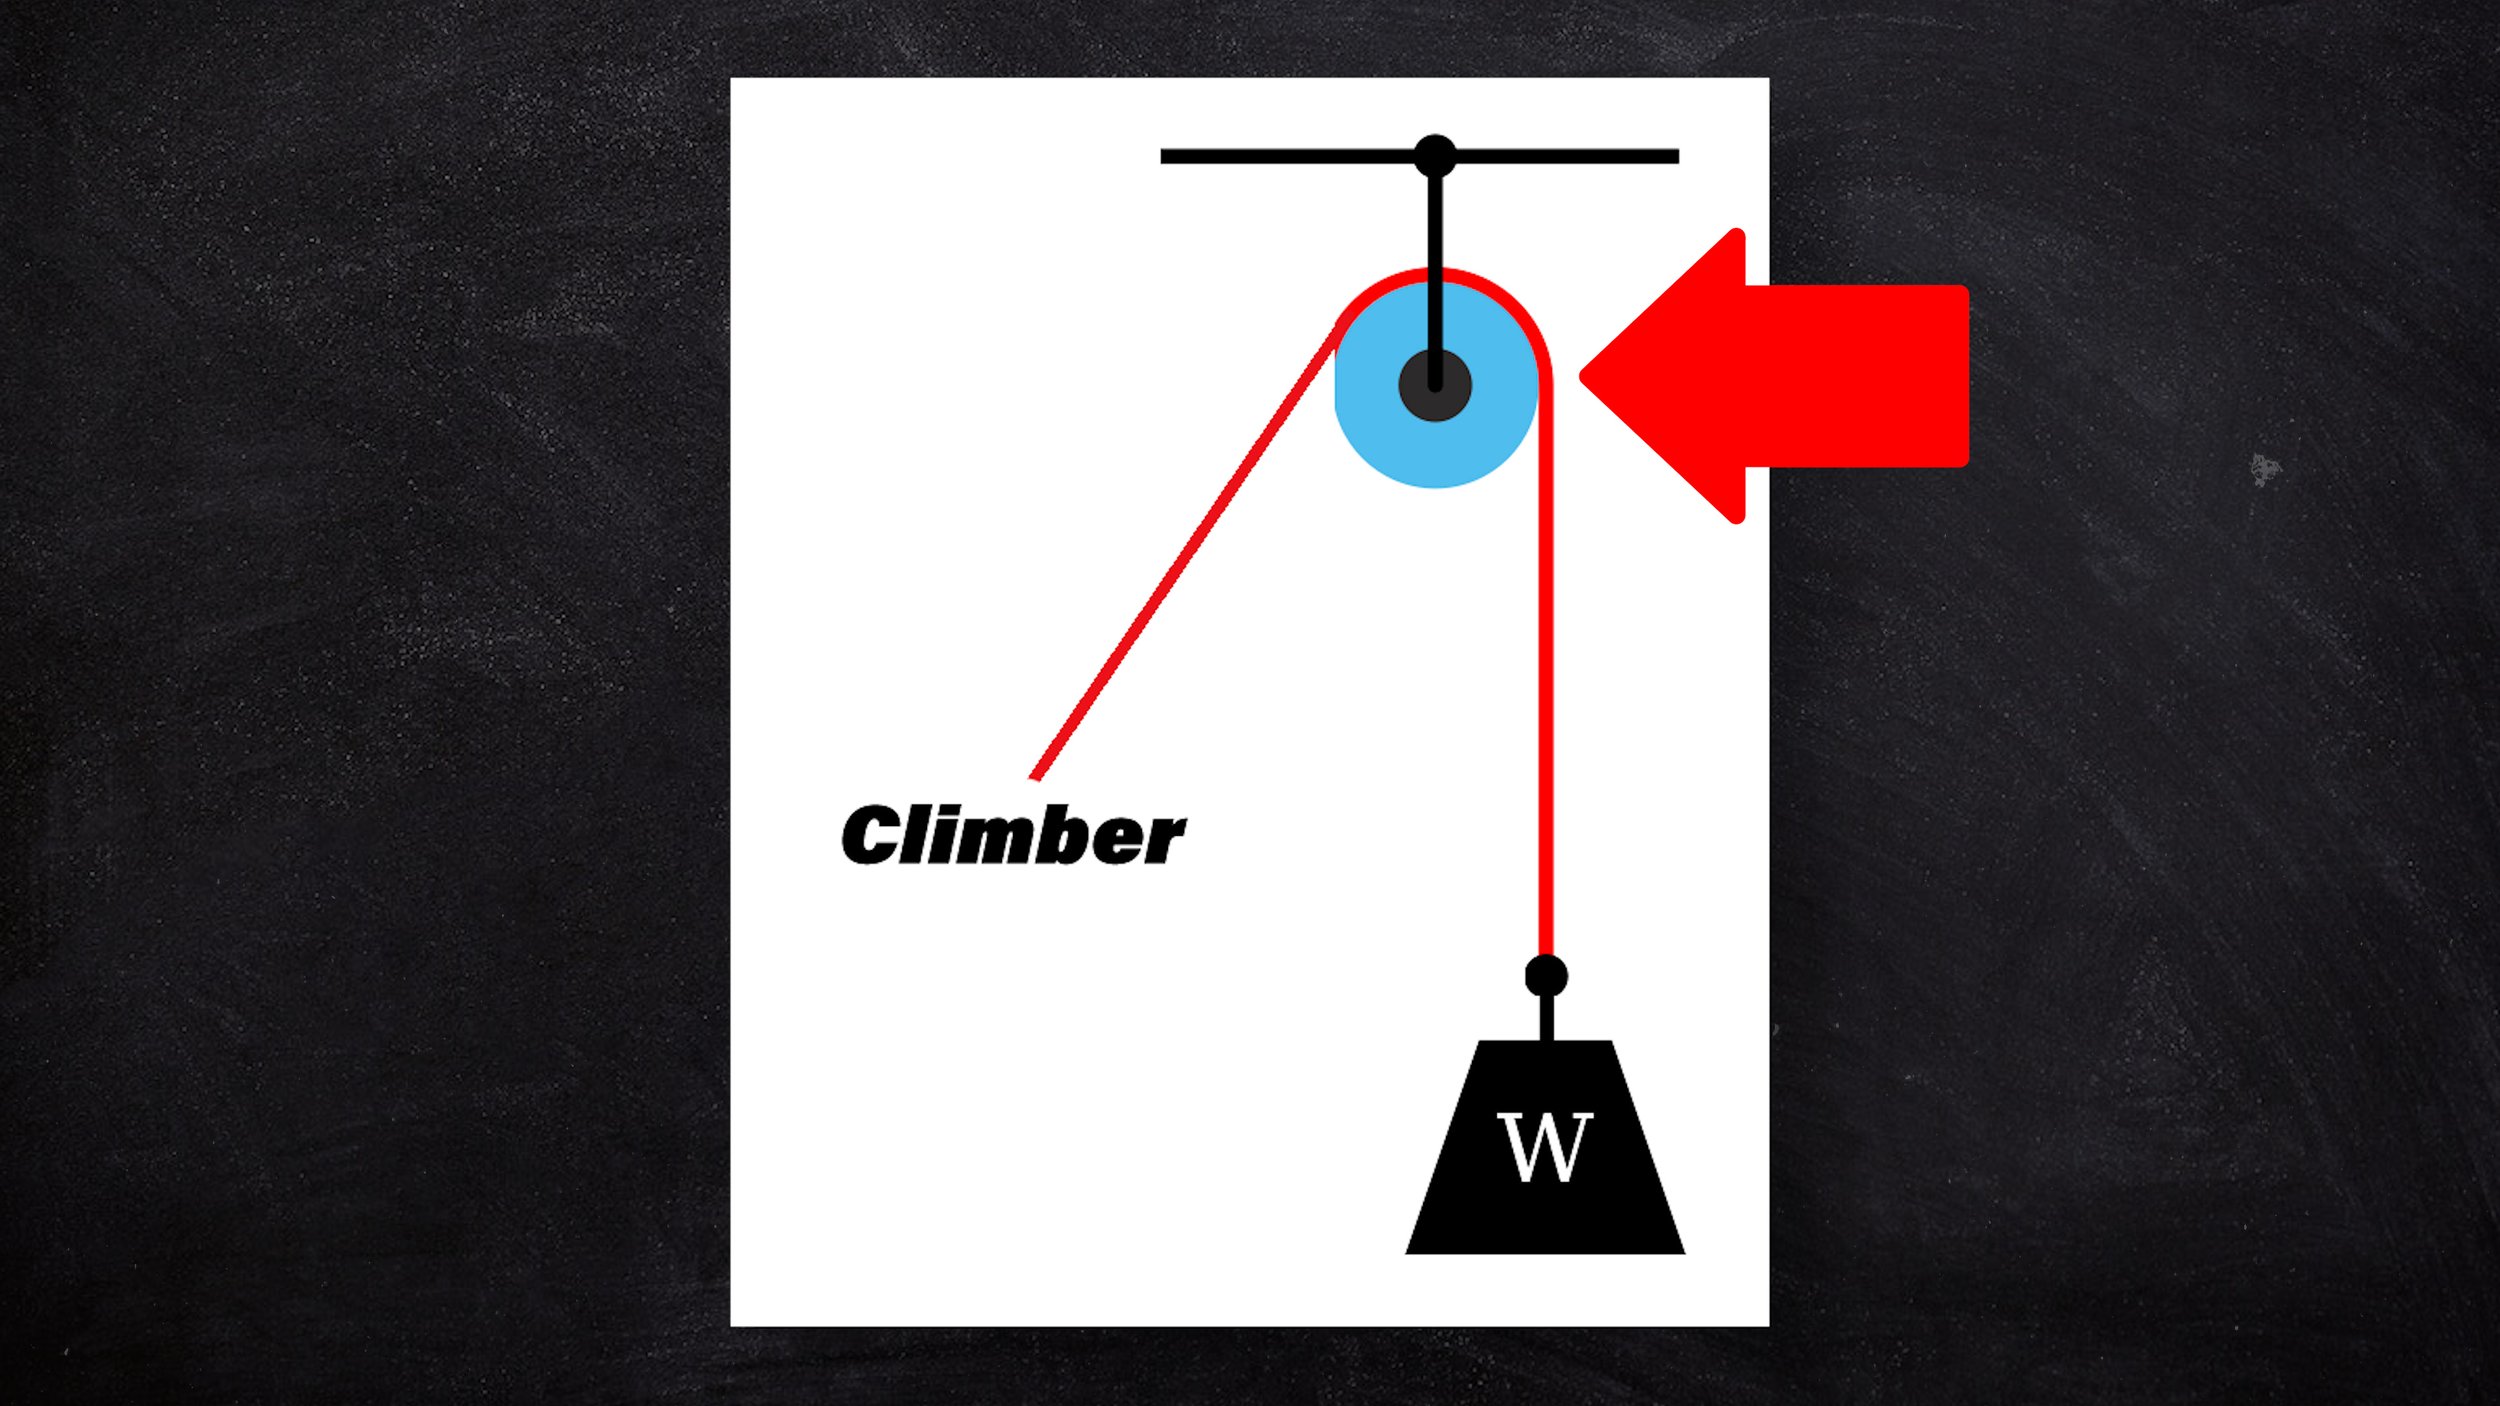
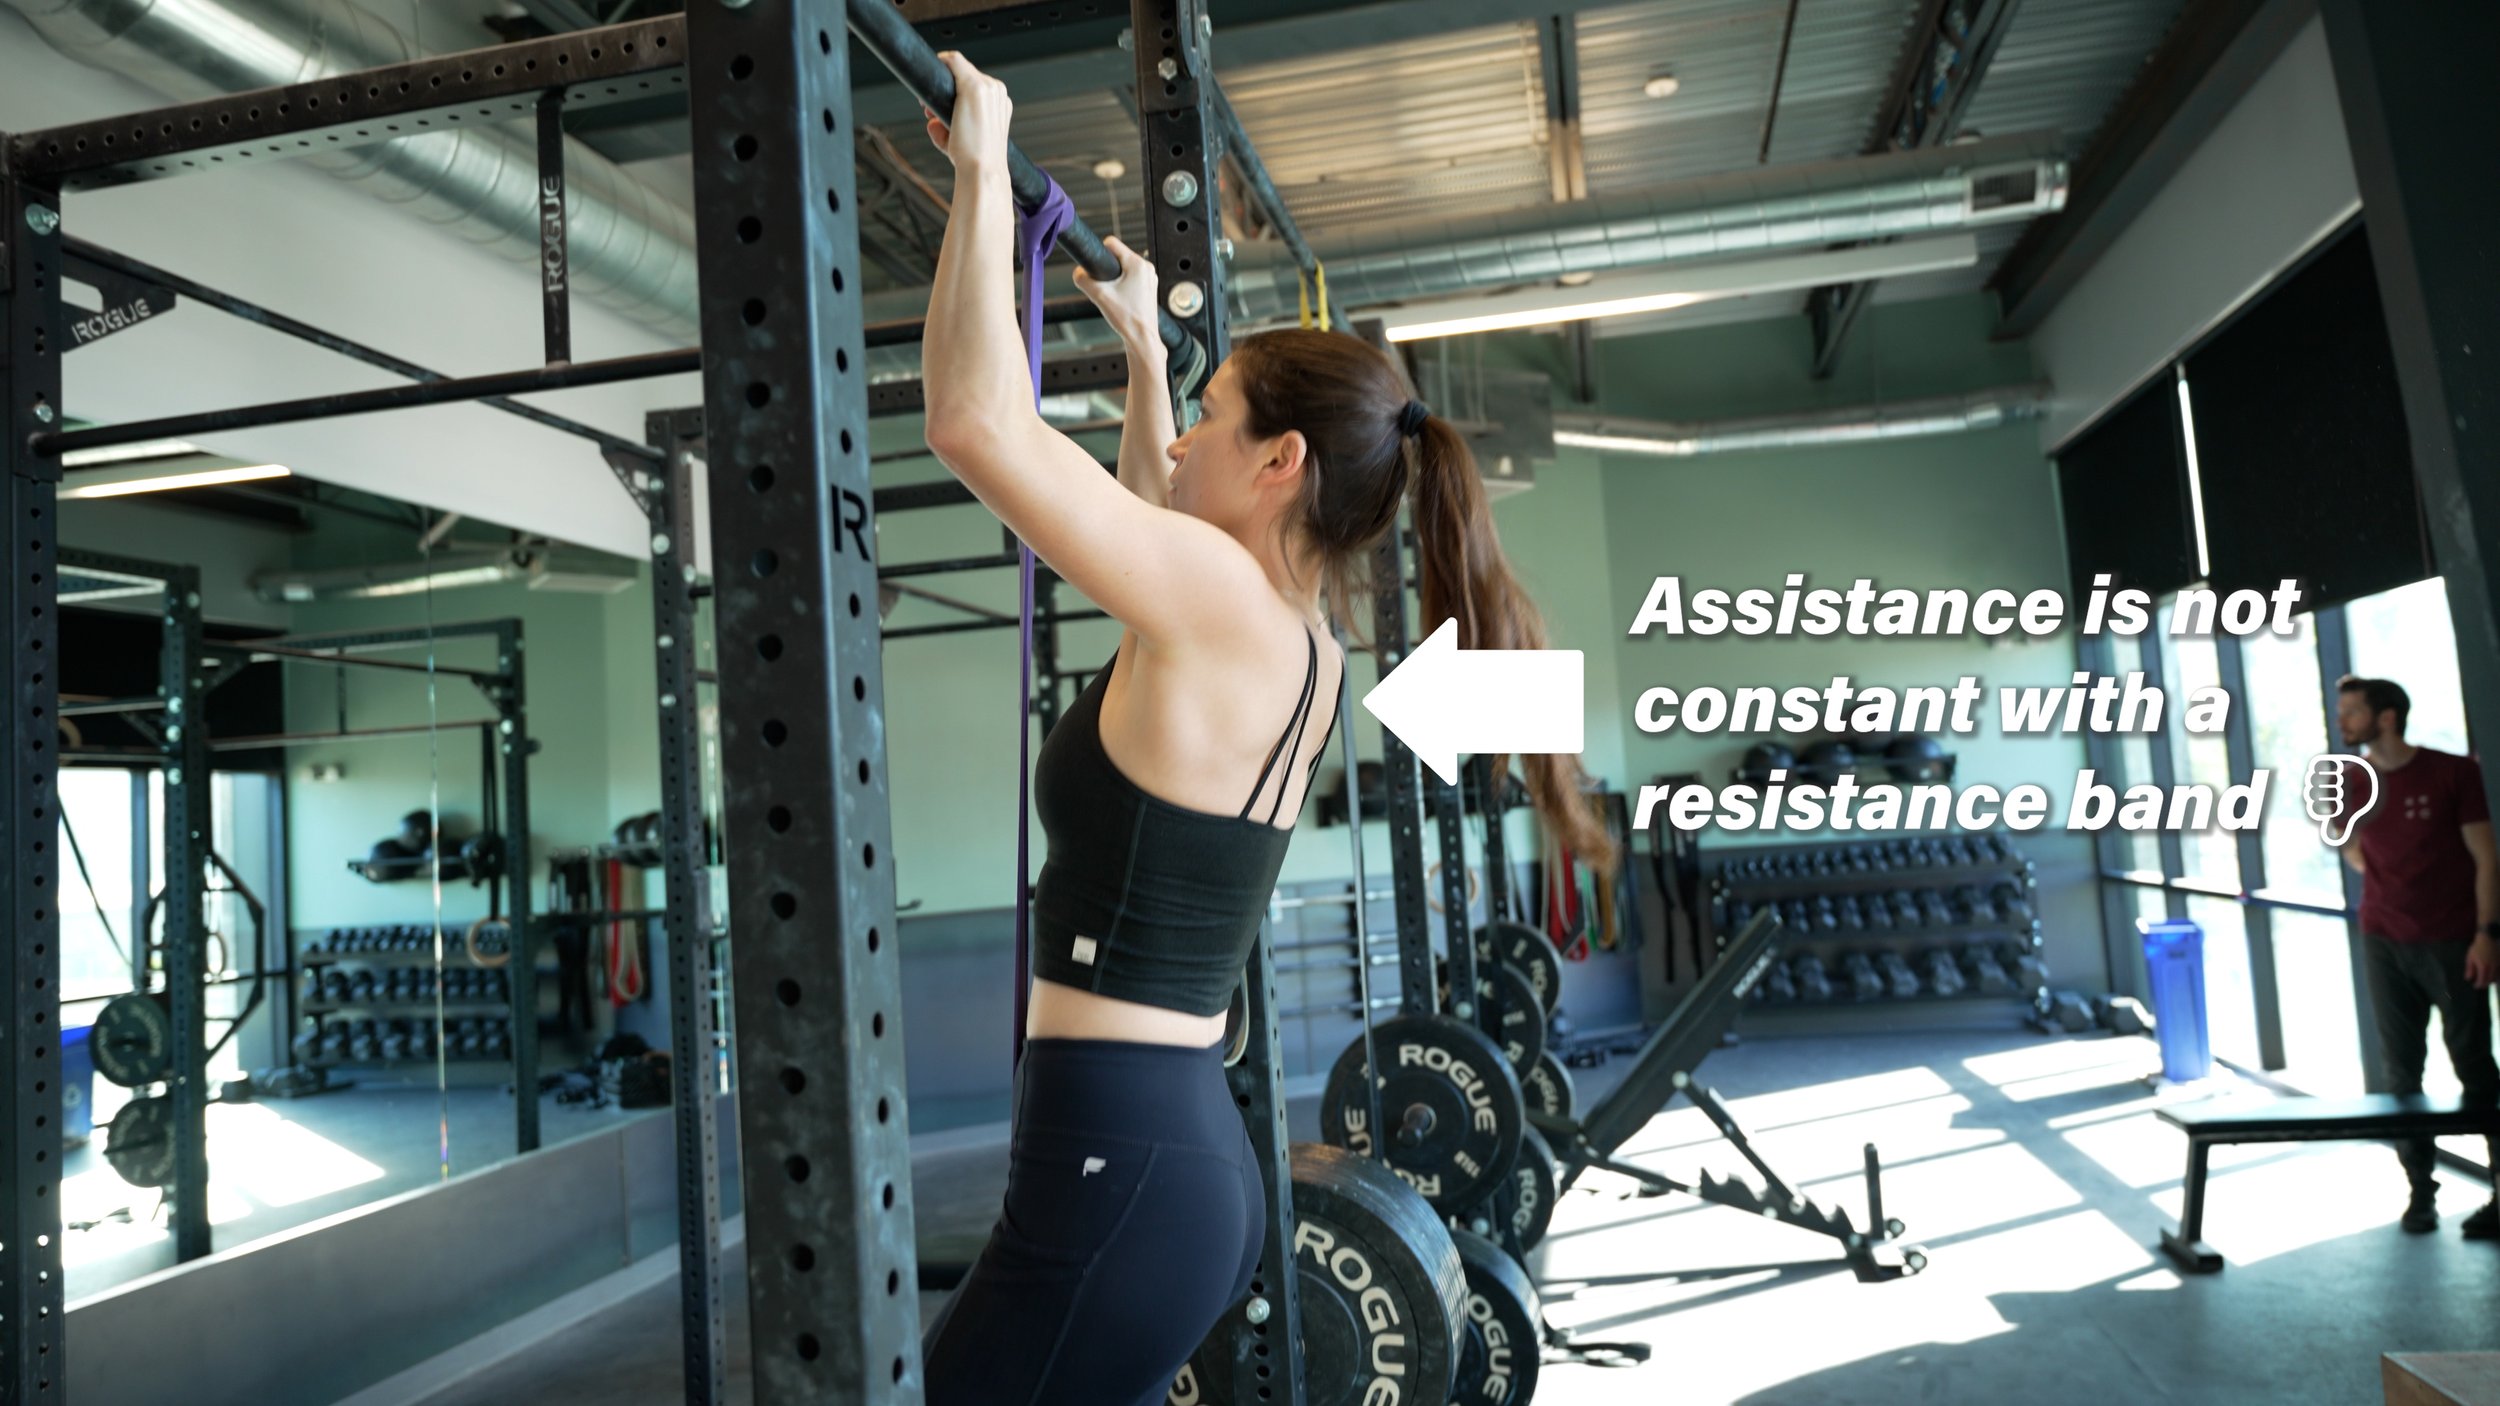
If you can’t yet do a bodyweight pullup, there are many ways to work up to it. You can use resistance bands, cable machines, or simply perform the lowering portion of the pullup only (also called “negatives” or “eccentric pullups”). All of these options can work just fine, but in my opinion the best option is to use a pulley system. Unlike a resistance band, this allows you to perform your pullups with the exact same level of assistance throughout the full range of motion.
Whichever variation you choose, pick a hand position that is slightly wider than shoulder width and try to lead with a proud chest, as if you’re trying to touch your chest to the bar. This form will likely feel harder than a hollow-body or rounded-shoulder pullup, but it’s my preferred method for climbers.
Aim for 5-8 repetitions at an intensity of about one to two reps-in-reserve. Two RIR means you should have two reps left in the tank at the end of the set. If you could have done several more reps, the exercise was too easy. If you just barely finish your final rep, it was too intense. To make things uber simple, every exercise in this routine will be 5-8 reps with one to two RIR.

Of course, many climbers will be able to perform multiple pullups without assistance, in which case all the same guidelines apply here. You’ll quickly find you actually need to add weight to keep you in the proper rep range, otherwise you’ll end up doing sets of 12 or more which is not what we’re going for. By adding a few pounds every week or two you should be able to stay in the 5-8 rep range. Once you get to about 50% added bodyweight, switch to assisted one-arm pullups.
Exercise B: Dips


Next we’ll be performing our vertical push, which will be tricep dips. If you’ve never done these before, you may want to start on a solid bar. You can once again use a resistance band or cable machine to assist you if you can’t do bodyweight reps, but as soon as you’re able, I recommend switching to rings.
Dips are great for training the triceps, pecs, and anterior deltoids. Practically speaking, dips will go a long way to leveling up your mantle ability, which is imperative if you plan on climbing outdoors. Dips on rings also increase activity of the rotator cuff muscles, which will increase your shoulder stability for dynamic climbing moves.
Whichever variation you choose, once you’re in position with your arms straight, allow your chest to come slightly forward so that it is in front of your hands. Your chest will continue forward as you lower yourself down by bending your elbows. Don’t allow your elbows to flare out to the side but rather keep them tucked in towards your body. When you arrive back at the top of the motion, your chest should still be slightly forward, not perfectly vertical. If you feel any discomfort in your shoulder, decrease your total depth and/or increase assistance.
Rest & Stretch
Perform three rounds of this superset in total, resting 3-5 minutes in between. During your rests, perform your favorite stretch or my recommendation: 30-45 seconds of the frog stretch for that all important hip mobility.

Superset Two: Horizontal Pull-Push
Our second, optional superset will involve a horizontal pull-push pair. This is an excellent supplement to the previous superset because horizontal pulling will help you pull into the wall, especially on those overhanging climbs, and teach better scapular retraction. Meanwhile, horizontal pushing will continue to strengthen muscles that are useful for compression movements while also helping improve our general upper body strength and robustness.
Exercise A: Rows


The first exercise of our second superset is a horizontal pull, which we’ll accomplish with rows. There are many different types of row so you can choose the one that works best for you, but my personal favorites are inverted rows on rings and dumbbell rows. For simplicity, we’re going to do inverted rows.
Learning proper row technique is important as it strengthens crucial muscles we use consistently in climbing. Learning proper scapular retraction can also improve movement patterns and increase success with other exercises down the road.
All you have to do is grab the rings, position your body at an angle, and pull your body toward your hands. We want to lead with a proud chest, feeling the squeeze in our back muscles at the end of the motion, rather than hunching over and pulling with just our biceps. To make this harder, simply increase your lean angle.
As usual, we’ll be aiming for 5-8 reps with 1-2 RIR.
Exercise B: Bench Press
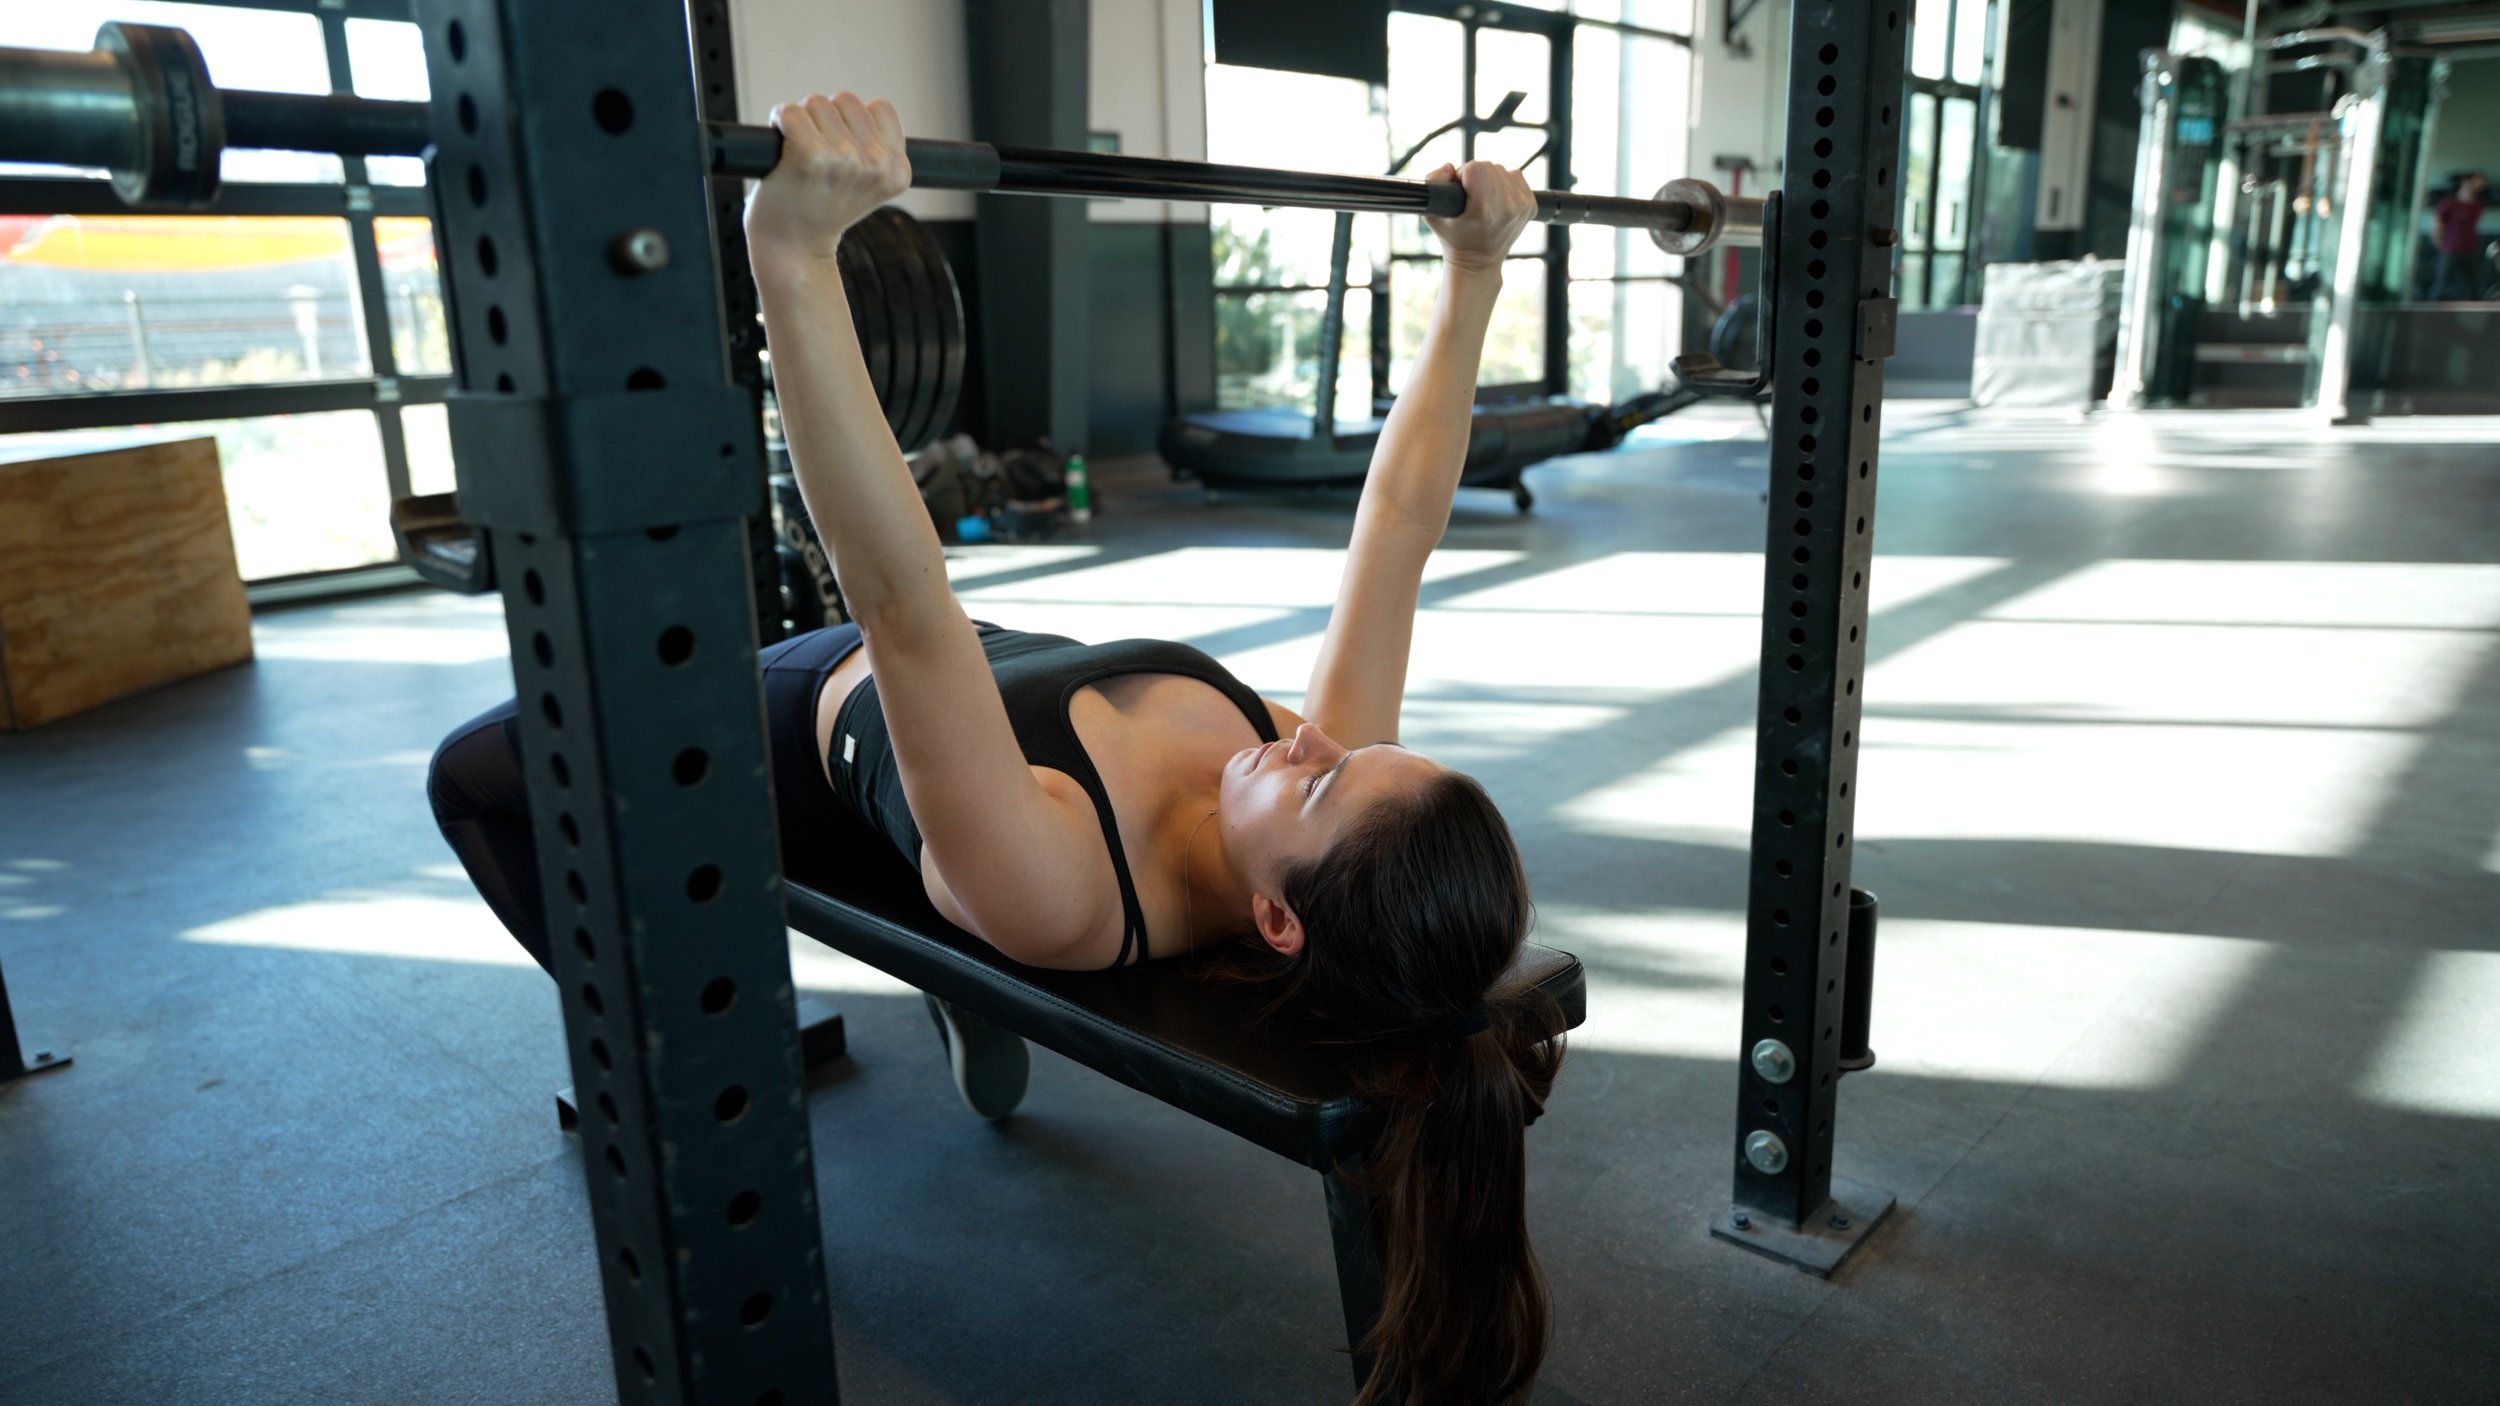
Our final exercise will be a horizontal push, which we’ll accomplish with the bench press. There are actually many great ways to train horizontal pushing, but here we’ve selected the bench press here as it’s accessible in most gyms, is approachable even for beginners, is much more intuitive to progress than pushups, and is easier to overload safely compared to a dumbbell press. In the past, we’ve said we tend to prefer dips over bench press, but since we’ve already done dips we can now branch out!
This movement is useful for climbers to train because the pec and tricep muscles are used way more than you might think in many climbing movements.
Start with the bar directly over your eyeline and tuck your shoulders back behind you like you’re puffing out your chest. As you lower the bar down to your chest, make sure that you aren’t going straight down. You don’t want your elbows flared out to the side, but rather they should be gently tucked in towards your body. This will naturally cause the bar to land more in the middle of your chest, close to the bottom of your sternum/breastbone rather than the top of the chest. Then, push the bar back up over your eyeline.
Everyone will have a slight preference on foot and lower back position here. It’s okay or even beneficial to have a mild arch in your back, and it’s also good to squeeze the shoulder blades together as you lower the bar.
If you don’t have access to a barbell, it’s okay to use dumbbells. To perform a dumbbell bench press: At the top of the motion, I like the weights to be parallel to one another, with your thumbs pointing towards each other. As you lower the weights, allow for a bit of natural rotation, allowing your elbows to tuck in towards the side of your body. This will put your shoulders in a better position for pressing back out of.
As usual, we’ll be aiming for 5-8 reps with 1-2 RIR.
Rest & Stretch

Perform three rounds of this superset in total, resting 3-5 minutes in between. During your rests, make sure you’re all caught up on your Hooper’s Beta episodes, perform your favorite stretch or my recommended stretch: the standing or seating pancake, reaching center, left, and right for 30-60 seconds total.
Final Tips
If you want to support this channel and get discounts on cool products, links to everything in this video will be in the description.
If you’re the type of person that doesn’t have a lot of time to spend in the gym, you might be wondering how you can get all this training done in as little time as possible. In that case, check out our video on “10 Science-Based Ways to Get Stronger in Half the Time.”
Or, if you’re looking for other exercises to add to your training as well as the anatomy behind all of them, check out our in-depth “How to Train for Climbing” video with pro climber Dan Beall.
Until next time: train, climb, send, repeat!
DISCLAIMER
As always, exercises are to be performed assuming your own risk and should not be done if you feel you are at risk for injury. See a medical professional if you have concerns before starting new exercises.
Written and Presented by Jason Hooper, PT, DPT, OCS, SCS, CAFS
IG: @hoopersbetaofficial
Filming and Editing by Emile Modesitt
www.emilemodesitt.com
IG: @emile166